
This project shows how you can bring the Wizarding of Harry Potter to reality with computer vision and machine learning!

Things used in this project
Hardware components
Hand tools and fabrication machines
3D Printer (generic)
Hot glue gun (generic)
Soldering iron (generic)
Story
"Any Sufficiently Advanced Technology is Indistinguishable from Magic" - Arthur C. Clarke
A few months back my brother visited Japan and had real wizarding experience in the Wizarding World of Harry Potter at the Universal Studios made possible through the technology of computer vision.
At the Wizarding World of Harry Potter in Universal Studios the tourists can perform "real magic" at certain locations (where the motion capture system is installed) using specially made wands with retro-reflective beads at the tip. The wands can be bought from a real Ollivander's Shop which are exactly like the one's shown in the Harry Potter Movies but do remember: "It is the wand that chooses the wizard" :P
At those certain locations if the person performs a particular gesture with wand, the motion capture system recognizes the gesture and all gestures correspond to a certain spell which causes certain activities in the surrounding area like turning on the fountain etc.
So, in this Project I will show how you can create a cheap and effective motion capture system at home to perform "real magic" by opening a box with the flick of your wand :D using just a normal night vision camera, a Raspberry Pi and some electronics, and some Python code using the OpenCV computer vision library and machine learning!
THE BASIC IDEA:
The wands which are bought from the Wizarding World of Harry Potter in Universal Studios, have a retroreflective bead at their tip. Those retroreflective beads reflect a great amount of infrared light which is given out by the camera in the motion capture system. So, what we humans perceive as a not-so-distinctive tip of the wand moving in the air, the motion capture system perceives as a bright blob which can be easily isolated in the video stream and tracked to recognize the pattern drawn by the person and execute the required action. All this processing takes place in real time and makes use of computer vision and machine learning.
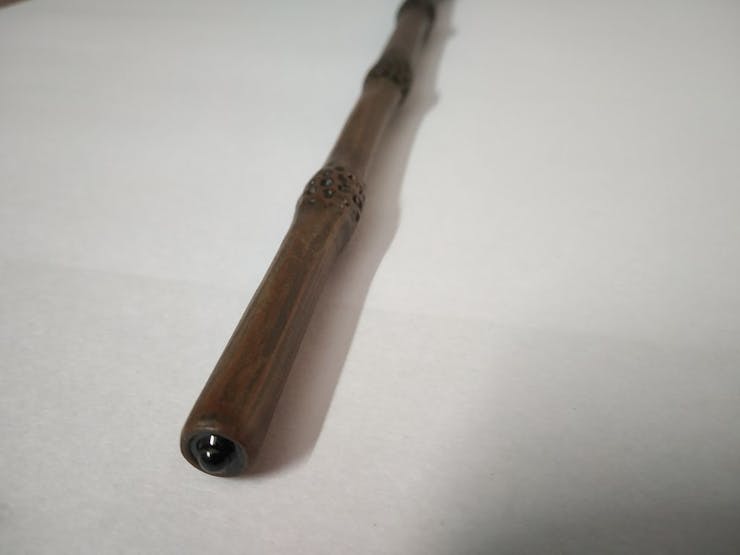
RetroReflector at the tip of the wand.
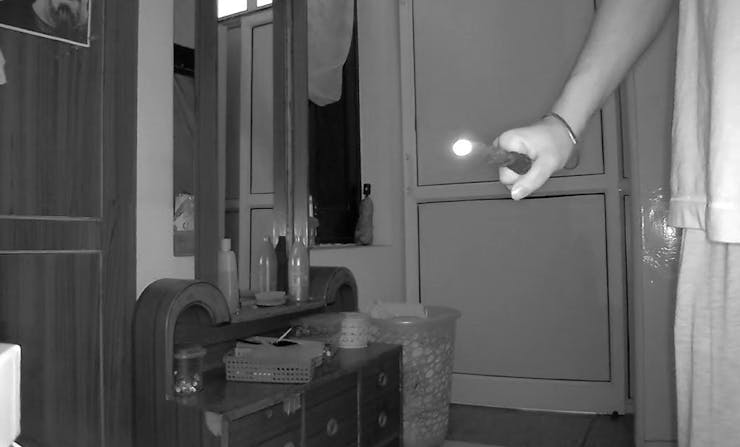
Wand tip glowing in night vision.
A simple night vision camera can be used as our camera for motion capture as they also blast out infrared light which is not visible to humans but can be clearly seen with a camera that has no infrared filter. So, the video stream from the camera is fed into a Raspberry Pi which has a Python program running OpenCV which is used for detecting, isolating and tracking the wand tip. Then we use SVM (Simple Vector Machine) algorithm of machine learning to recognize the pattern drawn and accordingly control the GPIOs of the raspberry pi to perform some activities. In this case, the GPIOs control a servo motor which opens or closes a harry potter themed box according to the letter drawn by the person with the wand.
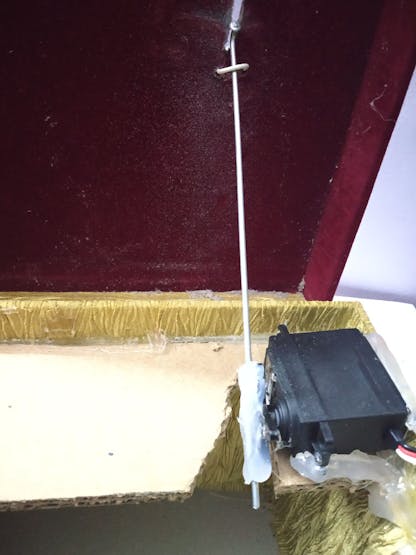
Box opening mechanism with servo
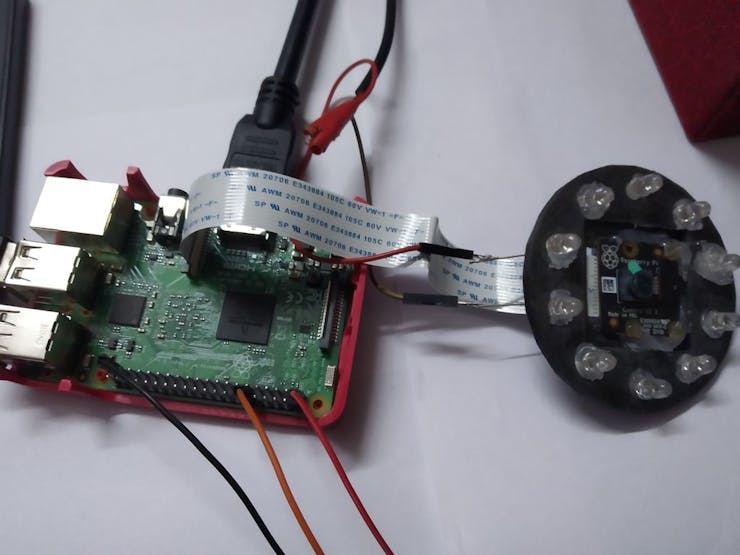
Servo and the camera module connected to the Raspberry Pi
For making a Harry Potter themed Box, I just took an old box and printed out some colored images of various things like Harry Potter Logo, The Hogwarts Crest, the crest of each of the four houses etc. on glossy A4 size sheet and the pasted them on the box at various places.

NOTE: Don't worry if you don't have the wand from the Wizarding World at Universal Studios. Anything with a retroreflector can be used. So, you can use any wand-like stick and apply retroreflector tape, paint or beads at the tip and it should work as shown in William Osman's video
Training the SVM Classifier Using Scikit-Learn:
For the purpose of recognizing the letter drawn by a person, I trained a machine learning model based on the Support Vector Machine (SVM) algorithm using a Dataset of handwritten English alphabets I found here SVMs are very efficient machine learning algorithms which can give a high accuracy, around 99.2% in this case!!
The Dataset is in the form of .csv file which contains 785 columns and more than 300,000 rows where each row represents a 28 x 28 image and each column in that row contains the value of that pixel for that image with an additional column in the beginning which contains the label, a number from 0 to 25, each corresponding to an english letter. Through a simple python code, I sliced the data to get all the images for only the 2 letters (A and C) I wanted and trained a model for them.
The Code That Makes It All Happen!!
After creating the trained model, the final step is to write a python program for our Raspberry Pi that allows us to do the following:
Access video form the picamera in realtime Detect and track white blobs(in this case tip of the wand which lights up in night vision) in the video Start tracing the path of the moving blob in the video after some trigger event(explained below) Stop tracing after another trigger event(explained below) Return the last frame with the pattern drawn by the user Perform pre-processing on the frame like thresholding, noise removal, resizing etc. Use the processed last frame for prediction. Perform some kind magic by controlling the GPIOs of the Raspberry Pi according to the predcition
Since letter 'A' stands for 'Alohamora' (one of the most famous spell from the Harry Potter movies which allows a wizard to open any lock!!), if a person draws letter A with the wand, the pi commands the servo to open the Box. If the person draws the letter 'C' which stands for close (as I could not think of any appropriate spell used for closing or locking :P), the pi commands the servo to close the box.
All the work related to image/video processing, like blob detection, tracing the path of the blob, pre-processing of the last frame etc., is done through the OpenCV module.
For the trigger events mentioned above, two circles are created on the real-time video, a green and a red circle. When the blob enters the region within the green circle, the program starts tracing the path taken by the blob after that moment allowing the person to start creating the letter. When the blob reaches the red circle, the video stops and the last frame is passed to a function which performs the pre-processing on the frame to make it ready for predcition.
Custom parts and enclosures
Schematics
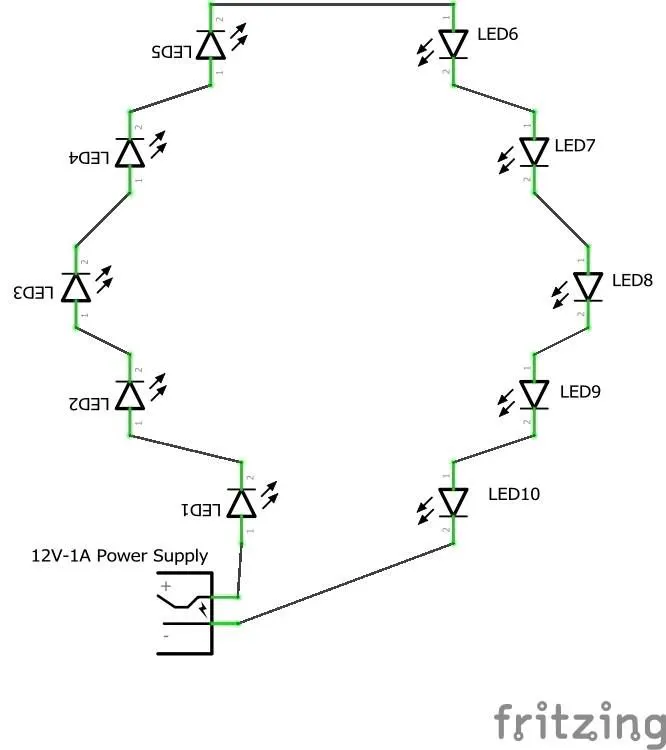
Infrared Leds For Camera Enclosure
This schematic shows how the 10 infrared leds are to be connected on the Night Vision Cammera mount after printing
Code
Training_SVM
Python
This is the python code which uses the scikit-learn module to create a SVM classifier and create a trained model for Handwritten English Alphabet Recognition.
This program imports the the downloaded dataset and slices it to get dataset of 2 letters, A and C, and then trains a SVM classifier, prints its accuracy and saves the trained model as alphabet_classifier.pkl
import pandas as pd
from pandas import DataFrame
from sklearn.externals import joblib
from sklearn.svm import SVC
from sklearn.model_selection import train_test_split
from sklearn.metrics import accuracy_score

print("....Reading DataSet and Creating Pandas DataFrame....")
alphabet_data = pd.read_csv("") # enter path of the saved .csv dataset file
print("...DataFrame Created...")


print("...Slicing and creating initial training and testing set...")
# Dataset of letter A containg features
X_Train_A = alphabet_data.iloc[:13869, 1:]
# Dataset of letter A containg labels
Y_Train_A = alphabet_data.iloc[:13869, 0]
# Dataset of letter C containg features
X_Train_C = alphabet_data.iloc[22537:45946, 1:]
# Dataset of letter C containg labels
Y_Train_C = alphabet_data.iloc[22537:45946, 0]
# Joining the Datasets of both letters
X_Train = pd.concat([X_Train_A, X_Train_C], ignore_index=True)
Y_Train = pd.concat([Y_Train_A, Y_Train_C], ignore_index=True)
print("...X_Train and Y_Train created...")


train_features, test_features, train_labels, test_labels = train_test_split(X_Train, Y_Train, test_size=0.25, random_state=0)

# SVM classifier created
clf = SVC(kernel='linear')
print("")
print("...Training the Model...")
clf.fit(train_features, train_labels)
print("...Model Trained...")


labels_predicted = clf.predict(test_features)
print(test_labels)
print(labels_predicted)
accuracy = accuracy_score(test_labels, labels_predicted)

print("")
print("Accuracy of the model is:  ")
print(accuracy)

print("...Saving the trained model...")
joblib.dump(clf, "alphabet_classifier.xml", compress=3)
print("...Model Saved...")
HarryPotterWandcv
Python
After creating the trained model, the final step is to write a python program which is does all the work related to video and image processing.
This program gets the last frame from the real-time video with the complete character drawn on it. Performs some pre-processing to make it fit for prediction and then saves it.
Using the subprocess module, this code runs the HarryPotterWandsklearn.py file(For making prediction) and gets its output according to which it controls the servo attached to pin 12 of the Raspberry Pi.
# For camera module
from picamera import PiCamera
from picamera.array import PiRGBArray

# For servo control
import RPi.GPIO as GPIO

# For image processing
import numpy as np
import cv2

import time
import subprocess

# initializing Picamera
camera = PiCamera()
camera.framerate = 33
      camera.resolution = (640, 480)
rawCapture = PiRGBArray(camera, size = (640, 480))

# setting up pin 12 for servo as PWM
GPIO.setmode(GPIO.BOARD)
GPIO.setup(12, GPIO.OUT)
servo = GPIO.PWM(12, 50)
servo.start(0)


# Define parameters for the required blob
params = cv2.SimpleBlobDetector_Params()

# setting the thresholds
params.minThreshold = 150
params.maxThreshold = 250

# filter by color
params.filterByColor = 1
params.blobColor = 255

# filter by circularity
params.filterByCircularity = 1
params.minCircularity = 0.68

# filter by area
params.filterByArea = 1
params.minArea = 30
# params.maxArea = 1500

# creating object for SimpleBlobDetector
detector = cv2.SimpleBlobDetector_create(params)


flag = 0
points = []
lower_blue = np.array([255, 255, 0])
upper_blue = np.array([255, 255, 0])

# Function for Pre-processing
def last_frame(img):
    cv2.imwrite("/home/pi/Desktop/lastframe1.jpg", img)
    img = cv2.GaussianBlur(img, (5, 5), 0)
    cv2.imwrite("/home/pi/Desktop/lastframe2.jpg", img)
    retval, img = cv2.threshold(img, 80, 255, cv2.THRESH_BINARY)
    cv2.imwrite("/home/pi/Desktop/lastframe3.jpg", img)
    img = cv2.resize(img, (28, 28), interpolation=cv2.INTER_AREA)
    cv2.imwrite("/home/pi/Desktop/lastframe4.jpg", img)
    img = cv2.dilate(img, (3, 3))
    cv2.imwrite("/home/pi/Desktop/lastframe.jpg", img)
    output = subprocess.check_output(['python3', '/home/pi/Desktop/HarryPotterWandsklearn.py'])
    print(output[1])
    if output[1] == "0":
        print("Alohamora!!")
        servo.ChangeDutyCycle(6.5)
        time.sleep(1.5)
        print("Box Opened!!")
    if output[1] == "2":
        print("Close!!")
        servo.ChangeDutyCycle(3.5)
        print("Box Closed!!")
        time.sleep(1.5)

time.sleep(0.1)

for image in camera.capture_continuous(rawCapture, format='bgr', use_video_port=True):
    frame = image.array
    frame = cv2.resize(frame, (frame.shape[1]//2, frame.shape[0]//2))
    frame =cv2.cvtColor(frame, cv2.COLOR_BGR2GRAY)


    #detecting keypoints
    keypoints = detector.detect(frame)
    frame_with_keypoints = cv2.drawKeypoints(frame, keypoints, np.array([]), (0, 0, 255), cv2.DRAW_MATCHES_FLAGS_DRAW_RICH_KEYPOINTS)


    #starting and ending circle
    frame_with_keypoints = cv2.circle(frame_with_keypoints, (140, 70), 6, (0, 255, 0), 2)
    frame_with_keypoints = cv2.circle(frame_with_keypoints, (190, 140), 6, (0, 0, 255), 2)


    #points_array = cv2.KeyPoint_convert(keypoints)
    points_array = cv2.KeyPoint_convert(keypoints)


    if flag == 1:
        # Get coordinates of the center of blob from keypoints and append them in points list
        points.append(points_array[0])


        # Draw the path by drawing lines between 2 consecutive points in points list
        for i in range(1, len(points)):
            cv2.line(frame_with_keypoints, tuple(points[i-1]), tuple(points[i]), (255, 255, 0), 3)


    if len(points_array) != 0:

        if flag == 1:
            if int(points_array[0][0]) in range(185, 195) and int(points_array[0][1]) in range(135, 145):
                print("Tracing Done!!")
                frame_with_keypoints = cv2.inRange(frame_with_keypoints, lower_blue, upper_blue)
                last_frame(frame_with_keypoints)
                break

        if flag == 0:
            if int(points_array[0][0]) in range(135, 145) and int(points_array[0][1]) in range(65, 75):
                time.sleep(0.5)
                print("Start Tracing!!")
                flag = 1


    cv2.imshow("video",frame_with_keypoints)
    cv2.imshow("video 2",frame)
    rawCapture.truncate(0)
    key = cv2.waitKey(1) & 0xFF
    if key == ord('q'):
        break


cv2.destroyAllWindows()
servo.stop()
GPIO.cleanup()
HarryPotterWandsklearn
Python
This code file is accessed from the HarryPotterWandcv.py file using the subprocess module. It loads the processed last frame using the pillow module and makes the prediction by loading the saved SVM classifier and prints the prediction.
from PIL import Image
from sklearn.externals import joblib
import numpy as np

# Loading the processed last frame form Desktop
img = Image.open("/home/pi/Desktop/lastframe.jpg")

# Loading the SVM classifier
clf = joblib.load("/home/pi/Desktop/alphabet_classifier.pkl")

# Converting image to numpy array
img = np.array(img)
# Converting the numpy array to 1-Dimensional array
img = img.reshape(1, -1)


prediction = clf.predict(img)
print(prediction)
The article was first published in hackster, July 6, 2019
cr: https://www.hackster.io/jasmeet-singh/real-harry-potter-wand-with-computer-vision-520e3b
author:Jasmeet Singh


