
Autonomous Air Sanitization Machine filter airborne COVID-19 particles and provide virus free air using UV light disinfection process.
Things used in this project
Hardware components
Software apps and online services
Hand tools and fabrication machines
acrylic sheet
Cradle sheet
lathe machine
Story
Abstract
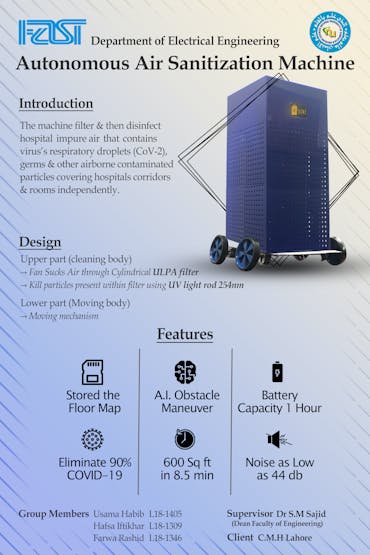
Autonomous Air Sanitization Machine is an autonomous body for filtering and killing germs present in air specifically COVID particles. The COVID-19 outbreak and its rapid spread in the year 2019 and onwards the world faced 269 million cases till date and almost 5.3 million deaths. The purpose of the project is to design and implement an Autonomous Air Sanitization Machine that would be capable to disinfect air. The machine will firstly filter the air, then kill the germs and provide clean air. This is primarily intended for hospital environments that are surrounded by infectious air. A map will be traced earlier in the area by the machine and saved, this machine will move autonomously on the mapped region and accomplish its task. Obstacle Sensing along the path is done by 4 Ultrasonic Sensors anchored at each side of the autonomous body. On detection of a human body, buzzer will ring to give him a signal to move sideways. The machine will eliminate 90% of smoke, dust, viruses, germs, COVID-19 and other particles as small as 0.1 microns. Machine will take 8.5 minutes to disinfect a 600 square foot area. The proposed project is autonomous, cost-effective and reduce the risk of COVID spread specially in hospitals.
Introduction
The COVID-19 outbreak and its rapid spread in the year 2019 and onwards the world faced 269 million cases till date and almost 5.3 million deaths. Pakistan handled 1.29 million cases and endurance 28.863 thousand deaths. COVID transmits when people breathe in air contaminated by droplets and small airborne particles containing the virus. The risk of breathing these droplets in is highest, when people are in close proximity. Air pollution not only affects the air we breathe outside, in fact the air inside our house or workplace may be two to five times more contaminated. Because we spend 90% of our time indoors, even low amounts of indoor air pollution can have a harmful impact on our health. This emphasizes the need to maintain the highest possible indoor air quality.
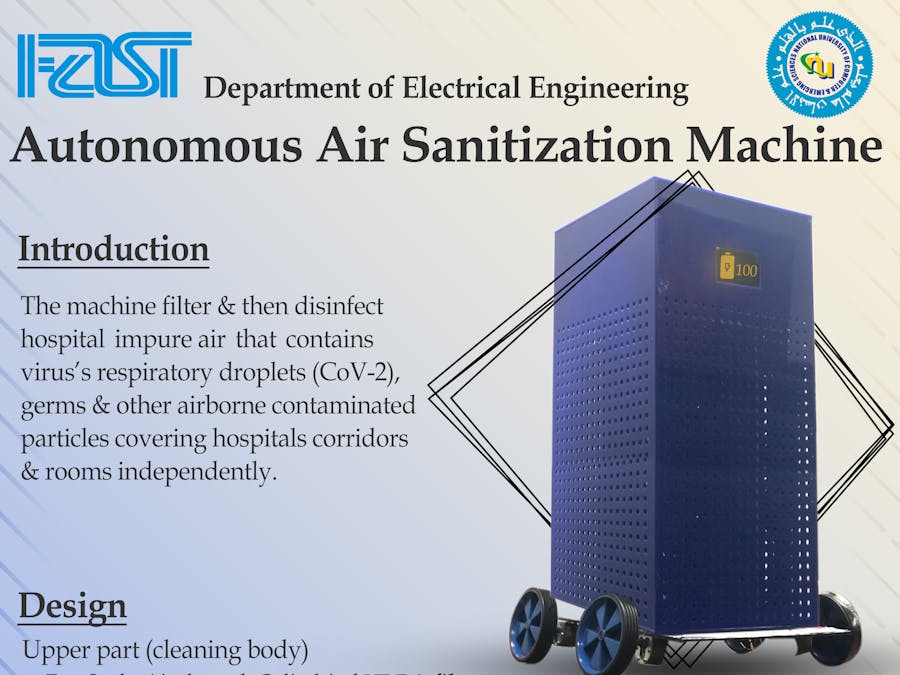
The purpose of the project is to design and implement an Autonomous Air Sanitization Machine that would be capable to disinfect air. The machine will filter the air and then kill the germs and provide clean air. This is primarily intended for hospital environments that are surrounded by infectious air. A map will be traced early in the area by the machine and saved, this machine will move autonomously on the mapped region and accomplish its task. If the machine is to be moved to a different location, the map can be restored.
This report will strive to review the client’s requirements and the preliminary design of the product. Furthermore, it will shed light on the problem analysis, the desired product specifications, simulations, actual implementation and testing. There are a number of chapters in this report each explaining the different parts of the project. Chapter 2 presents the problem definition in the context of a complex engineering problem which requires knowledge of multiple domains and involves complex engineering activities for its solution. Chapter 3 comprises of problem analysis where a scientific analysis of the complex engineering problem has been carried out. Any projects that resemble this project are listed followed by the distinguishing features of this project. Moreover, the societal and environmental implications of this project are also listed in this chapter. The next chapter, chapter 4, describes in detail the design and implementation work done on the project. This section describes the hardware and the software design of the product. Chapter 5 provides the details of the testing carried out and the results obtained. Chapter 6 presents a user guide to make sure the customers face no problems while using the product. The deliverables and costs are mentioned in Chapter 6 which explains the project plan and the projected costs. The last chapter, chapter 8 concludes the project report by briefly stating the achievements of the project while comparing to the objectives that were set and stating any further work that can be done.
Problem Formulation
The air inside hospital could be unaccountably toxic, leading to dust allergies, breathing issues and asthma specially leaving kids vulnerable. The COVID-19 increment & its various variants lead to feeble health or death. Wearing masks and sanitizing our hands and the goods around us is for sure necessary, but what if the air in which we breathe, either inside or outside is contaminated. Sanitizing is very necessary nowadays and everyone wants a clean and sanitized environment, especially in hospitals where large numbers of COVID patients are admitted and breathe in the same ward/area, which is unsafe. Due to infected air, hospital visitor could be prey to COVID-19. Following is the graph of COVID-19 rise in Pakistan.
Engineering Problem Model
Project Objective is to decrease the risk of spreading viruses such as COVID 19 in hospitals and other areas. Our prototype consists of two processes:
Filtration
Disinfection
Filtration
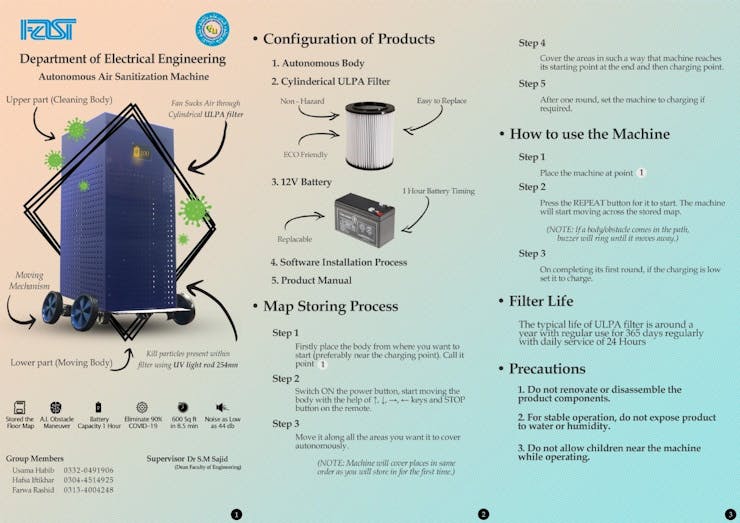
The filtration process will firstly filter out large particles of 20 microns in size such as dust mite waste particles and pollen grains. Secondly, the main filter will filter out particles of size larger than 0.1 microns which includes COVID and other viruses. This process will detain all contaminated particles within the filter.
Disinfection
For the disinfection process, UV light rays will kill the contaminated particles accumulated in the filter. UV light rays will only expose to filter, so that rays may not produce any harmful effect on humans.
Preliminary Product Specification
Following are basic product specifications list:
1. Eliminate 90% of smoke, dust, viruses, germs, COVID-19 and other particles as small as 0.1 microns.
2. Display air quality, charging and distance covered.
3. Disinfect average hospital room of 600 square feet in 8 minutes.
4. Filter life 5 to 7 months.
5. Max noise level needs to be less than or equal to an air conditioning window unit.
6. Net weight 9 kg approx.
7. Dimensions 300 * 300 * 700 mm.
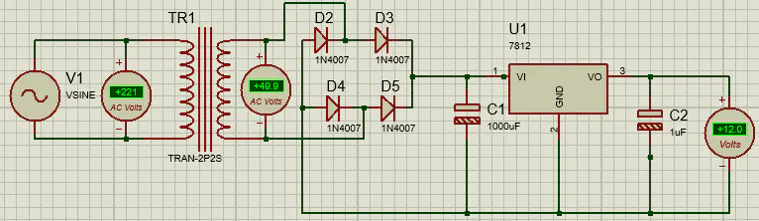
8. DC Voltage 12 V.
9. Incline a slope of 25 degrees.
10. Smooth operation with rubber wheels.
Recent Similar Projects
Virus-Killing Air Filtration System (By Cambridge Scientists and Engineers)
A new carbon-based air filtration nanomaterial capable of capturing and destroying various viruses, including animal coronavirus, a close relative of SARS-CoV-2, the virus that causes COVID-19 has been developed by Cambridge scientists and engineers.
Curbing air pollution with purification towers (By University of Minnesota)
The air in Delhi, India is thick with smog, ridden with fine particles of sulfates, nitrates, and carbon that millions of residents inhale every day. Imagine a nearly 60-foot tall tower, equipped with a state-of-the-art filtration system, sucking in these particles and pushing out clean, breathable air.
City Air Purification System (By Arup and Sino Green) The sustainable arm of Hong Kong property developer Sino Group, developed a patent pending air purification system that targets street-canyon pollution at the pedestrian level. The prototype, which resembles a bus shelter, was tested at a busy intersection in Hong Kong, where pollution levels are double that of the World Health Organization’s recommended limits. Inside, a fan, a pre-filter, and a medical-grade HEPA bag filter circulate the air to remove both large and fine particles. A vent in the canopy directs the newly clean air down to waiting bus riders, where a pressurized air–barrier keeps unfiltered air away.
Societal and Environmental Implications of the Project
Due to the COVID out break and its rapid spread in the year 2019 and onwards the world faced 269 Million cases till date and almost 5.3 Million deaths which is quite of a number. In this situation, although vaccine is there to stop rapid spread of COVID but still it is high time for hospitals to have a machine that can clean the infected air with different variants to at least have a safer surrounding for doctors, nurses, patients 24 hours a day.
The machine doesn’t eject any gas or material that may causes any societal, legal, cultural and environmental issues.
Machine can also produce good results, if used in large buildings.
Yielding a pure atmosphere, this machine could be a daily life partner as well.
Storing the Map
1. Firstly, place the body from where you want to start (preferably near the charging point). Call it point ❶.
2. Switch ON the power button, start moving the body with the help of ↑, ↓, →, ← keys and STOP button on the remote.
3. Move it along all the areas you want it to cover autonomously. NOTE: Machine will cover places in same order as you will store in for the first time.
4. Cover the areas in such a way that machine reaches its starting point at the end and then charging point.
5. After one round, set the machine to charging if required.
How to use the machine
1. Place the machine at point ❶.
2. Press the REPEAT button for it to start. The machine will start moving across the stored map. NOTE: If a body/obstacle comes in the path, buzzer will ring until it moves away.
3. On completing its first round, if the charging is low set it to charge
Conclusion
Autonomous Air Sanitization Machine kills germs and COVID 19 particles that travel within air using filtration and disinfection process. The filtration and disinfection processes went smoothly as theoretically explained on internet. Initial calculations are based on reference values of component and hence project outcome is not exactly in line with assumptions. Machine is tested in tough situations to identify all loop holes and clear them. Machine’s LCD clearly indicates the air quality before and after the presence of machine within the room, which results in a COVID free and improved air quality. According to the various surveys, Autonomous Air Sanitization Machine is based on an innovative idea and will have good market sales if commercialized.
Some adults and children experience multisystem inflammatory syndrome after they have had COVID-19. If this machine is brought in hospitals as well as other buildings, people can work in a heathy work environment without the fear of getting infected.
Schematics
Circuit Schematics

Circuit Schematics
Circuit Schematics
Code
Moving body code
C/C++
#include <IRremote.h>// IR remote library
#include <EEPROM.h>// EEPROM pre-installed library
#include<NewPing.h>
NewPing sonarfront (9,10);
/*
   ***********Left Motor***********
*/
// IN 1
#define ena       4
#define LM_IN1    2
// IN 2
#define LM_IN2    3
/*
   ************Right Motor************
*/
// IN 3
#define enb       7
#define RM_IN3    5
// IN 4
#define RM_IN4    6
/*
   ********************IR Receiver**********************
*/
# define RECV_PIN 8// Pin to which IR reciever is connected
IRrecv irrecv(RECV_PIN);// Pass the pin number to the function
decode_results results;// variable results stores the decoded hex values
/*
 ************HEX code of all the buttons used in the project**************
 */
#define FWD       0xF700FF // go forward(2)
#define LFT       0xF7807F // go left(4)
#define RGT       0xF740BF // go right(6)
#define BWD       0xF7C03F // go backward(8)
#define STOP      0xF720DF // stop(0)
#define RPEAT     0xF7A05F // repeat the stored sequence of movement from the temporary memory(automatically stores) (REPT)
#define DEL       0xF7609F // delete the stored sequence of movement from temporary memory(EQ)
#define PERST     0xF7E01F // copy the sequence from temp. memory to the peramanent memory(EEPROM)
#define PLAYEPROM 0xF710EF // repeat the sequence stored in EEPROM(FASTFWD)
#define RESET     0xF7906F // Resets the Arduino Board(RED)

/*
 ************Global Variables and Arrays**************
 */

unsigned long int value = 0; // stores the incoming hex value
byte seq = 0; //stores the current number of executed sequences
byte seq_Array[50];// array to store the movement sequence in terms of integers(1 for FWD, 2 for LEFT and so on..)
//counter for counting the number of times program pass through a movement function(fwd, lft etc.)
int fwd_Counter = -1;
int lft_Counter = -1;
int rgt_Counter = -1;
int bwd_Counter = -1;
int stp_Counter = -1;
//global "current time" variables for different movement functions(fwd, lft etc.)
unsigned long int current_Time0 = 0;// for FWD movement
unsigned long int current_Time1 = 0;// for LEFT movement
unsigned long int current_Time2 = 0;// for RIGHT movement
unsigned long int current_Time3 = 0;// for BWD movement
unsigned long int current_Time4 = 0;// for STOP
//total time spend by the pgm in executing the movement(fwd, lft etc.) for a particular movement counter
unsigned long int total_Fwd_Time[10];
unsigned long int total_Lft_Time[10];
unsigned long int total_Rgt_Time[10];
unsigned long int total_Bwd_Time[10];
unsigned long int total_Stp_Time[10];
/*
 ************Arduino Reset Pin**************
 */
#define RESET_PIN A0
 int check =0;
void setup() {
  // set mode of the pins as output
  for (int i = 2; i <= 7; i++) {
    pinMode(i, OUTPUT);
  }
  // start serial communication
  Serial.begin(9600);
  // In case the interrupt driver crashes on setup, give a clue
  // to the user what's going on.
  Serial.println("Enabling IRin");
  irrecv.enableIRIn(); // Start the receiver
  Serial.println("Enabled IRin");
}
void loop() {
  if (irrecv.decode(&results)) {
    value = results.value;
    Serial.println(value, HEX);
    irrecv.resume(); // Receive the next value
    delay(200);
  }
  delay(100);
  check_Inst(value);
  value=0;
  if(sonarfront.ping_cm()<=40 && sonarfront.ping_cm()>0 && check==1)
  {
    Serial.println("Stopping ultra");
  digitalWrite(LM_IN1, LOW);
  digitalWrite(LM_IN2, LOW);
  digitalWrite(RM_IN3, LOW);
  digitalWrite(RM_IN4, LOW);
  digitalWrite(ena, LOW);
  digitalWrite(enb, LOW);
  delay(700);
  Serial.println("Going_Forward ultra");
  digitalWrite(LM_IN1, HIGH);
  digitalWrite(LM_IN2, LOW);
  digitalWrite(RM_IN3, HIGH);
  digitalWrite(RM_IN4, LOW);
  digitalWrite(ena, HIGH);
  digitalWrite(enb, HIGH);
  }

}
void check_Inst(long int value) {
  switch (value) {
    case FWD:
      go_Forward();
      delay(10);
      break;
    case LFT:
      go_Left();
      delay(10);
      break;
    case RGT:
      go_Right();
      delay(10);
      break;
    case BWD:
      go_Backward();
      delay(10);
      break;
    case STOP:
      go_Stop();
      delay(10);
      break;
    case RPEAT:
      go_In_Seq();
      delay(10);
      break;
    case DEL:
      del_From_Local_Mem();
      delay(10);
      break;
    case PERST:
      write_To_Permt_Mem();
      delay(10);
      break;
    case PLAYEPROM:
      Read_Permt_Mem();
      delay(10);
      break;
    case RESET:
      pinMode(RESET_PIN, OUTPUT);
      digitalWrite(RESET_PIN,HIGH);
      break;

     default:
      value = 0;
  }
}
void go_Forward() {
  movement_Inst_Fwd();
  current_Time0 = millis();
  int i = seq_Array[(seq - 1)];
  switch (i) {
    case 2:
      // total time elaspsed since Left button is pressed including rest time
      total_Lft_Time[lft_Counter + 1] = (current_Time0 - current_Time1);
      lft_Counter++;
      break;
    case 3:
      // total time elaspsed since Right button is pressed including rest time
      total_Rgt_Time[rgt_Counter + 1] = (current_Time0 - current_Time2);
      rgt_Counter++;
      break;
    case 4:
      total_Bwd_Time[bwd_Counter + 1] = (current_Time0 - current_Time3);
      bwd_Counter++;
      break;
    case 5:
      total_Stp_Time[stp_Counter + 1] = (current_Time0 - current_Time4);
      stp_Counter++;
      break;
  }
  seq_Array[seq] = 1;
  seq++;
}
void go_Left() {
  movement_Inst_Lft();
  current_Time1 = millis();
  int i = seq_Array[(seq - 1)];
  switch (i) {
    case 1:
      total_Fwd_Time[fwd_Counter + 1] = (current_Time1 - current_Time0);
      fwd_Counter++;
      break;
    case 3:
      total_Rgt_Time[rgt_Counter + 1] = (current_Time1 - current_Time2);
      rgt_Counter++;
      break;
    case 4:
      total_Bwd_Time[bwd_Counter + 1] = (current_Time1 - current_Time3);
      bwd_Counter++;
      break;
    case 5:
      total_Stp_Time[stp_Counter + 1] = (current_Time1 - current_Time4);
      stp_Counter++;
      break;
  }
  seq_Array[seq] = 2;
  seq++;
}
void go_Right() {
  movement_Inst_Rgt();
  current_Time2 = millis();
  int i = seq_Array[(seq - 1)];
  switch (i) {
    case 1:
      total_Fwd_Time[fwd_Counter + 1] = (current_Time2 - current_Time0);
      fwd_Counter++;
      break;
    case 2:
      total_Lft_Time[lft_Counter + 1] = (current_Time2 - current_Time1);
      lft_Counter++;
      break;
    case 4:
      total_Bwd_Time[bwd_Counter + 1] = (current_Time2 - current_Time3);
      bwd_Counter++;
      break;
    case 5:
      total_Stp_Time[stp_Counter + 1] = (current_Time2 - current_Time4);
      stp_Counter++;
      break;
  }
  seq_Array[seq] = 3;
  seq++;
}
void go_Backward() {
  movement_Inst_Bwd();
  current_Time3 = millis();
  int i = seq_Array[(seq - 1)];
  switch (i) {
    case 1:
      total_Fwd_Time[fwd_Counter + 1] = (current_Time3 - current_Time0);
      fwd_Counter++;
      break;
    case 2:
      total_Lft_Time[lft_Counter + 1] = (current_Time3 - current_Time1);
      lft_Counter++;
      break;
    case 3:
      total_Rgt_Time[rgt_Counter + 1] = (current_Time3 - current_Time2);
      rgt_Counter++;
      break;
    case 5:
      total_Stp_Time[stp_Counter + 1] = (current_Time3 - current_Time4);
      stp_Counter++;
      break;
  }
  seq_Array[seq] = 4;
  seq++;
}
void go_Stop() {
  movement_Inst_Stp();
  current_Time4 = millis();
  int i = seq_Array[(seq - 1)];
  switch (i) {
    case 1:
      total_Fwd_Time[fwd_Counter + 1] = (current_Time4 - current_Time0);
      fwd_Counter++;
      break;
    case 2:
      total_Lft_Time[lft_Counter + 1] = (current_Time4 - current_Time1);
      lft_Counter++;
      break;
    case 3:
      total_Rgt_Time[rgt_Counter + 1] = (current_Time4 - current_Time2);
      rgt_Counter++;
      break;
    case 4:
      total_Bwd_Time[bwd_Counter + 1] = (current_Time4 - current_Time3);
      bwd_Counter++;
      break;
  }
  seq_Array[seq] = 5;
  seq++;
}
void go_In_Seq(void) {
  value = 0;
  for (int i = 0; i < (seq + 1); i++) {
    int value1 = 0;
    value1 = seq_Array[i];
    switch (value1) {
      case 1:
        static int j = 0;
        go_Forward_Seq(j);
        j++;
        break;
      case 2:
        static int k = 0;
        go_Left_Seq(k);
        k++;
        break;
      case 3:
        static int l = 0;
        go_Right_Seq(l);
        l++;
        break;
      case 4:
        static int m = 0;
        go_Backward_Seq(m);
        m++;
        break;
      case 5:
        static int n = 0;
        go_Stop_Seq(n);
        n++;
        break;
      default:
        j = 0; k = 0; l = 0; m = 0; n = 0;
    }
  }
}
void del_From_Local_Mem() {
  //set the movement counters to their default values
  fwd_Counter = -1;
  lft_Counter = -1;
  rgt_Counter = -1;
  bwd_Counter = - 1;
  stp_Counter = - 1;
  //set the total movement time to its default value
  for (int i = 0; i < 10; i++) {
    total_Fwd_Time[i] = 0;
    total_Lft_Time[i] = 0;
    total_Rgt_Time[i] = 0;
    total_Bwd_Time[i] = 0;
    total_Stp_Time[i] = 0;
  }
  // Reset the sequence array(stored movement instructions)
  for (int i = 0; i < 50; i++) {
    seq_Array[i] = 0;
  }
  seq = 0;

}
/**********************************************************************************************************
     This function copy the data from the arrays to the EEPROM(permanent memory)
************************************************************************************************************/
void write_To_Permt_Mem(){
  // total number of movement is stored in a random address i.e, 100
  EEPROM.write(100,seq);

  //writing the movement sequence
  for(int i=0; i<seq; i++){
  EEPROM.write(2*i,seq_Array[i]);
  }
  //storing the time bw two successive movements
  for(int i=1; i<seq+1; i++){
  if(seq_Array[i-1]==1){
    static byte a=0;
    EEPROM.write(2*i-1,(total_Fwd_Time[a])/1000);// Note: One location can store maximum value of 255, hence the time is divided by 1000 here. And then multiplied by 1000 while retreiving the data from EEPROM location
    a++;
    }
  else if(seq_Array[i-1]==2){
    static byte b=0;
    EEPROM.write(2*i-1,(total_Lft_Time[b])/1000);
    b++;
    }
  else if(seq_Array[i-1]==3){
    static byte c=0;
    EEPROM.write(2*i-1,(total_Rgt_Time[c])/1000);
    c++;
    }
  else if(seq_Array[i-1]==4){
    static byte d=0;
    EEPROM.write(2*i-1,(total_Bwd_Time[d])/1000);
    d++;
    }
  else if(seq_Array[i-1]==5){
    static byte e=0;
    EEPROM.write(2*i-1,(total_Stp_Time[e])/1000);
    e++;
    }
  }
 }

/**********************************************************************************************************
     This function reads the stored sequence from the EEPROM(permanent memory)
************************************************************************************************************/
void Read_Permt_Mem(){
  // Read from permanent memory
   byte x = EEPROM.read(100);
   for(int i=0; i<x+1; i++){
    byte r = EEPROM.read(2*i);
    switch(r){
      case 1:
        movement_Inst_Fwd();
        break;
      case 2:
        movement_Inst_Lft();
        break;
      case 3:
        movement_Inst_Rgt();
        break;
      case 4:
        movement_Inst_Bwd();
        break;
      case 5:
        movement_Inst_Stp();
        break;
      }
     delay((EEPROM.read(i+1))*1000);    // multiplied by thousand because the original time was divided by 1000 while storing in EEPROM.
    }
  }

/**********************************************************************************************************
     These function moves the car in a direction for the time specified/stored in the total_x_time array
************************************************************************************************************/
void go_Forward_Seq(int j) {
  //go in forward direction sequence
  movement_Inst_Fwd();
  delay(total_Fwd_Time[j]);
}
void go_Left_Seq(int k) {
  //go in Left direction sequence
  movement_Inst_Lft();
  delay(total_Lft_Time[k]);
}
void go_Right_Seq(int l) {
  //go in right direction sequence
  movement_Inst_Rgt();
  delay(total_Rgt_Time[l]);
}
void go_Backward_Seq(int m) {
  //go in backward direction sequence
  movement_Inst_Bwd();
  delay(total_Bwd_Time[m]);
}
void go_Stop_Seq(int n) {
  //go in Stop sequence
  movement_Inst_Stp();
  delay(total_Stp_Time[n]);
}
/*********************************************************************************************
          These movement instruction are repeated(required) several times in the code
**********************************************************************************************/
void movement_Inst_Fwd(void) {
  // forward movement instructions
  Serial.println("Going_Forward");
  digitalWrite(LM_IN1, HIGH);
  digitalWrite(LM_IN2, LOW);
  digitalWrite(RM_IN3, HIGH);
  digitalWrite(RM_IN4, LOW);
  digitalWrite(ena, LOW);
  digitalWrite(enb, LOW);
  digitalWrite(ena, HIGH);
  digitalWrite(enb, HIGH);
  check=1;
}
void movement_Inst_Lft(void) {
  // Left movement instructions
  Serial.println("Going_Left");
  digitalWrite(LM_IN1, LOW);
  digitalWrite(LM_IN2, HIGH);
  digitalWrite(RM_IN3, HIGH);
  digitalWrite(RM_IN4, LOW);
  digitalWrite(ena, HIGH);
  digitalWrite(enb, HIGH);
  //delay(3000);// default delay for smooth rotation.
//  digitalWrite(LM_IN1, LOW);
//  digitalWrite(LM_IN2, LOW);
//  digitalWrite(RM_IN3, LOW);
//  digitalWrite(RM_IN4, LOW);
//  digitalWrite(ena, LOW);
//  digitalWrite(enb, LOW);
  delay(500);
  // NOTE: The minimum delay for RIGHT/LEFT movement is 1S(inluding .5s ON time & .5s OFF time). Hence subtract 1s before repeating this movement
}
void movement_Inst_Rgt(void) {
  // Rgt movement instructions
  Serial.println("Going_Right");
  digitalWrite(LM_IN1, HIGH);
  digitalWrite(LM_IN2, LOW);
  digitalWrite(RM_IN3, LOW);
  digitalWrite(RM_IN4, HIGH);
  digitalWrite(ena, HIGH);
  digitalWrite(enb, HIGH);
//  delay(3000);// default delay for smooth rotation.
//  digitalWrite(LM_IN1, LOW);
//  digitalWrite(LM_IN2, LOW);
//  digitalWrite(RM_IN3, LOW);
//  digitalWrite(RM_IN4, LOW);
//  digitalWrite(ena, LOW);
//  digitalWrite(enb, LOW);
  delay(500);
  // NOTE: The minimum delay for RIGHT/LEFT movement is 1S(inluding .5s ON time & .5s OFF time). Hence subtract 1s before repeating this movement
}
void movement_Inst_Bwd(void) {
  // Bwd movement instructions
  Serial.println("Going_Backward");
  digitalWrite(LM_IN1, LOW);
  digitalWrite(LM_IN2, HIGH);
  digitalWrite(RM_IN3, LOW);
  digitalWrite(RM_IN4, HIGH);
  digitalWrite(ena, LOW);
  digitalWrite(enb, LOW);
  digitalWrite(ena, HIGH);
  digitalWrite(enb, HIGH);
}
void movement_Inst_Stp(void) {
  // Stp movement instructions
  Serial.println("Stopping");
  digitalWrite(LM_IN1, LOW);
  digitalWrite(LM_IN2, LOW);
  digitalWrite(RM_IN3, LOW);
  digitalWrite(RM_IN4, LOW);
  digitalWrite(ena, LOW);
  digitalWrite(enb, LOW);
  check=0;
}
The article was first published in hackster, February 9, 2023
cr: https://www.hackster.io/504083/autonomous-air-sanitization-machine-4671d1
author: Usama Habib, Hafsa Iftikhar, Farwa Rashid


