

Program a 32-bit Tivaware Board (TM4C123x series) from Texas Instruments using Embedded C from scratch. Contains TM4C123G ARM-cortex MCU.
Things used in this project
Hardware Components:-
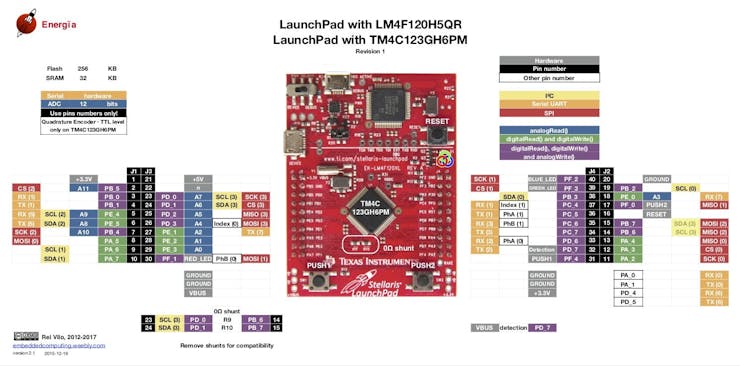
Texas Instruments EK-TM4C123GXL TM4C Tiva LaunchPad
Software apps and online services
Texas Instruments Code Composer Studio
What is Tivaware? 🎒

Texas Instruments, also known as TI, is an embedded design company, that designs, manufactures and sells embedded systems. These systems include semiconductors, integrated circuits, development boards, etc, for industrial, commercial, automotive, and personal electronics. Tivaware is an initiative by TI to manufacture a series of MCUs that support a common SDK.
Get PCBs For Your Projects Manufactured

You must check out PCBWAY to order PCBs online for cheap!
You get 10 good-quality PCBs manufactured and shipped to your doorstep for cheap. You will also get a discount on shipping on your first order. Upload your Gerber files onto PCBWAY to get them manufactured with good quality and quick turnaround time. PCBWay now could provide a complete product solution, from design to enclosure production. Check out their online Gerber viewer function. With reward points, you can get free stuff from their gift shop.
Getting Started 🗽
The TivaWare for software development kit (SDK) provides all of the components necessary for engineers to evaluate and develop applications for the Texas Instruments TM4C Arm Cortex - M4F device family. Based on Embedded C language, it allows developers to get started quickly, uses already-tested development methods and drivers that take less time to build and create.
In our case, we'll be using a basic microcontroller board TM4C123GXL, which has the same properties as an STM Nucleo Board. TI Boards for this series are termed as 'Launchpad' due to its ability to support other booster drivers and boards that'll give extra support to provide more features.
Hardware Section 🔧
This Tivaware Launchpad (TM4C123GXL) has the following features :
Tiva TM4C123GH6PMI microcontrollerMotion control PWMUSB micro-A and micro-B connectors for USB device, host, and on-the-go (OTG) connectivityRGB user LEDTwo user switches (application/wake)Available I/O brought out to headers on a 0.1-in (2.54-mm) gridOn-board ICDISwitch-selectable power sources: – ICDI – USB deviceReset switchPreloaded RGB quickstart application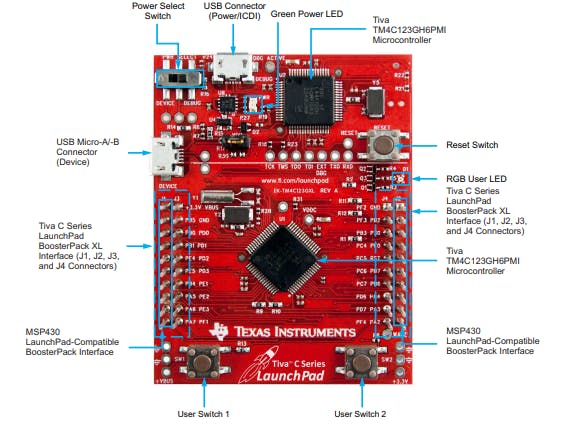
Let us check more about the TM4C123GH6PMMCU :
80MHz 32-bit ARM Cortex-M4-based microcontrollers CPU256KB Flash, 32KB SRAM, 2KB EEPROMTwo Controller Area Network (CAN) modules (requires CAN transceivers)USB 2.0 Host/Device/OTG + PHYDual 12-bit 2MSPS ADCs, motion control PWMs8 UART, 6 I2C, 4 SPIThis board provides more features than any other Arduino Board. What's special about it, is the 32-bit MCU taking control of the board.
Software Requirements 👨💻
To be able to upload and run codes on the Tiva launchpad, we need to download the IDE and library, then make a couple of configurations. Below are the software to be downloaded -
Download and Install Code Composer Studio from here. Then click on 'Download Options' > select 'Windows single file (offline)'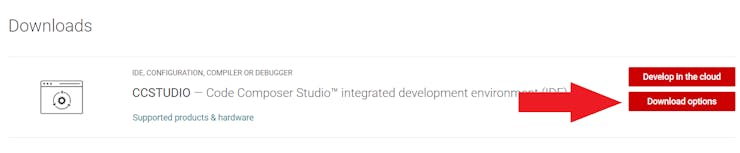
Installing Code Composer Studio -
Run the CCS (Code Composer Studio) setup file.Choose the Location to install the CCS. Tip - All the code files are saved in that location.Choose 'Custom Installation', since we will only be using the TM4C123GXL board, select 'TM4C12x ARM Cortex M4F core-based MCU'
Running CCS forTM4C Library -
Open CCS and create a new project > select Device - TM4C123GH6PM, connection - Stellaris ICD > Create a project with main.c fileNow, right-click on the project > and select properties > go to Build > go to the ARM Compiler section > click on the Include Options > click the icon with a green plus sign to add file > browse to the downloaded library file (previously noted location)Now, let us use the ARM Linker > go to File Search Path > add the driverlib.lib file here (found at CCS installed location -..\..\TivaWare_C_Series-v.er.sion\driverlib\ccs\Debug\driverlib.lib).Once done, click 'Apply and Close' to continue with the build.Alright! We can now begin with Write - Build - Upload to the Launchpad !!
❗❗ We can also follow the Documentation for guidance on the functions used for the peripherals of the board. Download the documentation - TivaWare™ Peripheral Driver Library for C Series User's Guide(Rev. E). ❗❗
PORTs - How to use them? 🔌
Ports are the peripheral pins on an embedded system, or SoC to communicate with the external environment. Whenever a port receives a HIGH or LOW signal, it communicates throughout the system.
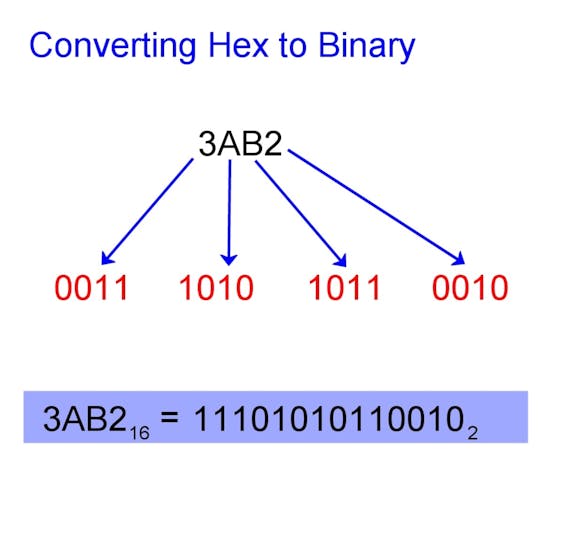
A PORT is usually bit-packed, i.e. each port is represented with an 8-bit binary number. The number count starts from right to left. So when we mention a pin's address as 0x0E - it means we are pointing at the pins which are O according to the below representation -X X X X O O O X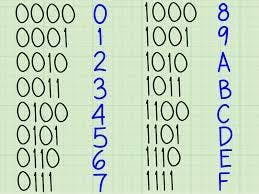
while(1)
    {
        GPIOPinWrite(GPIO_PORTA_BASE,0x0A, 0x02);
        SysCtlDelay(1333333);
        GPIOPinWrite(GPIO_PORTA_BASE,0x0A, 0x08);
        SysCtlDelay(1333333);
    }
Congratulations! You can now understand other functions that use the ports, directly from the documentation by TI.
First Project - LED Blinking 🚀
We shall be using the inbuilt RGB LED present on the board itself. The LEDs are internally connected to GPIO 1 on Port F.
SysCtlClockSet(SYSCTL_SYSDIV_5 | SYSCTL_XTAL_16MHZ | SYSCTL_USE_PLL | SYSCTL_USE_OSC);
SysCtlPeripheralEnable(SYSCTL_PERIPH_GPIOF);
GPIOPinTypeGPIOOutput(GPIO_PORTF_BASE, GPIO_PIN_1);
GPIOPinWrite(GPIO_PORTF_BASE,0x0E, GPIO_PIN_1);
#include <stdint.h>
#include <stdbool.h>

#include "inc/tm4c123gh6pm.h"
#include "inc/hw_memmap.h"
#include "inc/hw_types.h"

#include "driverlib/sysctl.h"
#include "driverlib/gpio.h"
/**
* main.c
*/
int main(void)
{
    SysCtlClockSet(SYSCTL_SYSDIV_5 | SYSCTL_XTAL_16MHZ | SYSCTL_USE_PLL | SYSCTL_USE_OSC);
    SysCtlPeripheralEnable(SYSCTL_PERIPH_GPIOF);
    GPIOPinTypeGPIOOutput(GPIO_PORTF_BASE, GPIO_PIN_1);
    while(1)
    {
        GPIOPinWrite(GPIO_PORTF_BASE,0x0E, GPIO_PIN_1);
        SysCtlDelay(1333333);
        GPIOPinWrite(GPIO_PORTF_BASE,0x0E, !(GPIO_PIN_1));
        SysCtlDelay(1333333);
    }
}
Hurray! 🎉
We have learned another Microcontroller Board - TivaC Launchpad (32-bit Microcontroller).


