Master-Slave Communication between Arduino Boards using HC-05 Modules

In this tutorial, we will learn how to set up a Master-Slave communication between two Arduino boards using HC-05 Bluetooth modules. This is an essential project for wireless communication in Arduino-based systems, and we’ll be focusing on how to make two Arduino boards communicate using HC-05 Bluetooth modules.
What is HC-05 Bluetooth Module?
The HC-05 Bluetooth module is a popular and affordable wireless communication module for Arduino projects. It allows two devices to communicate wirelessly using Bluetooth technology. The module can be used as both a master and a slave, making it versatile for a wide range of applications, from controlling robots to sending sensor data wirelessly.
Putting Bluetooth Module in Command Mode
To configure the HC-05 Bluetooth module in either Master or Slave mode, we must first enter the Command Mode. Command Mode allows you to send AT commands to the module for configuration. Here are the steps:
Wire the HC-05 Bluetooth module with your Arduino UNO . Once the wiring is complete, upload the Arduino code to the UNO board. After the code has been successfully uploaded, disconnect the USB cable from your Laptop/PC to remove power from the Arduino. Open the Serial Monitor in the Arduino IDE. Set the baud rate to 9600 with the settings “n, 8, 1” (no parity, 8 data bits, 1 stop bit). Also, ensure that the Line Ending option is set to “Both NL & CR.” Press and hold the button on the Bluetooth module, and connect the USB cable to your Laptop/PC to power the Arduino and the module. Continue to hold the button until you see the following message in the Serial Monitor window:
“Bluetooth Module initialization in command mode.”
This indicates that the module is now in Command Mode, and you can proceed to send Slave/Master-specific commands to configure it. If the expected message does not appear in the Serial Monitor, restart the sequence from Step 3 and try again.
Configuring the Bluetooth Module for the Slave Role
To manually configure the module and confirm its role, follow these steps:
Once the HC-05 is in Command Mode, you can communicate with it using the Arduino’s Serial Monitor. Type AT and press Enter. If the communication is successful, you will receive an "OK" response. This confirms that the module is ready to receive further AT commands. To make the Slave module easily identifiable, change its name by typing AT+NAME=SLAVE in the Serial Monitor and pressing Enter. You should receive an "OK" response, indicating that the name has been successfully changed. Since the module is by default in the Slave role, you can ensure it remains as a Slave by typing AT+ROLE=0 in the Serial Monitor and pressing Enter. The response should be "OK", confirming that the module is configured as a Slave. To obtain the module’s Bluetooth address, type AT+ADDR? and press Enter. The HC-05 will display its address in hexadecimal format. Write down this address, as it will be needed later to configure the Master device. The address will typically look like 0021:13:3BB60.Once the module has been configured as a Slave, you can remove the USB cable from your PC/Laptop and disconnect the HC-05 module from the circuit. This step completes the configuration for the Slave module.
Configuring the Bluetooth Module for the Master Role
Now that the Slave module is configured, we will set up another HC-05 module as a Master. Follow these steps:
Like the Slave module, first ensure that the Master HC-05 is in Command Mode. Open the Serial Monitor and type AT, then press Enter. You should receive an "OK" response, confirming that the module is ready for configuration. To identify the Master module, type AT+NAME=MASTER and press Enter. You will receive an "OK" response, confirming the module's name has been changed to MASTER. To change the role of this module to Master, type AT+ROLE=1 and press Enter. The response should be "OK", indicating that the module is now configured as a Master. To ensure that the Master module only connects to a specific Slave, type AT+CMODE=0 and press Enter. This command sets the connection mode to a fixed address. An "OK" response confirms the change. Now, pair the Master module with the Slave module by typing the command AT+BIND=0021,13,03BB60 (replace the address with the Slave module’s address from Step 4 of the Slave configuration). You should receive an "OK" response if the binding is successful. If the address is incorrectly entered or the binding fails, you can type AT+BIND? to check the address, and if it shows zeroes or another address, repeat this step to correct the pairing.Once the Master module is successfully configured, you can disconnect the USB cable and remove the module from the circuit. This completes the Master configuration.
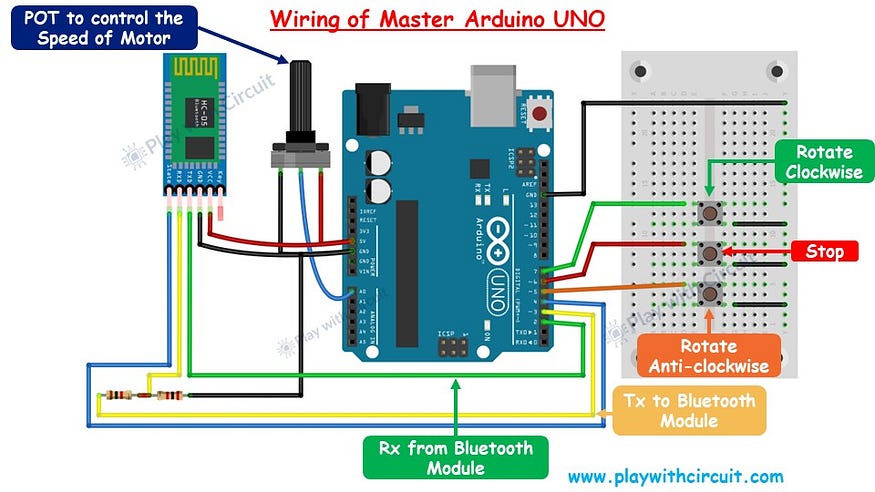
Master Arduino Connections
Slave Arduino Connections

To learn more about how to make two Arduino boards communicate wirelessly check out the full tutorial. There you will get complete code and step-by-step code explanation.
https://playwithcircuit.com/hc05-master-slave-arduino-tutorial/


