
Story
Creating a robot face using the Beetle ESP32-C3 and a DFRobot OLED display module is an exciting project! Here's a step-by-step guide to help you bring your robot face to life:
Materials Needed:
Beetle ESP32-C3: A compact development board with Wi-Fi and Bluetooth capabilities. DFRobot OLED Display Module: A 0.96-inch OLED screen for displaying the robot's face. Jumper Wires: For connecting components. Breadboard: For prototyping the circuit. Power Supply: A USB cable or a Li-ion battery. Soldering Kit (optional): For permanent connections. Arduino IDE: Software for writing and uploading code.
Get PCBs for Your Projects Manufactured

You must check out PCBWAY for ordering PCBs online for cheap!
You get 10 good-quality PCBs manufactured and shipped to your doorstep for cheap. You will also get a discount on shipping on your first order. Upload your Gerber files onto PCBWAY to get them manufactured with good quality and quick turnaround time. PCBWay now could provide a complete product solution, from design to enclosure production. Check out their online Gerber viewer function. With reward points, you can get free stuff from their gift shop. Also, check out this useful blog on PCBWay Plugin for KiCad from here. Using this plugin, you can directly order PCBs in just one click after completing your design in KiCad.
Step 1: Setting Up the Beetle ESP32-C3
Install Drivers: Download and install the necessary drivers for the Beetle ESP32-C3 from the DFRobot Wiki.
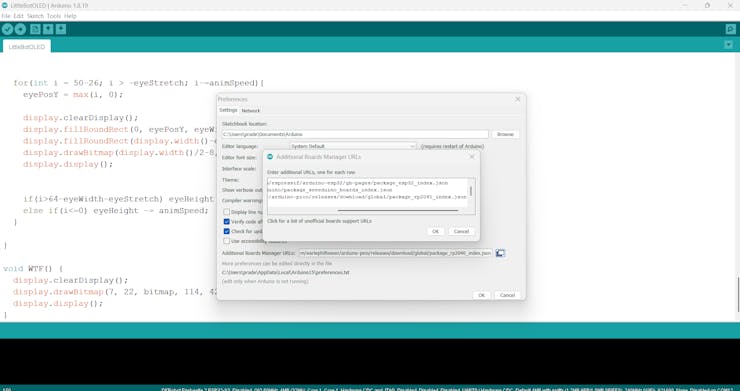
Set Up Arduino IDE:
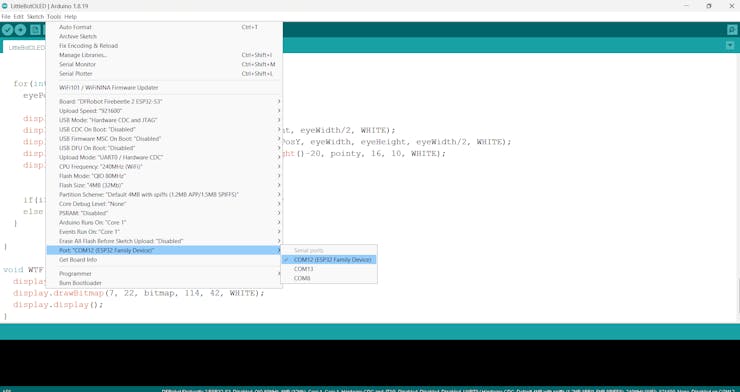
Install the ESP32 board package in Arduino IDE. Go to File > Preferences and add the following URL to the "Additional Board Manager URLs": https://dl.espressif.com/dl/package_esp32_index.json. Open Tools > Board > Board Manager, search for "ESP32," and install it. Connect the Board: Use a USB cable to connect the Beetle ESP32-C3 to your computer.
Step 2: Wiring the OLED Display
Pin Connections:
Connect the OLED's VCC to the Beetle ESP32-C3's 3.3V pin. Connect the OLED's GND to the Beetle ESP32-C3's GND pin. Connect the OLED's SCL to the Beetle ESP32-C3's GPIO22 (or the designated I2C clock pin). Connect the OLED's SDA to the Beetle ESP32-C3's GPIO21 (or the designated I2C data pin).
Secure Connections: Use a breadboard or solder the wires for a stable connection.

Step 3: Programming the Robot Face
Install Libraries:
In Arduino IDE, go to Sketch > Include Library > Manage Libraries.Search for and install the Adafruit SSD1306 and Adafruit GFX libraries for OLED control.
Write the Code:
Create a simple program to display a face on the OLED. Here's an example:
#include <Wire.h>
#include <Adafruit_GFX.h>
#include <Adafruit_SSD1306.h>
Adafruit_SSD1306 display(128, 64, &Wire, 4, 800000UL, 100000UL);
static unsigned char bitmap[] PROGMEM ={
0x3f, 0x00, 0x0f, 0xf0, 0x00, 0x3c, 0x0f, 0xff, 0xff, 0xfb, 0x00, 0x20, 0x00, 0x80, 0x00, 0x7f,
0x80, 0x1f, 0xf8, 0x00, 0x7e, 0x1f, 0xff, 0xff, 0xff, 0x80, 0x7f, 0xff, 0xff, 0x00, 0x7f, 0x80,
0x1f, 0xfc, 0x00, 0xff, 0x1f, 0xff, 0xff, 0xff, 0xf1, 0xff, 0xff, 0xff, 0x80, 0x7f, 0x80, 0x3f,
0xfc, 0x01, 0xff, 0xff, 0xff, 0xff, 0xff, 0xf3, 0xff, 0xff, 0xff, 0xc0, 0x7f, 0xc0, 0x3f, 0xfc,
0x01, 0xff, 0xff, 0xff, 0xff, 0xff, 0xf3, 0xff, 0xff, 0xff, 0xc0, 0x7f, 0xc0, 0x3f, 0xfe, 0x01,
0xff, 0xbf, 0xff, 0xff, 0xff, 0xf3, 0xff, 0xff, 0xff, 0xc0, 0x7f, 0xc0, 0x7f, 0xfe, 0x03, 0xff,
0x9f, 0xff, 0xff, 0xff, 0xf3, 0xff, 0xff, 0xff, 0xc0, 0x7f, 0xc0, 0x7f, 0xff, 0x03, 0xff, 0x1f,
0xff, 0xff, 0xff, 0xf3, 0xff, 0xff, 0xff, 0x80, 0x3f, 0xe0, 0xff, 0xff, 0x03, 0xfe, 0x03, 0x7f,
0xff, 0xff, 0x83, 0xff, 0xff, 0xff, 0x00, 0x3f, 0xe0, 0xff, 0xff, 0x03, 0xfe, 0x00, 0x07, 0xff,
0x80, 0x03, 0xff, 0xc0, 0x00, 0x00, 0x3f, 0xe0, 0xff, 0xff, 0x83, 0xfe, 0x00, 0x03, 0xfe, 0x00,
0x03, 0xff, 0x00, 0x00, 0x00, 0x3f, 0xe1, 0xff, 0xff, 0x87, 0xfc, 0x00, 0x03, 0xfe, 0x00, 0x03,
0xfe, 0x00, 0x00, 0x00, 0x3f, 0xe1, 0xff, 0xff, 0x87, 0xfc, 0x00, 0x03, 0xfe, 0x00, 0x03, 0xfe,
0x00, 0x00, 0x00, 0x1f, 0xe1, 0xff, 0xff, 0x87, 0xfc, 0x00, 0x03, 0xfe, 0x00, 0x03, 0xfe, 0x00,
0x00, 0x00, 0x1f, 0xf1, 0xff, 0xff, 0x8f, 0xfc, 0x00, 0x03, 0xfe, 0x00, 0x03, 0xfe, 0x00, 0x00,
0x00, 0x1f, 0xf3, 0xff, 0xff, 0x8f, 0xfc, 0x00, 0x03, 0xfe, 0x00, 0x03, 0xff, 0x80, 0x00, 0x00,
0x1f, 0xf3, 0xff, 0xff, 0x8f, 0xf8, 0x00, 0x03, 0xfe, 0x00, 0x03, 0xff, 0xfd, 0xd8, 0x00, 0x0f,
0xff, 0xff, 0xff, 0xdf, 0xf8, 0x00, 0x03, 0xfe, 0x00, 0x03, 0xff, 0xff, 0xfc, 0x00, 0x0f, 0xff,
0xff, 0xff, 0xff, 0xf8, 0x00, 0x03, 0xfe, 0x00, 0x03, 0xff, 0xff, 0xfe, 0x00, 0x0f, 0xff, 0xfe,
0x7f, 0xff, 0xf0, 0x00, 0x03, 0xfe, 0x00, 0x03, 0xff, 0xff, 0xfe, 0x00, 0x0f, 0xff, 0xfc, 0x7f,
0xff, 0xf0, 0x00, 0x03, 0xfe, 0x00, 0x03, 0xff, 0xff, 0xfe, 0x00, 0x0f, 0xff, 0xfc, 0x7f, 0xff,
0xf0, 0x00, 0x03, 0xfe, 0x00, 0x03, 0xff, 0xff, 0xfe, 0x00, 0x07, 0xff, 0xf8, 0x3f, 0xff, 0xe0,
0x00, 0x03, 0xfe, 0x00, 0x03, 0xff, 0xff, 0xfe, 0x00, 0x07, 0xff, 0xf8, 0x3f, 0xff, 0xe0, 0x00,
0x03, 0xfe, 0x00, 0x03, 0xff, 0xff, 0xf8, 0x00, 0x07, 0xff, 0xf8, 0x3f, 0xff, 0xe0, 0x00, 0x03,
0xfe, 0x00, 0x03, 0xfe, 0x00, 0x00, 0x00, 0x07, 0xff, 0xf8, 0x1f, 0xff, 0xe0, 0x00, 0x03, 0xfe,
0x00, 0x03, 0xfc, 0x00, 0x00, 0x00, 0x07, 0xff, 0xf0, 0x1f, 0xff, 0xe0, 0x00, 0x03, 0xfe, 0x00,
0x03, 0xfc, 0x00, 0x00, 0x00, 0x03, 0xff, 0xf0, 0x0f, 0xff, 0xc0, 0x00, 0x03, 0xfe, 0x00, 0x03,
0xfc, 0x00, 0x00, 0x00, 0x03, 0xff, 0xf0, 0x0f, 0xff, 0xc0, 0x00, 0x03, 0xfc, 0x00, 0x03, 0xfe,
0x00, 0x00, 0x00, 0x03, 0xff, 0xf0, 0x0f, 0xff, 0xc0, 0x00, 0x03, 0xfe, 0x00, 0x03, 0xfe, 0x00,
0x00, 0x00, 0x03, 0xff, 0xe0, 0x0f, 0xff, 0x80, 0x00, 0x03, 0xfe, 0x00, 0x03, 0xfc, 0x00, 0x00,
0x00, 0x01, 0xff, 0xe0, 0x0f, 0xff, 0x80, 0x00, 0x03, 0xfe, 0x00, 0x03, 0xfc, 0x00, 0x00, 0x00,
0x01, 0xff, 0xe0, 0x0f, 0xff, 0x80, 0x00, 0x03, 0xfe, 0x00, 0x03, 0xfe, 0x00, 0x00, 0x00, 0x01,
0xff, 0xc0, 0x07, 0xff, 0x00, 0x00, 0x03, 0xfc, 0x00, 0x03, 0xfc, 0x00, 0x00, 0x00, 0x01, 0xff,
0xc0, 0x07, 0xff, 0x00, 0x00, 0x03, 0xfc, 0x00, 0x03, 0xfc, 0x00, 0x00, 0x00, 0x00, 0xff, 0xc0,
0x03, 0xff, 0x00, 0x00, 0x03, 0xfc, 0x00, 0x03, 0xfc, 0x00, 0x00, 0x00, 0x00, 0xff, 0x80, 0x03,
0xfe, 0x00, 0x00, 0x03, 0xfc, 0x00, 0x03, 0xfc, 0x00, 0x00, 0x00, 0x00, 0x3f, 0x00, 0x01, 0xfc,
0x00, 0x00, 0x01, 0xfc, 0x00, 0x03, 0xfc, 0x00, 0x00, 0x00, 0x00, 0x00, 0x00, 0x00, 0x00, 0x00,
0x00, 0x00, 0x78, 0x00, 0x01, 0xf0, 0x00, 0x00, 0x00, 0x00, 0x00, 0x00, 0x00, 0x00, 0x00, 0x00,
0x00, 0x00, 0x00, 0x00, 0x60, 0x00, 0x00, 0x00, 0x00, 0x00, 0x00, 0x00, 0x00, 0x00, 0x00, 0x00,
0x00, 0x00, 0x00, 0x00, 0x00, 0x00, 0x00, 0x00, 0x00, 0x00, 0x00, 0x00, 0x00, 0x00, 0x00, 0x00,
0x00, 0x00, 0x00, 0x00, 0x00, 0x00,
};
static unsigned char pointy[] PROGMEM ={
0x60, 0x06, 0xf0, 0x0f, 0xf8, 0x1f, 0x7c, 0x3e, 0x3e, 0x7c, 0x1f, 0xf8, 0x0f, 0xf0, 0x07, 0xe0,
0x03, 0xc0, 0x01, 0x80,
};
void setup() {
display.begin(SSD1306_SWITCHCAPVCC, 0x3c); // initialize with the I2C addr 0x3D (for the 128x64)
display.clearDisplay();
display.setTextColor(WHITE);
display.setRotation(0);// Rotate the display at the start: 0, 1, 2 or 3 = (0, 90, 180 or 270 degrees)
display.clearDisplay();
}
void loop() {
boing();
boing();
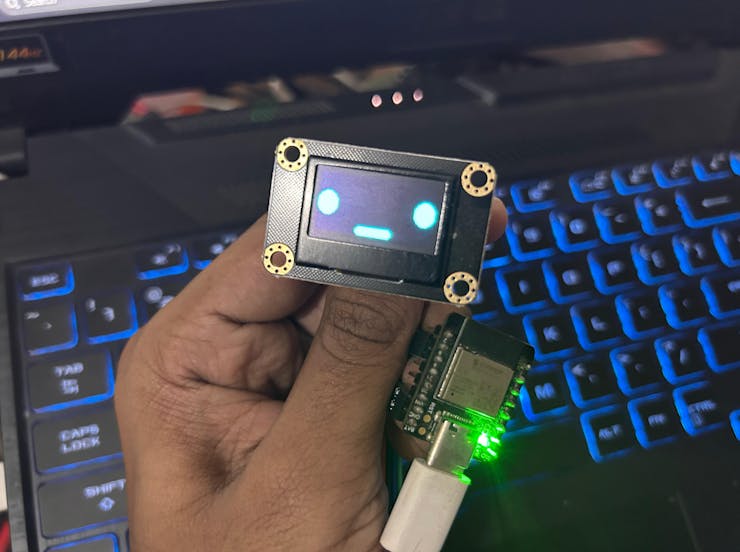
drawOpeneyes(22, 26);
delay(1000);
drawClosedyes(22);
delay(50);
drawOpeneyes(22, 26);
delay(1000);
drawNarrowMouth(16, 16);
delay(1000);
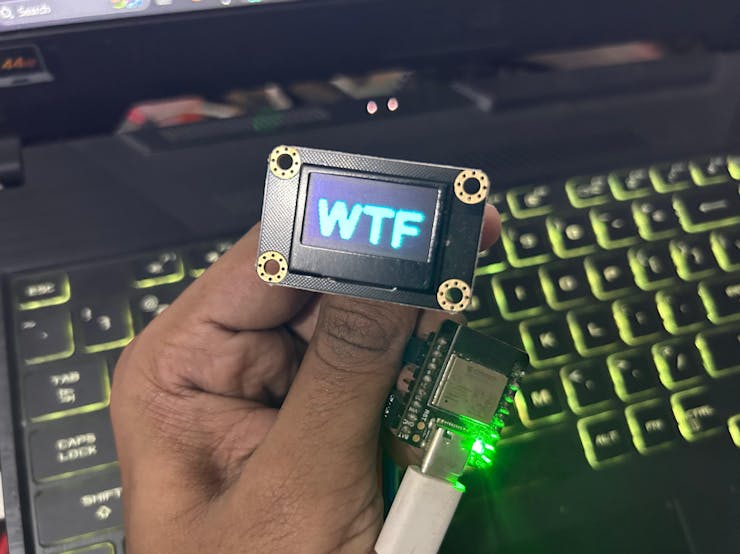
WTF();
delay(1000);
drawOpeneyes(22, 26);
delay(1000);
drawClosedyes(22);
delay(50);
drawOpeneyes(22, 26);
delay(1000);
}
void drawOpeneyes(int eyeWidth, int eyeHeight) {
display.clearDisplay();
display.fillRoundRect(0, 20, eyeWidth, eyeHeight, eyeWidth/2, WHITE);
display.fillRoundRect(display.width()-eyeWidth, 20, eyeWidth, eyeHeight, eyeWidth/2, WHITE);
display.fillRoundRect(display.width()/2-20, display.height()-10, 40, 10, 5, WHITE);
display.display();
}
void drawClosedyes(int eyeWidth) {
display.clearDisplay();
display.fillRoundRect(0, 28, eyeWidth, 6, 3, WHITE);
display.fillRoundRect(display.width()-eyeWidth, 28, eyeWidth, 6, 3, WHITE);
display.fillRoundRect(display.width()/2-20, display.height()-10, 40, 10, 5, WHITE);
display.display();
}
void drawNarrowMouth(int eyeWidth, int eyeHeight) {
display.clearDisplay();
display.fillRoundRect(0, 20, eyeWidth, eyeHeight, eyeWidth/2, WHITE);
display.fillRoundRect(display.width()-eyeWidth, 20, eyeWidth, eyeHeight, eyeWidth/2, WHITE);
display.fillRoundRect(display.width()/2-35, display.height()-10, 70, 10, 5, WHITE);
display.display();
}
void boing() {
int eyeWidth = 22, eyeHeight = 26, animSpeed = 4, eyeStretch = 10;
int eyePosY;
for(int i = -eyeStretch ; i <= 50-26; i+=animSpeed){
eyePosY = max(i, 0);
display.clearDisplay();
display.fillRoundRect(0, eyePosY, eyeWidth, eyeHeight, eyeWidth/2, WHITE);
display.fillRoundRect(display.width()-eyeWidth, eyePosY, eyeWidth, eyeHeight, eyeWidth/2, WHITE);
display.drawBitmap(display.width()/2-8, display.height()-20, pointy, 16, 10, WHITE);
display.display();
if(i>=64-eyeWidth-eyeStretch) eyeHeight -= animSpeed;
else if(i<0) eyeHeight += animSpeed;
}
for(int i = 50-26; i > -eyeStretch; i-=animSpeed){
eyePosY = max(i, 0);
display.clearDisplay();
display.fillRoundRect(0, eyePosY, eyeWidth, eyeHeight, eyeWidth/2, WHITE);
display.fillRoundRect(display.width()-eyeWidth, eyePosY, eyeWidth, eyeHeight, eyeWidth/2, WHITE);
display.drawBitmap(display.width()/2-8, display.height()-20, pointy, 16, 10, WHITE);
display.display();
if(i>64-eyeWidth-eyeStretch) eyeHeight += animSpeed;
else if(i<=0) eyeHeight -= animSpeed;
}
}
void WTF() {
display.clearDisplay();
display.drawBitmap(7, 22, bitmap, 114, 42, WHITE);
display. Display();
}
Step 4: Customizing the Face
Experiment with different shapes and animations to give your robot face personality.Use the Adafruit GFX library's functions like drawRect(), drawLine(), and fillCircle() to create unique expressions.
Wrap-Up: Bringing Your Robot Face to Life!
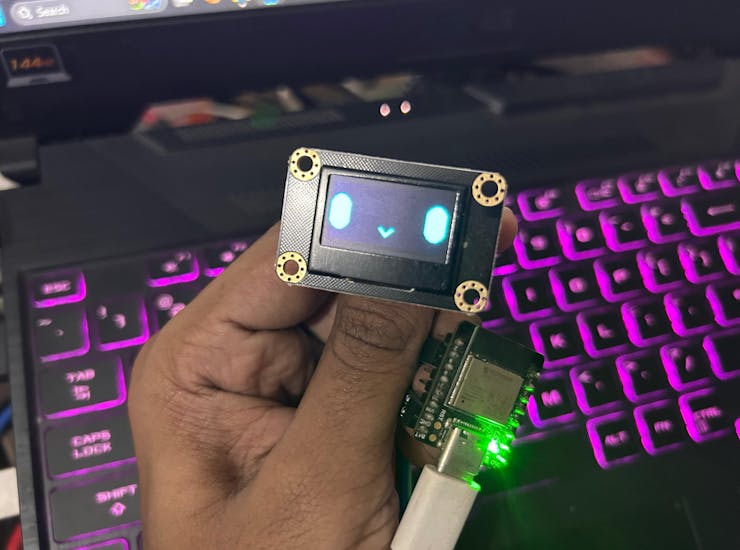
Congratulations on crafting your very own robot face with the Beetle ESP32-C3 and DFRobot OLED display module! This project provided you with hands-on experience with microcontroller setup, OLED display wiring, and programming creative animations. You've successfully combined technology and imagination to design a personality-filled robot face.


