
In this guide, we will build an obstacle avoiding car using arduino. This project involves using an L293D motor shield, a servo motor, and an ultrasonic sensor. The robot car will continuously scan its surroundings using the ultrasonic sensor mounted on a servo motor. If an obstacle is detected, the car will change direction to avoid it. This Arduino-based obstacle avoiding robot car project is an excellent way to learn about motor control, servo motors, and sensor integration.
Components Needed:
Arduino Uno - BUY NOW
L293D Motor Shield
2 DC Motors-BUY NOW
Servo Motor (SG90) -BUY NOW
Ultrasonic Sensor (HC-SR04) -BUY NOW
Jumper wires - BUY NOW
8 AA rechargeable batteries (1.5V each).
We will use 8 AA rechargeable batteries in series, which provide 1.5V * 8 = 12V. The Arduino shield can be operated with 5 to 12 volts, and the Arduino will be powered directly from this supply
Battery holders for 4 AA batteries each
Switch - BUY NOW
Chassis for mounting components -BUY NOW
Wheels -BUY NOW
Screws and nuts3D-printed mounts for the servo motor and ultrasonic sensor
Step-by-Step Guide to Building an Obstacle Avoiding Robot Car
Step 1: Assemble the Battery Holders
Mount the Battery Holders:
Mount both battery holders on the robot chassis using screws and nuts.Solder the cables of the two holders in series, so that the 8 batteries are connected in a series configuration, resulting in a total of 12V.
Step 2: Install the Switch
Add the Switch:
Solder one side of the switch to the positive terminal of the battery series.Secure the switch on the chassis in an easily accessible location.
Step 3: Prepare the DC Motors
Attach the DC Motors:
Solder wires to the terminals of the DC motors.Mount the two DC motors on the left and right sides of the chassis using screws and nuts.
Step 4: Prepare the Arduino Mount
Prepare the 3D-Printed Arduino Mount:
Heat the inserts with a soldering iron and press them into the corresponding holes in the 3D-printed mount.
Step 5: Attach the Arduino Mount
Mount the Arduino Holder:
Secure the 3D-printed mount onto the chassis using screws.Place the Arduino microcontroller onto the holder and secure it with screws.Insert the Arduino motor shield into the Arduino microcontroller, ensuring all pins are properly aligned.
Step 6: Install the Servo Motor
Attach the Servo Motor Mount:
Use double-sided tape to attach the 3D-printed servo motor mount to the chassis.Insert the SG90 servo motor into the mount and secure it.
Step 7: Install the Ultrasonic Sensor
Attach the Ultrasonic Sensor:
Insert the HC-SR04 ultrasonic sensor into its 3D-printed holder.Secure the holder onto the servo motor using screws.
Step 8: Mount the Support Wheel
Install the Support Wheel:
Attach the support wheel to the chassis using the appropriate screws.
Step 9: Attach the Wheels
Attach the Wheels:
Secure the wheels onto the DC motors on the left and right sides.
Step 10: Wiring the Components
Connect the Components:
DC Motors: Connect the left motor to terminals A- and A+ on the motor shield, and the right motor to terminals B- and B+.Servo Motor: Connect the signal wire to pin 5 on the Arduino. Connect the VCC and GND to the (5V) 3,3V and GND pins on the motor shield.Ultrasonic Sensor: Connect the Trigger pin to pin 7 and the Echo pin to pin 6 on the Arduino. Connect VCC and GND to 5V and GND on the motor shield.Power Supply: Connect the positive terminal from the switch to the motor shield’s power terminal. Ensure the ground is connected properly.
Step 11: Insert the Batteries
Insert the AA Batteries:
Place the 8 AA rechargeable batteries into the holders.
Arduino Programming for an Obstacle Avoiding Robot Car
Here is the complete code for controlling the obstacle avoiding car using arduino. The code initializes the servo motor and ultrasonic sensor and controls the motors based on the distance to the nearest obstacle.

/*
* This code controls a robot with ultrasonic sensors and servo motors to avoid obstacles.
*/
#include
// Create a Servo object to control the servo motor
Servo myservo;
int pos = 0; // Variable to store the servo position
// Define motor pins
int directionA = 12; // Pin for direction of Motor A
int speedA = 3; // Pin for speed of Motor A
int brakeA = 9; // Pin for brake of Motor A
int directionB = 13; // Pin for direction of Motor B
int speedB = 11; // Pin for speed of Motor B
int brakeB = 8; // Pin for brake of Motor B
// Define ultrasonic sensor pins
int trigger = 7; // Trigger pin
int echo = 6; // Echo pin
long duration = 0; // Variable to store the duration of the echo
long distance = 0; // Variable to store the distance from the obstacle
int currentAngle = 90; // Start with the sensor facing forward
int scanDirection = 1; // 1 for right, -1 for left
void setup() {
// Attach the servo on pin 5 to the servo object
myservo.attach(5);
// Set the trigger pin as OUTPUT and the echo pin as INPUT
pinMode(trigger, OUTPUT);
pinMode(echo, INPUT);
// Initialize Motor A pins
pinMode(directionA, OUTPUT);
pinMode(directionB, OUTPUT);
pinMode(brakeA, OUTPUT);
pinMode(brakeB, OUTPUT);
// Apply brakes (stop the motors)
digitalWrite(brakeA, HIGH);
digitalWrite(brakeB, HIGH);
// Set the servo to the center position initially
myservo.write(90);
delay(500);
}
void loop() {
// Measure the distance to the nearest obstacle
distance = measureDistance();
if (distance < 40) {
// Gradually reduce speed as the obstacle approaches
int speed = map(distance, 20, 40, 75, 128);
motorTurn(directionA, speedA, HIGH, speed);
motorTurn(directionB, speedB, HIGH, speed);
if (distance < 15) {
// Stop the motors
digitalWrite(brakeA, HIGH);
digitalWrite(brakeB, HIGH);
delay(500);
// Check surroundings
int leftDistance = checkDirection(175);
int rightDistance = checkDirection(5);
// Determine if the robot is in a dead end
if (leftDistance < 15 && rightDistance < 15) {
// Move backward
motorTurn(directionA, speedA, LOW, 128);
motorTurn(directionB, speedB, LOW, 128);
delay(500);
// Apply brakes
digitalWrite(brakeA, HIGH);
digitalWrite(brakeB, HIGH);
delay(500);
// Scan again after moving back
leftDistance = checkDirection(30);
rightDistance = checkDirection(150);
}
// Determine the best direction to turn
if (leftDistance > rightDistance) {
// Turn left
motorTurn(directionA, speedA, LOW, 128);
motorTurn(directionB, speedB, HIGH, 128);
} else {
// Turn right
motorTurn(directionA, speedA, HIGH, 128);
motorTurn(directionB, speedB, LOW, 128);
}
delay(500);
// Apply brakes
digitalWrite(brakeA, HIGH);
digitalWrite(brakeB, HIGH);
delay(500);
// Set the servo back to the center position
myservo.write(90);
delay(500);
}
} else {
// Move forward at a reduced speed
motorTurn(directionA, speedA, HIGH, 100);
motorTurn(directionB, speedB, HIGH, 100);
// Continuously scan left and right
currentAngle += scanDirection * 10;
if (currentAngle >= 150 || currentAngle <= 30) {
scanDirection = -scanDirection;
}
myservo.write(currentAngle);
delay(40); // Adjusted delay for more realistic servo movement
}
}
// Function to set the direction and speed of motors
void motorTurn(int directionPin, int speedPin, int direction, int speed) {
digitalWrite(directionPin, direction);
analogWrite(speedPin, speed);
if (directionPin == directionA) {
digitalWrite(brakeA, LOW);
} else {
digitalWrite(brakeB, LOW);
}
}
// Function to measure the distance using the ultrasonic sensor
int measureDistance() {
digitalWrite(trigger, LOW);
delayMicroseconds(2);
digitalWrite(trigger, HIGH);
delayMicroseconds(10);
digitalWrite(trigger, LOW);
duration = pulseIn(echo, HIGH);
distance = (duration / 2) / 29.1;
return distance;
}
// Function to check the distance in a specific direction
int checkDirection(int angle) {
myservo.write(angle);
delay(500); // Give the servo time to move
int measuredDistance = measureDistance();
return measuredDistance;
}
Explanation of the Code
This Arduino code controls a robot equipped with DC motors, a servo motor, and an ultrasonic sensor to navigate and avoid obstacles.
Components and Pin Configuration:
Servo Motor: Controlled via pin 5.
DC Motors: Direction and speed controlled via pins 12, 3, 9 (Motor A) and 13, 11, 8 (Motor B).
Ultrasonic Sensor: Trigger and Echo pins connected to pins 7 and 6 respectively.
Setup Function:
Servo Initialization: The servo motor is attached to pin 5 and set to the center position (90 degrees).
Pin Modes: Motor direction and brake pins are set as outputs, and the ultrasonic sensor pins are configured for output (trigger) and input (echo).Initial State: The motors are braked to stop movement.
Loop Function:
Distance Measurement: The ultrasonic sensor measures the distance to the nearest obstacle.
Obstacle Avoidance:If an obstacle is detected within 40 cm, the robot slows down proportionally as it approaches the obstacle.If the distance is less than 15 cm, the robot stops and checks the distances to the left (175 degrees) and right (5 degrees).If both sides have obstacles within 15 cm, the robot moves backward briefly and scans again.Based on the scanned distances, the robot decides to turn left or right, whichever direction has more space.After turning, the servo is reset to the center position (90 degrees).
Continuous Scanning:
When no immediate obstacle is detected, the robot moves forward while the servo motor continuously scans left and right between 30 and 150 degrees, adjusting the scan direction dynamically.
Helper Functions:
motorTurn: Controls the direction and speed of the specified motor.
measureDistance: Triggers the ultrasonic sensor and calculates the distance to an obstacle based on the echo time.
checkDirection: Rotates the servo to a specified angle, measures the distance in that direction, and returns the measured distance.
This setup ensures the robot moves forward, avoids obstacles dynamically by scanning its environment, and makes decisions based on the detected distances to navigate effectively.
Final Steps for Assembly and Testing of an Obstacle Avoiding Robot Car
Upload the Code: Upload the code to the Arduino.Power the Robot: Ensure all components are connected and the external power supply is attached.Observe the Behavior: The car should move forward until an obstacle is detected, then change direction to avoid the obstacle.
More about Arduino Motor Shield

The Arduino Motor Shield simplifies motor control with a plug-and-play approach, providing an easy interface for connecting DC motors to your Arduino.
Key Features:
Controls two DC motors or one stepper motorHandles high currents (up to 2A per channel)Supports PWM for speed control
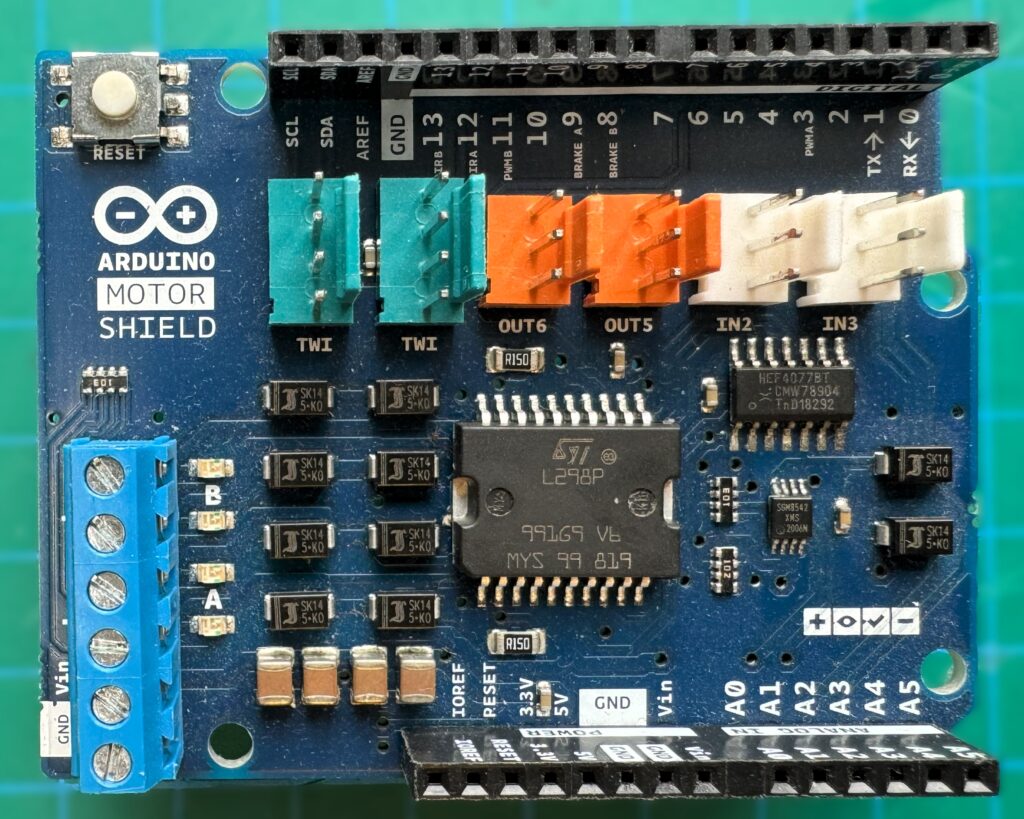
Connections:
Motor Terminals (A+, A-, B+, B-): Connects to the motor wires.Power Supply (Vin, GND): External power supply for the motors.Control Pins (DIR A, DIR B, PWM A, PWM B): Control motor direction and speed.
Conclusion
Building an obstacle avoiding car using arduino and a L293D motor shield is an excellent project for understanding motor control, servo motors, and sensor integration. This project can be expanded by adding more sensors or by extending the obstacle avoidance algorithm for more complex navigation. By following these steps and using the code provided, you can successfully create a working robot car capable of navigating its environment and avoiding obstacles.


