
[FireBeetle 2 ESP32 P4 Development Kit] Home Assistant IoT Thermometer

This article presents the project design of DFRobot FireBeetle 2 ESP32 P4 Development Kit for an IoT remote thermometer, which collects temperature data via ADC and uploads it to the Home Assistant platform through MQTT protocol and WiFi module.
It covers development environment setup, hardware connections, project testing, flowcharts, code, MQTTX testing, HA testing, and operational demonstrations.
Project Introduction
Environment Setup: Docker, EMQX, HA deployment, MQTT configuration;
Project Testing: Flowcharts, MicroPython code, MQTTX communication testing;
HA Testing: Configuration files, dashboard card design, temperature display;
Environment Setup
Includes Docker, EMQX, HA deployment, MQTT communication configuration, etc.
Docker Installation
Download and install Docker Desktop software;
Mirror Source Replacement
To facilitate subsequent EMQX and HA platform deployment, add mirror sources to accelerate downloads.
Settings → Docker Engine

{
  "builder": {
    "gc": {
      "defaultKeepStorage": "20GB",
      "enabled": true
    }
  },
  "debug": true,
  "experimental": false,
  "insecure-registries": [
    "registry.docker-cn.com",
    "docker.mirrors.ustc.edu.cn"
  ],
  "registry-mirrors": [
    "https://docker.registry.cyou",
    "https://docker-cf.registry.cyou",
    "https://dockercf.jsdelivr.fyi",
    "https://docker.jsdelivr.fyi",
    "https://dockertest.jsdelivr.fyi",
    "https://mirror.aliyuncs.com",
    "https://dockerproxy.com",
    "https://mirror.baidubce.com",
    "https://docker.m.daocloud.io",
    "https://docker.nju.edu.cn",
    "https://docker.mirrors.sjtug.sjtu.edu.cn",
    "https://docker.mirrors.ustc.edu.cn",
    "https://mirror.iscas.ac.cn",
    "https://docker.rainbond.cc",
    "https://do.nark.eu.org",
    "https://dc.j8.work",
    "https://dockerproxy.com",
    "https://gst6rzl9.mirror.aliyuncs.com",
    "https://registry.docker-cn.com",
    "http://hub-mirror.c.163.com",
    "http://mirrors.ustc.edu.cn/",
    "https://mirrors.tuna.tsinghua.edu.cn/",
    "http://mirrors.sohu.com/"
  ]
}
Select Apply to confirm.
HA Deployment
Open the command line terminal and execute:
docker pull homeassistant/home-assistant:latest
Wait for the HA image download to complete.
Create a homeassistant folder in the root directory, then generate a docker-compose.yaml file with the following configuration:
version: '3'
services:
  homeassistant:
    image: homeassistant/home-assistant:latest
    container_name: homeassistant
    restart: always
    volumes:
      - /data/homeassistant/config:/config
    environment:
      - TZ=Asia/Shanghai
    ports:
      - "8123:8123"
Save the file, open the terminal in this directory, and execute the command docker compose up -d to complete HA container creation.
Go to the Containers page, click the homeassistant port link, access the HA web interface, create an account and log in.
EMQX Deployment
With the software mirror source added, execute the following command in terminal:
docker pull emqx/emqx:latest
to download the latest emqx image.
Execute the command:
docker run -d --name emqx -p 1883:1883 -p 8083:8083 -p 8084:8084 -p 8883:8883 -p 18083:18083 emqx/emqx:latest to create and run the emqx container.
If port conflict errors occur, delete the existing emqx container, go to the Images tab, click the launch button for the emqx/emqx image, and manually configure container name, Host ports and other parameters. Enter 0 for ports to let the system randomly assign available ports.

Configure EMQX
(1) Go to the Containers page, click the emqx port link to access the EMQX web interface. Default login: username admin, password public.
(2) Navigate to Access Control → Client Authentication → Create → Password-Based → Built-in Database (default settings) → Create.
(3) Under User Management, select Add User and set a custom username and password.
MQTT
(1)In the command terminal, enter ipconfig to retrieve the local computer's IPv4 address, such as 192.168.31.160
(2)Configure Home Assistant by sequentially navigating through: Settings → Devices & Services → Add Integration → Search for MQTT → Fill in broker information. Broker field: Input the computer's IP address. Port: 1883. Username and Password: Use the credentials created in EMQX
(3)Access the HA directory, open the configuration.yaml configuration file, and add the temperature sensor device
mqtt:
  sensor:
    - name: "Temperature"
      state_topic: "esp/adc/temp"
      suggested_display_precision: 1
      unit_of_measurement: "°C"
      value_template: "{{ value_json.temperature }}"
Save changes and reload configuration to apply modifications.
(4) Navigate to the HA Overview page to view the newly added sensor card and Temperature entry.
Hardware Connections
This project uses onboard ADC0 corresponding to pin GPIO16;
Type-C data cable connects via USB-CDC for debugging and power supply.
Project Testing
Includes flowchart, project code, MQTTX testing, HA testing, etc.
Flowchart
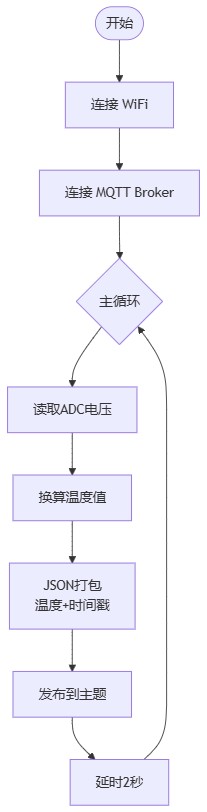
From top to bottom is as follows:
1.Start
2.Connect WiFi
3.Connect MQTT Broker
4.Main Loop
5.Read ADC Voltage
6.Convert to Temperature
7.JSON Package (Temperature + Timestamp)
8.Publish to Topic
9.Delay 2 Seconds
Project Code
Connect the development board to the computer using a data cable.
Run Thonny IDE software, configure the interpreter and device port, create a new file, and add the following code:
#!/usr/bin/env python3
# main.py
import json
import network
import time
import random
from machine import ADC, Pin
from umqtt.simple import MQTTClient

# ========== User Configurable Area ==========
WIFI_SSID = "xxx"
WIFI_PASS = "xxx"
ADC_PIN   = 16            # ESP32-P4 ADC0 pin
MQTT_SERVER = "192.168.31.160"
MQTT_PORT   = 32768
MQTT_CLIENT_ID = 'micropython-client-{id}'.format(id=random.getrandbits(8))
MQTT_USER   = "xxx"
MQTT_PASS   = "xxx"
PUB_TOPIC   = "esp/adc/temp"
PUB_INTERVAL = 2         # Publish interval (seconds)
# ===========================================

def wifi_connect(ssid, pwd):
    sta = network.WLAN(network.STA_IF)
    sta.active(True)
    if not sta.isconnected():
        print("Connecting Wi-Fi...")
        sta.connect(ssid, pwd)
        for _ in range(20):
            if sta.isconnected():
                break
            time.sleep(1)
    print("Wi-Fi connected:", sta.ifconfig())

# --------------- Temperature Conversion ---------------
def read_temperature():
    """
    Linear conversion:
    Reference voltage 3.3V, temperature sensor outputs 10 mV/°C
    """
    adc = ADC(Pin(ADC_PIN))
    adc.atten(ADC.ATTN_11DB)       # 0-3.3V range
    raw = adc.read()
    volt = raw / 4095 * 3.3        # ADC voltage
    temp = (volt - 1.4) * 100      # Temperature calculation
    return round(temp, 1)

# --------------- MQTT Connection ---------------
def mqtt_connect():
    c = MQTTClient(MQTT_CLIENT_ID, MQTT_SERVER, MQTT_PORT,
                   MQTT_USER, MQTT_PASS)
    c.connect()
    print("[MQTT] Connected to", MQTT_SERVER)
    return c

def mqtt_publish(client, data: dict):
    payload = json.dumps(data)
    client.publish(PUB_TOPIC, payload)
    print("[MQTT] Sent ->", payload)

# --------------- Main Function ---------------
def main():
    wifi_connect(WIFI_SSID, WIFI_PASS)  # Connect WiFi
    client = mqtt_connect()
    while True:
        temp = read_temperature()
        mqtt_publish(client, {"temperature": temp})
        time.sleep(PUB_INTERVAL)

if __name__ == "__main__":
    main()
Save the code and execute it.
The terminal will display WiFi connection status and MQTT message publication detail.

MQTTX Testing
Download and install MQTTX software;
Create a new connection, input local computer IP address, port number, MQTT Broker username, password, etc.;
Run the connection, add subscription topic esp/adc/temp to monitor messages;

HA Testing
Based on the added MQTT integration device in HA, real-time temperature updates can be obtained under Overview → Sensors.

Additionally, by integrating with the HA smart mobile app platform, real-time temperature data can be accessed remotely.
Summary
This article presented the project design of an IoT remote thermometer using the DFRobot FireBeetle 2 ESP32 P4 Development Kit, which collects temperature data via ADC and uploads it to the Home Assistant platform through MQTT protocol and WiFi module. The implementation serves as a reference for the development and application of this board in IoT solutions.
Original article by Makelog. Unauthorized reproduction prohibited.
Original text:【FireBeetle 2 ESP32 P4 开发套件】Home Assistant 物联网温度计- Makelog(造物记)


