
An air quality monitoring station that reports the PM2.5 density in the air, the Air Quality Index (AQI) via MQTT.
Things used in this project
Hardware components
Software apps and online services
Particle IDE
Story
One thing about having to live in a city is to watch out for the air quality, a more beautiful phrase for air pollution.
There are a lot of things inside the air that affect its overall quality. Pollutant is one of those things. There are different kind of pollutants in the air, including natural and man-made ones. Some of these pollutants reacts in the atmosphere to form small particles of different sizes. These particles are referred to as particulate matters (PM). Particles smaller than 10 micrometers pose health concerns because they can be inhaled and accumulated in our body. This kind of fine particles comes form many different sources but mainly is from cigarette, combustion engines or industrial process including burning of coal. Particularly particles that are smaller than 2.5 micrometers (PM2.5), they are believed to poses the greatest risk to health because of their small size thus easy to get lodged deeply into our lungs.
I decided to build a monitor to check the amount of the PM2.5 particles in the air, and to see how much deviation between the place that I am staying at and the Gov reported values.
So, the first thing I need to found is a decent sensor that can sense the PM2.5 particles.
Dust Sensor
Looking around the Internet there are quite a few different choices, many of them although labelled by the re-seller can detect PM2.5, upon checking the datasheets, some of them can only detect PM10 or bigger. There are, however, quite a number of them that could go down to PM2.5 or less, including the DFRobot SKU:SEN0177, Novafitness SD011, Dylos DC1100, Sharp DN7C3CA006, plus a few more others.
I finally settled down with the latest from Sharp, the DN7C3CA006, a dust sensor module that is capable to detect the amount of PM2.5 particles in the air – a PM2.5 sensor module. This module has a special unique design called a Virtual Impactor that separate the PM2.5 particles from the air for precise measurement, according to a source in Sharp.
This module output an analog signal representing the density of PM2.5 in the air. The sensitivity is 1V±15%/(100µg/m³), which is pretty good for air quality checking.
A fan is integrated into this module as part of the Virtual Impactor design. When measuring the dust amount, this fan needed to be turned on.
The actual measuring is done by lighting up an Internal LED briefly, the small dust particles in the air will reflect some of this light to the pick up unit, where the internal circuit and logic then convert the reading of the pick up unit into a voltage at the Vo pin. It is then up to the external processing to read this voltage and perform the Vo → µg/m³ conversion.
To start measuring, the fan needed to be turned on, then followed by the LED. The LED is supposed to be lit using a 10ms measuring pulse train with 0.32ms pulse width. The sampling shall be done 0.28ms after the start of the measuring pulse.
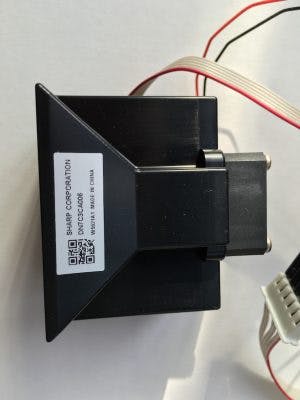
Sharp Dust Sensor
Effects by Temperature and Humidity
The dust sensor output does require some adjustment according to the temperature and especially humidity of the environment. It is because the dust particles in the air will become bigger after absorbing the moisture, therefore, when the air become humid, the output needed to be tuned down a bit to accommodate the changes in the size of the particulates.
The equation to adjust the reading according to the manufacturer's manual is:
PM2.5 level (μg/m3) = α × β ×(Vo[mV] – Vs[mV])
where β = {1 – 0.01467 (h-50)} if h>50, or
β = 1 if h <= 50
h is the relative humidity in percentage.
α is the conversion factor in true environment, the value of 0.6 is recommended.
Also, the reference output voltage changes according to the temperature of the module, the linear characteristics of the changes is also provided in the manual. The change is approximately 0.6V over a temperature range of 50ºC.
Temperature & Humidity Sensor
The usual, easy to use and accurate temperature & humidity sensor, SI7021, would be suitable to be used to get accurate temperature and humidity readings.
SI7021 uses I²C interface to communicate with the processor. It has an accuracy of ±0.3ºC over a wide range of temperature, and a 4ms conversion time for a 14-bit accuracy. It also has a peak operation current of 3mA and when in standby, consumes only 0.06µA.
Hooking up the SI7021 is extremely easy since it uses an I²C interface to talk to the MCU. The SI7021 library accessible through the Particle IDE is the easiest way to get the temperature and relative humidity readings from the module.
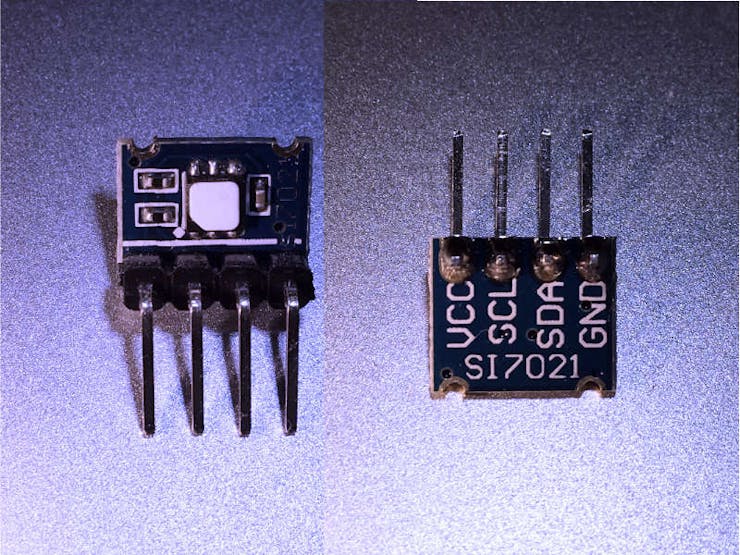
Sensor Module using the Silicon Labs SI7021 (Front and Back)
The Processor
The processor of choice, is still the Particle Photon. Not only that I have a few lying around ready to use but also its stability and capacity. Not that being a air-quality monitor requires a lot of processing power. It is just that comparing to other processors that I have, such as the NodeMCU, it’s cost and performance ratio is far better, especially the stability. Secondly, it’s RTOS does have advantage over other platforms such as those using OpenWRT. As according to the manual, the DN7C3CA006 does require some specific timing of 0.32±0.02ms pulse width for the LED used to measure the dust amount.
The output of the dust sensor is an analog signal, this signal is then picked up by the analog input of the Particle Photon. However, before doing this, since the maximum output voltage (Max Vo) of the DN7C3CA006 is 4.7V, and that the maximum input voltage of the Photon is 3.6V (ADC full scale is 3.3V), we have to reduce the output voltage a bit so that not only the output is suitably scales but also the Particle Photon input is protected. A voltage divider is then used as shown in the schematic below.
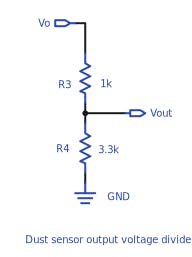
Dust sensor output divider
Messaging
The measured PM2.5, temperature and relative humidity, the calculated AQI values were send together as a JSON package to a MQTT broker where other subscribers on the network would get notified when there is data updated.
Same as other sensor device installations, a READY message will be published via a different MQTT topic when the device come online.
It also subscribes to a certain MQTT topics, such as fanOn, fanOff and measure to turn on/off the fan, and to start the measurement.
The NodeRed flow is modified to cater for this new AQI addition and the Web Interface, based on jQuery, is also changed to accommodate the AQI information. For more details about my using the NodeRed and MQTT, please see my other projects here at Hackster.io
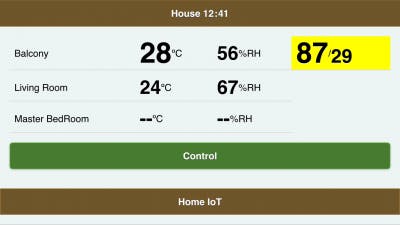
Web Interface
Both the AQI and the PM2.5 readings are stored in the local MongoDB. The plan is to also update it to Thingspeak for better graphing and analytic purpose.
Schematic Diagram
Following is the schematic diagram of the 4th generation of my Weather Station. Note the fly-back diode used to protect the reverse voltage during turning on and off the fan, as well as the de-noise capacitors used. The fly-back diode is especially important, you must not skip this.
There are also two supply voltages used, 5V and 3.3V. The dust sensor uses 5V all-around and the temperature sensor uses 3.3V. The Particle Photon can supply both these voltages from its pins and since the fan only take 140mA when operating, it is well within the capacity of the Photon's onboard power unit.
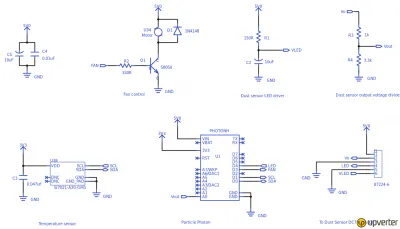
Schematic diagram of the Weather Station with AQI
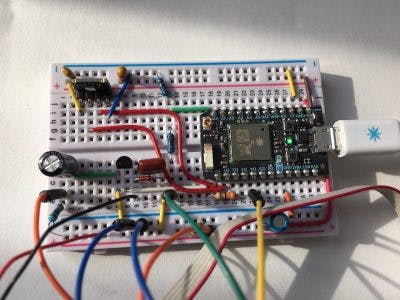
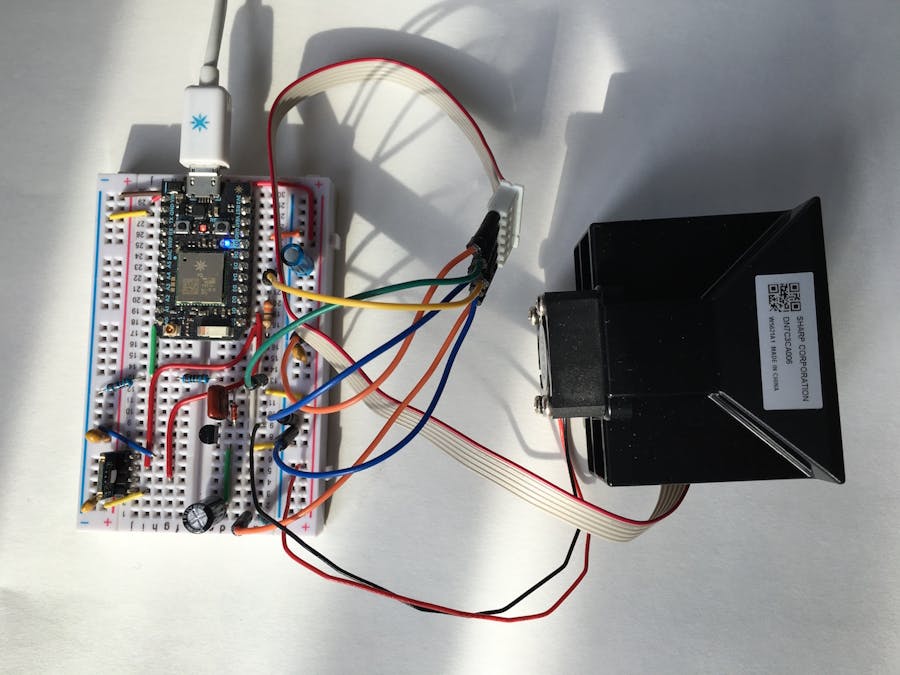
Working Prototype
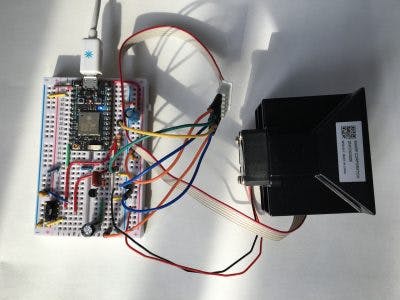
Weather Station v4 and the Sharp Dust Sensor
Source Code
Source code can be found here in my GitHub repository. Source code involve the use of the SI7021 Arduino library which is Copyright (C) 2014 by Jakub Kaminski.
The source code is provided as is with no warranty. The AQI value calculated from the output of the Sharp dust sensor gives only an approximate indication of the air pollution and must not be treated as an accurate, authentic reading. The set up described here is only a hobby setup, it must not be used directly in a production environment or applications areas that require reliability, accuracy and stability. The author is not responsible to any damage caused directly or indirectly from anything that is built in whole or in part by following the instructions given here. If you do not agree to the above, discard everything here and leave now.
//Ed


