
You can use it as remote switch, anti theft beacon, counter, movement detector and so on.
Things used in this project
Hardware components
Software apps and online services
Story
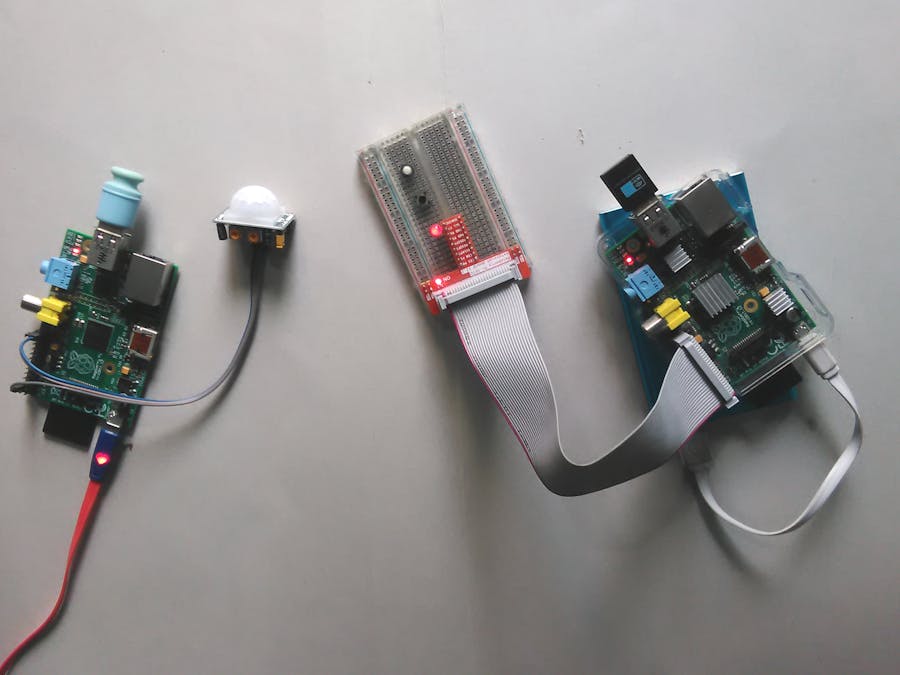
First, I would like to thank Amazon for announcing AWS IoT, a great environment for Internet of Things. After three weeks experiment I have successfully implemented my project with AWS IoT. Actually, I am thinking to make a Motion control IoT button which can be used to detect movement or thief from remote place and I was inspired by Amazon IoT button. Finally, I made it by Raspberry Pi and Amazon AWS IoT. I used PIR sensor for detecting the movement. Raspberry Pi is used here as a gateway which transmit a message to AWS using MQTT protocol. AWS IoT is working as a MQTT broker. Another Raspberry Pi is used as MQTT subscriber. When publisher publish message to a specific topic after detecting any movement MQTT broker( AWS IoT) transmit it to subscriber. According to received message subscriber (Raspberry Pi) implement predefined action. Action may be an alert or switching any light or camera etc. System also sends notification email or sms to your email address or phone number using Amazon SNS service.
Before going to the main task I want to give a brief introduction about mqtt protocol and PIR sensor.
MQTT protocol: MQTT is a machine-to-machine (M2M) / "Internet of Things" connectivity protocol. It was designed as an extremely lightweight publish/ subscribe messaging transport. It is useful for connections with remote locations where a small code footprint is required and/or network bandwidth is at a premium. -- mqtt.org
MQTT protocol uses a publish/subscribe architecture in contrast to HTTP with its request/response paradigm. Publish/Subscribe is event-driven and enables messages to be pushed to clients. The central communication point is the MQTT broker, it is in charge of dispatching all messages between the senders and the rightful receivers. Each client that publishes a message to the broker, includes a topic into the message. The topic is the routing information for the broker. Each client that wants to receive messages subscribes to a certain topic and the broker delivers all messages with the matching topic to the client. Therefore the clients don’t have to know each other, they only communicate over the topic. This architecture enables highly scalable solutions without dependencies between the data producers and the data consumers.
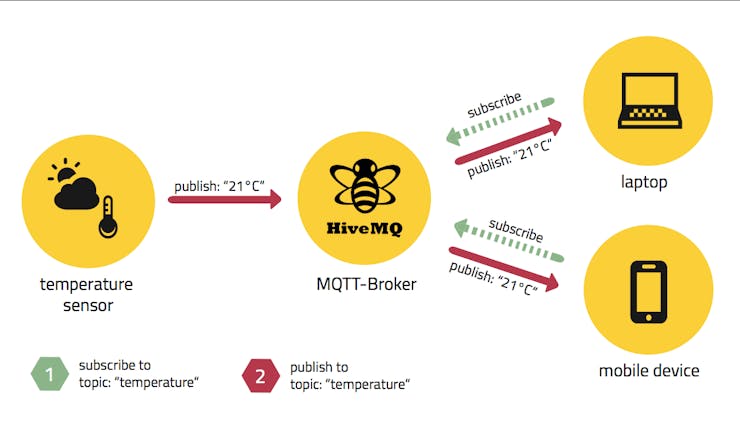
MQTT Publish/Subscribe Architecture (taken from hivemq.com)
Details of MQTT is available here: www.hivemq.com
PIR Sensor: PIR-based motion detector (PID) or a passive infrared sensor (PIR sensor) is an electronic sensor that measures infrared (IR) light radiating from objects in its field of view. They are most often used in PIR-based motion detectors. When a warm body like a human or animal passes by, it first intercepts one half of the PIR sensor, which causes a positive differential change between the two halves. When the warm body leaves the sensing area, the reverse happens, whereby the sensor generates a negative differential change. These change pulses are what is detected.
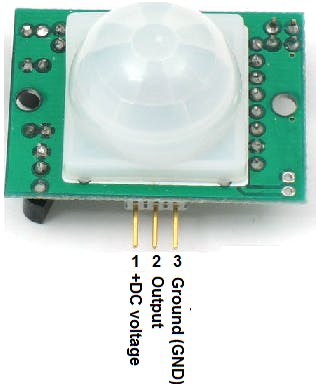
PIR motion sensor pin out
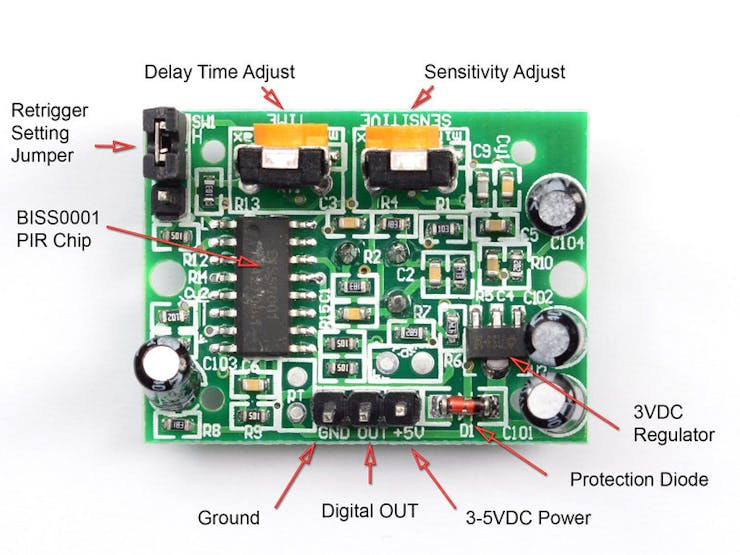
PIR sensor details
I hope you understand about MQTT and PIR Sensor. Now it is the time to start working:
Setup AWS IoT
All services in AWS are delivered via a rich set of REST APIs. You can use a service programmatically through the APIs by leveraging one of the many SDKs. You can use AWS cli. Alternatively, you can invoke services through the web-based AWS Management Console. To build my AWS environment, we will invoke AWS Management console. But keep in mind that every step we perform today can be done completely programmatically, which is one of the many reasons why the AWS cloud is so powerful. Follow the steps:
1. Create an AWS account from the link: http://aws.amazon.com/
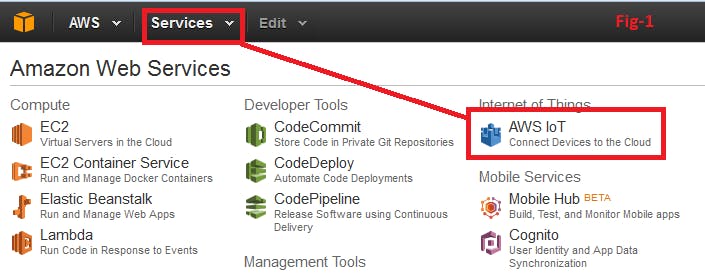
2. Sign in to AWS Management console and from the Services select AWS IoT (Fig-1)
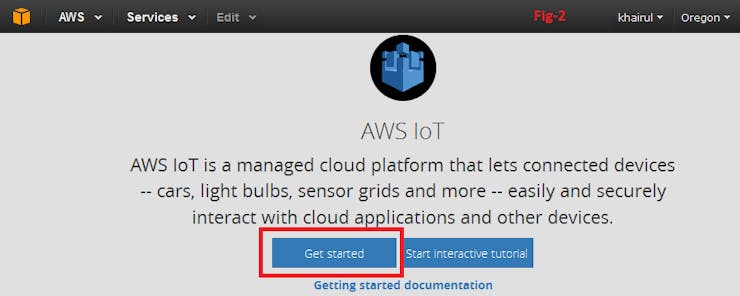
a. Click on Get Started (Fig-2)
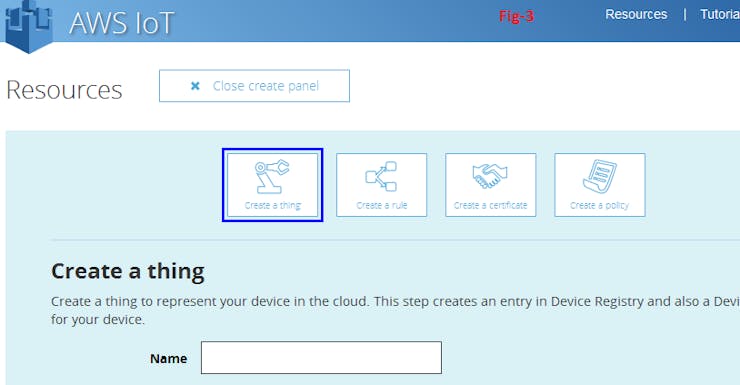
b. Click on Create a thing
c. Type a thing name (e.g. raspberry) & click to Create
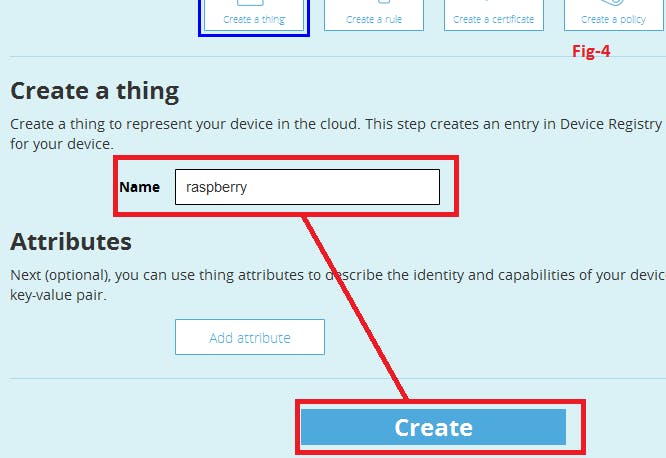
A thing named raspberry will be created (Fig-5)

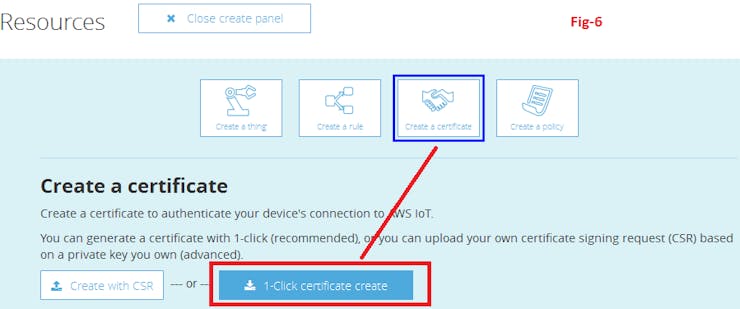
d. Now, click to Create a certificate & then click 1-Click certificate create (Fig-6)
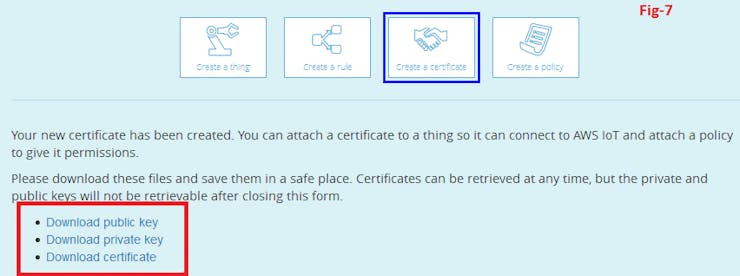
e. Download all the keys & certificates, it will be required for connection with AWS IoT (Fig-7)
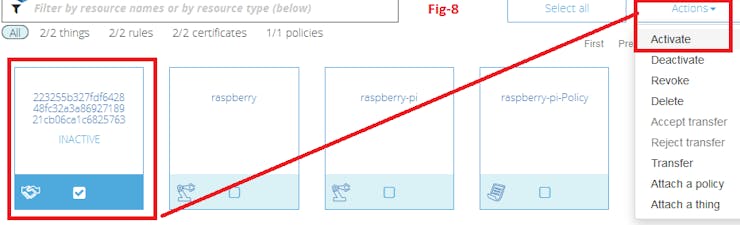
f. To activate already created certificate, select particular certificate and then Activate it from the Actions menu (Fig-8).
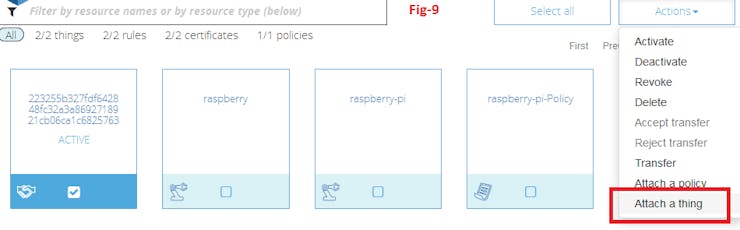
g. Now, you need to attach the thing to the certificate. To do it select the certificate and then Attach a thing from the Actions menu (Fig-9).
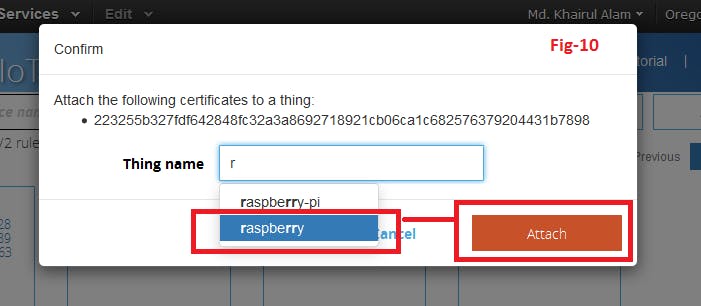
Type the thing name and click attach (Fig-10)
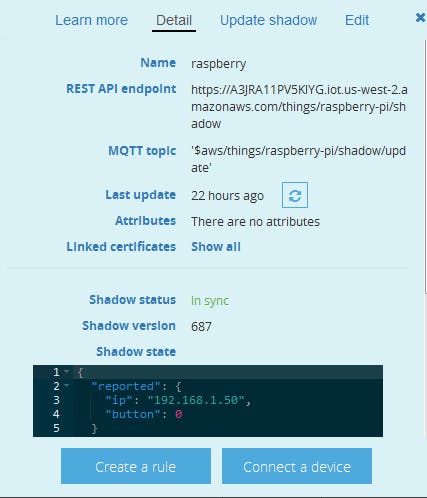
h. You can see details of thing on the right side as in screenshot by clicking on the thing name.

caption (optional)
AWS IoT is now ready for our project. Now, it is the time to connect Raspberry Pi to AWS IoT.
Setup publisher
3. Download the ready script i.e. "sensor-client.js" from the link: https://github.com/taifur20/aws-iot-project and modify myThingName, replace keyPath, certPath, and caPath with your own path of downloaded keys.You can follow the steps given below:
i. Create a directory to /home/pi of Raspberry Pi & named as aws-iot.
ii. Rename private key & certificate as private-key.pem & cert.pem respectively.
iii. Copy the files to aws-iot directory. You can use Filezila.
iv. Download the root CA certificate from the link and save it as rootCA.pem. Copy it to aws-iot directory.
v. Modify the code snippet of sensor-client.js as follow:
var myThingName = 'raspberry';

var thingShadows = awsIot.thingShadow({
   keyPath: './private-key.pem.key',
  certPath: './cert.pem.crt',
    caPath: './rootCA.pem',
  clientId: myThingName,
    region: 'us-west-2'
});
vi. Upload or copy it to aws-iot directory of raspberry pi.
vii. To initiate publishing to the topic (i.e. topic/test) run the script you just created “sensor-client.js” using
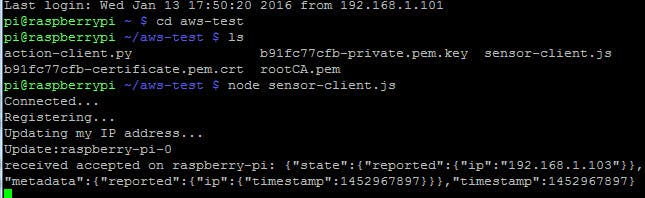
node sensor-client.js
If everything works well then you should be able to see the status of device on IoT console
.
caption (optional)
Raspberry pi terminal will show following result
That's it! Your Raspberry pi is connected to AWS IoT.
Setup subscriber
Set up your another pi as message receiver, which will receive the published message by the sensor-client.
i. Download the ready script i.e. action-client.py from the link and modify the code snippet accordingly:
client.tls_set(ca_certs='rootCA.pem', certfile='cert.pem.crt', keyfile='private-key.pem.key', tls_version=ssl.PROTOCOL_SSLv23) client.tls_insecure_set(True) client.connect("your API endpoint", 8883, 60)
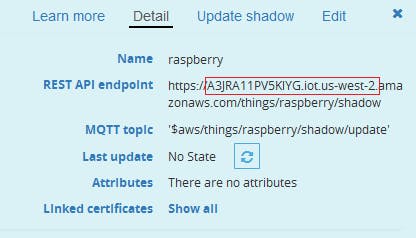
You can get API endpoint from details of your thing.
ii. Copy all the key files and action-client.py to a directory of raspberry pi and type the command from the terminal
sudo python action-client.py
Congratulation! Your project is ready to experiment. Move your hand above the PIR sensor and observe your subscriber.
If you want to keep track of movement you can use DynamoDB.
Setup AWS SNS
To setup AWS SNS you can follow my another tutorial (AWS Emergency Notifier) where complete instruction about AWS SNS setup was illustrated with details image.

SNS E-mail notification
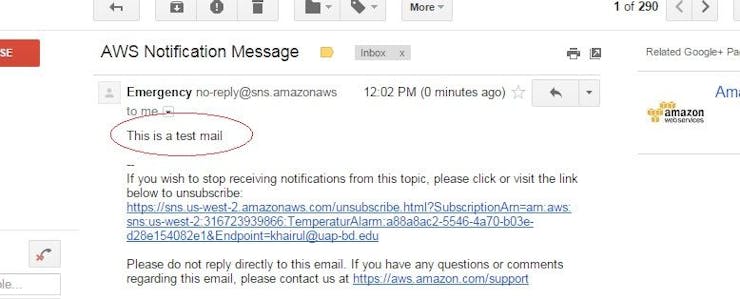
Test E-mail
Setup DynamoDB (Optional)
Create a rule as like as figure from the create panel
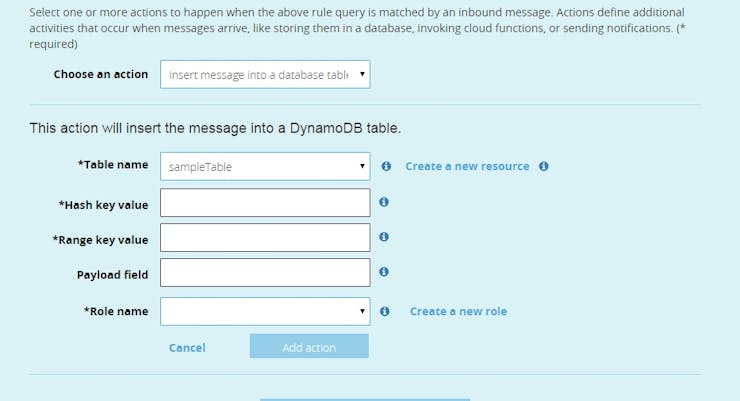
Fill up it as following figure

And enjoy it
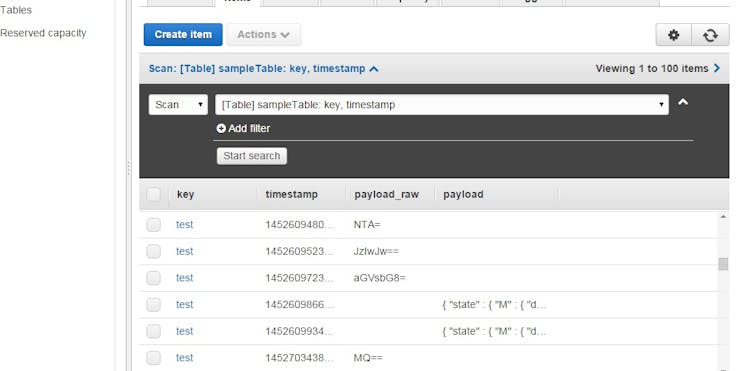
DynamoDB data items
Data is saved as json format.
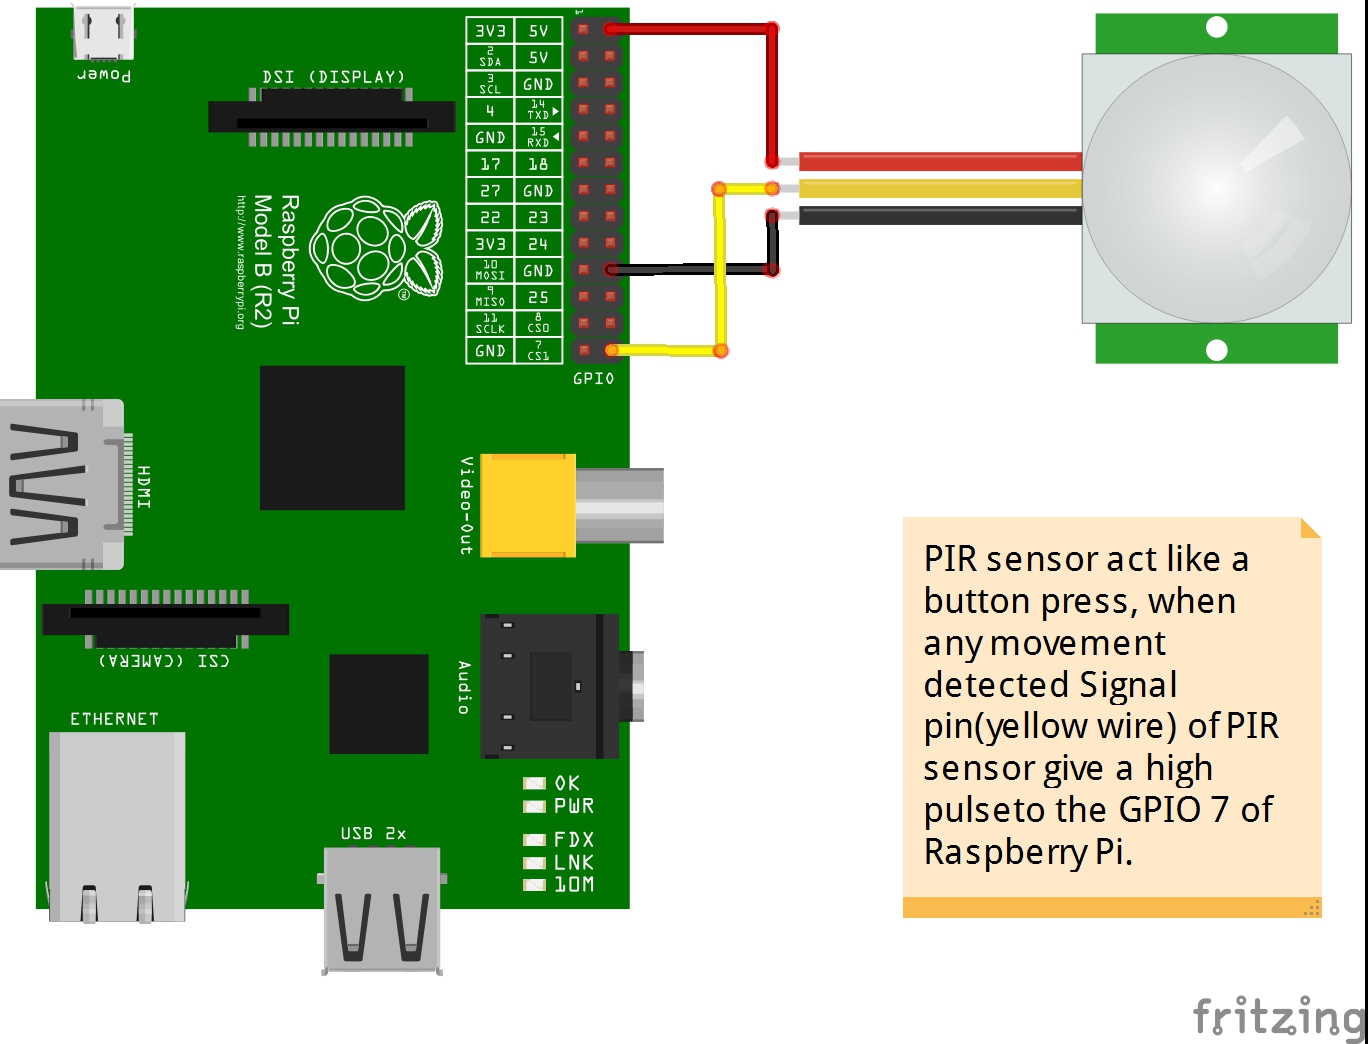
Schematics
PIR Connection to Raspberry Pi
Fritzing source file
Beacon connection-image
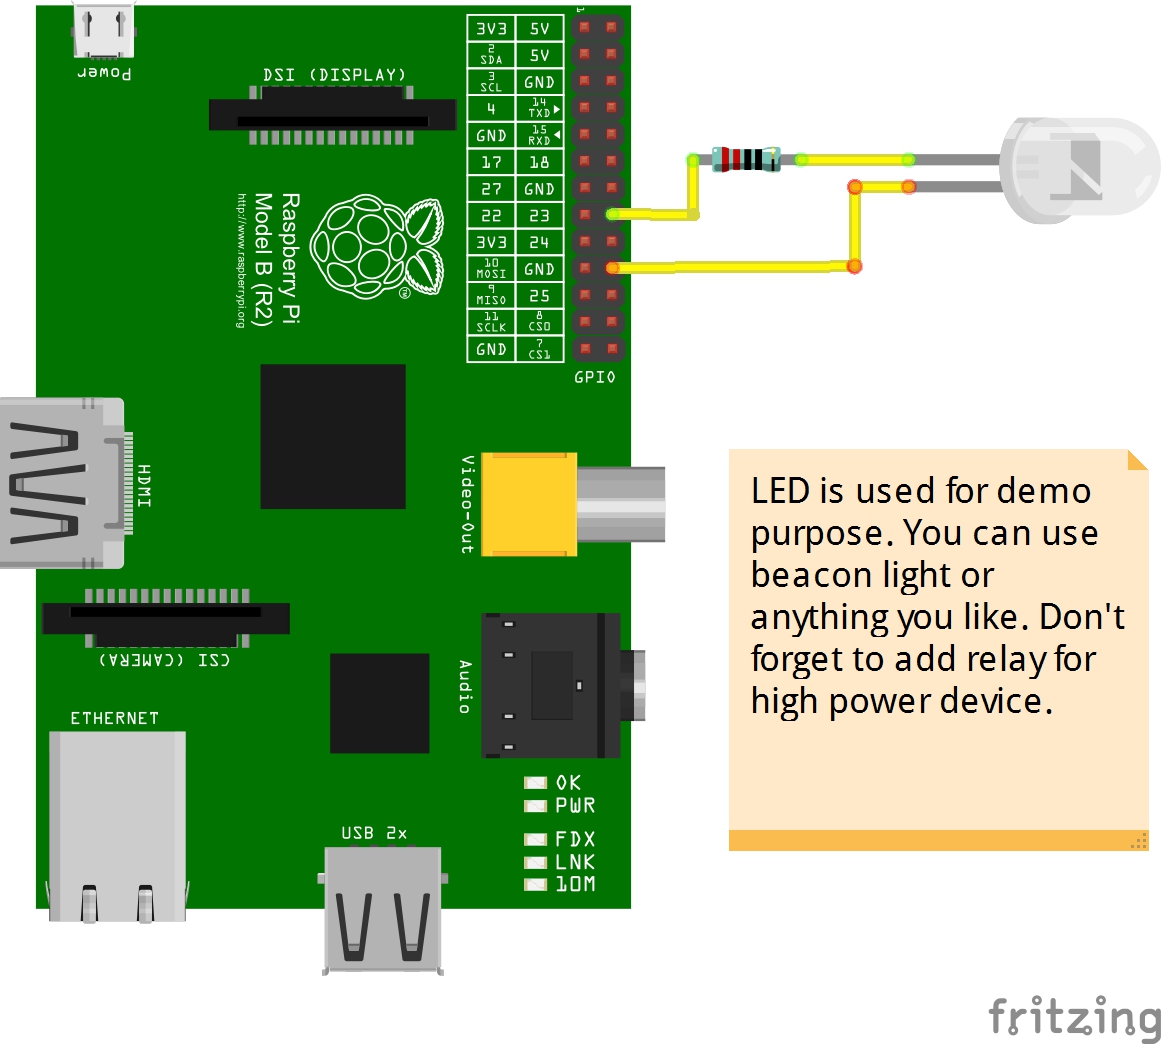
Beacon connection-source
Code
sensor-client.js
JavaScript
This code is for MQTT publisher. aws-iot sdk is used for the development of this Node.js code. When any movement is detected it publish 1 to the topic(topic/test).
var awsIot = require('aws-iot-device-sdk');

var myThingName = 'raspberry-pi';

var thingShadows = awsIot.thingShadow({
   keyPath: './private.pem.key',   // path of private key
  certPath: './certificate.pem.crt', // path of certificate
    caPath: './rootCA.pem',  // path of root file
  clientId: myThingName,
    region: 'us-west-2'  // your region
});

mythingstate = {
  "state": {
    "reported": {
      "ip": "unknown"
    }
  }
}

var networkInterfaces = require( 'os' ).networkInterfaces( );
mythingstate["state"]["reported"]["ip"] = networkInterfaces['wlan0'][0]['address'];

// PIR sensor connected to pin 7
// You can use any gpio pin
// install npm button library first
var Gpio = require('onoff').Gpio,
button = new Gpio(7, 'in', 'both');

// json data for dynamoDB
var msg = "{\"key\":\"value\"}";

thingShadows.on('connect', function() {
  console.log("Connected...");
  console.log("Registering...");
  thingShadows.register( myThingName );

  // An update right away causes a timeout error, so we wait about 2 seconds
  setTimeout( function() {
    console.log("Updating my IP address...");
    clientTokenIP = thingShadows.update(myThingName, mythingstate);
    console.log("Update:" + clientTokenIP);
  }, 2500 );


  // Code below just logs messages for info/debugging
  thingShadows.on('status',
    function(thingName, stat, clientToken, stateObject) {
       console.log('received '+stat+' on '+thingName+': '+
                   JSON.stringify(stateObject));
    });

  thingShadows.on('update',
      function(thingName, stateObject) {
         console.log('received update '+' on '+thingName+': '+
                     JSON.stringify(stateObject));
      });

  thingShadows.on('delta',
      function(thingName, stateObject) {
         console.log('received delta '+' on '+thingName+': '+
                     JSON.stringify(stateObject));
      });

  thingShadows.on('timeout',
      function(thingName, clientToken) {
         console.log('received timeout for '+ clientToken)
      });

  thingShadows
    .on('close', function() {
      console.log('close');
    });
  thingShadows
    .on('reconnect', function() {
      console.log('reconnect');
    });
  thingShadows
    .on('offline', function() {
      console.log('offline');
    });
  thingShadows
    .on('error', function(error) {
      console.log('error', error);
    });


  //Watch for motion detection. high for any movement
  button.watch(function(err, value) {
   console.log("Movement detected ")
   delete mythingstate['version']; //Cleanup to post to AWS
   mythingstate["state"]["reported"]["button"] = value
   buttonStateResponse = thingShadows.update(myThingName, mythingstate);
   thingShadows.publish('topic/test', value.toString()); // publish message
   console.log("Update:" + buttonStateResponse);
  });

});
action-client.py
Python
This Python code is for subscriber, when movement detected it receive 1 from the broker and makes a gpio pin high. Paho mqtt is used for developing the program.
import paho.mqtt.client as mqtt
import ssl
import json
import RPi.GPIO as GPIO
import time

# make sure python gpio library is installed
GPIO.setmode(GPIO.BOARD)
GPIO.setwarnings(False)
actionPin = 23 # Broadcom pin 23 (P1 pin 16)
GPIO.setup(actionPin, GPIO.OUT) # LED pin set as output
GPIO.output(actionPin, GPIO.LOW)

def on_connect(client, userdata, flags, rc):
    print("Connected with result code "+str(rc))
    client.subscribe("topic/test")

def on_message(client, userdata, msg):

     if str(msg.payload) == '1':
        print("Movement Detected")
        print(str(msg.payload))
        GPIO.output(actionPin, GPIO.HIGH)  # gpio pin high
        time.sleep(.1)
        GPIO.output(actionPin, GPIO.LOW)
        #time.sleep(0.075)

client = mqtt.Client()
client.on_connect = on_connect
client.on_message = on_message
client.tls_set(ca_certs='rootCA.pem', certfile='certificate.pem.crt', keyfile='private.pem.key', tls_version=ssl.PROTOCOL_SSLv23)
client.tls_insecure_set(True)
client.connect("A3JRA11PV5KIYG.iot.us-west-2.amazonaws.com", 8883, 60)
client.loop_forever()
The article was first published in hackster, February 4, 2016
cr:https://www.hackster.io/taifur/motion-controlled-aws-iot-button-542c73
author: Md. Khairul Alam


