
A device to monitor the condition of a classroom
Things used in this project
SOFTWARE APPS AND ONLINE SERVICES
HAND TOOLS AND FABRICATION MACHINES
· 3D Printer (generic)
Story
I am a faculty member in a university in Indonesia called Universitas Raharja. One of the major problem of my campus is sometimes the classroom isn't pleasant for the studying activity due to the AC that hasn't been turned on that causing the humidity to rise. Also there a few room that hasn't been for a quite sometime collecting many dust making the have high VoC level.
Preparation
In order to help solve the problem I want create a classroom condition monitor using the help of Hackster & DFRobot EEDU Enviromental Sensor Kit to help the building staff prepared and monitor the classroom readiness. In this project I'll be focusing on using the firebeetle 2 with the multifunctional environmental sensor and sgp40 that comes with the kit.

Fermion multifunctional Environment sensor
The Fermion multifunctional Environment sensor is a beast of a sensor. It has so many capability to read the environment data such as Temperature & Humidity(SHTC3), Pressure(BMP280), Ambient Light(VEML7700) and UV(ML8511). The right choice for this project.

The SGP40 sensor is a simple easy to connect and code module. The sample code work flawalessly.
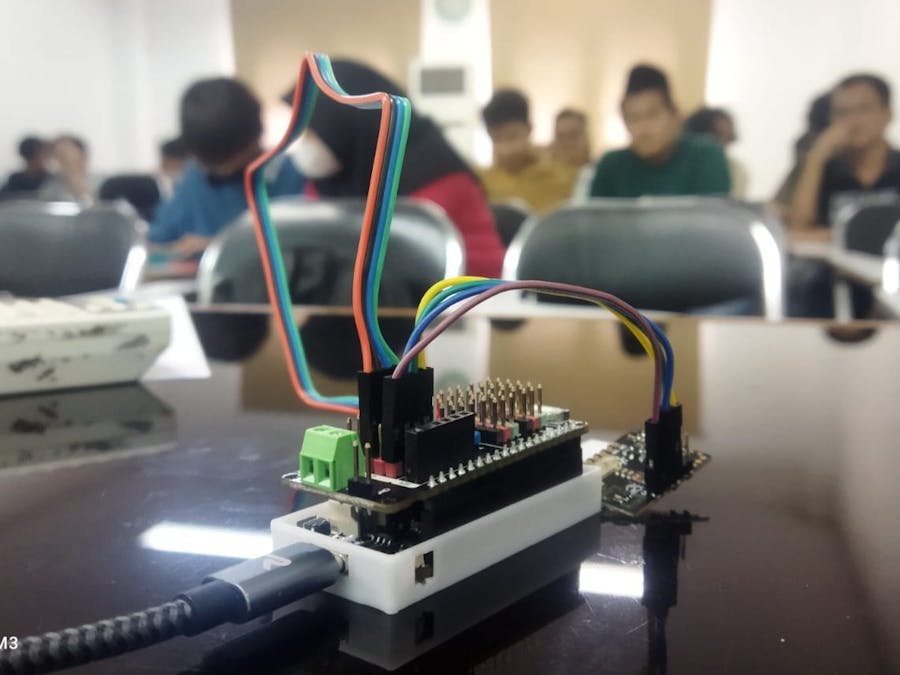
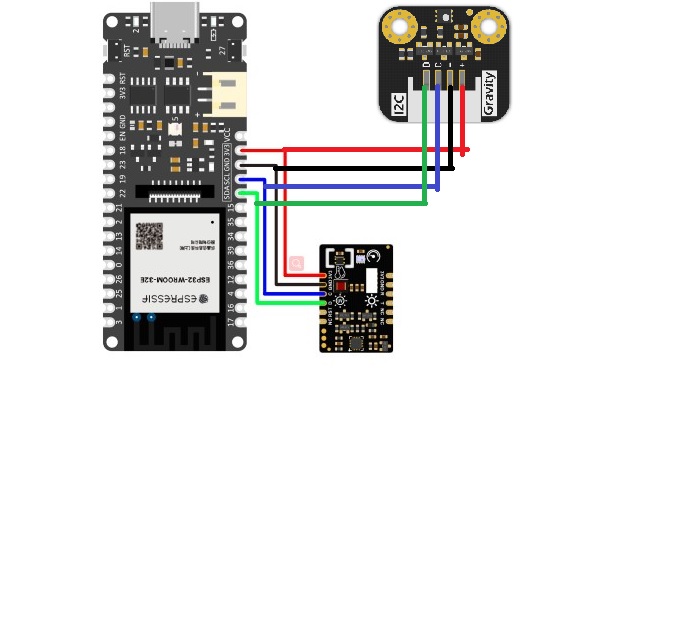
Grab the Gravity: IO Shield for FireBeetle 2 and plug it in on top of the firebeetle 2. Then Connect the sensors using the I2C line on the IO shield. Then you will have something like this
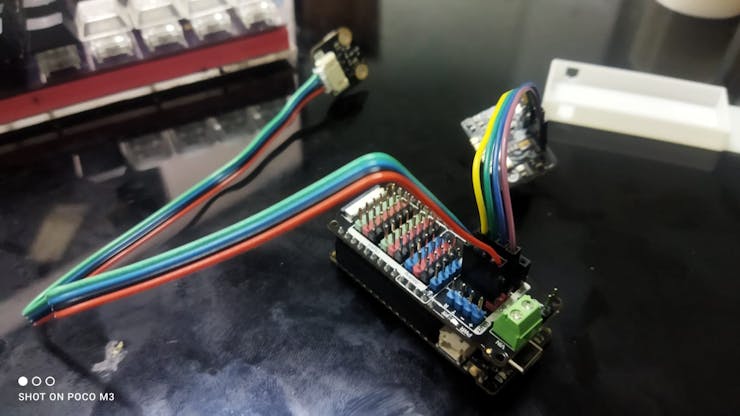
after the hardware is setup then we can proceed to the software side of this project.
Before coding the device, I need to setup an account and a few variables on the Arduino IoT Cloud.

Add the necessary Variables
After the variables is setup next thing I need to do is configure the wifi credential and add the key for my device

don't forget to add the secret key
Code the Device
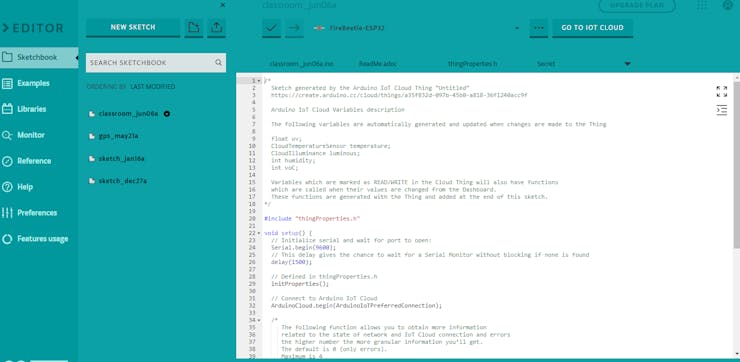
In order to easily connect the device to arduino Cloud platform I will be fully using the Web Editor for this project. Make you already install the arduino create agent to be able to connect the esp32 to the web editor. Open the Sketch then click on the open full editor button

then you will be on the editor page that look a bit familiar with the regular Arduino IDE
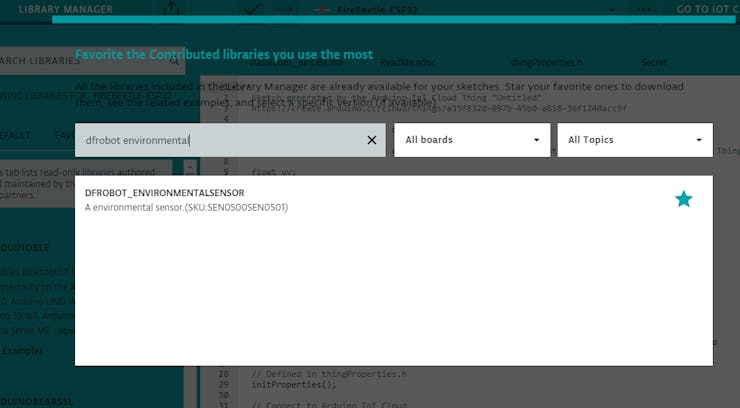
in order to able to use the Fermion multifunctional Environment sensor and SGP40 I need to add the libraries. Go to libaries menu and click the libray manager button

search for dfrobot environmental and click the star icon next to it. Do the same thing for the SGP40 then click done
add the libraries

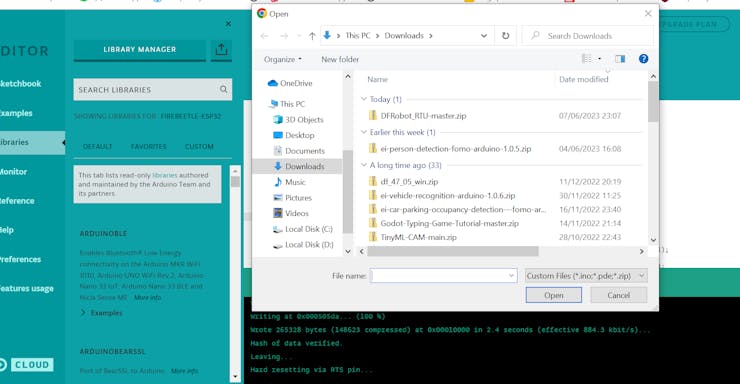
In order to use it, The Fermion multifunctional Environment sensor need additional library called the Dfrobot RTU, grab the library here then add it to the web editor
another quirk for the library is whenever I try the sample code it keeps throwing an error regarding the String.h library is not found. To remedy this problem just follow this few simple steps
Still in the libraries menu select dfrobot enviromental sensor library. Click on the drop down menu and select modify library
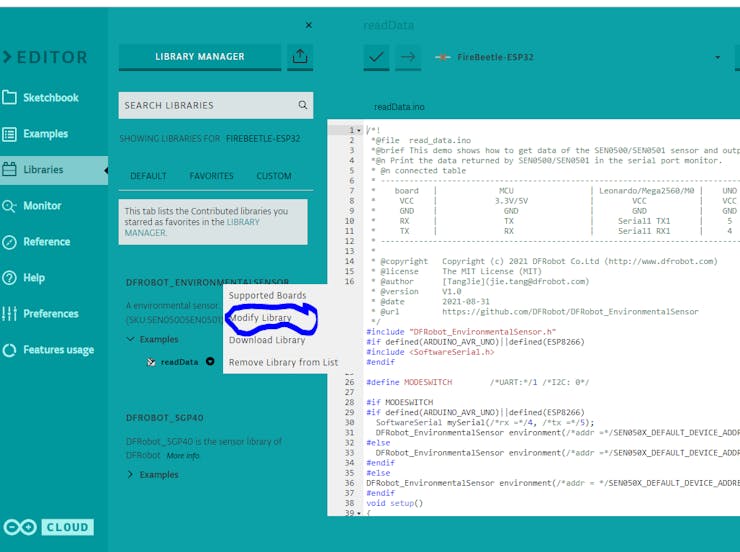
Then you will be presented with file from the library, you just need to delete or comment on the String.h line then save it and you're good to go

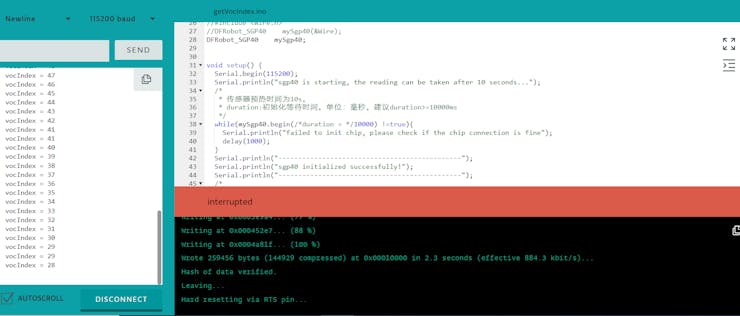
Try the sample code from the library the upload it. Open the serial monitor to make sure the sensors are working properly

After making sure the sensors are working properly, then you can proceed to upload the main code and the sensor data to the arduino cloud
/*
Sketch generated by the Arduino IoT Cloud Thing "Untitled"
https://create.arduino.cc/cloud/things/a35f832d-097b-45b0-a818-36f1240acc9f
Arduino IoT Cloud Variables description
The following variables are automatically generated and updated when changes are made to the Thing
float uv;
CloudTemperatureSensor temperature;
CloudIlluminance luminous;
int humidity;
int voC;
Variables which are marked as READ/WRITE in the Cloud Thing will also have functions
which are called when their values are changed from the Dashboard.
These functions are generated with the Thing and added at the end of this sketch.
*/
#include "thingProperties.h"
#include "DFRobot_EnvironmentalSensor.h"
#include <DFRobot_SGP40.h>
#if defined(ARDUINO_AVR_UNO)||defined(ESP8266)
#include <SoftwareSerial.h>
#endif
DFRobot_SGP40 mySgp40;
#define MODESWITCH /*UART:*/0 /*I2C: 0*/
#if MODESWITCH
#if defined(ARDUINO_AVR_UNO)||defined(ESP8266)
SoftwareSerial mySerial(/*rx =*/4, /*tx =*/5);
DFRobot_EnvironmentalSensor environment(/*addr =*/SEN050X_DEFAULT_DEVICE_ADDRESS, /*s =*/&mySerial);
#else
DFRobot_EnvironmentalSensor environment(/*addr =*/SEN050X_DEFAULT_DEVICE_ADDRESS, /*s =*/&Serial1);
#endif
#else
DFRobot_EnvironmentalSensor environment(/*addr = */SEN050X_DEFAULT_DEVICE_ADDRESS, /*pWire = */&Wire);
#endif
void setup() {
// Initialize serial and wait for port to open:
Serial.begin(115200);
// This delay gives the chance to wait for a Serial Monitor without blocking if none is found
delay(1500);
Serial.begin(115200);
while(environment.begin() != 0){
Serial.println("Environmental Sensor initialize failed!!");
delay(1000);
}
Serial.println("Voc Sensor initialize success!!");
while(mySgp40.begin(/*duration = */10000) !=true){
Serial.println("failed to init chip, please check if the chip connection is fine");
delay(1000);
}
Serial.println("----------------------------------------------");
Serial.println("sgp40 initialized successfully!");
Serial.println("----------------------------------------------");
// Defined in thingProperties.h
initProperties();
// Connect to Arduino IoT Cloud
ArduinoCloud.begin(ArduinoIoTPreferredConnection);
/*
The following function allows you to obtain more information
related to the state of network and IoT Cloud connection and errors
the higher number the more granular information you’ll get.
The default is 0 (only errors).
Maximum is 4
*/
setDebugMessageLevel(2);
ArduinoCloud.printDebugInfo();
}
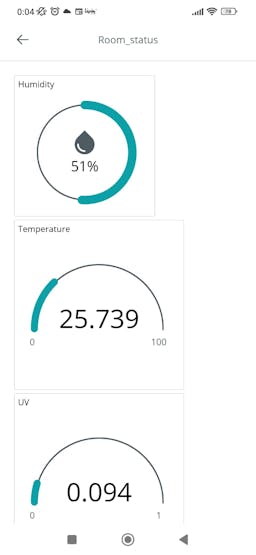
voidAfter the code is successfully uploaded, go back to IoT Clouds menu then select the dashboard. arrange the dashboard however you like.

you can also check the dashboard on the phone using the Arduino IoT remote App
more on how to setup the dashboard you can check a video tutorial made by techiesms youtube channel.
Student Counter using Edge Impulse
My initial plan for this feature is to use the HuskyLens from Dfrobot, but since I was sent the Environmental Kit, I will be using the Ai Thinker esp32 cam instead.
To make this feature there a few steps needed before we go to the web editor.
1. Create an edge impulse account then login to your account

2. Clone this edge impulse project to your account (credit to Edge Impulse User Norik for the shared project and dataset)
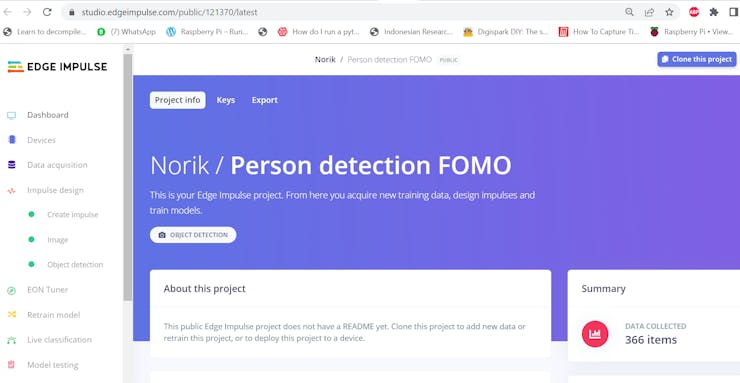
3. Proceed to impulse design and make the model
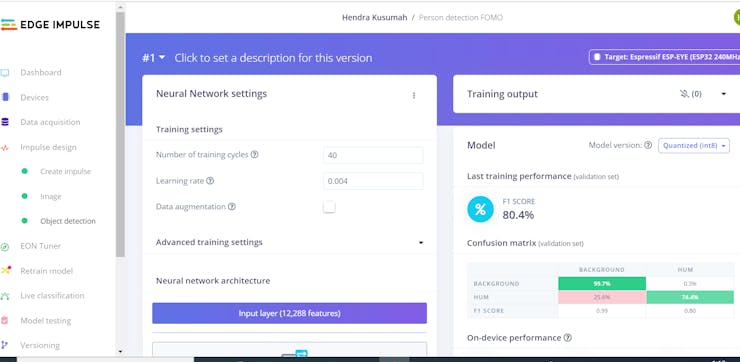
4. Click on deployment and choose arduino library

Then click on the build button make sure you also tick the Quantized option to make the model run faster on the esp32 cam
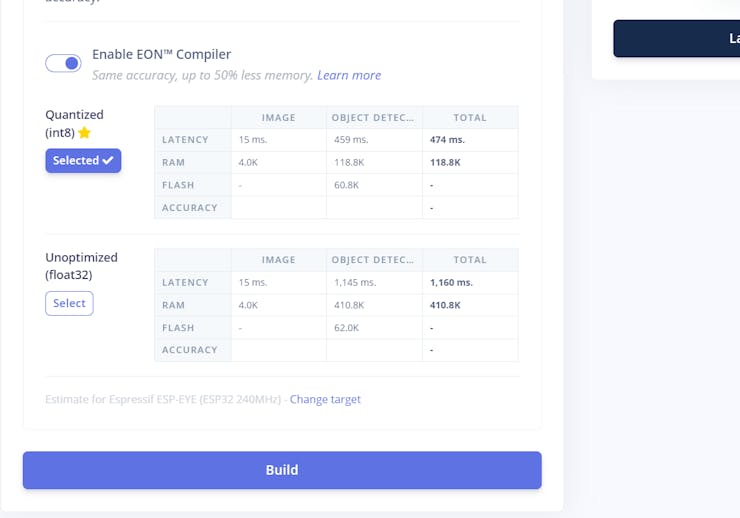
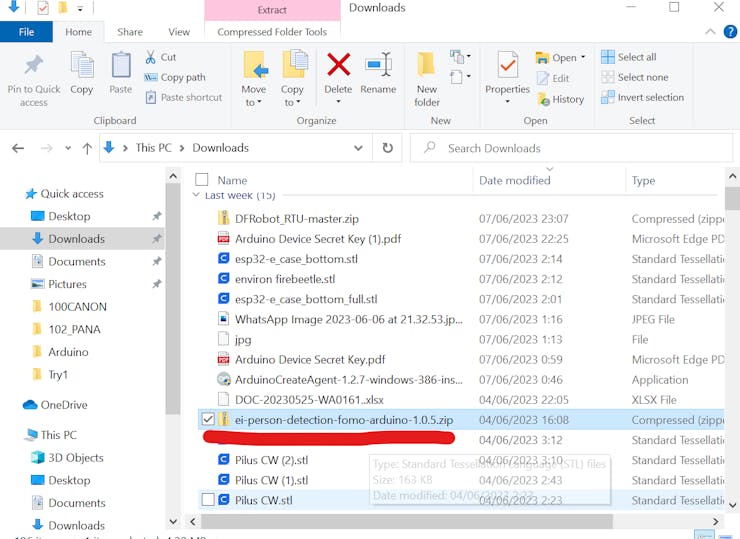
5. Keep the downloaded zip file to be use later at the arduino web editor
If you need a better or more detail understanding of steps I've mention, go check out the edge impulse documentation.
After the model is downloaded now go back to the arduino cloud platform. Then Create new things called Student watcher or anything you want

make a new variable and set the device to Ai Thinker esp32 cam and don't forget to input your wifi and secret key credential

After the device and variable is set go to dashboard and add a new widget based on the variable you just made

Now we can go to the arduino web editor. Unfortunately there are minimum documentation on how to use the edge impulse library on the web editor and send the camera reading to the cloud. I was worried that it could be difficult or even impossible to do, it turns out its not as difficult as I thought it would be.
First go to the libraries menu then upload the Zip file that we just downloaded from the edge impulse
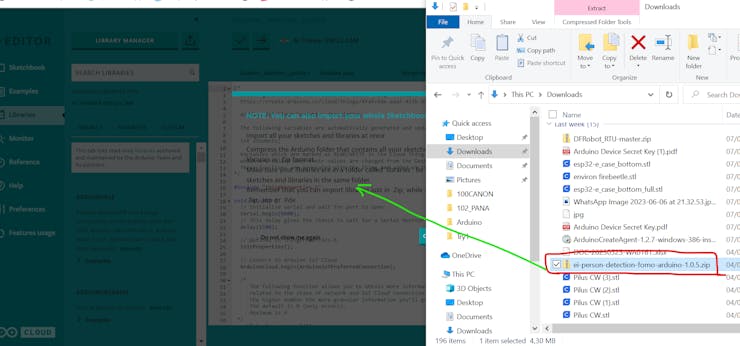
Check the custom library section, there you will have a new edge impulse (ei) library has been added
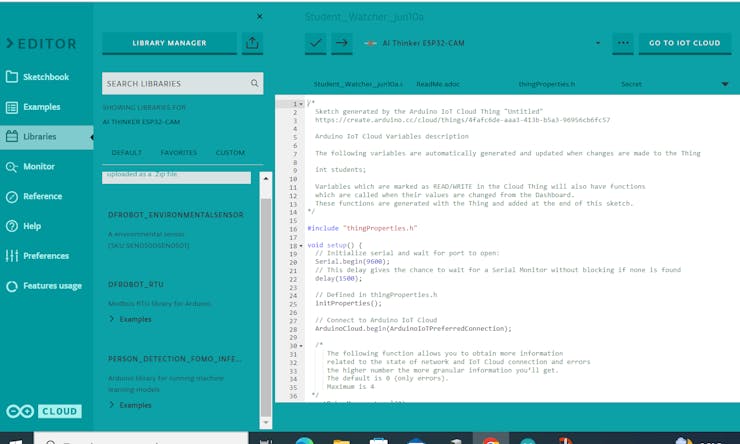
You can test out esp32 cam example from the library to check out the model that you just made or you can directly paste this code below on your sketch code to directly connect it to the cloud
/*
  Sketch generated by the Arduino IoT Cloud Thing "Untitled"
  https://create.arduino.cc/cloud/things/4fafc6de-aaa3-413b-b5a3-96956cb6fc57

  Arduino IoT Cloud Variables description

  The following variables are automatically generated and updated when changes are made to the Thing

  int students;

  Variables which are marked as READ/WRITE in the Cloud Thing will also have functions
  which are called when their values are changed from the Dashboard.
  These functions are generated with the Thing and added at the end of this sketch.
*/

#include "thingProperties.h"
#include <Person_detection_FOMO_inferencing.h>
#include "edge-impulse-sdk/dsp/image/image.hpp"

#include "esp_camera.h"

// Select camera model - find more camera models in camera_pins.h file here
// https://github.com/espressif/arduino-esp32/blob/master/libraries/ESP32/examples/Camera/CameraWebServer/camera_pins.h

//#define CAMERA_MODEL_ESP_EYE // Has PSRAM
#define CAMERA_MODEL_AI_THINKER // Has PSRAM

#if defined(CAMERA_MODEL_ESP_EYE)
#define PWDN_GPIO_NUM    -1
#define RESET_GPIO_NUM   -1
#define XCLK_GPIO_NUM    4
#define SIOD_GPIO_NUM    18
#define SIOC_GPIO_NUM    23

#define Y9_GPIO_NUM      36
#define Y8_GPIO_NUM      37
#define Y7_GPIO_NUM      38
#define Y6_GPIO_NUM      39
#define Y5_GPIO_NUM      35
#define Y4_GPIO_NUM      14
#define Y3_GPIO_NUM      13
#define Y2_GPIO_NUM      34
#define VSYNC_GPIO_NUM   5
#define HREF_GPIO_NUM    27
#define PCLK_GPIO_NUM    25

#elif defined(CAMERA_MODEL_AI_THINKER)
#define PWDN_GPIO_NUM     32
#define RESET_GPIO_NUM    -1
#define XCLK_GPIO_NUM      0
#define SIOD_GPIO_NUM     26
#define SIOC_GPIO_NUM     27

#define Y9_GPIO_NUM       35
#define Y8_GPIO_NUM       34
#define Y7_GPIO_NUM       39
#define Y6_GPIO_NUM       36
#define Y5_GPIO_NUM       21
#define Y4_GPIO_NUM       19
#define Y3_GPIO_NUM       18
#define Y2_GPIO_NUM        5
#define VSYNC_GPIO_NUM    25
#define HREF_GPIO_NUM     23
#define PCLK_GPIO_NUM     22

#else
#error "Camera model not selected"
#endif

/* Constant defines -------------------------------------------------------- */
#define EI_CAMERA_RAW_FRAME_BUFFER_COLS           320
#define EI_CAMERA_RAW_FRAME_BUFFER_ROWS           240
#define EI_CAMERA_FRAME_BYTE_SIZE                 3

/* Private variables ------------------------------------------------------- */
static bool debug_nn = false; // Set this to true to see e.g. features generated from the raw signal
static bool is_initialised = false;
uint8_t *snapshot_buf; //points to the output of the capture

static camera_config_t camera_config = {
    .pin_pwdn = PWDN_GPIO_NUM,
    .pin_reset = RESET_GPIO_NUM,
    .pin_xclk = XCLK_GPIO_NUM,
    .pin_sscb_sda = SIOD_GPIO_NUM,
    .pin_sscb_scl = SIOC_GPIO_NUM,

    .pin_d7 = Y9_GPIO_NUM,
    .pin_d6 = Y8_GPIO_NUM,
    .pin_d5 = Y7_GPIO_NUM,
    .pin_d4 = Y6_GPIO_NUM,
    .pin_d3 = Y5_GPIO_NUM,
    .pin_d2 = Y4_GPIO_NUM,
    .pin_d1 = Y3_GPIO_NUM,
    .pin_d0 = Y2_GPIO_NUM,
    .pin_vsync = VSYNC_GPIO_NUM,
    .pin_href = HREF_GPIO_NUM,
    .pin_pclk = PCLK_GPIO_NUM,

    //XCLK 20MHz or 10MHz for OV2640 double FPS (Experimental)
    .xclk_freq_hz = 20000000,
    .ledc_timer = LEDC_TIMER_0,
    .ledc_channel = LEDC_CHANNEL_0,

    .pixel_format = PIXFORMAT_JPEG, //YUV422,GRAYSCALE,RGB565,JPEG
    .frame_size = FRAMESIZE_QVGA,    //QQVGA-UXGA Do not use sizes above QVGA when not JPEG

    .jpeg_quality = 12, //0-63 lower number means higher quality
    .fb_count = 1,       //if more than one, i2s runs in continuous mode. Use only with JPEG
    .fb_location = CAMERA_FB_IN_PSRAM,
    .grab_mode = CAMERA_GRAB_WHEN_EMPTY,
};

/* Function definitions ------------------------------------------------------- */
bool ei_camera_init(void);
void ei_camera_deinit(void);
bool ei_camera_capture(uint32_t img_width, uint32_t img_height, uint8_t *out_buf) ;

void setup() {
  // Initialize serial and wait for port to open:
  Serial.begin(115200);
  // This delay gives the chance to wait for a Serial Monitor without blocking if none is found
  delay(1500);
  //while (!Serial);
    Serial.println("Edge Impulse Inferencing Demo");
    if (ei_camera_init() == false) {
        ei_printf("Failed to initialize Camera!\r\n");
    }
    else {
        ei_printf("Camera initialized\r\n");
    }

    ei_printf("\nStarting continious inference in 2 seconds...\n");
    ei_sleep(2000);
  // Defined in thingProperties.h
  initProperties();

  // Connect to Arduino IoT Cloud
  ArduinoCloud.begin(ArduinoIoTPreferredConnection);

  /*
     The following function allows you to obtain more information
     related to the state of network and IoT Cloud connection and errors
     the higher number the more granular information you’ll get.
     The default is 0 (only errors).
     Maximum is 4
 */
  setDebugMessageLevel(2);
  ArduinoCloud.printDebugInfo();
}

void loop() {
  ArduinoCloud.update();
  reading_data();
  // Your code here


}


void reading_data()
{

    // instead of wait_ms, we'll wait on the signal, this allows threads to cancel us...
    if (ei_sleep(5) != EI_IMPULSE_OK) {
        return;
    }

    snapshot_buf = (uint8_t*)malloc(EI_CAMERA_RAW_FRAME_BUFFER_COLS * EI_CAMERA_RAW_FRAME_BUFFER_ROWS * EI_CAMERA_FRAME_BYTE_SIZE);

    // check if allocation was successful
    if(snapshot_buf == nullptr) {
        ei_printf("ERR: Failed to allocate snapshot buffer!\n");
        return;
    }

    ei::signal_t signal;
    signal.total_length = EI_CLASSIFIER_INPUT_WIDTH * EI_CLASSIFIER_INPUT_HEIGHT;
    signal.get_data = &ei_camera_get_data;

    if (ei_camera_capture((size_t)EI_CLASSIFIER_INPUT_WIDTH, (size_t)EI_CLASSIFIER_INPUT_HEIGHT, snapshot_buf) == false) {
        ei_printf("Failed to capture image\r\n");
        free(snapshot_buf);
        return;
    }

    // Run the classifier
    ei_impulse_result_t result = { 0 };

    EI_IMPULSE_ERROR err = run_classifier(&signal, &result, debug_nn);
    if (err != EI_IMPULSE_OK) {
        ei_printf("ERR: Failed to run classifier (%d)\n", err);
        return;
    }

    // print the predictions
    ei_printf("Predictions (DSP: %d ms., Classification: %d ms., Anomaly: %d ms.): \n",
                result.timing.dsp, result.timing.classification, result.timing.anomaly);

#if EI_CLASSIFIER_OBJECT_DETECTION == 1
    bool bb_found = result.bounding_boxes[0].value > 0;
    for (size_t ix = 0; ix < result.bounding_boxes_count; ix++) {
        auto bb = result.bounding_boxes[ix];
        if (bb.value == 0) {
            continue;
        }
        ei_printf("    %s (%f) [ x: %u, y: %u, width: %u, height: %u ]\n", bb.label, bb.value, bb.x, bb.y, bb.width, bb.height);
          students = ix+1;
          Serial.print("People detected: ");
          Serial.println(students);
    }

    if (!bb_found) {
        ei_printf("    No objects found\n");
    }
#else
    for (size_t ix = 0; ix < EI_CLASSIFIER_LABEL_COUNT; ix++) {
        ei_printf("    %s: %.5f\n", result.classification[ix].label,
                                    result.classification[ix].value);
    }
#endif

#if EI_CLASSIFIER_HAS_ANOMALY == 1
        ei_printf("    anomaly score: %.3f\n", result.anomaly);
#endif


    free(snapshot_buf);

}

/**
 * @brief   Setup image sensor & start streaming
 *
 * @retval  false if initialisation failed
 */
bool ei_camera_init(void) {

    if (is_initialised) return true;

#if defined(CAMERA_MODEL_ESP_EYE)
  pinMode(13, INPUT_PULLUP);
  pinMode(14, INPUT_PULLUP);
#endif

    //initialize the camera
    esp_err_t err = esp_camera_init(&camera_config);
    if (err != ESP_OK) {
      Serial.printf("Camera init failed with error 0x%x\n", err);
      return false;
    }

    sensor_t * s = esp_camera_sensor_get();
    // initial sensors are flipped vertically and colors are a bit saturated
    if (s->id.PID == OV3660_PID) {
      s->set_vflip(s, 1); // flip it back
      s->set_brightness(s, 1); // up the brightness just a bit
      s->set_saturation(s, 0); // lower the saturation
    }

#if defined(CAMERA_MODEL_M5STACK_WIDE)
    s->set_vflip(s, 1);
    s->set_hmirror(s, 1);
#elif defined(CAMERA_MODEL_ESP_EYE)
    s->set_vflip(s, 1);
    s->set_hmirror(s, 1);
    s->set_awb_gain(s, 1);
#endif

    is_initialised = true;
    return true;
}

/**
 * @brief      Stop streaming of sensor data
 */
void ei_camera_deinit(void) {

    //deinitialize the camera
    esp_err_t err = esp_camera_deinit();

    if (err != ESP_OK)
    {
        ei_printf("Camera deinit failed\n");
        return;
    }

    is_initialised = false;
    return;
}


/**
 * @brief      Capture, rescale and crop image
 *
 * @param[in]  img_width     width of output image
 * @param[in]  img_height    height of output image
 * @param[in]  out_buf       pointer to store output image, NULL may be used
 *                           if ei_camera_frame_buffer is to be used for capture and resize/cropping.
 *
 * @retval     false if not initialised, image captured, rescaled or cropped failed
 *
 */
bool ei_camera_capture(uint32_t img_width, uint32_t img_height, uint8_t *out_buf) {
    bool do_resize = false;

    if (!is_initialised) {
        ei_printf("ERR: Camera is not initialized\r\n");
        return false;
    }

    camera_fb_t *fb = esp_camera_fb_get();

    if (!fb) {
        ei_printf("Camera capture failed\n");
        return false;
    }

   bool converted = fmt2rgb888(fb->buf, fb->len, PIXFORMAT_JPEG, snapshot_buf);

   esp_camera_fb_return(fb);

   if(!converted){
       ei_printf("Conversion failed\n");
       return false;
   }

    if ((img_width != EI_CAMERA_RAW_FRAME_BUFFER_COLS)
        || (img_height != EI_CAMERA_RAW_FRAME_BUFFER_ROWS)) {
        do_resize = true;
    }

    if (do_resize) {
        ei::image::processing::crop_and_interpolate_rgb888(
        out_buf,
        EI_CAMERA_RAW_FRAME_BUFFER_COLS,
        EI_CAMERA_RAW_FRAME_BUFFER_ROWS,
        out_buf,
        img_width,
        img_height);
    }


    return true;
}

static int ei_camera_get_data(size_t offset, size_t length, float *out_ptr)
{
    // we already have a RGB888 buffer, so recalculate offset into pixel index
    size_t pixel_ix = offset * 3;
    size_t pixels_left = length;
    size_t out_ptr_ix = 0;

    while (pixels_left != 0) {
        out_ptr[out_ptr_ix] = (snapshot_buf[pixel_ix] << 16) + (snapshot_buf[pixel_ix + 1] << 8) + snapshot_buf[pixel_ix + 2];

        // go to the next pixel
        out_ptr_ix++;
        pixel_ix+=3;
        pixels_left--;
    }
    // and done!
    return 0;
}

#if !defined(EI_CLASSIFIER_SENSOR) || EI_CLASSIFIER_SENSOR != EI_CLASSIFIER_SENSOR_CAMERA
#error "Invalid model for current sensor"
#endif
You can check the serial monitor or the dashboard then point the camera to a picture of people to test if there are people detected by the camera

Casing and Finishing
To make the hardware nice and tidy I printed a simple case which the design I got from thingiverse user potatobi123, I've just added a single sheet of square to the design to place the sensors
and this is the result

Tidying up all the hardware

Placing it in the classroom

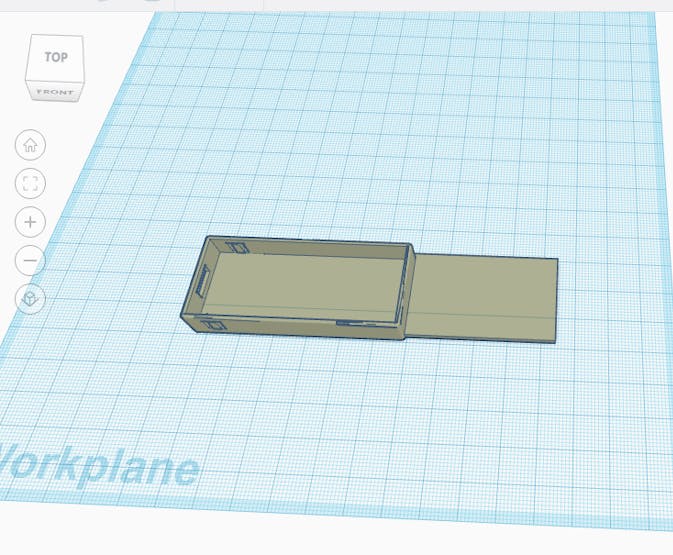
For the esp32 cam I use a small project box then cut a hole for the USB and the I screw it to make it tidy

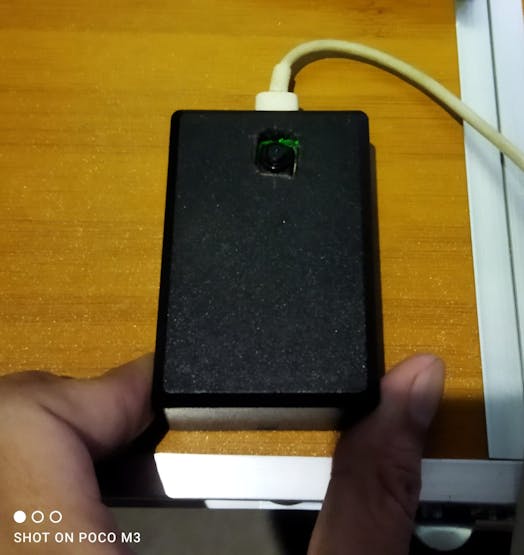
The reading on the camera still need improvement, you could try to use your own dataset to get a better result. Hopefully this project could help ohter campus that are facing the same problem
Custom parts and enclosures
https://hacksterio.s3.amazonaws.com/uploads/attachments/1599121/environ_firebeetle_CEprsTRChm.stl
Schematics
hardware
CODE
Classroom_condition
/*
  Sketch generated by the Arduino IoT Cloud Thing "Untitled"
  https://create.arduino.cc/cloud/things/a35f832d-097b-45b0-a818-36f1240acc9f

  Arduino IoT Cloud Variables description

  The following variables are automatically generated and updated when changes are made to the Thing

  float uv;
  CloudTemperatureSensor temperature;
  CloudIlluminance luminous;
  int humidity;
  int voC;

  Variables which are marked as READ/WRITE in the Cloud Thing will also have functions
  which are called when their values are changed from the Dashboard.
  These functions are generated with the Thing and added at the end of this sketch.
*/

#include "thingProperties.h"
#include "DFRobot_EnvironmentalSensor.h"
#include <DFRobot_SGP40.h>
#if defined(ARDUINO_AVR_UNO)||defined(ESP8266)
#include <SoftwareSerial.h>
#endif
DFRobot_SGP40    mySgp40;

#define MODESWITCH        /*UART:*/0 /*I2C: 0*/

#if MODESWITCH
#if defined(ARDUINO_AVR_UNO)||defined(ESP8266)
  SoftwareSerial mySerial(/*rx =*/4, /*tx =*/5);
  DFRobot_EnvironmentalSensor environment(/*addr =*/SEN050X_DEFAULT_DEVICE_ADDRESS, /*s =*/&mySerial);
#else
  DFRobot_EnvironmentalSensor environment(/*addr =*/SEN050X_DEFAULT_DEVICE_ADDRESS, /*s =*/&Serial1);
#endif
#else
DFRobot_EnvironmentalSensor environment(/*addr = */SEN050X_DEFAULT_DEVICE_ADDRESS, /*pWire = */&Wire);
#endif


void setup() {
  // Initialize serial and wait for port to open:
  Serial.begin(115200);
  // This delay gives the chance to wait for a Serial Monitor without blocking if none is found
  delay(1500);
  Serial.begin(115200);
  while(environment.begin() != 0){
    Serial.println("Environmental Sensor initialize failed!!");
    delay(1000);
  }

  Serial.println("Voc Sensor  initialize success!!");
   while(mySgp40.begin(/*duration = */10000) !=true){
    Serial.println("failed to init chip, please check if the chip connection is fine");
    delay(1000);
  }
  Serial.println("----------------------------------------------");
  Serial.println("sgp40 initialized successfully!");
  Serial.println("----------------------------------------------");

  // Defined in thingProperties.h
  initProperties();

  // Connect to Arduino IoT Cloud
  ArduinoCloud.begin(ArduinoIoTPreferredConnection);

  /*
     The following function allows you to obtain more information
     related to the state of network and IoT Cloud connection and errors
     the higher number the more granular information you’ll get.
     The default is 0 (only errors).
     Maximum is 4
 */
  setDebugMessageLevel(2);
  ArduinoCloud.printDebugInfo();
}

void loop() {
  ArduinoCloud.update();
  // call the function to read and send the data to the arduino iot cloud
  environdata();
  airqual();
}


void environdata(){
  //send reading data to the arduino cloud
  temperature = environment.getTemperature(TEMP_C);
  humidity = environment.getHumidity();
  uv = environment.getUltravioletIntensity();
  luminous = environment.getLuminousIntensity();

  Serial.println("-------------------------------");
  Serial.print("Temp: ");
  Serial.print(environment.getTemperature(TEMP_C));
  Serial.println(" ℃");
  Serial.print("Temp: ");
  Serial.print(environment.getTemperature(TEMP_F));
  Serial.println(" ℉");
  Serial.print("Humidity: ");
  Serial.print(environment.getHumidity());
  Serial.println(" %");
  Serial.print("Ultraviolet intensity: ");
  Serial.print(environment.getUltravioletIntensity());
  Serial.println(" mw/cm2");
  Serial.print("LuminousIntensity: ");
  Serial.print(environment.getLuminousIntensity());
  Serial.println(" lx");
  Serial.print("Atmospheric pressure: ");
  Serial.print(environment.getAtmospherePressure(HPA));
  Serial.println(" hpa");
  Serial.print("Altitude: ");
  Serial.print(environment.getElevation());
  Serial.println(" m");
  Serial.println("-------------------------------");
  delay(500);
}

void airqual(){

  uint16_t index = mySgp40.getVoclndex();
  voC = index; // send the air quality data to the dashboard
  Serial.print("vocIndex = ");
  Serial.println(index);
  delay(1000);
}
CODE
students_watcher
use this for the esp32 cam module
/*
  Sketch generated by the Arduino IoT Cloud Thing "Untitled"
  https://create.arduino.cc/cloud/things/4fafc6de-aaa3-413b-b5a3-96956cb6fc57

  Arduino IoT Cloud Variables description

  The following variables are automatically generated and updated when changes are made to the Thing

  int students;

  Variables which are marked as READ/WRITE in the Cloud Thing will also have functions
  which are called when their values are changed from the Dashboard.
  These functions are generated with the Thing and added at the end of this sketch.
*/

#include "thingProperties.h"
#include <Person_detection_FOMO_inferencing.h>
#include "edge-impulse-sdk/dsp/image/image.hpp"

#include "esp_camera.h"

// Select camera model - find more camera models in camera_pins.h file here
// https://github.com/espressif/arduino-esp32/blob/master/libraries/ESP32/examples/Camera/CameraWebServer/camera_pins.h

//#define CAMERA_MODEL_ESP_EYE // Has PSRAM
#define CAMERA_MODEL_AI_THINKER // Has PSRAM

#if defined(CAMERA_MODEL_ESP_EYE)
#define PWDN_GPIO_NUM    -1
#define RESET_GPIO_NUM   -1
#define XCLK_GPIO_NUM    4
#define SIOD_GPIO_NUM    18
#define SIOC_GPIO_NUM    23

#define Y9_GPIO_NUM      36
#define Y8_GPIO_NUM      37
#define Y7_GPIO_NUM      38
#define Y6_GPIO_NUM      39
#define Y5_GPIO_NUM      35
#define Y4_GPIO_NUM      14
#define Y3_GPIO_NUM      13
#define Y2_GPIO_NUM      34
#define VSYNC_GPIO_NUM   5
#define HREF_GPIO_NUM    27
#define PCLK_GPIO_NUM    25

#elif defined(CAMERA_MODEL_AI_THINKER)
#define PWDN_GPIO_NUM     32
#define RESET_GPIO_NUM    -1
#define XCLK_GPIO_NUM      0
#define SIOD_GPIO_NUM     26
#define SIOC_GPIO_NUM     27

#define Y9_GPIO_NUM       35
#define Y8_GPIO_NUM       34
#define Y7_GPIO_NUM       39
#define Y6_GPIO_NUM       36
#define Y5_GPIO_NUM       21
#define Y4_GPIO_NUM       19
#define Y3_GPIO_NUM       18
#define Y2_GPIO_NUM        5
#define VSYNC_GPIO_NUM    25
#define HREF_GPIO_NUM     23
#define PCLK_GPIO_NUM     22

#else
#error "Camera model not selected"
#endif

/* Constant defines -------------------------------------------------------- */
#define EI_CAMERA_RAW_FRAME_BUFFER_COLS           320
#define EI_CAMERA_RAW_FRAME_BUFFER_ROWS           240
#define EI_CAMERA_FRAME_BYTE_SIZE                 3

/* Private variables ------------------------------------------------------- */
static bool debug_nn = false; // Set this to true to see e.g. features generated from the raw signal
static bool is_initialised = false;
uint8_t *snapshot_buf; //points to the output of the capture

static camera_config_t camera_config = {
    .pin_pwdn = PWDN_GPIO_NUM,
    .pin_reset = RESET_GPIO_NUM,
    .pin_xclk = XCLK_GPIO_NUM,
    .pin_sscb_sda = SIOD_GPIO_NUM,
    .pin_sscb_scl = SIOC_GPIO_NUM,

    .pin_d7 = Y9_GPIO_NUM,
    .pin_d6 = Y8_GPIO_NUM,
    .pin_d5 = Y7_GPIO_NUM,
    .pin_d4 = Y6_GPIO_NUM,
    .pin_d3 = Y5_GPIO_NUM,
    .pin_d2 = Y4_GPIO_NUM,
    .pin_d1 = Y3_GPIO_NUM,
    .pin_d0 = Y2_GPIO_NUM,
    .pin_vsync = VSYNC_GPIO_NUM,
    .pin_href = HREF_GPIO_NUM,
    .pin_pclk = PCLK_GPIO_NUM,

    //XCLK 20MHz or 10MHz for OV2640 double FPS (Experimental)
    .xclk_freq_hz = 20000000,
    .ledc_timer = LEDC_TIMER_0,
    .ledc_channel = LEDC_CHANNEL_0,

    .pixel_format = PIXFORMAT_JPEG, //YUV422,GRAYSCALE,RGB565,JPEG
    .frame_size = FRAMESIZE_QVGA,    //QQVGA-UXGA Do not use sizes above QVGA when not JPEG

    .jpeg_quality = 12, //0-63 lower number means higher quality
    .fb_count = 1,       //if more than one, i2s runs in continuous mode. Use only with JPEG
    .fb_location = CAMERA_FB_IN_PSRAM,
    .grab_mode = CAMERA_GRAB_WHEN_EMPTY,
};

/* Function definitions ------------------------------------------------------- */
bool ei_camera_init(void);
void ei_camera_deinit(void);
bool ei_camera_capture(uint32_t img_width, uint32_t img_height, uint8_t *out_buf) ;

void setup() {
  // Initialize serial and wait for port to open:
  Serial.begin(115200);
  // This delay gives the chance to wait for a Serial Monitor without blocking if none is found
  delay(1500);
  //while (!Serial);
    Serial.println("Edge Impulse Inferencing Demo");
    if (ei_camera_init() == false) {
        ei_printf("Failed to initialize Camera!\r\n");
    }
    else {
        ei_printf("Camera initialized\r\n");
    }

    ei_printf("\nStarting continious inference in 2 seconds...\n");
    ei_sleep(2000);
  // Defined in thingProperties.h
  initProperties();

  // Connect to Arduino IoT Cloud
  ArduinoCloud.begin(ArduinoIoTPreferredConnection);

  /*
     The following function allows you to obtain more information
     related to the state of network and IoT Cloud connection and errors
     the higher number the more granular information you’ll get.
     The default is 0 (only errors).
     Maximum is 4
 */
  setDebugMessageLevel(2);
  ArduinoCloud.printDebugInfo();
}

void loop() {
  ArduinoCloud.update();
  reading_data();
  // Your code here


}


void reading_data()
{

    // instead of wait_ms, we'll wait on the signal, this allows threads to cancel us...
    if (ei_sleep(5) != EI_IMPULSE_OK) {
        return;
    }

    snapshot_buf = (uint8_t*)malloc(EI_CAMERA_RAW_FRAME_BUFFER_COLS * EI_CAMERA_RAW_FRAME_BUFFER_ROWS * EI_CAMERA_FRAME_BYTE_SIZE);

    // check if allocation was successful
    if(snapshot_buf == nullptr) {
        ei_printf("ERR: Failed to allocate snapshot buffer!\n");
        return;
    }

    ei::signal_t signal;
    signal.total_length = EI_CLASSIFIER_INPUT_WIDTH * EI_CLASSIFIER_INPUT_HEIGHT;
    signal.get_data = &ei_camera_get_data;

    if (ei_camera_capture((size_t)EI_CLASSIFIER_INPUT_WIDTH, (size_t)EI_CLASSIFIER_INPUT_HEIGHT, snapshot_buf) == false) {
        ei_printf("Failed to capture image\r\n");
        free(snapshot_buf);
        return;
    }

    // Run the classifier
    ei_impulse_result_t result = { 0 };

    EI_IMPULSE_ERROR err = run_classifier(&signal, &result, debug_nn);
    if (err != EI_IMPULSE_OK) {
        ei_printf("ERR: Failed to run classifier (%d)\n", err);
        return;
    }

    // print the predictions
    ei_printf("Predictions (DSP: %d ms., Classification: %d ms., Anomaly: %d ms.): \n",
                result.timing.dsp, result.timing.classification, result.timing.anomaly);

#if EI_CLASSIFIER_OBJECT_DETECTION == 1
    bool bb_found = result.bounding_boxes[0].value > 0;
    for (size_t ix = 0; ix < result.bounding_boxes_count; ix++) {
        auto bb = result.bounding_boxes[ix];
        if (bb.value == 0) {
            continue;
        }
        ei_printf("    %s (%f) [ x: %u, y: %u, width: %u, height: %u ]\n", bb.label, bb.value, bb.x, bb.y, bb.width, bb.height);
          students = ix+1; //send the reading data to Arduino IoT Cloud
          Serial.print("People detected: ");
          Serial.println(students); //print the amount of students read
    }

    if (!bb_found) {
        ei_printf("    No objects found\n");
    }
#else
    for (size_t ix = 0; ix < EI_CLASSIFIER_LABEL_COUNT; ix++) {
        ei_printf("    %s: %.5f\n", result.classification[ix].label,
                                    result.classification[ix].value);
    }
#endif

#if EI_CLASSIFIER_HAS_ANOMALY == 1
        ei_printf("    anomaly score: %.3f\n", result.anomaly);
#endif


    free(snapshot_buf);

}

/**
 * @brief   Setup image sensor & start streaming
 *
 * @retval  false if initialisation failed
 */
bool ei_camera_init(void) {

    if (is_initialised) return true;

#if defined(CAMERA_MODEL_ESP_EYE)
  pinMode(13, INPUT_PULLUP);
  pinMode(14, INPUT_PULLUP);
#endif

    //initialize the camera
    esp_err_t err = esp_camera_init(&camera_config);
    if (err != ESP_OK) {
      Serial.printf("Camera init failed with error 0x%x\n", err);
      return false;
    }

    sensor_t * s = esp_camera_sensor_get();
    // initial sensors are flipped vertically and colors are a bit saturated
    if (s->id.PID == OV3660_PID) {
      s->set_vflip(s, 1); // flip it back
      s->set_brightness(s, 1); // up the brightness just a bit
      s->set_saturation(s, 0); // lower the saturation
    }

#if defined(CAMERA_MODEL_M5STACK_WIDE)
    s->set_vflip(s, 1);
    s->set_hmirror(s, 1);
#elif defined(CAMERA_MODEL_ESP_EYE)
    s->set_vflip(s, 1);
    s->set_hmirror(s, 1);
    s->set_awb_gain(s, 1);
#endif

    is_initialised = true;
    return true;
}

/**
 * @brief      Stop streaming of sensor data
 */
void ei_camera_deinit(void) {

    //deinitialize the camera
    esp_err_t err = esp_camera_deinit();

    if (err != ESP_OK)
    {
        ei_printf("Camera deinit failed\n");
        return;
    }

    is_initialised = false;
    return;
}


/**
 * @brief      Capture, rescale and crop image
 *
 * @param[in]  img_width     width of output image
 * @param[in]  img_height    height of output image
 * @param[in]  out_buf       pointer to store output image, NULL may be used
 *                           if ei_camera_frame_buffer is to be used for capture and resize/cropping.
 *
 * @retval     false if not initialised, image captured, rescaled or cropped failed
 *
 */
bool ei_camera_capture(uint32_t img_width, uint32_t img_height, uint8_t *out_buf) {
    bool do_resize = false;

    if (!is_initialised) {
        ei_printf("ERR: Camera is not initialized\r\n");
        return false;
    }

    camera_fb_t *fb = esp_camera_fb_get();

    if (!fb) {
        ei_printf("Camera capture failed\n");
        return false;
    }

   bool converted = fmt2rgb888(fb->buf, fb->len, PIXFORMAT_JPEG, snapshot_buf);

   esp_camera_fb_return(fb);

   if(!converted){
       ei_printf("Conversion failed\n");
       return false;
   }

    if ((img_width != EI_CAMERA_RAW_FRAME_BUFFER_COLS)
        || (img_height != EI_CAMERA_RAW_FRAME_BUFFER_ROWS)) {
        do_resize = true;
    }

    if (do_resize) {
        ei::image::processing::crop_and_interpolate_rgb888(
        out_buf,
        EI_CAMERA_RAW_FRAME_BUFFER_COLS,
        EI_CAMERA_RAW_FRAME_BUFFER_ROWS,
        out_buf,
        img_width,
        img_height);
    }


    return true;
}

static int ei_camera_get_data(size_t offset, size_t length, float *out_ptr)
{
    // we already have a RGB888 buffer, so recalculate offset into pixel index
    size_t pixel_ix = offset * 3;
    size_t pixels_left = length;
    size_t out_ptr_ix = 0;

    while (pixels_left != 0) {
        out_ptr[out_ptr_ix] = (snapshot_buf[pixel_ix] << 16) + (snapshot_buf[pixel_ix + 1] << 8) + snapshot_buf[pixel_ix + 2];

        // go to the next pixel
        out_ptr_ix++;
        pixel_ix+=3;
        pixels_left--;
    }
    // and done!
    return 0;
}

#if !defined(EI_CLASSIFIER_SENSOR) || EI_CLASSIFIER_SENSOR != EI_CLASSIFIER_SENSOR_CAMERA
#error "Invalid model for current sensor"
#endif
The article was first published in hackster, June 8, 2023
cr: https://www.hackster.io/hendra/the-classroom-watcher-277d94
author: Hendra Kusumah


