How to achieve optimum bulk fermentation in sourdough bread with monitoring its pH.
Software apps and online services
- Arduino IDE
- Blynk
Story

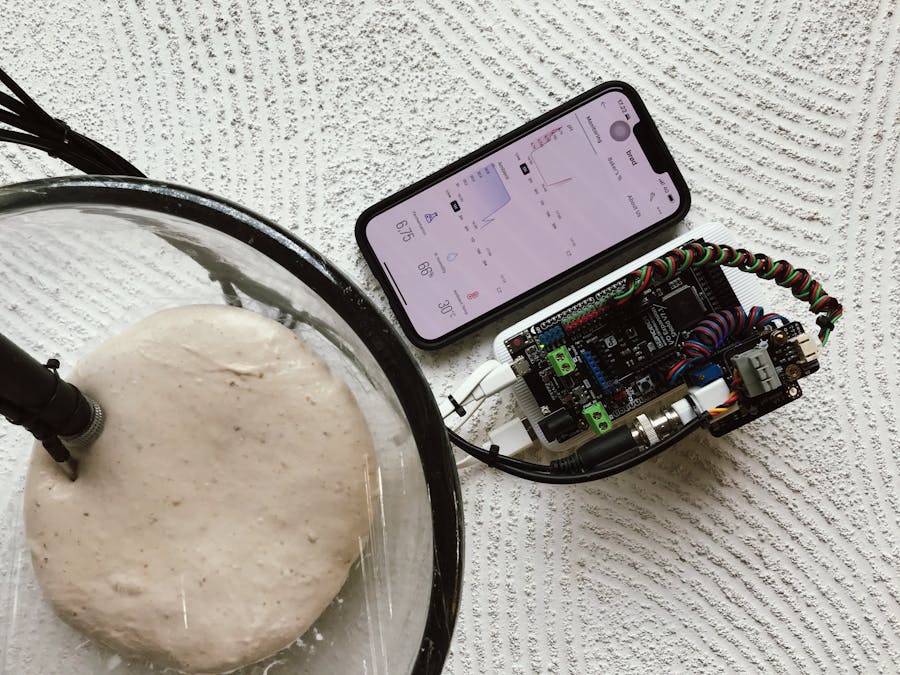
This idea came out when I was eating at RM Pagi Sore, I wanna have my pH device to watch my dough fermentation while I'm at coffee shop. So I decide to build dough monitoring device using arduino mega wifi, analog spear tip pH sensor, DHT22 and DS18B20 sensor. The output data such as dough temp, ambient temp, relative humidity, and pH of the dough will be uploaded to blynk server through ESP8266 in arduino.
Introduction About Fermentation Sourdough Bread
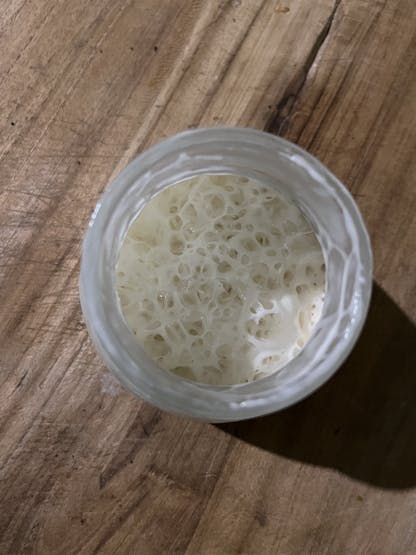
The pH level is an essential factor to consider during sourdough bread making fermentation. During the fermentation process, the pH level decreases, becoming more acidic as lactic acid and acetic acid are produced by the lactobacillus and yeast present in the sourdough starter. The ideal pH range for sourdough bread fermentation is between 3.5 and 4.5. This pH level helps to break down the gluten in the flour and release nutrients, giving the bread its characteristic flavor and texture. If the pH level drops below 3.5 or rises above 4.5, it can affect the fermentation process and adversely affect the final product's quality.
On the other hand, temperature is an essential factor in the fermentation process, which is fundamental to sourdough bread making. The ideal dough temperature for sourdough bread is between 74°F (23°C) and 78°F (25°C). At this range, the yeast and bacteria in the starter cultures can multiply and convert the sugars in the flour into carbon dioxide and other organic compounds that give flavor and texture to the bread. The ambient temperature also affects the dough temperature and the fermentation process. If the room temperature is relatively colder than the dough, the fermentation may slow down, or it may take longer to rise. Vice versa, if the ambient temperature is warmer than the dough, the fermentation may speed up, leading to over-proofed or flat bread. In summary, the baker should aim to control the dough temperature by adjusting the water temperature, flour temperature, and fermentation time to achieve the desired outcome. They should also consider the ambient temperature and adjust the fermentation conditions accordingly.
Introduction DFRobot Analog Spear Tip pH Sensor
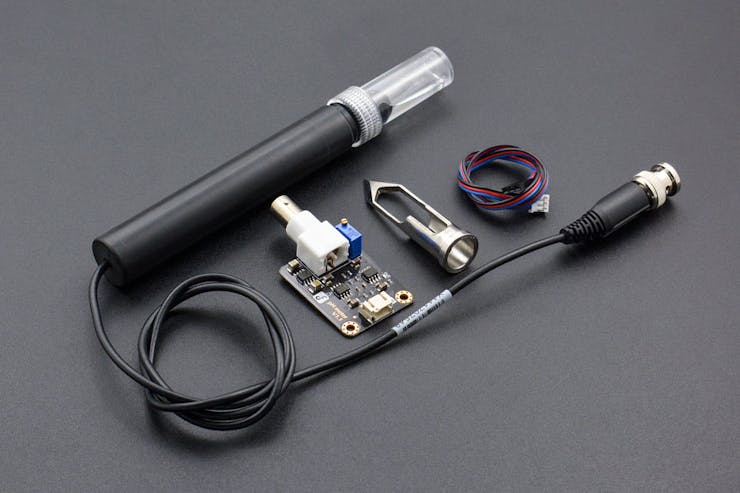
According DFRobot's website, analog Spear Tip pH Sensor / Meter Kit can directly stab into semisolid material to measure the pH value. It can be used to measure the pH value of wet soil and various foods. The pH value of the soil is an important factor affecting the growth of plants. Suitable pH values for different plants differ from each other. The pH value of foods, such as fruit, meat, and vegetable are also an important indicator of their quality. For example, by measuring the pH value of meat, we can determine whether the meat we bought is fresh or not. The pH probe of this kit is attached with a spear-like protection shield made of stainless steel with a sharp tip. It can be directly stabbed into the soft semisolid material to measure the pH value, such as wet soil or foods. But this can not be done with a common pH probe, or it will be damaged.
What Is Blynk?

Blynk is a full suite of software required to prototype, deploy, and remotely manage connected electronic devices at any scale: from personal IoT projects to millions of commercial connected products.
With Blynk anyone can connect their hardware to the cloud and build a no-code iOS, Android, and web applications to analyze real-time and historical data coming from devices, control them remotely from anywhere in the world, receive important notifications, and much more…
Blynk is a multi-tenant solution. You can configure how users get access to the data by setting roles and configuring permissions.
Applications made with Blynk are ready for the end-users. Whether it is your family member, an employee, or someone who has purchased your product, they will be able to download the app, connect the device and start using it.
Blynk also offers a white-label solution (part of the Business Plan), which means that you can add your company logo, app icon, choose the theme, colors, and publish the app to App Store and Google Play under your company name. These apps will work with your devices.
What Are We Monitoring?
We try to achieve the optimum bulk fermentation, in this case in our study, the optimum pH for bulk fermentation in our environment start from 2.9 to 3.6. This value can be varies, depends on flour blend, starter, room temperature, dough temperature, handling the dough, etc. In this project we focus on value pH of the dough.
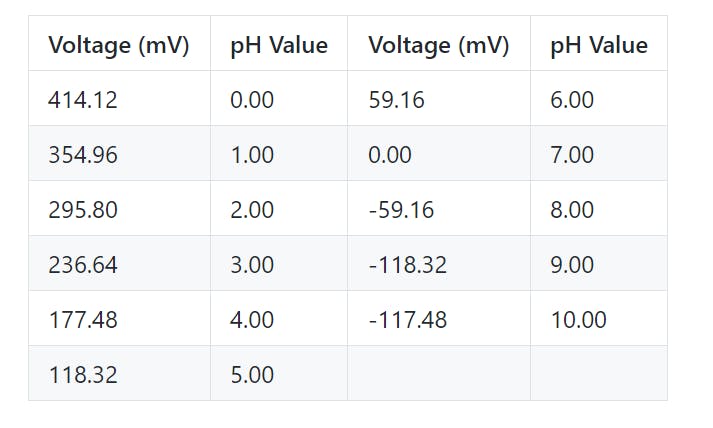
The spear sends analog output to Arduino through BNC connector. The analog voltage will be calculated with the specific formula to get the pH value.
Step By Step
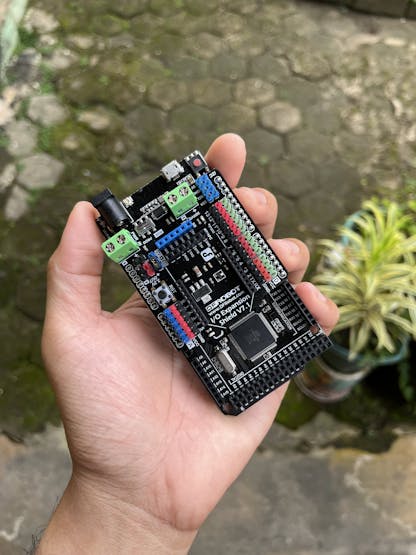
- Prepare the Arduino Mega Wifi Board with sensor shield.
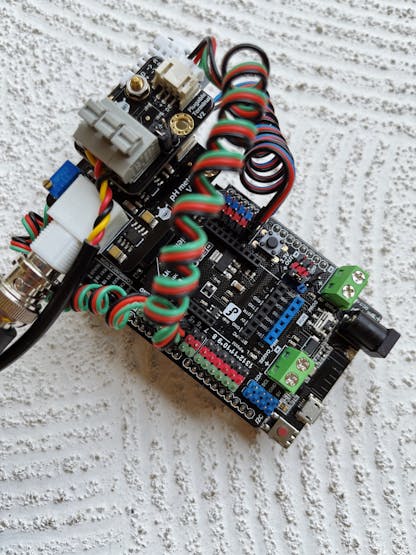
- Wiring the board with sensor DHT22, DS18B20, and DFRobot analog spear tip pH sensor to Arduino Mega Wifi board.
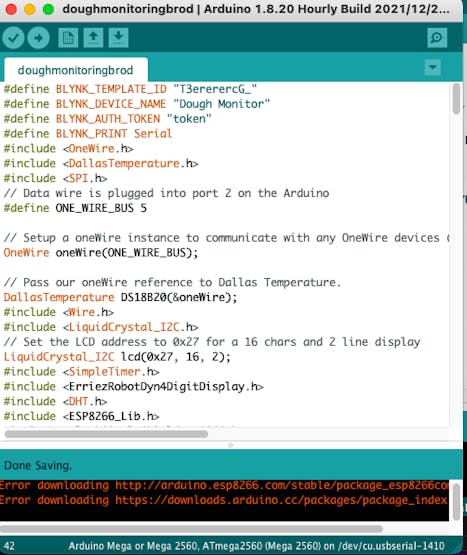
- Open Arduino IDE, make some codes.
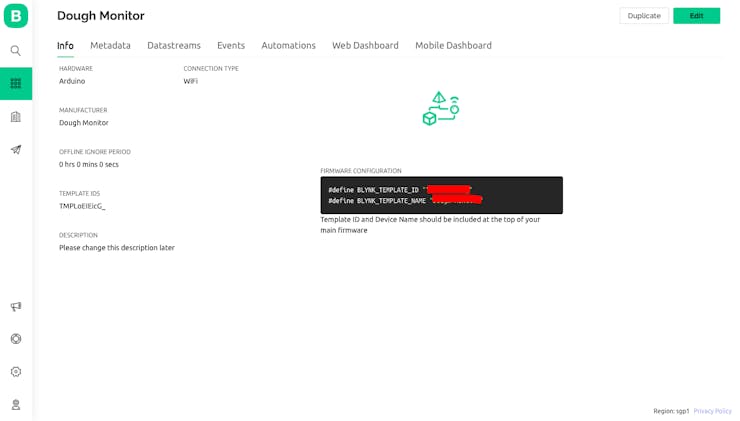
- Login Blynk Console to set up the dashboard and config the device.
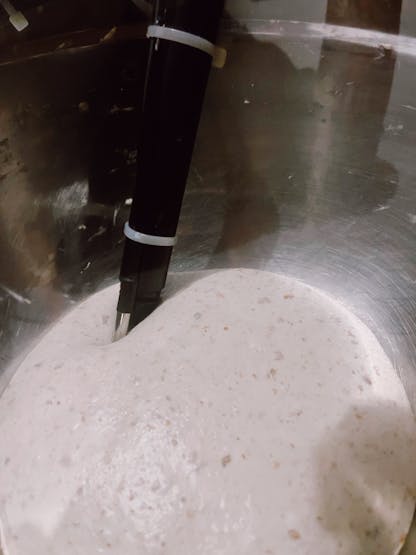
- Put the DFRobot Analog Spear Tip pH Sensor into the dough
- Dough Monitoring Blynk IOT App IOS

The Result

https://www.instagram.com/p/Cp98fNSpIFr/?utm_source=ig_embed&utm_campaign=embed_video_watch_again
#define BLYNK_TEMPLATE_ID "T3ererercG_"
#define BLYNK_DEVICE_NAME "Dough Monitor"
#define BLYNK_AUTH_TOKEN "token"
#define BLYNK_PRINT Serial
#include <OneWire.h>
#include <DallasTemperature.h>
#include <SPI.h>
// Data wire is plugged into port 2 on the Arduino
#define ONE_WIRE_BUS 5

// Setup a oneWire instance to communicate with any OneWire devices (not just Maxim/Dallas temperature ICs)
OneWire oneWire(ONE_WIRE_BUS);

// Pass our oneWire reference to Dallas Temperature.
DallasTemperature DS18B20(&oneWire);
#include <Wire.h>
#include <LiquidCrystal_I2C.h>
// Set the LCD address to 0x27 for a 16 chars and 2 line display
LiquidCrystal_I2C lcd(0x27, 16, 2);
#include <SimpleTimer.h>
#include <ErriezRobotDyn4DigitDisplay.h>
#include <DHT.h>
#include <ESP8266_Lib.h>
#include <BlynkSimpleShieldEsp8266.h>
#define TM1637_CLK_PIN      2
#define TM1637_DIO_PIN      3
#define DHTPIN 2
#define DHTTYPE DHT22     // DHT 11

#define PHSensorPin  A0    //dissolved oxygen sensor analog output pin to arduino mainboard
#define VREF 4.83    //for arduino uno, the ADC reference is the AVCC, that is 5.0V(TYP)
#define OFFSET 0.00  //zero drift compensation

#define SCOUNT  30           // sum of sample point
int analogBuffer[SCOUNT];    //store the analog value in the array, readed from ADC
int analogBufferTemp[SCOUNT];
int analogBufferIndex = 0,copyIndex = 0;

float averageVoltage,phValue;
DHT dht(DHTPIN, DHTTYPE);
RobotDyn4DigitDisplay display(TM1637_CLK_PIN, TM1637_DIO_PIN);
char auth[] = "token";

// Your WiFi credentials.
// Set password to "" for open networks.
char ssid[] = "jancuk";
char pass[] = "tailedig";
/*
char ssid[] = "anjing";
char pass[] = "geronimo"*//*
int latchPin = 10;
int clockPin = 13;
int dataPin = 11;
fourMatrix m(11,10,13,4);*/

byte volt[] = {
  B00011,
  B00110,
  B01100,
  B11111,
  B00011,
  B00110,
  B01100,
  B11000
};


byte tempChar []= {
  0x04,
  0x0A,
  0x0A,
  0x0E,
  0x0E,
  0x1F,
  0x1F,
  0x0E
};
byte degree[] = {
  B00100,
  B01010,
  B00100,
  B00000,
  B00000,
  B00000,
  B00000,
  B00000
};

byte rh[] = {
  0x04,
  0x04,
  0x0E,
  0x0E,
  0x1B,
  0x11,
  0x1B,
  0x0E
};


#define EspSerial Serial3
#define ESP8266_BAUD 115200

ESP8266 wifi(&EspSerial);


void setup()
{
    pinMode(PHSensorPin,OUTPUT);
    //lcd.clear();
    DS18B20.begin();
    lcd.createChar(0, tempChar);
    lcd.createChar(1, degree);
    lcd.createChar(2, rh);
    Serial.begin(9600);
    display.begin();
    lcd.begin();
    lcd.backlight();
    display.clear();
    dht.begin();
    delay(10);
    EspSerial.begin(ESP8266_BAUD);
    delay(10);
    Blynk.begin(BLYNK_AUTH_TOKEN, wifi, ssid, pass);


}


void phSpear()
{
  static unsigned long analogSampleTimepoint = millis();
  if(millis()-analogSampleTimepoint > 30U)     //every 30 milliseconds,read the analog value from the ADC
  {
     analogSampleTimepoint = millis();
     analogBuffer[analogBufferIndex] = analogRead(PHSensorPin);    //read the analog value and store into the buffer
     analogBufferIndex++;
     if(analogBufferIndex == SCOUNT)
         analogBufferIndex = 0;
  }
   static unsigned long printTimepoint = millis();
   if(millis()-printTimepoint > 1000U){
    printTimepoint = millis();
    for(copyIndex=0;copyIndex<SCOUNT;copyIndex++)
    {
      analogBufferTemp[copyIndex]= analogBuffer[copyIndex];
      }
      averageVoltage = getMedianNum(analogBufferTemp,SCOUNT) * (float)VREF / 1024.0; // read the value more stable by the median filtering algorithm
      phValue = 3.5 * averageVoltage + OFFSET;
      /*Serial.print("Voltage:");
      Serial.print(averageVoltage,2);
      Serial.print("   pH value:");
      Serial.println(phValue,2);*/
   }
}
int getMedianNum(int bArray[], int iFilterLen)
{
      int bTab[iFilterLen];
      for (byte i = 0; i<iFilterLen; i++)
      {
      bTab[i] = bArray[i];
      }
      int i, j, bTemp;
      for (j = 0; j < iFilterLen - 1; j++)
      {
      for (i = 0; i < iFilterLen - j - 1; i++)
          {
        if (bTab[i] > bTab[i + 1])
            {
        bTemp = bTab[i];
            bTab[i] = bTab[i + 1];
        bTab[i + 1] = bTemp;
         }
      }
      }
      if ((iFilterLen & 1) > 0)
    bTemp = bTab[(iFilterLen - 1) / 2];
      else
    bTemp = (bTab[iFilterLen / 2] + bTab[iFilterLen / 2 - 1]) / 2;
      return bTemp;
}


void sendSensor()
{
  pinMode(PHSensorPin,INPUT);
  lcd.backlight();
  lcd.createChar(0, tempChar);
  lcd.createChar(1, degree);
  lcd.createChar(2, rh);
  lcd.createChar(3, volt);
  float tempdough;
  float Fahrenheit=0;
  int h = dht.readHumidity();
  int t = dht.readTemperature(); // or dht.readTemperature(true) for Fahrenheit
  int temp1 = t / 10;
  int temp2 = t % 10;
  int temp = t,dec;
  Blynk.virtualWrite(V5, temp); //suhu virtual 5
  Blynk.virtualWrite(V6, h); //kelembaban virtual 6
  Blynk.virtualWrite(V7, phValue); //kelembaban virtual 6
  lcd.setCursor(0,0);
  lcd.print("DOUGH MONITORING");
  lcd.setCursor(0,1);
  lcd.write(0);
  //lcd.setCursor(12,1);
  //lcd.write(2);
  lcd.setCursor(14,1);
  lcd.print("pH");
  lcd.setCursor(10,1);
  lcd.print(phValue);
  DS18B20.requestTemperatures();
  tempdough = DS18B20.getTempCByIndex(0); // Celcius
  //int tempdoughc= (float)tempdough/10,1;
  Fahrenheit = DS18B20.toFahrenheit(tempdough); // Fahrenheit;
  Blynk.virtualWrite(V8, tempdough); //virtual pin V3
  Blynk.virtualWrite(V9, Fahrenheit); //virtual pin V4
  lcd.setCursor(5,1);
  lcd.write(1);
  lcd.setCursor(1,1);
  lcd.print((float)tempdough,1);
  lcd.setCursor(6,1);
  lcd.print("C");
  phSpear();
  delay(1000);

}

void loop()
{


  Blynk.run();
  sendSensor();


}
The article was first published in hackster, March 19, 2023
cr: https://www.hackster.io/kevinmarcelino/dough-monitoring-in-sourdough-bread-making-307016
author: M.Kevin Marcelino


