Building a Bluetooth-Controlled Robot Car with Arduino, HC-05, and Adafruit Motor Shield

In this Arduino Bluetooth tutorial, we will build a Bluetooth-controlled car using Arduino Uno, HC-05 Bluetooth module, and the Adafruit Motor Shield. This project covers everything from assembling the car’s chassis to programming the Arduino and developing a control app for your smartphone.
By the end of this guide, you’ll have a fully functional robot car that you can control wirelessly using your Android device.
Components Needed:
Plexiglas sheet (for the chassis)4 DC motors with gearboxes - BUY NOW
Adafruit Motor Shield V1.2Arduino Uno - BUY NOW
HC-05 Bluetooth Module3D
printed motor mounts and
Arduino holder
Jumper wires- BUY NOW
Battery pack and batteries
Smartphone with MIT App Inventor installed
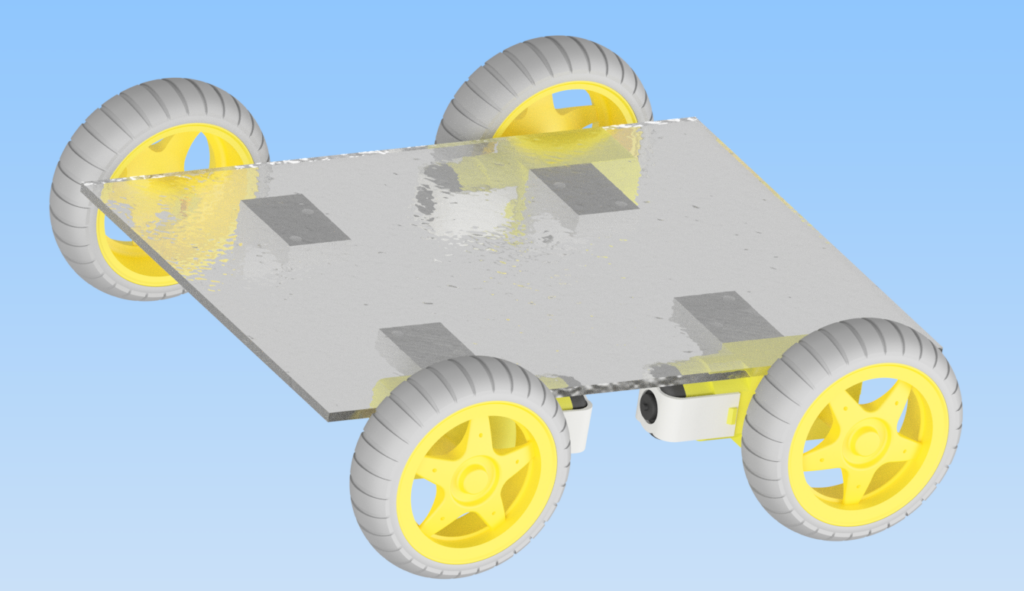
Step 1: Building the Chassis for Your Bluetooth-Controlled Car
To start building your Bluetooth-controlled car, we’ll create the chassis using a Plexiglas sheet. This will serve as the base to mount all the components.
Cut the Plexiglas: Measure and cut the Plexiglas sheet to your desired dimensions for the chassis.Mounts: Design and print motor mounts to securely attach the DC motors to the chassis.3D Print Arduino Holder: Design and print a holder to securely mount the Arduino Uno on the chassis.
Step 2: Mounting the Motors
Next, we’ll mount the DC motors as part of our Bluetooth-controlled car project.
Attach the Motors: Use screws and nuts to secure the DC motors to the 3D-printed motor mounts.Mount the Motors on the Chassis: Attach the motor mounts to the Plexiglas chassis using screws and nuts.
Step 3: Mounting the Arduino and Motor Shield
Secure the Arduino Uno and the Adafruit Motor Shield as we progress in our Bluetooth-controlled car tutorial.
Attach the Arduino Holder: Secure the 3D-printed Arduino holder to the chassis.Mount the Arduino: Place the Arduino Uno in the holder and secure it with screws.Attach the Motor Shield: Place the Adafruit Motor Shield onto the Arduino Uno, ensuring all pins are properly aligned.
Step 4: Wiring the Components
Wiring the components correctly is crucial in this Bluetooth-controlled car project.
Connect the Motors to the Shield:
– Connect the left motors to terminals M1 and M2 on the motor shield.
– Connect the right motors to terminals M3 and M4 on the motor shield.Connect the HC-05 Bluetooth Module:
– VCC to 5V on the Arduino.
– GND to GND on the Arduino.
– TXD to RX (Pin 0) on the Arduino.
– RXD to TX (Pin 1) on the Arduino.

Step 5: Powering the Bluetooth-Controlled Car
Learn how to power your Bluetooth-controlled car in this step.
Connect the Battery Pack:
– Connect the positive and negative terminals of the battery pack to the power terminals on the motor shield.
– Ensure the ground is connected properly.
Step 6: Programming the Arduino for Bluetooth Control
Here’s the Arduino code to control the robot car using Bluetooth commands from your smartphone.
* This code controls the forward and backward movement of a motor using an H-bridge.
*/
#include
AF_DCMotor motor1(1); // Create motor #1 using M1 connector
AF_DCMotor motor2(2); // Create motor #2 using M2 connector
AF_DCMotor motor3(3); // Create motor #3 using M3 connector
AF_DCMotor motor4(4); // Create motor #4 using M4 connector
char command;
void setup() {
Serial.begin(9600); // Start serial communication at 9600 baud rate
motor1.setSpeed(255); // Set initial motor speeds
motor2.setSpeed(255);
motor3.setSpeed(255);
motor4.setSpeed(255);
}
void loop() {
if (Serial.available() > 0) {
command = Serial.read(); // Read the incoming command
if (command == 'F') {
forward();
} else if (command == 'B') {
backward();
} else if (command == 'L') {
turnLeft();
} else if (command == 'R') {
turnRight();
} else if (command == 'S') {
stop();
}
}
}
void forward() {
motor1.run(FORWARD);
motor2.run(FORWARD);
motor3.run(FORWARD);
motor4.run(FORWARD);
}
void backward() {
motor1.run(BACKWARD);
motor2.run(BACKWARD);
motor3.run(BACKWARD);
motor4.run(BACKWARD);
}
void turnLeft() {
motor1.run(BACKWARD);
motor2.run(BACKWARD);
motor3.run(FORWARD);
motor4.run(FORWARD);
}
void turnRight() {
motor1.run(FORWARD);
motor2.run(FORWARD);
motor3.run(BACKWARD);
motor4.run(BACKWARD);
}
void stop() {
motor1.run(RELEASE);
motor2.run(RELEASE);
motor3.run(RELEASE);
motor4.run(RELEASE);
}
Description:
This code controls a robot with four DC motors using serial Bluetooth communication. The Arduino receives commands from a smartphone and executes corresponding movements:
Motor Initialization: The motors are configured using the Adafruit Motor Shield library () with connectors M1 to M4. Each motor is initially set to full speed.
Serial Communication: The Arduino waits for serial data from the smartphone. When a command is received, it is read and stored in the variable command.
Command Execution: Depending on the received command (F for forward, B for backward, L for left, R for right, S for stop), the corresponding function is called to control the motors.
Movement Functions:
forward(): All motors move forward.
backward(): All motors move backward.
turnLeft(): Left motors move backward, right motors move forward.
turnRight(): Left motors move forward, right motors move backward.
stop(): All motors stop.
Step 7: Developing the Android App for Bluetooth Control
We’ll use MIT App Inventor to create an app that will send commands to the robot via Bluetooth.
Register and Log In:
Go to MIT App Inventor and log in with your Google account.
Create a New Project:
Click on “Start New Project” and name it “RobotCarControl”.
Design the User Interface:
Add a ListPicker and set the text to “Select Bluetooth Device”.
Add a BluetoothClient component from the Connectivity palette (non-visible component).
Add four buttons for control: Forward, Backward, Left, Right, and set their colors accordingly.
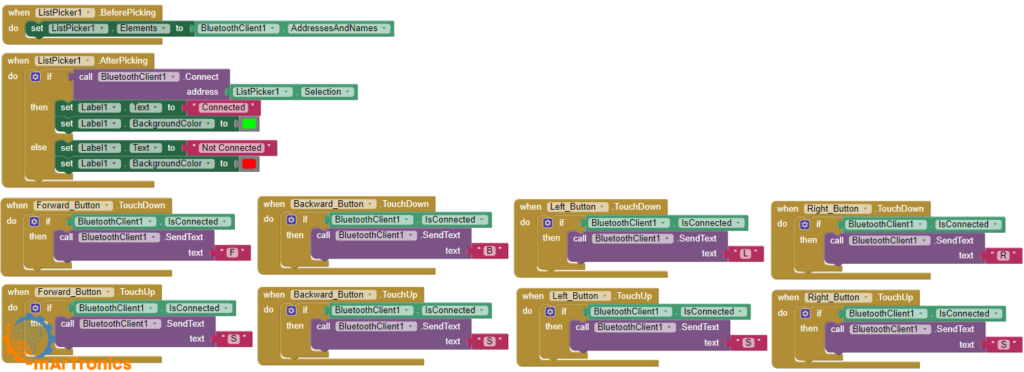
Program the Blocks:
Add the following blocks to manage Bluetooth connection and send control commands.
when ListPicker1.BeforePicking
set ListPicker1.Elements to BluetoothClient1.AddressesAndNames
when ListPicker1.AfterPicking
if call BluetoothClient1.Connect address ListPicker1.Selection
then set Label1.Text to "Connected"
else set Label1.Text to "Not Connected"
when ButtonForward.TouchDown
if BluetoothClient1.IsConnected
call BluetoothClient1.SendText text "F"
when ButtonBackward.TouchDown
if BluetoothClient1.IsConnected
call BluetoothClient1.SendText text "B"
when ButtonLeft.TouchDown
if BluetoothClient1.IsConnected
call BluetoothClient1.SendText text "L"
when ButtonRight.TouchDown
if BluetoothClient1.IsConnected
call BluetoothClient1.SendText text "R"
when ButtonForward.TouchUp
if BluetoothClient1.IsConnected
call BluetoothClient1.SendText text "S"
when ButtonBackward.TouchUp
if BluetoothClient1.IsConnected
call BluetoothClient1.SendText text "S"
when ButtonLeft.TouchUp
if BluetoothClient1.IsConnected
call BluetoothClient1.SendText text "S"
when ButtonRight.TouchUp
if BluetoothClient1.IsConnected
call BluetoothClient1.SendText text "S"
Step 8: Connecting and Testing the Robot
Pair the Bluetooth Device:
Turn on Bluetooth on your smartphone and pair with the HC-05 module (default password is 1234).Connect via App:
Use the app to connect to the Bluetooth module.
Use the directional buttons to control the robot.
Conclusion
Building a Bluetooth-controlled robot car is an exciting project that combines various aspects of robotics, including motor control, Bluetooth communication, and mobile app development. By following this comprehensive guide, you can create a fully functional robot car that responds to commands from your smartphone. This project not only enhances your understanding of Arduino and Bluetooth modules but also provides a solid foundation for more advanced robotics projects.
Feel free to ask any questions in the comments section below and check out my other Arduino projects for more inspiration.


