
This is the wiki for our project "Projet produit"

Things used in this project
Hardware components
Story
Projet Produit
Our project "Projet Produit" is a project in order to complete our second year at L'Ecole LDLC where we have to create a product from scratch.
We took a lot of time to think about an innovative project following our theme and constraint. We had to use an Arduino or a Raspberry, use Wifi, use at least one screen and a python script. Our theme was the bars in general.
First of all, we wanted to make a table that would be interactive for bars. We thought about being able to order from the table, interact with other tables and play alcohol games.
We (sadly) realised that it would be too complicated to make in the time and budget we had so we had to think about a new idea.
In order to find this new idea, we went to bars and asked waiters and bosses of bars about what was a problem in their bar. We ended up thinking about making a payment terminal that would include the pad to take orders from customers.
An all in one order/payment pad.
First step was to make the raspberry work, so we decided to install raspbian on it to install our simulation software. Here is a link to a tutorial to install Raspbian on your Raspberry : Link
I am talking here about a "simulation" software because in this project we are not making a real order/payement software. When we created our project we decided not to aim to sell our product to bars but to aim for cash register software companies and sell it to them so they can adapt the software and sell them to whoever they want.
The software
In order to complete our project we have to make a simulation software so i'm going to detail how it was made.
We hopped on Adobe XD and designed a simple interface that is the following.

Adobe XD preview
We then proceed to create it in HTML, here is the repo with all the code.
Note that this is not meant to be a real ordering software and this is why it it not very complete.
The payment part is available in the repo in the Python folder. Note that the two softwares are not connected together yet.
The prototype
1. Software part
Thanks to the screen we choose, the screen becomes touche sensitive just by plugging it into the raspberry so we don't need extra code for this.
After installing raspbian on the raspberry, we then open the terminal and update everything in the apt :
sudo apt-get updateWe then cd in the directory you want to clone the project :
cd /pi/DesktopAnd finally we clone the repository :
git clone https://github.com/Thomz07/ProjetProduitAnd now you just have to open the file "index.php"
About the paiement part, we started to develop a software that can read NFC card and we are working to get the certifications we need to make it a real paiement sofware.
We started to make our version 1 of the user interface with Python Tkinter.
To activate the nfc reader, simply run the following command on the Raspberry terminal :
sudo raspi-config Then choose Interfacing Options, SPI, confirm by pressing Y and that's it.
Last but not least, we will install the Python3 library "pi-rc522" which allows to control the RC522 reader.
We will use Pip3, a library manager for Python. We will just run the following command :
sudo pip3 install pi-rc522Here is the sofware architecture :
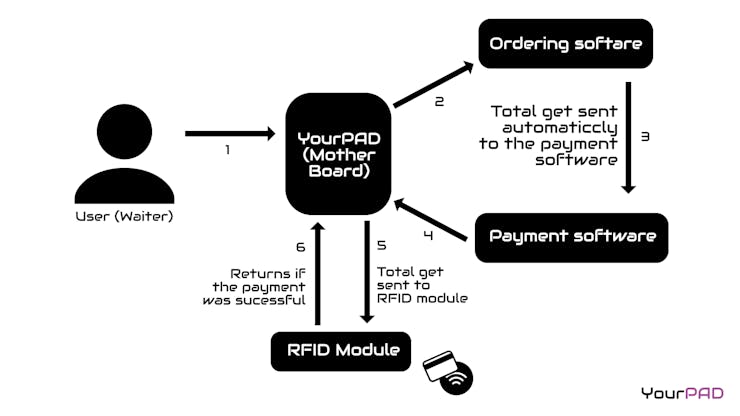
Software architecture
2. The hardware
The hardware part is pretty easy, you just have to plug the HDMI to the screen to make it work, Note that you might want to change the screen resolution in Raspbian settings.
To make the screen touch sensitive you have to plug a USB to microUSB cable from the Raspberry to the screen.
For the wiring of the RFID module, here is a diagram that explains it :
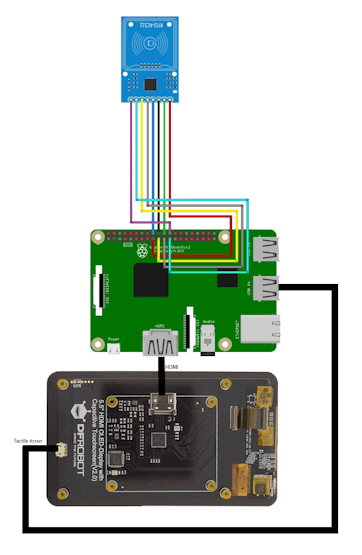
Wiring diagram
In order to power all of this, we used a random external battery. It needs to be quite powerful though
Thanks for reading and we hope your prototype is working properly !
Custom parts and enclosures


Schematics


Code
HTML ordering software
This is the repo for the simulation software code
The article was first published in hackster, April 22, 2022
cr: https://www.hackster.io/bar/yourpad-connected-tpe-e98248
author: Team Bar: Thomas Laffay, Jean Noël, Tristan Fauvet, Mael


