
Use OpenHardwareMonitor to get a reading on the diagnostics of my hardware in C#. Not WMI. Make a DIY Computer cooling system by yourself!

Things used in this project
Hardware components
Story
Introduction
The LattePanda is a full Windows 10 compatible single board computer based on the Intel Cherry Trail CPU. It features an upgraded Z8350 CPU (up to 1.92GHz) and a more stable RTL8723BS Wi-Fi chip (2.4G 802.11n). I brought one 2/32g LattePanda and used as a normal computer, only $89! Due to its powerful hardware and small size, heat dissipation inevitably becomes a problem (More details about LattePanda, click here).
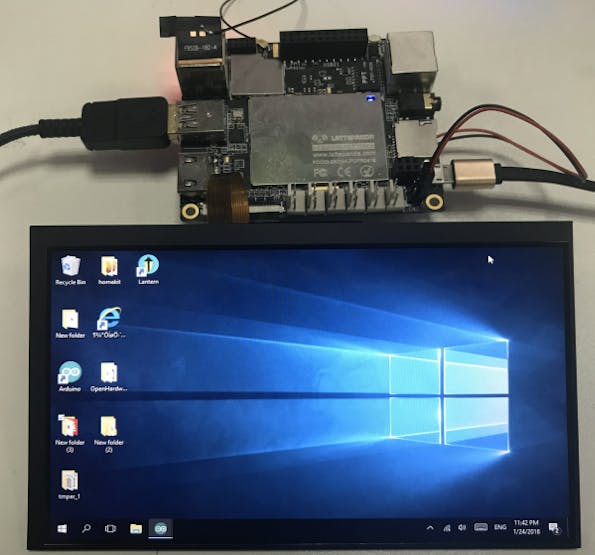
These days, I'm trying to make a smart fan cooling system for my baby Lattepanda. In short, just 2 steps:
Get the temperature of the CPU.Control the fan ON/OFF.
The most difficult part of this project is getting the CPU temperature. Searching on the Internet for many days. I find many solutions but most of them don't work for me. In this post, I will show you one way that can definitely work on everyone's computer by Openhardwaremonitor. If you have any problems on getting the CPU temperature, feel free to post your questions here!
You can also test these code on your PC. (The WMI way is not working for me, but I will still post the code and you can have a try)
What you need:
Hardware:
Aluminum Heatsink Cooling FanLattePanda or Arduino+PC
Software:
DEMO 1: Openhardwaremonitor
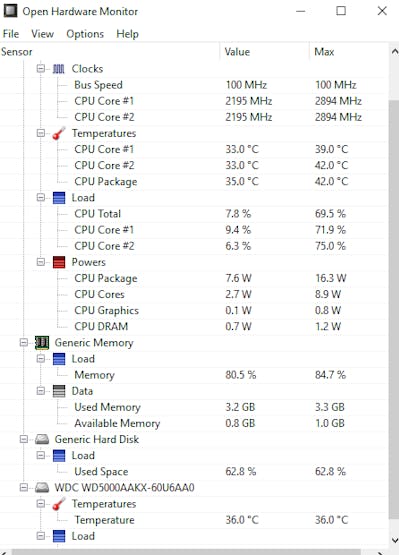
The Open Hardware Monitor is a free open source software that monitors temperature sensors, fan speeds, voltages, load and clock speeds of a computer.
Step 1: Download Openhardwaremonitor
Download the lastest Openhardwaremonitor software here: http://openhardwaremonitor.org/downloads/ You can open the .exe file first to see your hardware information, CPU usage, etc.
Step 2: Install Visual Studio 2017
Download Visual Studio 2017
Step 3 : Create A New Visual Studio Project
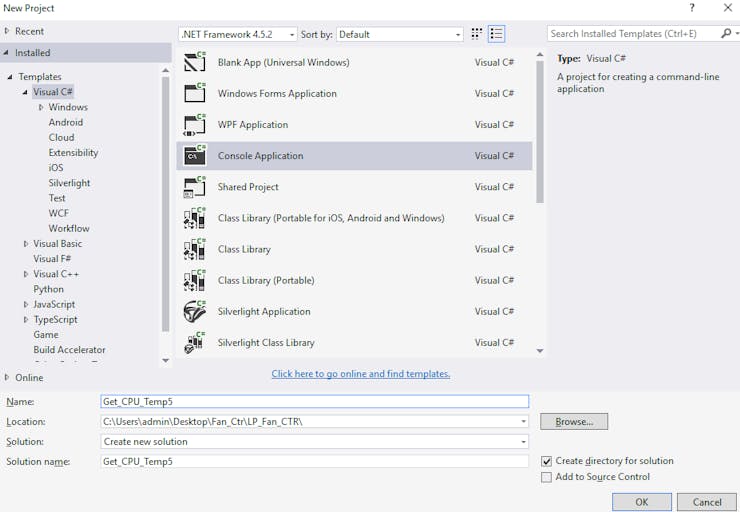
1. Create a new Console Application.
Click File > New Project > Visual C# > Console Application > OK
2. To use the code, you need to include a copy of OpenHardwareMonitorLib.dll in your project, add a reference to it.
Right Click on References>Add Reference>Browse
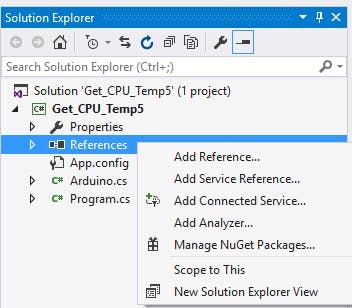
The OpenHardwareMonitorLib.dll is in the OpenHardwareMonitor folder.
9_L1t0xJ1Eu9.png?auto=compress%2Cformat&w=740&h=555&fit=max)
3. Copy the following code to your Visual Studio program.
using System;
using System.Collections.Generic;
using System.Linq;
using System.Text;
using System.Threading.Tasks;
using OpenHardwareMonitor.Hardware;
namespace Get_CPU_Temp5
{
   class Program
   {
       public class UpdateVisitor : IVisitor
       {
           public void VisitComputer(IComputer computer)
           {
               computer.Traverse(this);
           }
           public void VisitHardware(IHardware hardware)
           {
               hardware.Update();
               foreach (IHardware subHardware in hardware.SubHardware) subHardware.Accept(this);
           }
           public void VisitSensor(ISensor sensor) { }
           public void VisitParameter(IParameter parameter) { }
       }
       static void GetSystemInfo()
       {
           UpdateVisitor updateVisitor = new UpdateVisitor();
           Computer computer = new Computer();
           computer.Open();
           computer.CPUEnabled = true;
           computer.Accept(updateVisitor);
           for (int i = 0; i < computer.Hardware.Length; i++)
           {
               if (computer.Hardware[i].HardwareType == HardwareType.CPU)
               {
                   for (int j = 0; j < computer.Hardware[i].Sensors.Length; j++)
                   {
                       if (computer.Hardware[i].Sensors[j].SensorType == SensorType.Temperature)
                               Console.WriteLine(computer.Hardware[i].Sensors[j].Name + ":" + computer.Hardware[i].Sensors[j].Value.ToString() + "\r");
                   }
               }
           }
           computer.Close();
       }
       static void Main(string[] args)
       {
           while (true)
           {
               GetSystemInfo();
           }
       }
   }
}
4. Force your application to run as administrator
It's very important, or you won't get the data back! Right click on Project > Add New Item, select "Application Manifest File".
o3d_OFK9Ckz5vf.png?auto=compress%2Cformat&w=740&h=555&fit=max)
Change the
<requestedExecutionLevel level="requireAdministrator" uiAccess="false" />
3fx_eo_3sRoDQKc5c.png?auto=compress%2Cformat&w=740&h=555&fit=max)
5. Click Run
There you go! Here's the Temperature of my CPU. What about yours?
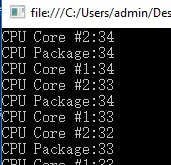
If you just want to get the average temp of the CPU, try to modify the code on your own~ It's very easy! So far so good? If your have any questions, please let me know!
DEMO 2: WMI (No Success)
This WMI demo is not working for me, but it's most of the people suggest me to use. You can have a try.
Create a new Console Application and copy the following code.
using System;
using System.Diagnostics;
using System.Management;
class Program
{
   static void Main(string[] args)
   {
       Double CPUtprt = 0;
       System.Management.ManagementObjectSearcher mos = new System.Management.ManagementObjectSearcher(@"root\WMI", "Select * From MSAcpi_ThermalZoneTemperature");
       foreach (System.Management.ManagementObject mo in mos.Get())
       {
           CPUtprt = Convert.ToDouble(Convert.ToDouble(mo.GetPropertyValue("CurrentTemperature").ToString()) - 2732) / 10;
          Console.WriteLine("CPU temp : " + CPUtprt.ToString() + " °C");
       }
   }
}
My computer doesn't support this demo.
1woyb_hjil1aoYIf.png?auto=compress%2Cformat&w=740&h=555&fit=max)
If somebody can run this demo, please teach me~please~ lol
DEMO 3: Cooling fan Control system based on CPU temperature
Since we get the CPU data successfully, we can now easily control the Fan with the logic below.
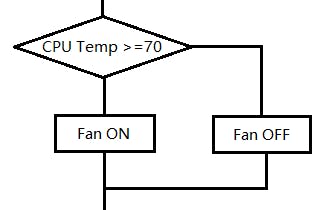
(Change the threshold value according to your actual situation)
Hardware Step:
1. Connect your Arduino to your PC.
My LattePanda has an ATmega32u4 microcontroller integrated in to it (like you would find in an Arduino Leonardo) with accompanying GPIO. This makes it ideal for physical computing, IoT and embedded applications. (More details about LattePanda)
2. Connect the Fan to A0.
Software Step:
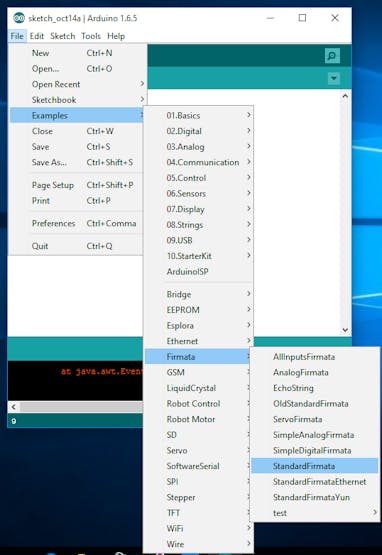
1. Upload StandardFirmata to your Arduino.
2. Download the LattePanda.Firmata class library
(To find more details and tutorial about LattePanda.Firmata, click here)
3. Open Visual Studio 2017 and create a new console app:
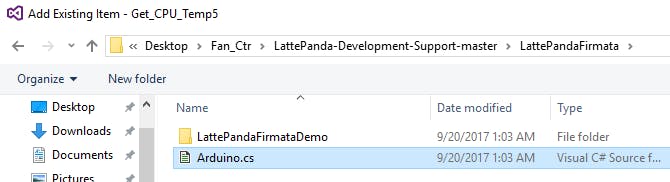
4. Add the downloaded class library to your project. Open your Solution Explorer and right-click in the blank area, then add existing item.
5. Include a copy of OpenHardwareMonitorLib.dll in your project, add a reference to it.
Right Click on References>Add Reference>Browse
9_MZu7a6Qq2H.png?auto=compress%2Cformat&w=740&h=555&fit=max)
6. Copy the following code to your Visual Studio program.
using System;
using System.Collections.Generic;
using System.Linq;
using System.Text;
using System.Threading.Tasks;
using OpenHardwareMonitor.Hardware;
using LattePanda.Firmata;
namespace Get_CPU_Temp5
{
   class Program
   {
       static Arduino arduino = new Arduino();
       public class UpdateVisitor : IVisitor
       {
           public void VisitComputer(IComputer computer)
           {
               computer.Traverse(this);
           }
           public void VisitHardware(IHardware hardware)
           {
               hardware.Update();
               foreach (IHardware subHardware in hardware.SubHardware) subHardware.Accept(this);
           }
           public void VisitSensor(ISensor sensor) { }
           public void VisitParameter(IParameter parameter) { }
       }
       static int GetCpuTemp()
       {
           int Cputemp = 0;
           UpdateVisitor updateVisitor = new UpdateVisitor();
           Computer computer = new Computer();
           computer.Open();
           computer.CPUEnabled = true;
           computer.Accept(updateVisitor);
           for (int i = 0; i < computer.Hardware.Length; i++)
           {
               if (computer.Hardware[i].HardwareType == HardwareType.CPU)
               {
                   for (int j = 0; j < computer.Hardware[i].Sensors.Length; j++)
                   {
                       if (computer.Hardware[i].Sensors[j].SensorType == SensorType.Temperature)
                       {
                           Cputemp += (int)computer.Hardware[i].Sensors[j].Value;
                       }
                   }
               }
           }
           computer.Close();
           return Cputemp;
       }
       static void Main(string[] args)
       {
           arduino.pinMode(0, Arduino.OUTPUT);
           while (true)
           {
               int temp= GetCpuTemp()/4;
               Console.WriteLine(temp);
               if(temp>=70)
                   arduino.digitalWrite(0, Arduino.HIGH);//
               else
                   arduino.digitalWrite(0, Arduino.LOW);//
           }
       }
   }
}
7. Force your application to run as administrator.
Right click on Project > Add New Item, select "Application Manifest File".
Change the
<requestedExecutionLevel level="requireAdministrator" uiAccess="false" />3fx_eo_pHz4QAWZw2.png?auto=compress%2Cformat&w=740&h=555&fit=max)
8.Finally debug your project Connect your Arduino and click Start.

See, It's nice! The fan will work when the CPU temperature is above 70 degree.
If you have any questions, please let me know!
DEMO 4: Arduino Mod for Open Hardware Monitor
I find a really nice software in the LattePanda forum that can easily control the GPIO output according to the CPU temperature. The function is integrated in the Openhardwaremonitor software. It's really easy to use. See the original post and download the software here.

Summary
It really takes me a lot of time to find the solution, I holp this post is useful for you and save your time. Even if you are just start with C# or start with Arduino, this tutorial is good for you to study. Modify the code, you can do a lot of thing.
Sadly, the output of the Arduino GPIO is about 5v 30mA. Fan really works slow :-<
Is somebody interested in making a Arduino Fan control Shield? LOL. So we can have a more powerful GPIO output!
If you have any questions, please let me know!
The article was first published in hackster, January 25 2018
cr: https://www.hackster.io/haoming-weng/get-cpu-temperature-using-open-hardware-monitor-in-c-1a3338
author: Haoming Weng


