
Never mourn a dead, dried-out plant again when you use this Plant Health Monitoring System
Things used in this project
Hardware components
Story
Remember the days of unwatered plants and dying flowers? Never again with our Plant Health Monitoring System that tells you when your plant needs water, if it is getting the right amount of sunlight, and whether the temperature of the soil is too hot or too humid. The idea came to us when we discussed how we all forget to water our plants and flowers and how it is difficult to tell how the plant's health is doing.
We then deliberated on alternatives that were doable to adopt, which further reduced the list. One could just set an alarm to water the plant every day, but this would entail setting many alarms if the person had various plants that demand varying degrees of moisture. By utilizing Argon to measure soil moisture levels and establishing a limit, it is possible to adjust the limit to suit the particular requirements of the plant. There is an abundance of technology and resources available online for optimizing soil health, and we concluded that the Particle Argons could be employed to achieve this objective.
Plant monitoring systems can be used for a range of applications, from precision agriculture and indoor farming to urban gardening and plant research. They can help farmers and gardeners optimize plant growth, reduce water and fertilizer use, and improve overall crop yields. Additionally, they can assist researchers in studying plant behavior and developing new plant varieties that are more resilient to environmental stresses.
Project Deliverables:
To begin, we conducted research on potential sensors suitable for measuring soil moisture, as well as other sensors that could be used in combination with the soil moisture sensor. Our research led us to discover two sensors currently available in the market: Resistive Soil Sensor and the Capacitive Soil Sensor.
A resistive soil sensor is a device that measures soil moisture content by gauging the electrical resistance between two electrodes. It works by passing a low-level current through the soil and measuring the resistance to this current, which varies depending on the amount of moisture present in the soil. The higher the moisture content, the lower the resistance, and vice versa. On the other hand, a capacitive soil moisture sensor measures soil moisture content by detecting changes in the dielectric constant of the soil. It consists of two electrodes that act as the plates of a capacitor. The water content of the soil determines the dielectric constant, which in turn influences the capacitance between the two electrodes. The higher the moisture content, the greater the capacitance, and vice versa. We have chosen the capacitive soil sensor because it provides greater accuracy in comparison to the resistive soil moisture measuring sensor.
Sensors Used:
1.) Capacitive Soil Sensor: which will measure the moisture (amount of water) of the soil increases, the voltage will increase.
2.) DHT11 Temperature & Humidity Sensor: that measures the temperature and humidity of the plant because it is a crucial factor in determining the growth of a plant, and the optimal temperature range varies depending on the plant species. This is where the Argon project proves to be beneficial as it allows for the customization of threshold values based on the specific plant being monitored
3.) LDR Photoresistor: By utilizing a photoresistor, we could determine the precise level of sunlight that a plant was receiving. With this information, we could identify the ideal location within a house where the plant can receive the necessary amount of sunlight each day
After identifying and selecting the four sensors, we began exploring how to integrate them with the Argons. We discovered codes that closely matched our project requirements and only required minor modifications to suit our specific needs.
Project Setup:
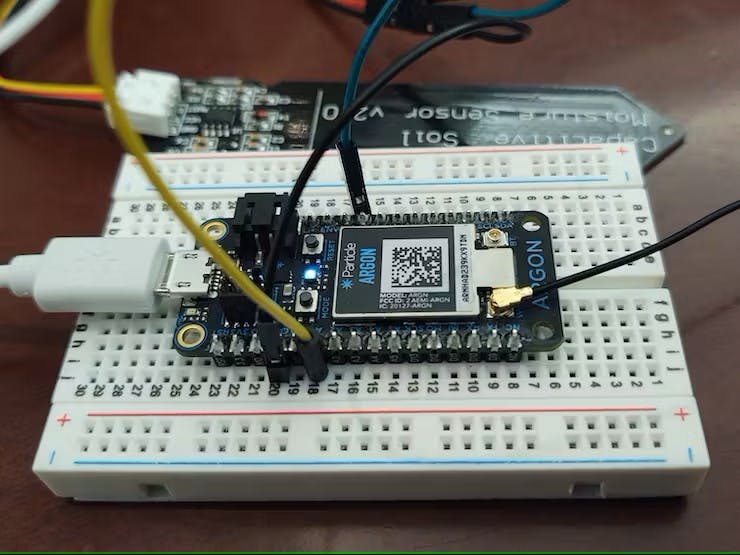
_Ht8VI6jAge.png?auto=compress%2Cformat&w=740&h=555&fit=max)
Plant Health Monitoring System, set up and using all three sensors to gather vital data
This project, as mentioned earlier, uses a sensor that measures the temperature and humidity of the plant because it is a crucial factor in determining the growth of a plant, and the optimal temperature range varies depending on the plant species. This is where the Argon project proves to be beneficial as it allows for the customization of threshold values based on the specific plant being monitored.
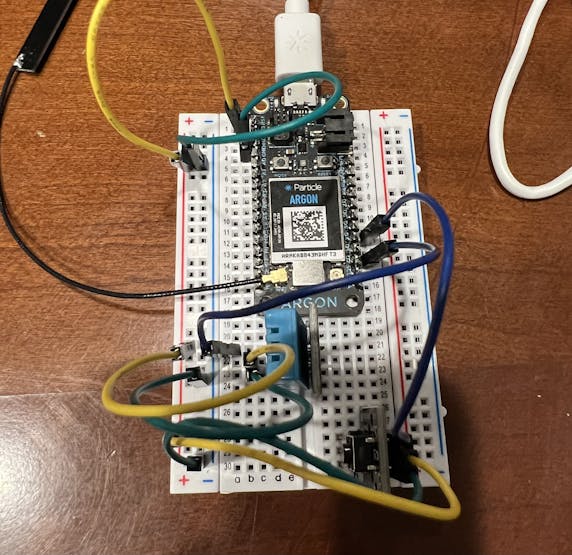
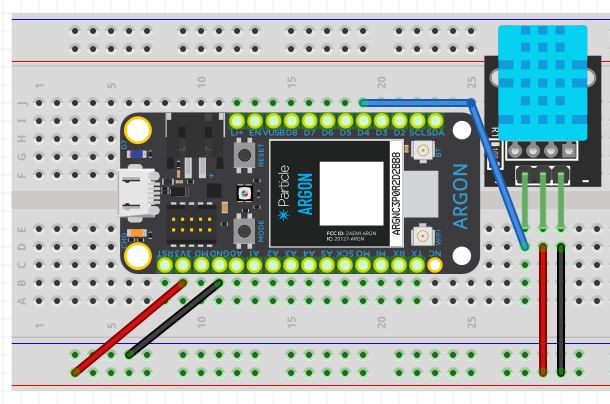
The First Argon with the DHT 11 Temperature and Humidity Sensor:
The process begins with temperature and humidity data gathered in the first Argon device, which then transmits the data to the cloud and signals the two subsidiary Argons to begin data collection. When the two subsidiary Argons receive the message, they initiate data collection.
DHT 11 Temperature and Humidity Sensor Circuit Top View

DHT 11 Temperature and Humidity Sensor Circuit Side View
The Second Argon with the LDR Photoresistor:
Upon receiving the signal from the first Argon, the second Argon begins to gather ambient light data with its attached Light Dependent Resistor (LDR). This is a variable resistance photoresistor whose resistance changes with the amount of light present. When the photoresistor detects that there is low or no ambient light, it sends a HIGH signal to its connected LED, which will illuminate. This second Argon also publishes its data to the Particle cloud, the ThingSpeak live data graph (linked below), and sends its data to the first Argon.

LDR Photoresistor Circuit Top
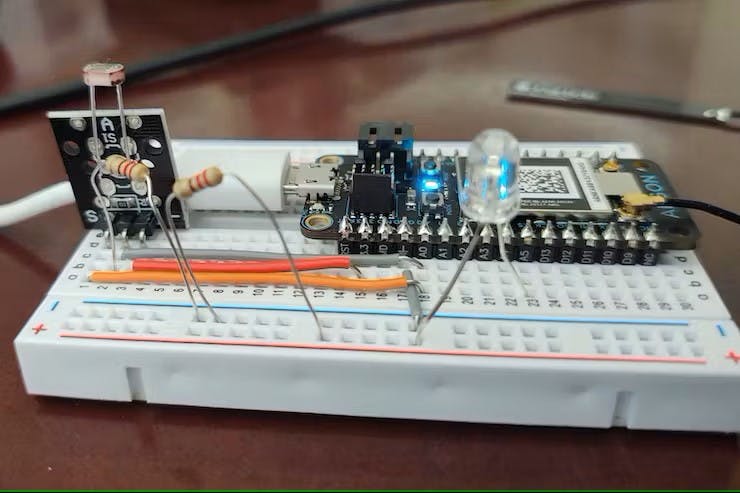
LDR Photoresistor Side
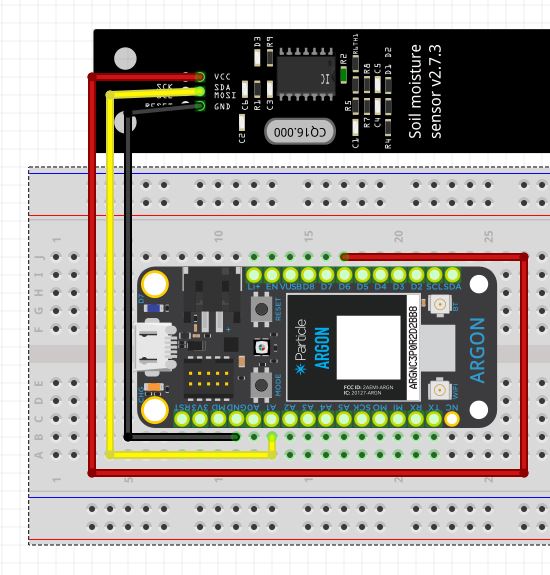
The Third Argon with the Capacitive Soil Moisture Sensor:
Upon receiving the trigger from the first Argon, the third Argon initiates collecting both temperature and humidity data. It then publishes its data to the Particle cloud, two ThingSpeak graphs (linked below), and sends its data to the first Argon.
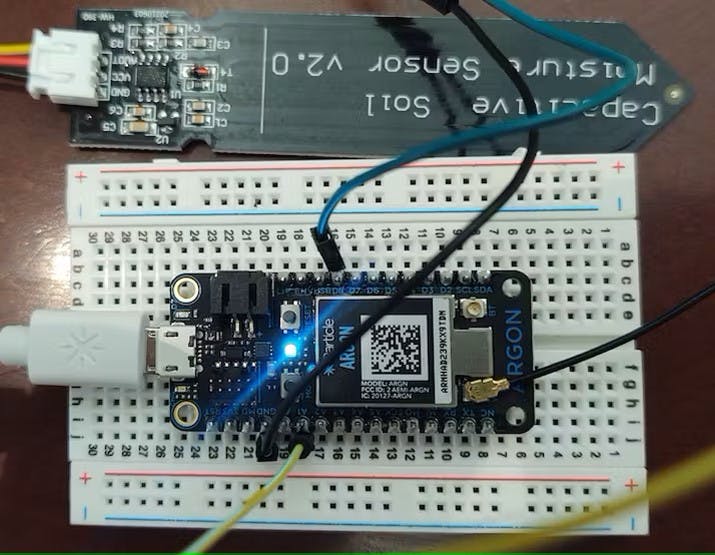
Capacitive Soil Moisture Sensor Circuit Top
Capacitive Soil Moisture Sensor Circuit Side
Video Representation :
Results:
In general, the project was successful, all components are functioning properly and all three devices are communicating with each other. Each of the devices is sending and receiving data with the sensor included in them. Our team was able to effectively display the readings from the soil moisture sensor using ThingSpeak. Furthermore, the photoresistor and LED are also performing as intended. The photoresistor sends us a signal indicating whether it is "Bright Light" or "Low or No Light" based on the amount of sunlight the plant is receiving, and the LED provides a visual cue by turning on when it detects low light. The DHT 11 temperature and humidity sensor is precisely measuring the soil temperature and signaling us if the temperature around the soil is too hot. If necessary, a lower temperature threshold could be established. While we had initial success with our soil moisture sensor, while filming the video, that Argon had difficulty staying connected to the internet. Its measurements were intermittent so we excluded the live data.
Conclusion:
Throughout the years, we've had a few plants that always seem to die because we forget to water them. However, with this project, we no longer have to remember to water them ourselves because the Argons will do it for us. The great thing about this project is that it can be used for multiple plants by customizing the threshold values for each individual plant. Additionally, the project can be improved by integrating an automatic watering system with another Argon and water solenoid. This would eliminate the need to worry about watering the plants altogether. As long as the solenoid is connected to a water source, the valve can open and close based on the soil moisture detected by the Argon and the threshold values that have been set.
Credits:
Photoresistor and Soil Moisture codes sourced from Fall 2022 IOT Project Group 23: Matthew Marslender, Mljenkins, and vnaguirre and modified to suit our needsTemp and Humidity sensor codes sourced from MEGR 3171 Popcorn Monitor Group 27: Kenta Casagrande and Will Troxel
Flow Chart- Communication:
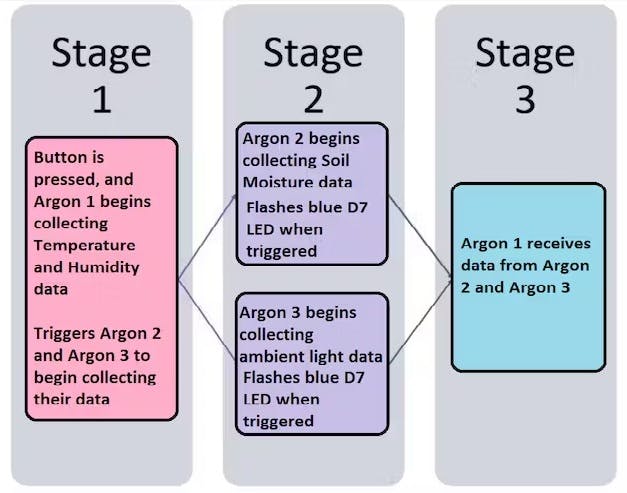
Flowchart of Argon Communication and Data Collection
Graphed Data & Live Data with Link:
Photoresistor Raw Live Data Feed
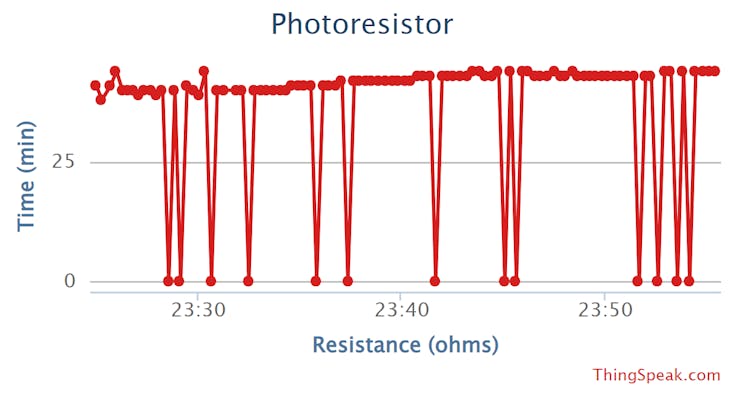
Photoresistor Live Data Feed Screenshot (0 = photoresistor reading "low or no light")
Schematics
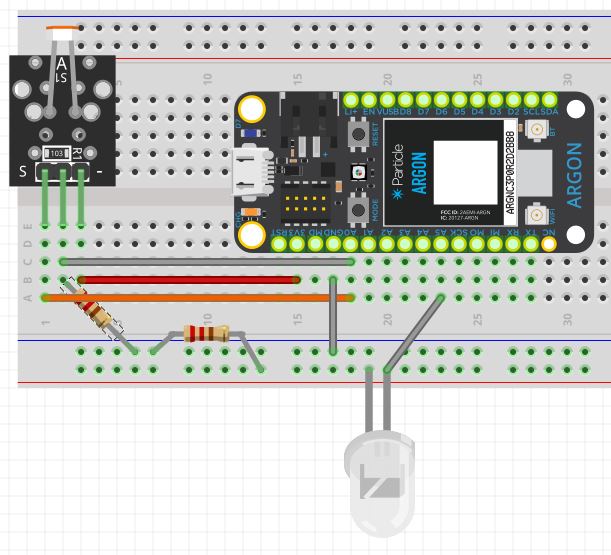
Photo-resistor Cluster circuit
Temperature Sensor Circuit
Soil Moisture Sensor Circuit
Code
Photoresistor
C/C++
// This #include statement was automatically added by the Particle IDE.
#include <ThingSpeak.h>

TCPClient client;

unsigned long myChannelNumber = 2113664;
const char * myWriteAPIKey = "9DR7CR40K7C54NHT";


int led1 = A5; // White LED (+ to A5, - to GND), lights when sensor is below light threshold

int photoresistor = A0; // Photoresistor connected to A0 pin
int analogValue;

void setup() {

  ThingSpeak.begin(client);
  pinMode(led1, OUTPUT);
  pinMode(led2, OUTPUT);
  pinMode(photoresistor, INPUT);

}

void loop() {
    analogValue = analogRead(photoresistor); // Loop reads analog value of photo resistor
    ThingSpeak.writeField(myChannelNumber, 1, analogValue, myWriteAPIKey);
    if (analogValue > 75) { //If over threshold, digital write LOW to LEDs
        digitalWrite(led1, LOW);
        digitalWrite(led2, LOW);
        Particle.publish("Bright Light", "0", PUBLIC); //Publish to Particle console
        delay(15000);

    } else { //If over threshold, digital write HIGH to LEDs
        digitalWrite(led1, HIGH);
        digitalWrite(led2, HIGH);
        Particle.publish("Low or No Light", "1", PUBLIC); //Publish to Particle console
        delay(15000);
    }
}
DHT Code
C/C++
// This #include statement was automatically added by the Particle IDE.
#include <Grove_Temperature_And_Humidity_Sensor.h>

// This #include statement was automatically added by the Particle IDE.
#include <ThingSpeak.h>

#define DHTPIN  D2     // set pin

TCPClient client;

unsigned long myChannelNumber = 2113664;    // change this to your channel number
const char * myWriteAPIKey = "9DR7CR40K7C54NHT"; // change this to your channels write API key

unsigned long previousMillis = 0;

DHT dht1(DHTPIN);

// Initialize Grove Button on digital pin D4
const int BUTTON_PIN = D4;

// Initialize variables to track the state of the button
bool buttonState = LOW;
bool lastButtonState = LOW;
bool isOn = false;

// Set the interval for taking readings
const unsigned long INTERVAL = 500; // in milliseconds

// Set the interval for printing readings
const unsigned long PRINT_INTERVAL = 5000; // in milliseconds
unsigned long lastPrintTime = 0;

void setup() {
  Serial.begin(9600);
  Serial.println("DHT11 Begin!!!");
  ThingSpeak.begin(client);
  pinMode(BUTTON_PIN, INPUT_PULLUP);
  pinMode(D7, OUTPUT);
}


void loop() {
  // Read the button state
  buttonState = digitalRead(BUTTON_PIN);
  // Check if the button state has changed
  if (buttonState != lastButtonState) {
    // If the button is pressed, toggle the state of isOn
    if (buttonState == LOW) {
      isOn = !isOn;
    }
    // Delay for debounce
    delay(50);

   digitalWrite(D7, HIGH);
    Particle.publish("toggle-led", PUBLIC);
    delay(1000);
    digitalWrite(D7, LOW);
    delay(5000);


  }

  // Save the current button state for comparison
  lastButtonState = buttonState;

  // If the code is on, take and print readings
  if (isOn) {
    // Check if it's time to take a reading
    if (millis() - lastPrintTime >= INTERVAL) {
      //Read Humidity
      float h = dht1.getHumidity();
      // Read temperature as Celsius
      float t = dht1.getTempCelcius();
      // Read temperature as Farenheit
      float f = dht1.getTempFarenheit();

      Serial.print("Humid: ");
      Serial.print(h);
      Serial.println("%  ");
      Serial.print("Temp: ");
      Serial.print(t);
      Serial.println("*C ");
      Serial.print("Temp: ");
      Serial.print(f);
      Serial.println("*F ");
      Serial.println();

      String Humidity = "{" + String(h) + "}";

      String Temp = "{" + String(f) + "}";

      Particle.publish("Temp", Temp);

      Particle.publish("Humidity", Humidity);

      ThingSpeak.setField(1,String(h));
      ThingSpeak.setField(2,String(f));

      // Update the last print time
      lastPrintTime = millis();

      // Write to ThingSpeak, field 1, immediately
      ThingSpeak.writeFields(myChannelNumber, myWriteAPIKey);

      delay(15000); // ThingSpeak will only accept updates every 15 seconds.
    }
  }
  else {
    // If the code is off, reset the last print time
    lastPrintTime = millis();
  }
}
Soil Moisture Sensor
C/C++
//Set Moisture Sensor to Analog 0 Pin
int Moisture = A1;
int analogMoisture = 0;
int mVoltage = 0;
int i = 0;

void setup() {

    pinMode(D7, OUTPUT);
    Particle.subscribe("toggle-led", toggleLed, ALL_DEVICES);

    //Set pinmode as INPUT so that we read the data from the Moisture sensor
    pinMode(Moisture, INPUT);


}

void loop() {
    //Connect to Particle Clould check
    if (Particle.connected() == false) {
        Particle.connect();
    }

  //While loop to run a specified number times when initialized
  while (i < 50 && digitalRead(D7) == LOW) {
  //Read Moisture Sensor and send data to analogMoisture Variable, this data is    in counts out of 4096, so it needs to be converted to voltage
  analogMoisture = analogRead(Moisture);
  // data is in counts out of 4096, so it needs to be converted to voltage
  mVoltage = (analogMoisture*3300)/4096;

 //Publish mVoltage variable which is the output voltage in mV of the moisture    sensor
 Particle.variable("mVoltage", mVoltage);

  //Publish Voltage in millivolts
  Particle.publish("mvoltage_reading", String(mVoltage), PUBLIC);
  //Publish voltage values to cloud
  String data = String(mVoltage);
  //Trigger the integration
  Particle.publish("mvoltage_reading ", data, PRIVATE);
            i++;

  //Wait 10 seconds
  delay(10000);
        }

}


//this function turns on LED
void toggleLed(const char *event, const char *data) {

    digitalWrite(D7, HIGH);
    delay(1000);
    digitalWrite(D7,LOW);
    delay(1000);
}
The article was first published in hackster, April 19, 2023
cr: https://www.hackster.io/team-14-megr-3171/plant-health-monitoring-system-spring-23-iot-group-14-5bf4a1#story
author: Team 14: MEGR-3171: Zena, Amanda Shaw, Kennedi


