

I. Project Introduction
UNIHIKER Board and Mecanum Wheeled platform of Elegance! Imagine that you can sit at home, without having to connect to a computer with complex wires, or lying on the ground to debug the mobile platform. You can elegantly control them remotely through the network to track facial recognition.

1. OpenCV
OpenCV (Open Source Computer Vision Library) is an open-source computer vision library consisting of C functions and C++ classes. It also provides interfaces for Python, Ruby, MATLAB and other languages, enabling implementation of common image processing and computer vision algorithms.
Some key capabilities of OpenCV include Image processing, Video analysis, Camera calibration & 3D reconstruction, Feature detection & description, Machine learning, statistical models, Object detection, etc.

2. Mecanum Wheel
The Mecanum Wheel allows vehicles to move flexibly in any direction without needing to rotate the chassis. Unlike regular wheels that require complex axles and mechanisms to turn, Mecanum Wheels can roll and slide perpendicular to their axis.
This is achieved through their ingenious wheel design. Each wheel has a series of rollers attached at an angle around the rim. When the wheel spins, the angle of the rollers translates some of this rotation into lateral motion.
By controlling the speed and direction of each wheel independently, you can make the vehicle drive forward, sideways, diagonally and even spin around on the spot. The net force produced lets it move freely while keeping the chassis orientation intact.
Mecanum Wheels eliminate the constraints of front-facing vehicles. You can navigate in tight spaces easily and move in any direction without first turning. They are used in robotics, transportation, automation systems and more. Their versatility opens up new possibilities for projects!

3. UNIHIKER Introduction
UNIHIKER makes IoT prototyping super easy. It has a built-in touchscreen, Wi-Fi, Bluetooth and sensors like light, motion and gyroscope. What's amazing is the co-processor that lets you interface with external sensors and actuators. There's also a Python library to quickly control connected devices. No more wiring up complex wires! Other great features are support for VS Code and VIM for coding, built-in IoT service with MQTT and local data storage, and real-time web access to your projects. UNIHIKER is perfect for DIY IoT projects. With its user-friendly design, extensive connectivity options, Python library and innovative tools, it makes IoT development faster and more convenient.

4. Hardware List
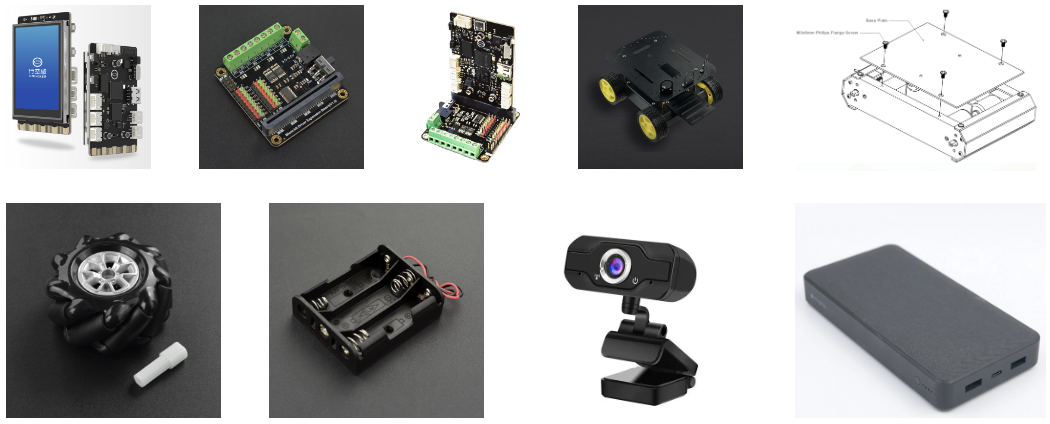
5. Hardware Connection

- Plug the ‘Edge Connector’ in UNIHIKER to ‘Micro Adapter’ in Microbit Expansion Board

- Connect the four Mecanum Wheels to the microbit driver expansion board as shown in the picture. And install three AA batteries for the power supply.
- The wheels need to be installed in an x-shape.

Before running the program, make sure you have done the following three steps, an error will occur when the program is uploaded.
- Make sure the USB of the camera is plugged in.
- Make sure the UNIHIKER is powered by the power bank.
- Make sure to turn on the power switch of the microbit driver board.

II. Remotely Configuring the UNIHIKER

1. Config Method 1: UNIHIKER+USB
When the UNIHIKER is connected to your computer via a USB cable, you can directly open chrome and input the UNIHIKER IP (10.1.2.3) to open the local webpage.
2. Config Method 2: UNIHIKER+WIFI
I ran into a key debugging issue - it's not very elegant to drag a data cable while the car needs to run on the ground in real-time for debugging. The remote upload debugging feature is especially important! The Wi-Fi capability of the UNIHIKER can meet this need!
Let's connect the UNIHIKER and the computer to the same Wi-Fi to achieve wireless upload.
(1) First, on the '5-Hotspot' page, make sure 'enable' the wireless hotspot of the UNIHIKER. Check the ssid (hotspot name) and pass (hotspot password).
(2) Connect the computer to the hotspot of the UNIHIKER: Find the UNIHIKER's ID on the computer's Wi-Fi and enter the password.
(3) Long press the Home button to enter the onboard menu of the UNIHIKER. The network information page displays all current IP addresses.
(4) Connect the UNIHIKER to the Wi-Fi: Enter Wireless IP in the browser. Click on Network Settings and enter the Wi-Fi to connect (note it needs to be 2.4G Wi-Fi). Then connect the computer to the same hotspot and enter the board's IP to start programming.

More tutorials to connect the UNIHIKER: Multi connection methods of UNIHIEKR
The remote control of the UNIHIKER is now configured!
III. OpenCV in Python
1. Coding Platform
VSCode: After installing the 'Remote' and 'python' plug-ins, you can remotely connect to UNIHIKER through SSH to upload coding.

2. Coding Logic
Using the OpenCV library to detect faces and calculate their position in the frame, when the position is less than 20 or greater than 80, drive the Mecanum wheels to turn left or right to achieve the tracking and steering effect.

As shown in the driving principle diagram above, the driving logic for the Mecanum wheel to track and turn left or right facing the person: When a person is detected on the left side of the camera, the platform turns right (from the perspective of facing the person) -- M1 & M2 rotate clockwise, M3 & M4 rotate counterclockwise. When a person is detected on the right side of the camera, the platform turns left (from the perspective of facing the person) -- M1 & M2 rotate counterclockwise, and M3 & M4 rotate clockwise.
import cv2
from pinpong.libs.microbit_motor import DFMotor
from pinpong.board import Board
import time
Board("unihiker").begin()
# Initialize motors
p_dfr0548_motor_one = DFMotor(1)
p_dfr0548_motor_two = DFMotor(2)
p_dfr0548_motor_three = DFMotor(3)
p_dfr0548_motor_four = DFMotor(4)- ccw: Counter Clockwise Direction
- cw: Clockwise Direction
Turn left: M1 & M2--cw,M3 & M4--ccw
Turn right: M1 & M2--ccw,M3 & M4--cw
No detection:M1 & M2 & M3 & M4 stop together
def Left():
    # Set motor speeds and directions to turn left
    p_dfr0548_motor_one.speed(180)
    p_dfr0548_motor_one.run(p_dfr0548_motor_one.CCW)
    p_dfr0548_motor_two.speed(180)
    p_dfr0548_motor_two.run(p_dfr0548_motor_two.CCW)
    p_dfr0548_motor_three.speed(180)
    p_dfr0548_motor_three.run(p_dfr0548_motor_three.CW)
    p_dfr0548_motor_four.speed(180)
    p_dfr0548_motor_four.run(p_dfr0548_motor_four.CW)

def Right():
    # Set motor speeds and directions to turn right
    p_dfr0548_motor_one.speed(180)
    p_dfr0548_motor_one.run(p_dfr0548_motor_one.CW)
    p_dfr0548_motor_two.speed(180)
    p_dfr0548_motor_two.run(p_dfr0548_motor_two.CW)
    p_dfr0548_motor_three.speed(180)
    p_dfr0548_motor_three.run(p_dfr0548_motor_three.CCW)
    p_dfr0548_motor_four.speed(180)
    p_dfr0548_motor_four.run(p_dfr0548_motor_four.CCW)

def Stop():
    # Stop all motors
    p_dfr0548_motor_one.stop()
    p_dfr0548_motor_two.stop()
    p_dfr0548_motor_three.stop()
p_dfr0548_motor_four.stop()- Load opencv face recognition model "haarcascade_frontalface_default.xml"
- cap = cv2.VideoCapture(0), open the default camera
casecade = cv2.CascadeClassifier()
casecade.load(cv2.data.haarcascades + "haarcascade_frontalface_default.xml")

cap = cv2.VideoCapture(0)
while not (cap.isOpened()):
    print("Camera not found")
time.sleep(1)cap.set(cv2.CAP_PROP_FRAME_WIDTH, 320)
cap.set(cv2.CAP_PROP_FRAME_HEIGHT, 240)
cap.set(cv2.CAP_PROP_BUFFERSIZE, 1)
cv2.namedWindow('camera',cv2.WND_PROP_FULLSCREEN)
cv2.setWindowProperty('camera', cv2.WND_PROP_FULLSCREEN, cv2.WINDOW_FULLSCREEN)Turn on the camera to get the video stream.
---> Read each frame in a loop for face detection.
---> If no face is detected, stop the car.
---> If a face is detected, obtain the face position and draw a rectangular frame.
---> According to the position of the face on the screen,
if x<20, the car needs to turn left,
if x>80, the car needs to turn right, otherwise it will stop.
---> Display the screen and determine whether to exit the loop.
while True:
# Read frame from the camera
success, img = cap.read()
img = cv2.flip(img, 1)
if success:
h, w, c = img.shape
w1 = h*240//320 # change the height to fit the render image
x1 = (w-w1)//2 # midpoint of width without resizing
img = img[:, x1:x1+w1] # crop into the center
img = cv2.resize(img, (240, 320)) # resize according to the screen keeping the aspect ratio
outImg = cv2.cvtColor(img, cv2.COLOR_BGR2GRAY)
poss = casecade.detectMultiScale(outImg, 1.5, 3)
print(poss)
if len(poss) == 0:
Stop()
else:
for pos in poss:
x = pos[0]
y = pos[1]
w = pos[2]
h = pos[3]
cv2.rectangle(img, (x,y), (x+w,y+h), (255,0,0), 2, cv2.FILLED)
cv2.putText(img, str(x), (100, 30), cv2.FONT_HERSHEY_SIMPLEX, 0.8, (0, 255, 0) , 1)
if x < 20:
Left()
print("car left")
time.sleep(0.01)
elif x > 80:
Right()
print("car right")
time.sleep(0.01)
else:
Stop()
# show the window
cv2.imshow("camera", img)
if cv2.waitKey(10) & 0xff== ord('a'):
breakStop()
cap.release()
cv2.destroyAllWindows()
Complete Code
#coding:utf-8
import cv2
from pinpong.libs.microbit_motor import DFMotor
from pinpong.board import Board
import time
Board("unihiker").begin()
# Initialize motors
p_dfr0548_motor_one = DFMotor(1)
p_dfr0548_motor_two = DFMotor(2)
p_dfr0548_motor_three = DFMotor(3)
p_dfr0548_motor_four = DFMotor(4)
def Left():
# Set motor speeds and directions to turn left
p_dfr0548_motor_one.speed(180)
p_dfr0548_motor_one.run(p_dfr0548_motor_one.CCW)
p_dfr0548_motor_two.speed(180)
p_dfr0548_motor_two.run(p_dfr0548_motor_two.CCW)
p_dfr0548_motor_three.speed(180)
p_dfr0548_motor_three.run(p_dfr0548_motor_three.CW)
p_dfr0548_motor_four.speed(180)
p_dfr0548_motor_four.run(p_dfr0548_motor_four.CW)
def Right():
# Set motor speeds and directions to turn right
p_dfr0548_motor_one.speed(180)
p_dfr0548_motor_one.run(p_dfr0548_motor_one.CW)
p_dfr0548_motor_two.speed(180)
p_dfr0548_motor_two.run(p_dfr0548_motor_two.CW)
p_dfr0548_motor_three.speed(180)
p_dfr0548_motor_three.run(p_dfr0548_motor_three.CCW)
p_dfr0548_motor_four.speed(180)
p_dfr0548_motor_four.run(p_dfr0548_motor_four.CCW)
def Stop():
# Stop all motors
p_dfr0548_motor_one.stop()
p_dfr0548_motor_two.stop()
p_dfr0548_motor_three.stop()
p_dfr0548_motor_four.stop()
# Load the face cascade classifier
casecade = cv2.CascadeClassifier()
casecade.load(cv2.data.haarcascades + "haarcascade_frontalface_default.xml")
# Initialize the camera
cap = cv2.VideoCapture(0)
while not (cap.isOpened()):
print("Camera not found")
time.sleep(1)
# Set camera properties
cap.set(cv2.CAP_PROP_FRAME_WIDTH, 320)
cap.set(cv2.CAP_PROP_FRAME_HEIGHT, 240)
cap.set(cv2.CAP_PROP_BUFFERSIZE, 1)
cv2.namedWindow('camera',cv2.WND_PROP_FULLSCREEN)
cv2.setWindowProperty('camera', cv2.WND_PROP_FULLSCREEN, cv2.WINDOW_FULLSCREEN)
while True:
    # Read frame from the camera
    success, img = cap.read()
    img = cv2.flip(img, 1)
    if success:
        h, w, c = img.shape
        w1 = h*240//320 # change the height to fit the render image
        x1 = (w-w1)//2 # midpoint of width without resizing
        img = img[:, x1:x1+w1] # crop into the center
        img = cv2.resize(img, (240, 320)) # resize according to the screen keeping the aspect ratio
        outImg = cv2.cvtColor(img, cv2.COLOR_BGR2GRAY)
        poss = casecade.detectMultiScale(outImg, 1.5, 3)
        print(poss)
        if len(poss) == 0:
            Stop()
        else:
            for pos in poss:
                x = pos[0]
                y = pos[1]
                w = pos[2]
                h = pos[3]
                cv2.rectangle(img, (x,y), (x+w,y+h), (255,0,0), 2, cv2.FILLED)

                cv2.putText(img, str(x), (100, 30), cv2.FONT_HERSHEY_SIMPLEX, 0.8, (0, 255, 0) , 1)

                if x < 20:
                    Left()
                    print("car left")
                    time.sleep(0.01)
                elif x > 80:
                    Right()
                    print("car right")
                    time.sleep(0.01)
                else:
                    Stop()
        # show the window
        cv2.imshow("camera", img)
        if cv2.waitKey(10) & 0xff== ord('a'):
            break
# Stop motors and release the camera
Stop()
cap.release()
cv2.destroyAllWindows()
3. Emotional Image Display
If I imagine the Mobile Platform as an emotionally independent entity interacting with me, then the camera image can be replaced with its own "facial expressions". When I detect that my position is different, it turns left or right while triggering different expressions. By anthropomorphizing the mobile platflom, it becomes a responsive companion that expresses its internal state rather than just a monitoring camera. This makes interaction more natural and engaging.

3.1 Revise Code
To achieve this goal, the screen display needs to be changed from OpenCV window display to UNIHIKER GUI expression display. Therefore, the following parts of the code need to be modified:
(1) Remove OpenCV window related code
#full screen setting
#cv2.namedWindow('camera',cv2.WND_PROP_FULLSCREEN)
#cv2.setWindowProperty('camera', cv2.WND_PROP_FULLSCREEN, cv2.WINDOW_FULLSCREEN)

#demonstrate the rectangle and realtime position on the screen
#cv2.rectangle(img, (x,y), (x+w,y+h), (255,0,0), 2, cv2.FILLED)
#cv2.putText(img, str(x), (100, 30), cv2.FONT_HERSHEY_SIMPLEX, 0.8, (0, 255, 0) , 1)

#show camera on the screen
#cv2.imshow("camera", img)
(2) Add UNIHIKER GUI initialization code
from unihiker import GUI
u_gui=GUI()
(3) Add expression display initialization code on the screen, and add expression switching display code where actions need to be performed
- Initialize expressions
- Switch expressions
emj=u_gui.draw_emoji(emoji="Smile",x=0,y=0,duration=0.2)

emj.config(emoji="Peace")
emj.config(emoji="shock")
emj.config(emoji="Nerve")
(4) Since the camera image and face frame display are removed, a flag needs to be added to indicate the current camera recognition position. Here, a movable horizontal line at the bottom of the screen is used to indicate the position.

- Initialize horizontal line
- Update horizontal line position
#show on the bottomof the screen without interfering with the display.
ln=u_gui.draw_line(x0=0, y0=318, x1=0, y1=318, width=2, color=(122,222,44))

#Update the start and end points of the horizontal line to match the width of the recognition frame.
ln.config(x0=x,x1=x+w)
3.2 Complete Code for Emotional Mode
#coding:utf-8

import cv2
from pinpong.libs.microbit_motor import DFMotor
from pinpong.board import Board
import time

Board("unihiker").begin()

# Initialize motors
p_dfr0548_motor_one = DFMotor(1)
p_dfr0548_motor_two = DFMotor(2)
p_dfr0548_motor_three = DFMotor(3)
p_dfr0548_motor_four = DFMotor(4)

def Left():
    # Set motor speeds and directions to turn left
    p_dfr0548_motor_one.speed(180)
    p_dfr0548_motor_one.run(p_dfr0548_motor_one.CCW)
    p_dfr0548_motor_two.speed(180)
    p_dfr0548_motor_two.run(p_dfr0548_motor_two.CCW)
    p_dfr0548_motor_three.speed(180)
    p_dfr0548_motor_three.run(p_dfr0548_motor_three.CW)
    p_dfr0548_motor_four.speed(180)
    p_dfr0548_motor_four.run(p_dfr0548_motor_four.CW)

def Right():
    # Set motor speeds and directions to turn right
    p_dfr0548_motor_one.speed(180)
    p_dfr0548_motor_one.run(p_dfr0548_motor_one.CW)
    p_dfr0548_motor_two.speed(180)
    p_dfr0548_motor_two.run(p_dfr0548_motor_two.CW)
    p_dfr0548_motor_three.speed(180)
    p_dfr0548_motor_three.run(p_dfr0548_motor_three.CCW)
    p_dfr0548_motor_four.speed(180)
    p_dfr0548_motor_four.run(p_dfr0548_motor_four.CCW)

def Stop():
    # Stop all motors
    p_dfr0548_motor_one.stop()
    p_dfr0548_motor_two.stop()
    p_dfr0548_motor_three.stop()
    p_dfr0548_motor_four.stop()

# Load the face cascade classifier
casecade = cv2.CascadeClassifier()
casecade.load(cv2.data.haarcascades + "haarcascade_frontalface_default.xml")

# Initialize the camera
cap = cv2.VideoCapture(0)
while not (cap.isOpened()):
    print("Camera not found")
    time.sleep(1)

# Set camera properties
cap.set(cv2.CAP_PROP_FRAME_WIDTH, 320)
cap.set(cv2.CAP_PROP_FRAME_HEIGHT, 240)
cap.set(cv2.CAP_PROP_BUFFERSIZE, 1)
#cv2.namedWindow('camera',cv2.WND_PROP_FULLSCREEN)
#cv2.setWindowProperty('camera', cv2.WND_PROP_FULLSCREEN, cv2.WINDOW_FULLSCREEN)

# show emoji and line
from unihiker import GUI

u_gui=GUI()
ln=u_gui.draw_line(x0=0, y0=318, x1=0, y1=318, width=2, color=(122,222,44))
emj=u_gui.draw_emoji(emoji="Smile",x=0,y=0,duration=0.2)

while True:
    # Read frame from the camera
    success, img = cap.read()
    img = cv2.flip(img, 1)
    if success:
        h, w, c = img.shape
        w1 = h*240//320 # change the height to fit the render image
        x1 = (w-w1)//2 # midpoint of width without resizing
        img = img[:, x1:x1+w1] # crop into the center
        img = cv2.resize(img, (240, 320)) # resize according to the screen keeping the aspect ratio
        outImg = cv2.cvtColor(img, cv2.COLOR_BGR2GRAY)
        poss = casecade.detectMultiScale(outImg, 1.5, 3)
        print(poss)
        if len(poss) == 0:
            emj.config(emoji="Peace")
            ln.config(x0=0,x1=0)
            Stop()
        else:
            for pos in poss:
                x = pos[0]
                y = pos[1]
                w = pos[2]
                h = pos[3]
                #cv2.rectangle(img, (x,y), (x+w,y+h), (255,0,0), 2, cv2.FILLED)

                #cv2.putText(img, str(x), (100, 30), cv2.FONT_HERSHEY_SIMPLEX, 0.8, (0, 255, 0) , 1)
                ln.config(x0=x,x1=x+w)
                if x < 20:
                    emj.config(emoji="shock")
                    Left()
                    print("car left")
                    time.sleep(0.01)
                elif x > 80:
                    emj.config(emoji="Nerve")
                    Right()
                    print("car right")
                    time.sleep(0.01)
                else:
                    emj.config(emoji="Peace")
                    Stop()
        # show the window
        #cv2.imshow("camera", img)
        if cv2.waitKey(10) & 0xff== ord('a'):
            break

# Stop motors and release the camera
Stop()
cap.release()
cv2.destroyAllWindows()
The application composed of the UNIHIKER, Mecanum wheels, and OpenCV demonstrates the potential of remote wireless control and computer vision. We can create more creative applications and build various intelligent, interactive robots and systems. In the near future, these types of systems integrating control, vision, and networking may be applied in more areas, improving our lives and work.


