
This Offline Voice Recognition Sensor is built around an offline voice recognition chip, which can be directly used without an internet.
Story
What is voice recognition?
Voice recognition, also known as speech recognition or automatic speech recognition (ASR), is a technology that allows a computer system to identify and interpret spoken language. It is a subfield of artificial intelligence and natural language processing that focuses on converting spoken language into written text or performing specific actions based on spoken commands.

Voice recognition, also known as speech recognition
It allows people to interact with computers by speaking without using a mouse, keyboard, or other input devices. Voice recognition technology has been widely used in applications such as voice assistants, smart homes, voice search, Transcription, and voice recognition notebooks.
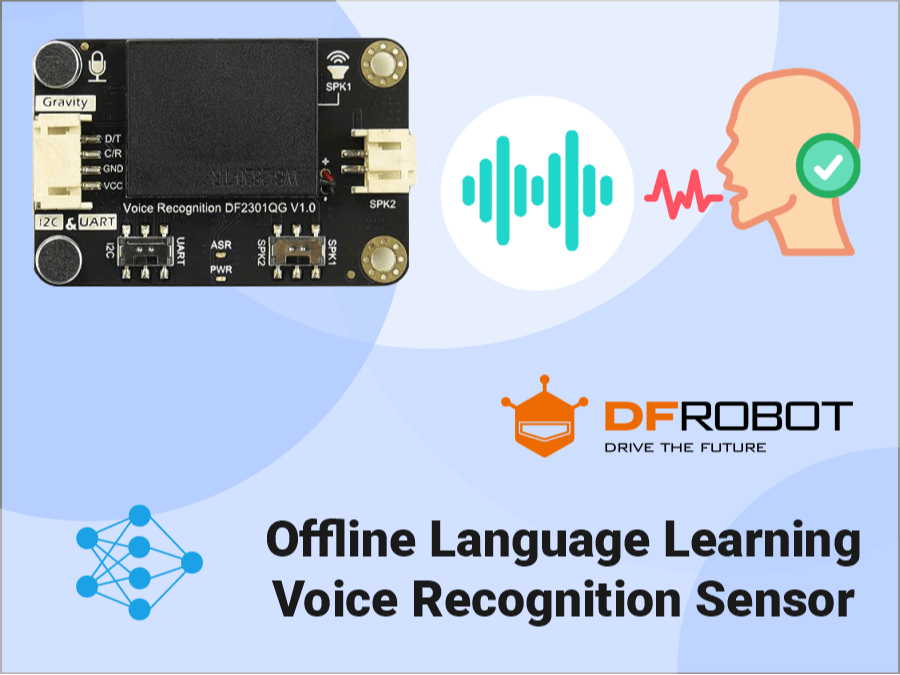
Gravity: Offline Language Learning Voice Recognition Sensor
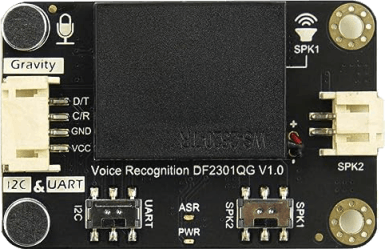
This Gravity: Offline Voice Recognition Sensor is built around an offline voice recognition chip, which can be directly used without an internet connection. It comes with 121 built-in fixed command words and supports the addition of 17 custom command words.
Following are the 5 main features of this sensor
· Offline Speech processing - Typically in many applications like voice assistants like Alexa echo dot, Siri, Google home mini etc, we see that speech recognition processing done on the cloud which requires internet connectivity. This Gravity: Offline Voice Recognition Sensor is built around an offline voice recognition chip, which can be directly used without an internet connection.
· Self-Learning Function - The Voice Recognition module is equipped with a self-learning function and supports the addition of 17 custom command words. Any sound could be trained as a command, such as whistling, snapping, or even cat meows, which brings great flexibility to interactive audio projects.
For instance automatic pet feeder. When a cat emits a meow, the offline voice recognition module can recognize the meow and trigger the feeder to automatically provide food for the cat. This innovative design ensures that the owner can promptly meet the cat's dietary needs. Moreover, the product is equipped with excellent noise resistance and long-distance recognition capabilities, allowing for precise identification of the cat's meows even in noisy environments.
· User-Friendly - The offline voice recognition module boasts a user-friendly design. It comes with 121 built-in fixed command words, eliminating the need for users to record their own voices. For instance, in an intelligent window system, when it starts to rain or thunder, there's no need for manual window operation. The offline voice recognition module can recognize the pre-set command word "close the window, " triggering the automatic closing of the window to cope with sudden weather changes.
· Real-Time Voice Feedback - It comes with a built-in speaker and an external speaker interface for real-time voice feedback of recognition results. For instance, one can wake up a voice assistant using a wake-up word, and the assistant promptly responds and begins learning or utilizing command words. When learning or deleting command words, the voice assistant also provides immediate feedback on the success of the operation. This greatly enhances the user's experience and convenience.
· High Compatibility (Multiprotocol)- The module boasts high compatibility, supporting both I2C and UART communication methods, while also being compatible with various 3.3V or 5V controllers, such as micro:bit, Arduino (Arduino UNO, Arduino Leonardo, Arduino MEGA), Raspberry Pi, FireBeetle series, and more. This provides a flexible solution for building smart home systems, robotics projects, and more.
Voice Commands
For this Gravity: Offline Voice Recognition Sensor module there are two types of voice commands available. Wake-up word and Command Words
· Wake-up word : The wake-up word refers to the word that switches a product from standby mode to operational mode. It serves as the initial point of interaction between users and voice-enabled devices.
· command words : Fixed command words refers to the designated vocabulary used by users to issue specific instructions to voice interactive products, enabling effective communication with them.
Learning Mode
This Gravity: Offline Voice Recognition Sensor module features the Self-learning function: We can Control the module to learn command words by the voice, and any audio can be trained as a command.
There are 121 fixed command words. And 1 default wake word ("Hello Robot")We can program 17 custom commandsWe can program 1 custom wake word
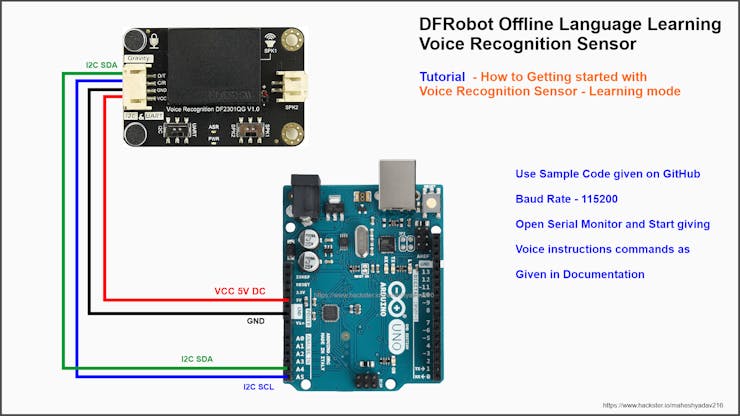
Use above circuit diagram assembly and sample code given On GitHub repo or given below in codes section. **You can also use application code and circuit given below, if you do not want create separate setup for learning mode. In this setup we just need to learn what command ID's are getting yielded on serial port for each unique voice command.
Please Note That - In following instructions all phrases encapsulated with " " (double quotes) and Italic words are the speech phrases you have to speak to voice assistant. Please refer the video for more information
Learning wake-up word:
· Initiate the voice assistant by employing the default wake-up word, then utter "Learning wake word" Follow the prompts to learn the new wake-up word (prior to each learning command, it is necessary to remove the previously learned wake-up word; kindly refer to the instructions for wake-up word and command phrase deletion)
· Indication: Learning now, be quiet, please say the wake word to be learned!
· The designated wake-up word to be acquired (taking "Hey, Minda" as an example): “Hey, Minda”
· Indication: Learning successful, please say it again!
· The designated wake-up word to be acquired : “Hey, Minda”
· Prompt: Learning successful, please say it again!
· The designated wake-up word to be acquired : “Hey, Minda”
· Prompt: Ok, learning completed!
· Once the learning process is accomplished, you will be able to utilize the phrase "hello, there" to awaken the voice assistant!
Learning command words:
Use a wake-up word (default or learned) to wake up the voice assistant, and then say "Learning command word" to initiate the process of learning command phrases, following the provided prompts. Before each session of learning command phrases, it is necessary to delete the previously learned command phrases. Please refer to instructions on how to delete wake-up words and command phrases.
· Indication: Learning now, be quiet, please learn the command word according to the prompt! Please say the first command to be learned!
· Command phrase to be learned (using "Turn on Greenlight" as an example): "Turn on Green light"
· Indication: Learning successful, please say it again!
· Command phrase to be learned : “Turn on Green light”
· Indication: Learning successful, please say it again!
· Command phrase to be learned : “Turn on Green light”
· Indication: OK, learned the first command successfully! Please say the second command to be learned!
... (Continue learning)
Command phrase to exit learning mode: "Exit learning"
After the completion of the learning process, an ID will be automatically generated. Please refer to the subsequent document titled 'Command Words/Wake-up Words & ID Table' By utilizing this unique ID, you can author programs to exercise control accordingly.
Delete Wake Words and Command Words:
Use a wake-up word (default or learned) to wake up the voice assistant, and articulate the phrase "I want to delete" Follow the prompts to eliminate the specified command phrase as instructed.
· Indication: Do you want to delete the learned wake word or command word?
· "Delete command word " : will Remove the previously acquired command phrases.
· "Delete wake word" : will Erase the learned awakening words from the system.
· "Delete all" : Eliminate the assimilated awakening utterances and command phrases from memory.
· "Exit deleting".
Command Words/Wake-up Words & ID
You must have been thinking how we can interface this voice recognition sensor with any MCU board like Arduino and How we can program "The Voice Assistant Systems".
So, there are specific ID's for each command, the documentation of this Sensor module lists all commands and their respective ID's, you can check out this documentation here,
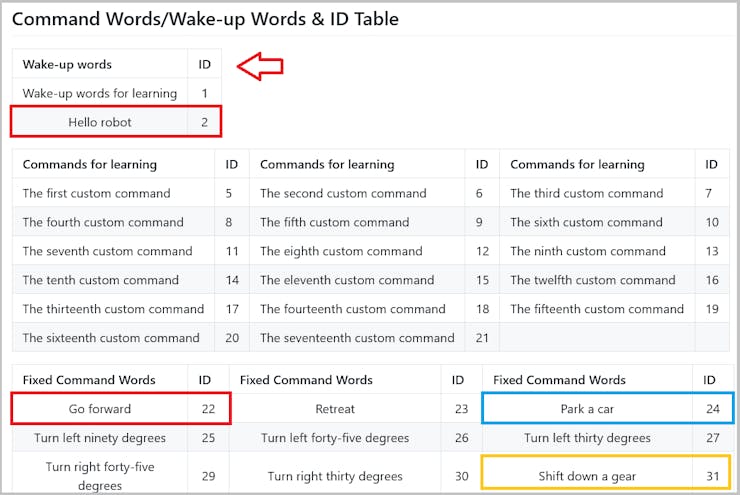
When we wake-up the voice recognition sensor using predefined awakening phrase. "Hello Robot", its ID = 2 will get (yielded) outputted automatically on serial port. Similarly for other commands their respective ID's will get send to serial port whenever they get detected by speech/voice recognizer mic.
You can see in following picture that the commands we highlighted in above table of ID's have got shown on serial port
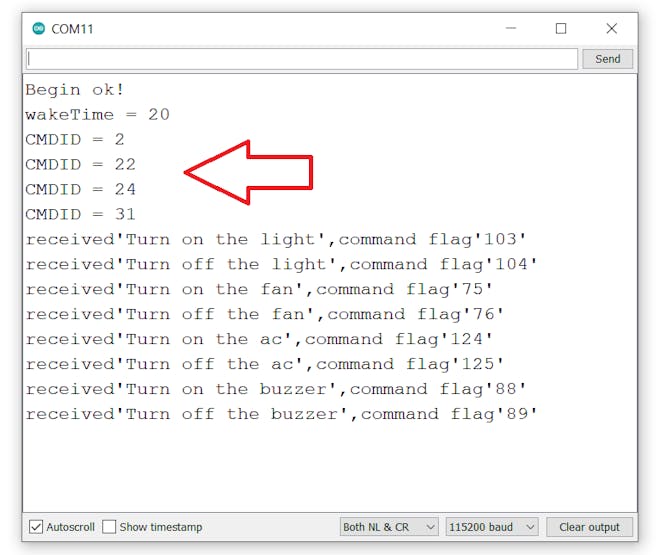
Once we get the ID, we can easily find out which command is being spoken/summoned by speaker. Hence we can program our application respectively. For example, If we received the ID 22 on serial port we know that its a command of "Go Forward", hence we can write program to forward the Motor or Robot.
This is all about theory, now lets build simple application using this voice recognition module. We will make application which will control household appliances like Lights, Fan, AC etc. via voice commands.
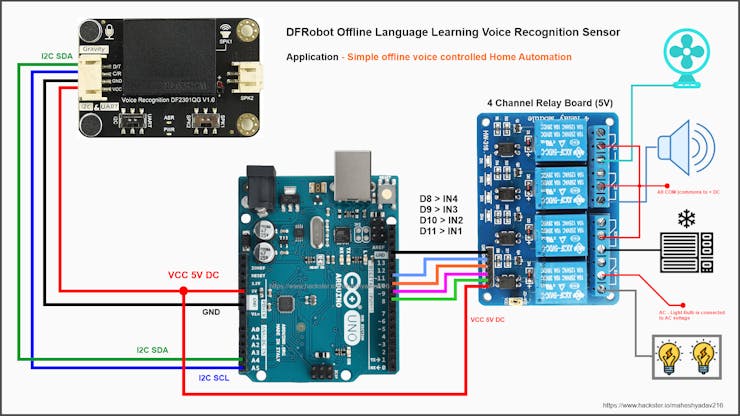
As we know this Gravity offline voice recognition sensor module supports both UART as well as I2C communications. We will interface it with Arduino Uno development board via I2C protocol. Circuit diagram will be as following
Programming
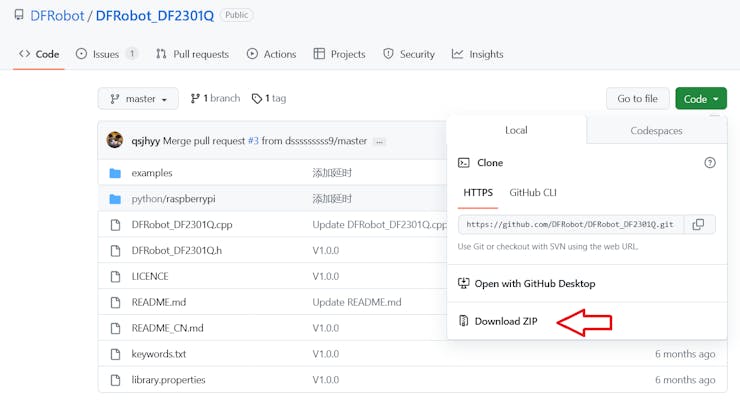
Download and install the DFRobot_DF2301Q Library. You can either install it from library manger or download and install from its GitHub page. You can refer the guide of (Installing Libraries) from official Arduino.

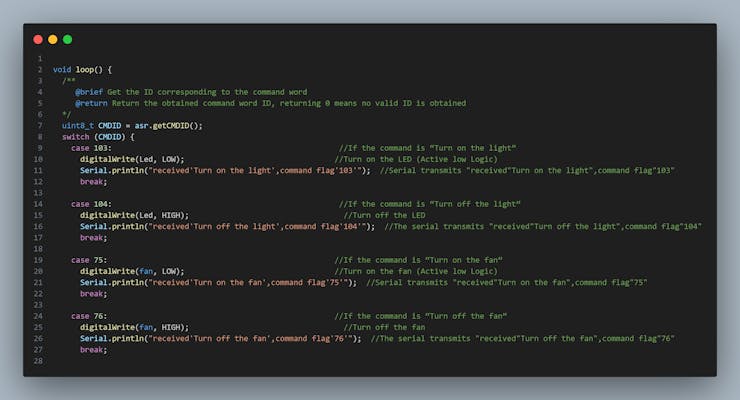
In code, As we discussed earlier we have to serially check for specific command ID for commands and act on accordingly. As you can see in following code snippet, In main loop we Get the ID corresponding to the command word, using the function asr.getCMDID(), it will also Return the obtained command word ID, returning 0 means no valid ID is obtained.
Demo
We have created simple application using this Voice recognition sensor module to demonstrate the functioning of voice assistant. We will control 4 household appliances using voice commands.
We have also made one DIY project using this Voice recognition sensor module. You can check out its article on hackster - Smart Waiter - Intelligent Voice Assistant in Restaurant
Tutorial Documentation
I will share all the documents, codes, schematics, etc. on GitHub.
Suggestions about Project design, Circuits, code modifications, Optimization, Errors/Bugs findings and queries are most welcomed.
Credits
Thank you Hackster, DFRobot and all other peoples, websites and entities who helped me (directly/indirectly) for creating this article.
Schematics
Tutorial Circuit Diagram

Learning Mode

Tutorial Circuit Diagram
https://github.com/maheshyadav216/DFRobot-Offline-Voice-Recognition-Sensor
Tutorial Source Code
//==============================================================================================//
// Project Tutorial  - Getting started with DFRobot Voice Recognition Sensor
// Author  - https://www.hackster.io/maheshyadav216
// Hardware  - SKU_SEN0539-EN_Gravity_Voice_Recognition_Module, Arduino Uno, 5v Relay Board
// Softare  - Arduino IDE 1
// GitHub Repo of Projet  - https://github.com/maheshyadav216/DFRobot-Offline-Voice-Recognition-Sensor
// Code last Modified on  - 19/09/2023
//===============================================================================================//
#include "DFRobot_DF2301Q.h"    // DFRobot Voice Recognition sensor library

// Connected appliances Pin definitions
#define Light 8
#define fan 9
#define ac 10
#define buzzer 11

//I2C communication
DFRobot_DF2301Q_I2C asr;

void setup() {
  Serial.begin(115200);

// Please note that my Relay module follows Active Low logic
  pinMode(Led, OUTPUT);    //Init LIGHT pin to output mode
  digitalWrite(Led, HIGH);  //Set LIGHT pin to low initially

  pinMode(fan, OUTPUT);    //Init Fan pin to output mode
  digitalWrite(fan, HIGH);  //Set Fan pin to low

  pinMode(ac, OUTPUT);    //Init AC pin to output mode
  digitalWrite(ac, HIGH);  //Set AC pin to low

  pinMode(buzzer, OUTPUT);    //Init Buzzer pin to output mode
  digitalWrite(buzzer, HIGH);  //Set Buzzer pin to low

  // Init the sensor
  while (!(asr.begin())) {
    Serial.println("Communication with device failed, please check connection");
    delay(3000);
  }
  Serial.println("Begin ok!");

  /**
   * @brief Set voice volume
   * @param voc - Volume value(1~7)
   */
  asr.setVolume(7);

  /**
     @brief Set mute mode
     @param mode - Mute mode; set value 1: mute, 0: unmute
  */
  asr.setMuteMode(0);

  /**
     @brief Set wake-up duration
     @param wakeTime - Wake-up duration (0-255)
  */
  asr.setWakeTime(20);

  /**
     @brief Get wake-up duration
     @return The currently-set wake-up period
  */
  uint8_t wakeTime = 0;
  wakeTime = asr.getWakeTime();
  Serial.print("wakeTime = ");
  Serial.println(wakeTime);

  // asr.playByCMDID(1);   // Wake-up command

  /**
     @brief Play the corresponding reply audio according to the ID
     @param CMDID - command word ID
  */
  //asr.playByCMDID(23);  // Command word ID
}

void loop() {
  /**
     @brief Get the ID corresponding to the command word
     @return Return the obtained command word ID, returning 0 means no valid ID is obtained
  */
  uint8_t CMDID = asr.getCMDID();
  switch (CMDID) {
    case 103:                                                  //If the command is Turn on the light
      digitalWrite(Led, LOW);                                 //Turn on the LED (Active low Logic)
      Serial.println("received'Turn on the light',command flag'103'");  //Serial transmits "received"Turn on the light",command flag"103"
      break;

    case 104:                                                  //If the command is Turn off the light
      digitalWrite(Led, HIGH);                                  //Turn off the LED
      Serial.println("received'Turn off the light',command flag'104'");  //The serial transmits "received"Turn off the light",command flag"104"
      break;

    case 75:                                                  //If the command is Turn on the fan
      digitalWrite(fan, LOW);                                 //Turn on the fan (Active low Logic)
      Serial.println("received'Turn on the fan',command flag'75'");  //Serial transmits "received"Turn on the fan",command flag"75"
      break;

    case 76:                                                  //If the command is Turn off the fan
      digitalWrite(fan, HIGH);                                  //Turn off the fan
      Serial.println("received'Turn off the fan',command flag'76'");  //The serial transmits "received"Turn off the fan",command flag"76"
      break;

    case 124:                                                  //If the command is Turn on the ac
      digitalWrite(ac, LOW);                                 //Turn on the ac (Active low Logic)
      Serial.println("received'Turn on the ac',command flag'124'");  //Serial transmits "received"Turn on the ac",command flag"124"
      break;

    case 125:                                                  //If the command is Turn off the ac
      digitalWrite(ac, HIGH);                                  //Turn off the ac
      Serial.println("received'Turn off the ac',command flag'125'");  //The serial transmits "received"Turn off the ac",command flag"125"
      break;

    case 88:                                                  //If the command is Turn on the buzzer
      digitalWrite(buzzer, LOW);                                 //Turn on the buzzer
      Serial.println("received'Turn on the buzzer',command flag'88'");  //Serial transmits "received"Turn on the buzzer",command flag"88"
      break;

    case 89:                                                  //If the command is Turn off the buzzer
      digitalWrite(buzzer, HIGH);                                  //Turn off the buzzer
      Serial.println("received'Turn off the buzzer',command flag'89'");  //The serial transmits "received"Turn off the buzzer",command flag"89"
      break;

    default:
      if (CMDID != 0) {
        Serial.print("CMDID = ");  //Printing command ID
        Serial.println(CMDID);
      }
  }
  delay(300);
}

//================================================================================================================================================//
Sample Code
//==============================================================================================//
// Project Tutorial  - Getting started with DFRobot Voice Recognition Sensor
// Author  - https://www.hackster.io/maheshyadav216
// Hardware  - SKU_SEN0539-EN_Gravity_Voice_Recognition_Module, Arduino Uno, 5v Relay Board
// Softare  - Arduino IDE 1
// GitHub Repo of Projet  - https://github.com/maheshyadav216/DFRobot-Offline-Voice-Recognition-Sensor
// Code last Modified on  - 19/09/2023
//===============================================================================================//
#include "DFRobot_DF2301Q.h"

#define Led 8

//I2C communication
DFRobot_DF2301Q_I2C asr;

void setup() {
  Serial.begin(115200);

  pinMode(Led, OUTPUT);    //Init LED pin to output mode
  digitalWrite(Led, LOW);  //Set LED pin to low

  // Init the sensor
  while (!(asr.begin())) {
    Serial.println("Communication with device failed, please check connection");
    delay(3000);
  }
  Serial.println("Begin ok!");

  /**
   * @brief Set voice volume
   * @param voc - Volume value(1~7)
   */
  asr.setVolume(4);

  /**
     @brief Set mute mode
     @param mode - Mute mode; set value 1: mute, 0: unmute
  */
  asr.setMuteMode(0);

  /**
     @brief Set wake-up duration
     @param wakeTime - Wake-up duration (0-255)
  */
  asr.setWakeTime(20);

  /**
     @brief Get wake-up duration
     @return The currently-set wake-up period
  */
  uint8_t wakeTime = 0;
  wakeTime = asr.getWakeTime();
  Serial.print("wakeTime = ");
  Serial.println(wakeTime);

  // asr.playByCMDID(1);   // Wake-up command

  /**
     @brief Play the corresponding reply audio according to the ID
     @param CMDID - command word ID
  */
  //asr.playByCMDID(23);  // Command word ID
}

void loop() {
  /**
     @brief Get the ID corresponding to the command word
     @return Return the obtained command word ID, returning 0 means no valid ID is obtained
  */
  uint8_t CMDID = asr.getCMDID();
  switch (CMDID) {
    case 103:                                                  //If the command is “Turn on the light”
      digitalWrite(Led, HIGH);                                 //Turn on the LED
      Serial.println("received'Turn on the light',command flag'103'");  //Serial transmits "received"Turn on the light",command flag"103
      break;

    case 104:                                                  //If the command is “Turn off the light”
      digitalWrite(Led, LOW);                                  //Turn off the LED
      Serial.println("received'Turn off the light',command flag'104'");  //The serial transmits "received"Turn off the light",command flag"104""
      break;

    default:
      if (CMDID != 0) {
        Serial.print("CMDID = ");  //Printing command ID
        Serial.println(CMDID);
      }
  }
  delay(300);
}
Tutorial Source Code
https://github.com/maheshyadav216/DFRobot-Offline-Voice-Recognition-Sensor
The article was first published in hackster, September 24, 2023
cr: https://www.hackster.io/maheshyadav216/getting-started-with-dfrobot-voice-recognition-sensor-e29488
author: maheshyadav216


