
Thousands of vehicles were reported stolen each year. In Australia alone, 53,450 vehicles were stolen between year 2013-2014. An averaged at least 146.4 vehicles per day consisting of light / commercial vehicles, motorcycles and others.
Click the links below for more info.
Link1: https://ncars.on.net/docs/annual/annual_2013_14_web.pdf

UPDATE:
I found these data which showed the data from here
Chance of getting your car back after having it stolen
TAS 92%
ACT 78%
NT 75%
QLD 70%
VIC 67%
NSW 63% - had increased to 68% (as at 31 July 2014 ) new data from https://ncars.on.net/docs/annual/annual_2013_14_web.pdf.
Although there is a decline in car stealing incidents, it is still happening and recovery statistics had increased. What shall we do? There are a lot of ways to prevent car theft or recover quickly stolen vehicle. One of it is to install a vehicle anti-get-away device.
Vehicle Anti-Get-Away Device will disable your vehicle in few minutes while driven when your car is stolen and if the device is activated. Your stolen vehicle can't be driven in a far distance. That means it would be easy to locate the vehicle.
If someone would point a gun unto you and ask for your car keys, just give it and don't hesitate. The thief will drive your vehicle with the device activated and it won't be long until the engine will stall and the vehicle will stop running. At least you are safe because you've given the car keys without resistance. Just imagine if you don't have a device like this installed. You would fight for your car and you could be killed and your car would be hard to recover too. Well you might think, what about the immobilizer built into the vehicle itself? Immobilizer system is your first line of defense but if someone will point a gun or knife at you asking for car keys, definitely the immobilizer security system is breached and you are helpless and in danger!!!. At least, with this device, you have secondary protection that works for you and your safety.
UPDATE:
As I was reading more into this report from https://ncars.on.net/docs/annual/annual_2013_14_web.pdf, I understood out that; vehicles fitted with immobilizer has greater number than vehicle without immobilizer. The data below justifies that immobilizer system is not so secured, so therefore there is a need for other security devices as a secondary line of defense in case of breach in immobilizer security.
NSW
Immobiliser type---Number of thefts---% of thefts in past 12 months
----------------------------------in past 12 months---------------------------------------
Australian Standard---5,669---66.2%
Non-Australian Standard---355---4.1%
No Immobiliser---2,542---29.7%
This device is easy to build and easy to install. This can be installed into any type or brand of vehicle as long as you knew where to connect.
Note: Consult a professional electrician before installing this device. Install at your own risks. This device has not been thoroughly tested. I won't be responsible for any any damage caused.
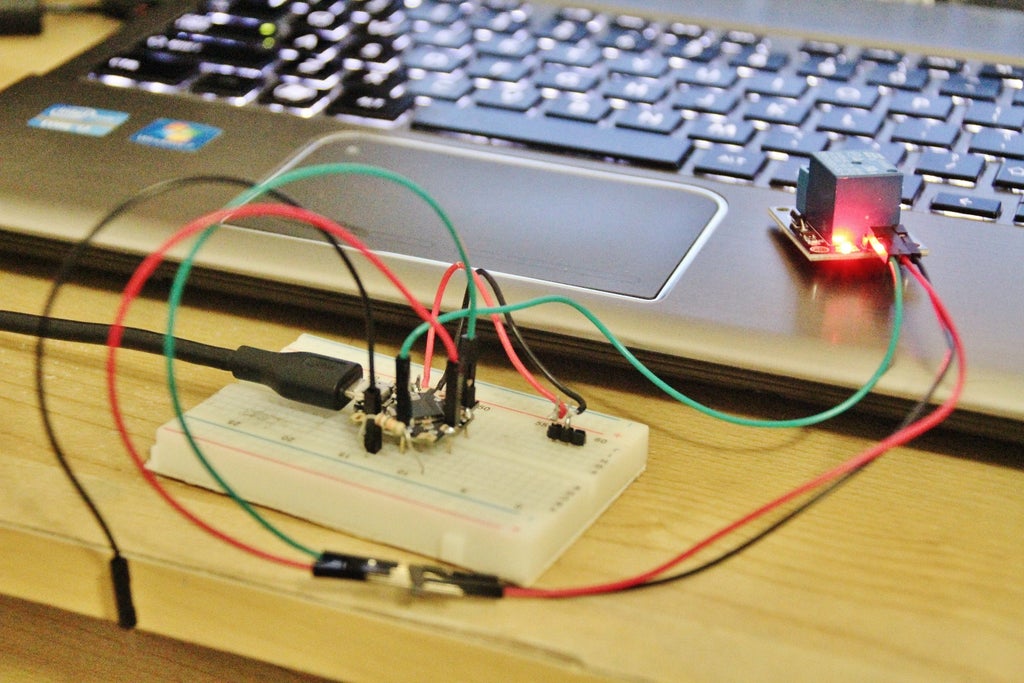
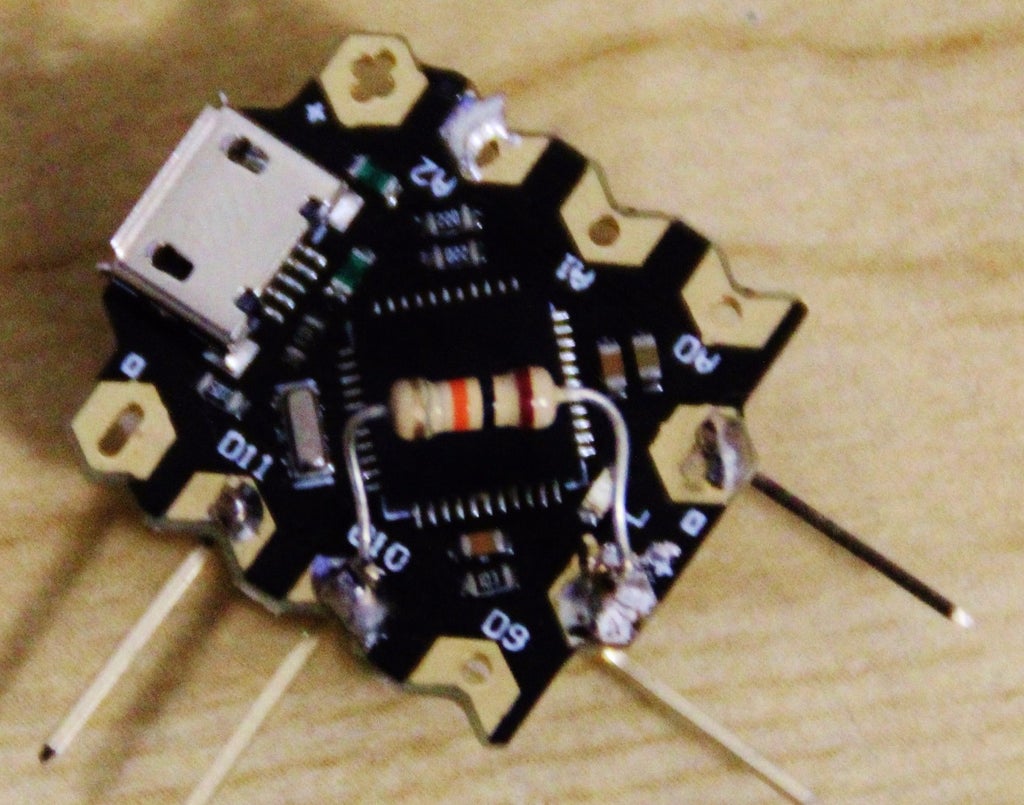
Step 1: Materials

To build this device, we would need few things like:
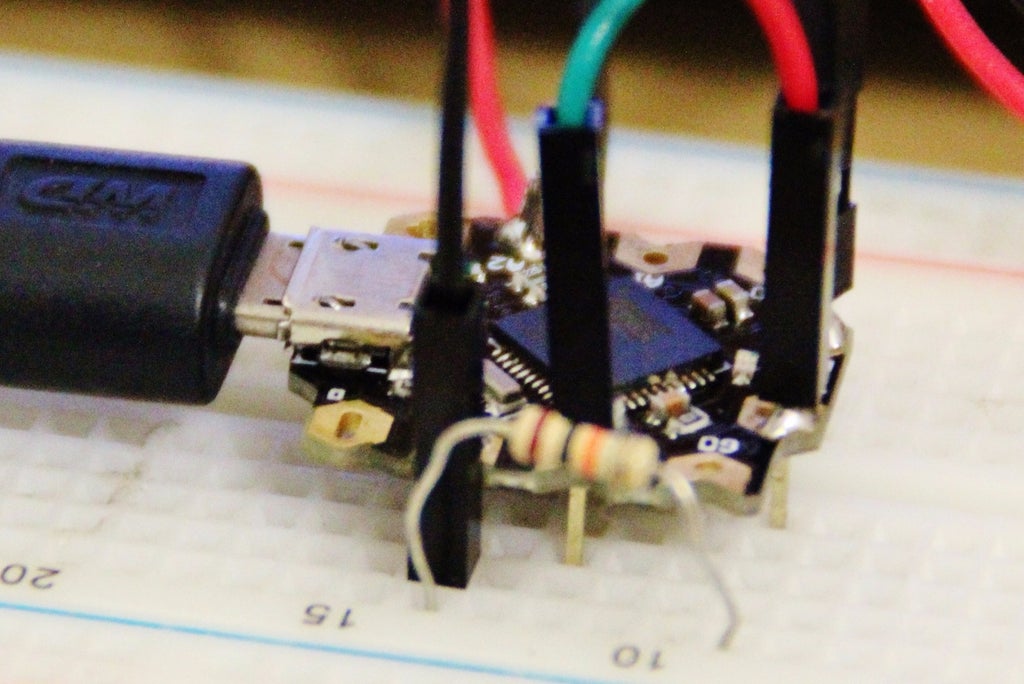
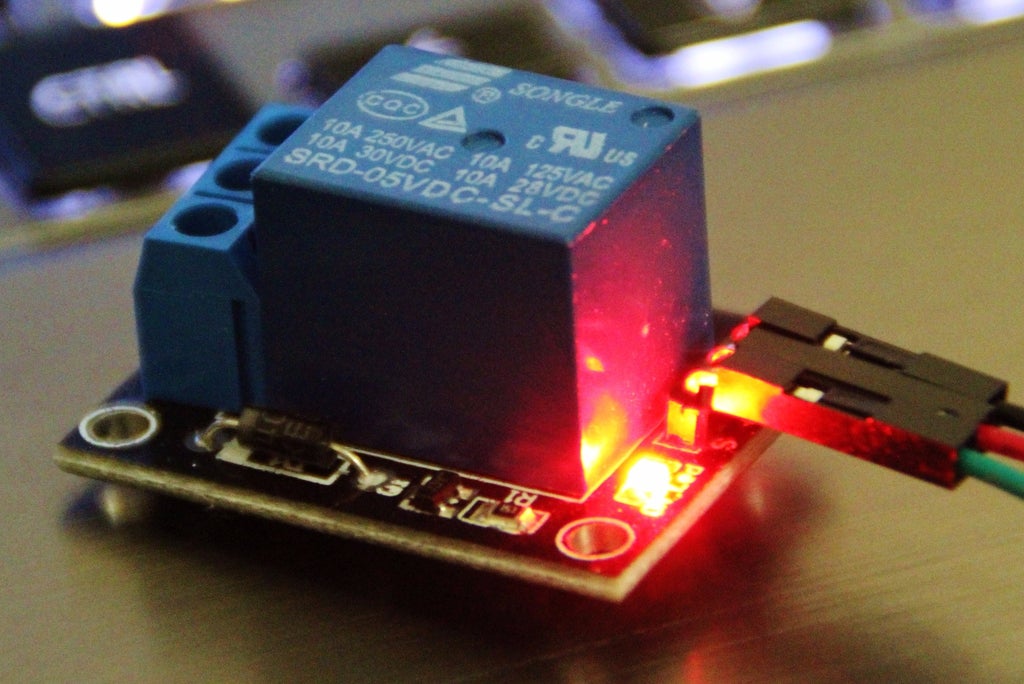
1. Relay Module
The relay module will enable or disable the vehicle with the command of the Arduino.
The Beetle Arduino will activate the timer whenever a theft condition is exists.
3. DC/DC converter
the DC/DC converter will step down the 12V supply from vehicle battery into 5V that the Arduino requires.
4. 1K resistor
1K resistor will be used as pull-up resistor to prevent damaged into the into input pin
5. Switch
The switch is the triggering device. This is to be hidden in a location only you who knows where to find it. Install this switch in a place where it is convenient for you but not easy to find for the thief.
Step 2: Programming
The Arduino compatible Beetle from DFRobot is programmed using Arduino IDE by selecting Arduino Leonardo in the Arduino IDE. Tools>Board> Arduino Leonardo.
The “Beetle” is a miniaturized version of Arduino Leonardo, and has same powerful functionalities as Leonardo that is why I like this device. It's tiny but has incredible capabilities.
For detailed explanation of this device, follow this link.
Step 3: The Sketch
This sketch is a modified version of the timer sketch which I found from this website. That's the good thing about Arduino. There are a lot of examples and help from the community of makers and thinkers.
I have added few codes in it so that it would function the way I want it to be.
int RL1 = 10;

int sw1=11; int

buttonState=0;

unsigned long timer; // the timer

boolean timedOut = false; // set to true when timer fired

unsigned long INTERVAL = 120000; // the timeout interval

void setup() {

pinMode(sw1,INPUT); // initiliaze switch input

pinMode(RL1, OUTPUT); // initialize RL1 output

timedOut = false; // allow timer to fire

timer = millis(); // start timer }

void loop() {

// detect switch state

buttonState = digitalRead(sw1);

// this will turn on relay connected to pin 10

if ((!timedOut && (buttonState=HIGH) ) && ((millis() - timer) > INTERVAL)) {

// timed out timedOut = true; // don't do this again

// you can reset the single shot timer by setting

// timedOut = false;

// timer = millis();

// toggle relay

if (digitalRead(RL1)) {

digitalWrite(RL1, LOW); // turn the RL1 off by making the voltage LOW

} else { digitalWrite(RL1, HIGH); // turn the RL1 on (HIGH is the voltage level)

}

}

}
Step 4: Wiring and Installation
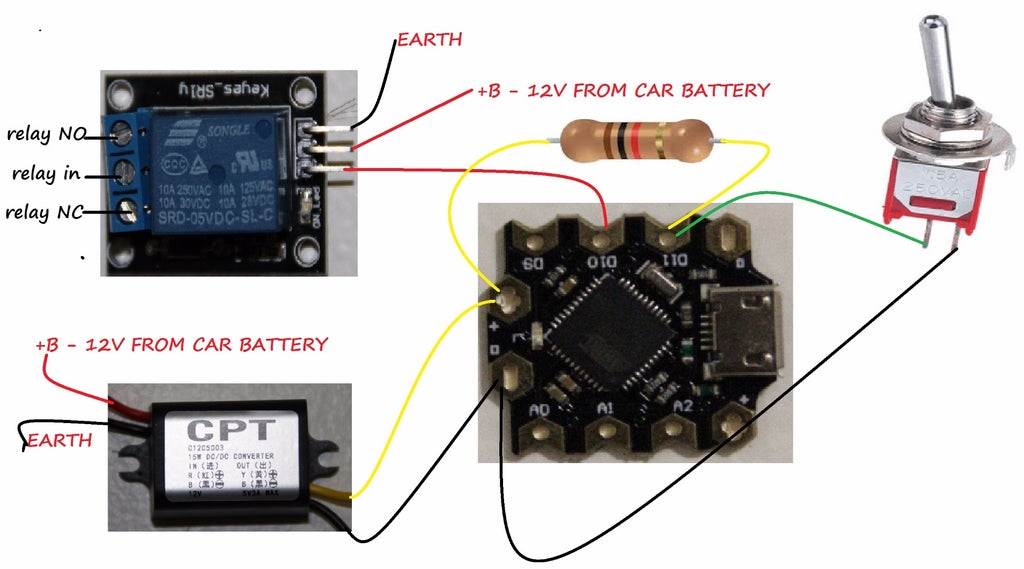
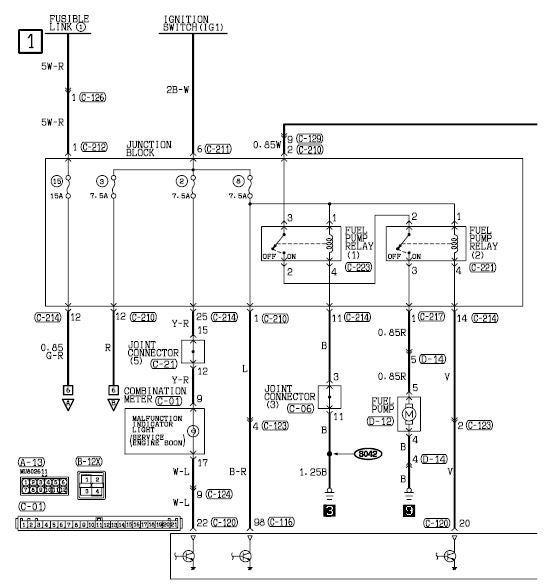
Once you have all the parts together, follow the connections in the diagram provided. You can assemble this as one package then install into your vehicle. This device is so flexible. It can be connected into any circuit in the vehicle that you think it would be easy for you but still serve its purpose. Don't forget to consult the Electrical Wiring Diagram for your vehicle for detailed wiring information before attempting to install this device into your car yourself. Ask help from an Automotive Electrician if possible to avoid damaging your vehicle.
Step 5: Suggestions for Installation
For petrol engines, you can connect this to the fuel pump circuit or ignition circuit. This way, either there would be no fuel supply or spark to the plugs. The engine will then stop running.
For diesel engines, you can connect this into the fuel metering valve circuit. Fuel metering valve is located into the high pressure pump mounted in the engine itself.
In this instructable, the device was connected to the fuel pump. Here are the steps:
1. Consult the wiring diagram in order to determine which part in the circuit is easy for me to connect the device.
2. Locate the fuel pump harness in the floor of the vehicle. I cut the supply wire (the red wire before the fuel pump; see the wiring diagram attached) and connect another wire which then I can connect to the relay. One of the wire will be connected to the common terminal of the relay and the other will be connected to the normally closed (NC) terminal of the relay. In this way, if the device is deactivated, the break in the line will be connected back inside the relay connection. If the device is active, the relay will activate and opens the NC contact of the relay, shutting the fuel pump. Fuel supply to the engine will be cut-off and engine will stop running.
3. Connect the power supply to any voltage source that will only exist when ignition switch is "ON position".
4. Connect 12V supply to the relay.
5. Connect the trigger wire from relay to the control board.
6. Connect the trigger and install in a hidden location that only you would know.
7. Load the software using Arduino IDE.
Note: Be sure to remove the 12V power supply from the vehicle or disconnect the device from the vehicle before programming. I'm not sure what will happen but just a caution to everyone.
8. Test the operation.
Any comment, feedback or if you need help in building this instructable, please comment below. I will try to help you out the best that i could in the best possible time. thank you. Please vote for this instructable.
This article was first published on Instructables,
cr: https://www.instructables.com/Vehicle-Anti-Get-Away-Device/
Author: pelegren


