Created February 12, 2023 © MIT
This tutorial is for building a talking extreme heat temperature sensor! It measures up to 1300˚F and speaks warnings and info!
Beginner Full instructions provided 1 hour
Tutorial also found here: https://www.hackster.io/k-gray/talking-wood-pellet-stove-high-temperature-sensor-75f370

The Story
I have a great wood stove, but sometimes wood stoves can be dangerous; for example if they get too hot. You can buy a spring temperature sensor device that magnets to your wood stove, but they use a spring to tell the temperature, and are not very accurate. Also, over time, they can deteriorate!
So... I thought of building a Arduino temperature sensor for my wood stove. This would fix the temperature accuracy problem (as DFRobot's temperature sensor is accurate within 2.5˚C!), but it would be great, if I could somehow be warned when my stove is getting too hot, so I can turn down the air valve.
I made a list of warning ideas; from a neopixel ring, to an obnoxious buzzer, but where is the fun in that. While looking around for ideas on DFRobot's website, I came across their Fermion Voice Recorder Module; the answer to my problem! I could make a talking temperature sensor for my wood stove!
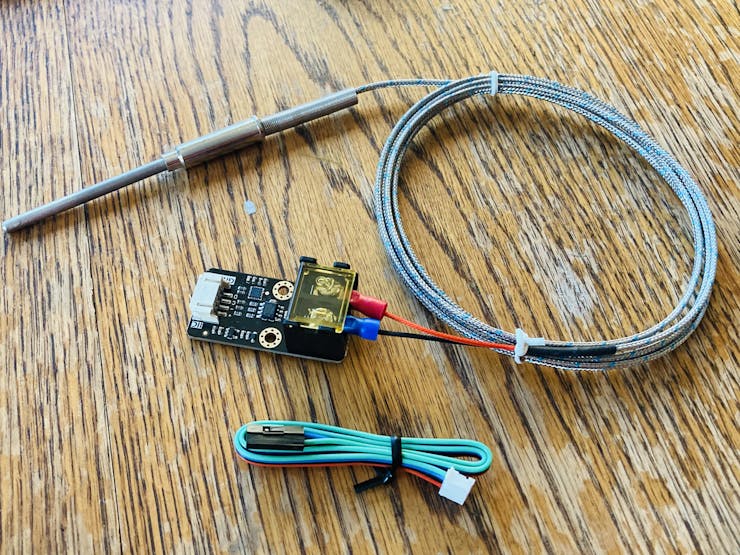
My concept is based off of DFRobot's Gravity I2C High Temperature Sensor (K-Type, 800℃). This amazing sensor measures some insanely hot temperatures! With the converter module, it also comes with a high temperature thermocouple probe, and a metal cased wire, to prevent melting.
A DFRobot Beetle is the main brain for this project. It controls the LCD and reads the temperature over I2C. It also controls the playback of the Voice Recorder Module over software serial.
How the thermocouple temperature sensor works:
DFRobot Thermocouple High Temperature Sensor
Electrons carry heat and electricity. If a piece of copper wire is heated at one end, the electrons will move along the wire to the cooler end and create a temperature gradient along the wire. The heat has been changed into energy. This same principle, as discovered by Volta and Seebeck, applies to a thermocouple.
A thermocouple is a sensor that measures temperature. It consists of two different types of metals, joined together at one end.
When the junction of the two metals is heated or cooled, a voltage is created that can be correlated back to the temperature.
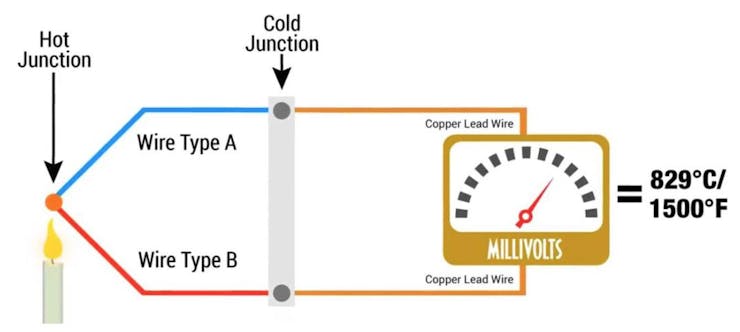
Thermocouple
The wiring for this project is fairly simple! Here is a description (if this doesn't make much sense, scroll to the schematic below):
Beetle - Temperature:
+5V - VCC
GND - GND
SCL - SCL
SDA - SDA
Beetle - LCD:
+5V - VCC
GND - GND
SCL - SCL
SDA - SDA
Beetle - Voice Recorder:
+5V - VIN
GND - GND
RX - D9
TX - D10
Speaker - Voice Recorder:
Red - Spk+
Black - Spk-
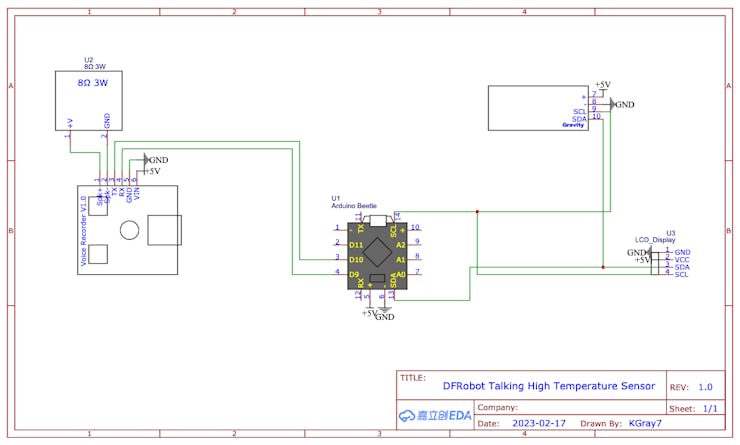
Schematic
The first thing to do, is the onboard storage needs to be formatted.
So... plug in the voice recorder with a USB C cable to your computer and open Disk Utility.
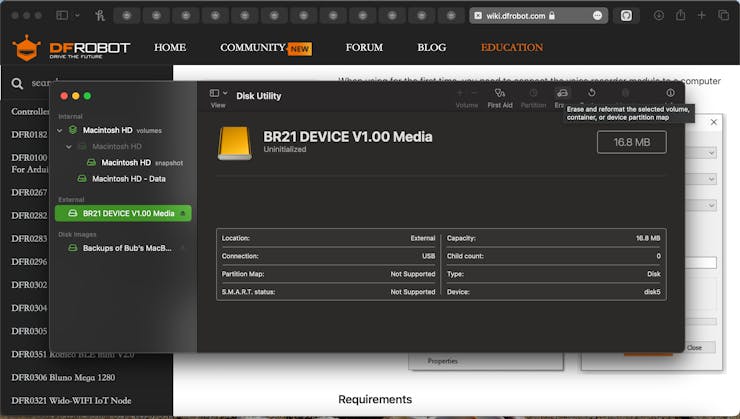
Uninitialized Voice Recorder Storage
Select the external uninitialized disk (this is the voice recorder module).
Click the Erase button to the top right (as shown above).
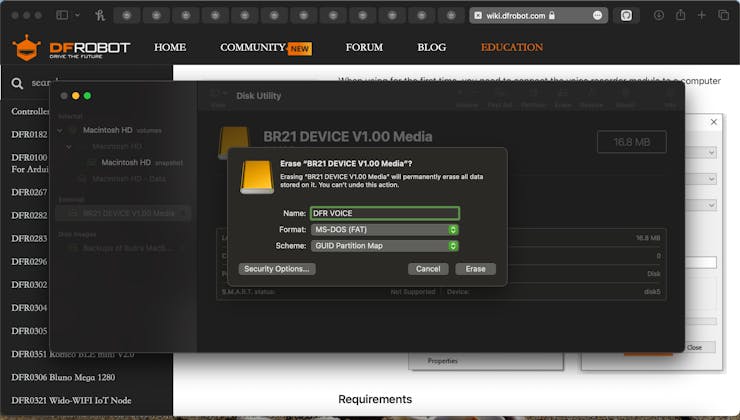
Erasing storage
Pick a suitable name (I picked "DFR VOICE"), select the format as MS-DOS (FAT), and select the Scheme as GUID Partition Map. Now, click Erase!
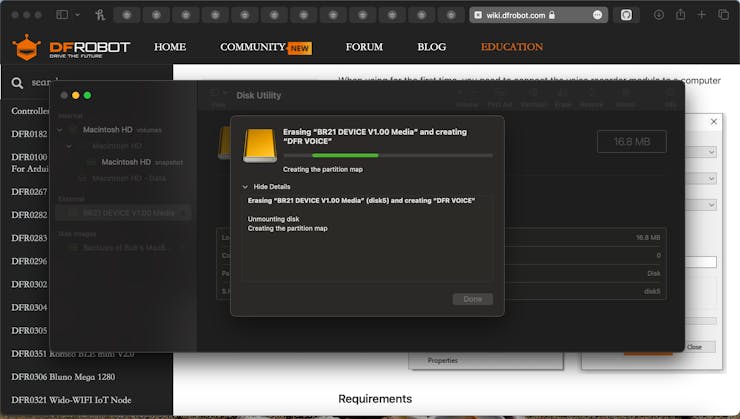
Erasing
This process takes quite a bit of time, so be patient with it. DO NOT unplug the voice recorder module, as this will restart the process. This took roughly 1.5 hours to complete for me.
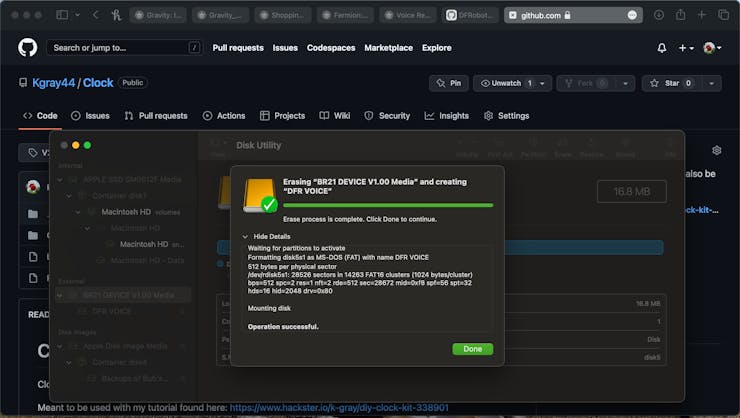
Finished Erasing!
Finally, your screen will show this; the erase is completed!
Now for the fun part!
Now that we have our DFRobot Voice Recorder module ready, we have to get some audio clips onto it. There are two options to do this; record your voice via the onboard buttons and mic, or transfer short audio files from your computer.
First I came up with a list of things I would like my project to say! Here is somewhat how it went the first time:
• Going out• Getting cold fast• Warming up• Getting hot fast• Getting hot too fast
Then I decided these weren't precise enough for me, so I did this instead:
• needmorewood• goingtobecold• gettingchilly• gettingtoasty• gettingprettyhot• gettingtoohot• temptoohot• iamgettingsohot
When I recorded them though, I did spice them up just a little 😉.
After you have a list of recordings you're ready to do, it is time to record!
So, to record using the onboard mic, first press the REC button once. The orange LED should now be flashing. Now press the REC button once more and it is recording (make sure to have your notes ready)! To finish recording, press the PLAY button (this saves the recording), or press the REC button one more time, and the recording is paused. Only do one voice part at a time; for example, "I am getting too hot".
After you have recorded all of your voice clips, you are ready to complete the project!
As in the previous section, first come up with a list of things to say.
Now, I used a text to speech website to turn my phrases into audio files (MP3)! There are many, but the one I used is voicemaker.in. Because I used the free version though, my project sounds like a robot because I couldn't use the better voice options.
After you have all of your audio files downloaded, they all need to be renamed. The naming format is "FILE00[filenumber].MP3".
So for example, "FILE0007.MP3". I wrote down which audio file was which number, that way I could keep track when I wrote the code.
After all of your audio files are renamed, plug in the Voice Recorder module, and transfer them into the single file found on the disk! The best way is to open the module like an external memory in Finder, open the single file inside, and drag your audio files into it.
Eject your Voice Recorder module, and you are finished! On to completion.
#include <DFRobot_RGBLCD1602.h>
#include <DFRobot_MAX31855.h>
#include <DFRobot_DF1101S.h>
#include <SoftwareSerial.h>
First, include all of the needed libraries.
float temp=0;
float lasttemp=0;
float fpm=0;
unsigned long lastmillis=0;
unsigned long lastamillis=0;
bool active = true;
bool extraactive = false;
bool off = false;
bool announced = false;
Next, we declare some variables for saving time, temperature, and status.
DFRobot_RGBLCD1602 lcd(/*lcdCols*/16,/*lcdRows*/2);  //16 characters and 2 lines of show
DFRobot_MAX31855 max31855;
SoftwareSerial df1101sSerial(9, 10);  //RX  TX
DFRobot_DF1101S df1101s;
Here we define instances of the libraries we used. The software serial pins used here is 9 and 10.
void setup() {
  Serial.begin(115200);
  df1101sSerial.begin(115200);
  lcd.init();
  if (!df1101s.begin(df1101sSerial)){
    Serial.println("Init failed, please check the wire connection!");
    delay(1000);
  }
First in voidsetup(), we start everything up; the Serial monitor for debugging, the software serial for communicating with the Voice Recorder, and the LCD.
/*Set volume to 20*/
df1101s.setVol(80);
Serial.print("VOL:");
/*Get volume*/
Serial.println(df1101s.getVol());
/*Enter music mode*/
df1101s.switchFunction(df1101s.MUSIC);
/*Wait for the end of prompt tone*/
delay(2000);
/*Set playback mode to "repeat all"*/
df1101s.setPlayMode(df1101s.ALLCYCLE);
Serial.print("PlayMode:");
/*Get playback mode*/
Serial.println(df1101s.getPlayMode());
df1101s.setPrompt(false);
Lastly in setup, we setup the Voice Recorder. The volume can be changed to your preference (I set mine to 80%).
void loop() {
  display(temperature(true));
  if (millis() - lastmillis > 60000){//check temperature announcements once per 60 seconds
    Serial.println("Checking announcements...");
    announcements(temperature(true));
  }
First in voidloop(), the temperature is displayed using several functions. temperature(boolf) returns a float temperature value (false = Celsius). The display() function displays the temperature and status to the LCD.
Next, the lastmillis value is checked to see if it has been a full 60 seconds (60000 milliseconds). If it has, the announcements() function is called to see if we have some announcing to do.
if (active){//if temperature is fluctuating a lot, announce quicker (10 minutes)
    if (millis() - lastamillis > 60000*12){//10 minutes
      if (!off){
        announced = false;
        Serial.println("Reset 'announced'");
        lastamillis = millis();
      }
    }
  }
  else if (extraactive){
    if (millis() - lastamillis > 60000*4){//4 minutes
      if (!off){
        announced = false;
        Serial.println("Reset 'announced'");
        lastamillis = millis();
      }
    }
  }
  else {//if not, announce slower (45 minutes)
    if (millis() - lastamillis > 60000*50){//45 minutes
      if (!off){
        announced = false;
        Serial.println("Reset 'announced'");
        lastamillis = millis();
      }
    }
  }
}
The rest of the loop is a series of if/else. The bool values active and extraactive are either true or false depending on how fast the temperature is moving in degrees per minute. If the temperature is active, the status is announced every 12 minutes. If the temperature is extra active, the status is announced every 4 minutes. If the temperature is not very active, the status is announced every 60 minutes. Also, if the temperature falls below 80˚, the status will be off, which means there will be no announcements at all.
float temperature(bool F){
  float t=0;
  /*Read Celsius and F*/
  if (!F){
    t = max31855.readCelsius();
  }
  else {
    t = (max31855.readCelsius()*1.8)+32;
  }
  Serial.print("Temperature:");
  Serial.println(t);
  return t;
}
This is the temperature() function which reads the temperature and returns it as a float (with a decimal).
void display(float t){
  lcd.setCursor(0,0);
  lcd.print("Temp (F): ");
  lcd.print(t,1);
  lcd.setCursor(0,1);
  if (t <= 350){
    lcd.setRGB(255,255,0);//yellow
    lcd.print("Creosote");
  }
  else if (t > 350 && t <= 650){
    lcd.setRGB(0,255,0);
    lcd.print("Optimal");
  }
  else if (t > 650){
    lcd.setRGB(255,0,0);
    lcd.print("Overfire");
  }
  lcd.setCursor(9,1);
  lcd.print("FPM:");
  lcd.print(fpm);
}
This is the display() function. This function just displays the current temperature, the status, and the "FPM" (Fahrenheit Per Minute).
void announcements(float temp){
  if (abs(temp - lasttemp) >= 2 && abs(temp - lasttemp) < 5){//if the temperature is moving quite fast, set active value to true (for shorter delay between announcements)
    active = true;
  }
  else {active = false;}
  if (abs(temp - lasttemp) >= 5){
    extraactive = true;
  }
  else {extraactive = false;}
    Serial.println(temp - lasttemp);
    if (temp < 170){
      if (!announced){
        //need more wood
        df1101s.playSpecFile(11);//6
        delay(4000);
        announced = true;
        active = false;
        extraactive = false;
      }
    }
  if ((temp - lasttemp <= -0.9) && (temp - lasttemp > -1.7)){
    if (temp < 350){
      if (!announced){
        //going out
        df1101s.playSpecFile(13);//7
        delay(4000);
        announced = true;
      }
    }
  }
  else if ((temp - lasttemp <= -1.7)){
    if (temp < 350){
      if (!announced){
        //getting cold fast
        df1101s.playSpecFile(12);//6
        delay(4000);
        announced = true;
      }
    }
  }
  else if ((temp - lasttemp >= 2) && (temp - lasttemp < 4)){
    if (temp > 450){
      if (!announced){
        //warming up
        df1101s.playSpecFile(14);//8
        delay(4000);
        announced = true;
      }
    }
  }
  else if (temp - lasttemp >= 4){
    if (temp > 550){
      if (!announced){
        //getting hot fast
        df1101s.playSpecFile(15);//9
        delay(4000);
        announced = true;
      }
    }
    if (temp > 600 && temp <= 675){
      if (!announced){
        //getting hot too fast
        df1101s.playSpecFile(16);//10
        delay(4000);
        announced = true;
      }
    }
    if (temp > 675){
      if (!announced){
        //getting hot too fast
        df1101s.playSpecFile(18);//10
        delay(4000);
        announced = true;
      }
    }
  }
  if (temp <= 90){
    if (temp - lasttemp <= 0.3){
      off = true;
    }
    else {
      off = false;
    }
  }
  Serial.print("Last temp:");
  Serial.println(lasttemp);
  fpm = temp - lasttemp;
  Serial.print("F per minute:");
  Serial.println(fpm);
  lasttemp = temp;
  lastmillis = millis();
}
This is the last function; the announcements() function. First, we check how active the temperature is, then based off of what temperature it is, and which way it is moving, we announce certain things! Replace all of the numbers inside the df1101s.playSpecFile(xx); functions, as this is the file number. For example, if the file name is "FILE0007.MP3", then you would write just "7" in that function.
Upload my code, install the sensor, and you're all set!
That was all for this tutorial. If you have any questions or thoughts, feel free to post in the comments!
Check out more of my awesome projects here!
https://www.hackster.io/k-gray
#include <DFRobot_RGBLCD1602.h>
#include <DFRobot_MAX31855.h>
#include <DFRobot_DF1101S.h>
#include <SoftwareSerial.h>

float temp=0;
float lasttemp=0;
float fpm=0;

unsigned long lastmillis=0;
unsigned long lastamillis=0;

bool active = true;
bool extraactive = false;
bool off = false;
bool announced = false;

DFRobot_RGBLCD1602 lcd(/*lcdCols*/16,/*lcdRows*/2);  //16 characters and 2 lines of show
DFRobot_MAX31855 max31855;
SoftwareSerial df1101sSerial(9, 10);  //RX  TX
DFRobot_DF1101S df1101s;

void setup() {
  Serial.begin(115200);
  df1101sSerial.begin(115200);

  lcd.init();

  if (!df1101s.begin(df1101sSerial)){
    Serial.println("Init failed, please check the wire connection!");
    delay(1000);
  }

  /*Set volume to 20*/
  df1101s.setVol(80);
  Serial.print("VOL:");
  /*Get volume*/
  Serial.println(df1101s.getVol());
  /*Enter music mode*/
  df1101s.switchFunction(df1101s.MUSIC);
  /*Wait for the end of prompt tone*/
  delay(2000);
  /*Set playback mode to "repeat all"*/
  df1101s.setPlayMode(df1101s.ALLCYCLE);
  Serial.print("PlayMode:");
  /*Get playback mode*/
  Serial.println(df1101s.getPlayMode());

  df1101s.setPrompt(false);

  lasttemp = temperature(true);
}

void loop() {
  display(temperature(true));

  if (millis() - lastmillis > 60000){//check temperature announcements once per 60 seconds
    Serial.println("Checking announcements...");
    announcements(temperature(true));
  }

  if (active){//if temperature is fluctuating a lot, announce quicker (10 minutes)
    if (millis() - lastamillis > 60000*12){//10 minutes
      if (!off){
        announced = false;
        Serial.println("Reset 'announced'");
        lastamillis = millis();
      }
    }
  }
  else if (extraactive){
    if (millis() - lastamillis > 60000*4){//4 minutes
      if (!off){
        announced = false;
        Serial.println("Reset 'announced'");
        lastamillis = millis();
      }
    }
  }
  else {//if not, announce slower (45 minutes)
    if (millis() - lastamillis > 60000*50){//45 minutes
      if (!off){
        announced = false;
        Serial.println("Reset 'announced'");
        lastamillis = millis();
      }
    }
  }

}

float temperature(bool F){
  float t=0;

  /*Read Celsius and F*/
  if (!F){
    t = max31855.readCelsius();
  }
  else {
    t = (max31855.readCelsius()*1.8)+32;
  }
  Serial.print("Temperature:");
  Serial.println(t);
  return t;
}

void display(float t){
  lcd.setCursor(0,0);
  lcd.print("Temp (F): ");
  lcd.print(t,1);
  lcd.setCursor(0,1);
  if (t <= 350){
    lcd.setRGB(255,255,0);//yellow
    lcd.print("Creosote");
  }
  else if (t > 350 && t <= 650){
    lcd.setRGB(0,255,0);
    lcd.print("Optimal");
  }
  else if (t > 650){
    lcd.setRGB(255,0,0);
    lcd.print("Overfire");
  }
  lcd.setCursor(9,1);
  lcd.print("FPM:");
  lcd.print(fpm);
}

void announcements(float temp){
  if (abs(temp - lasttemp) >= 2 && abs(temp - lasttemp) < 5){//if the temperature is moving quite fast, set active value to true (for shorter delay between announcements)
    active = true;
  }
  else {active = false;}
  if (abs(temp - lasttemp) >= 5){
    extraactive = true;
  }
  else {extraactive = false;}
  Serial.println(temp - lasttemp);

  if (temp < 170){
    if (!announced){
      //need more wood
      df1101s.playSpecFile(11);//6
      delay(4000);
      announced = true;
      active = false;
      extraactive = false;
    }
  }

  if ((temp - lasttemp <= -0.9) && (temp - lasttemp > -1.7)){
    if (temp < 350){
      if (!announced){
        //going out
        df1101s.playSpecFile(13);//7
        delay(4000);
        announced = true;
      }
    }
  }
  else if ((temp - lasttemp <= -1.7)){
    if (temp < 350){
      if (!announced){
        //getting cold fast
        df1101s.playSpecFile(12);//6
        delay(4000);
        announced = true;
      }
    }
  }
  else if ((temp - lasttemp >= 2) && (temp - lasttemp < 4)){
    if (temp > 450){
      if (!announced){
        //warming up
        df1101s.playSpecFile(14);//8
        delay(4000);
        announced = true;
      }
    }
  }
  else if (temp - lasttemp >= 4){
    if (temp > 550){
      if (!announced){
        //getting hot fast
        df1101s.playSpecFile(15);//9
        delay(4000);
        announced = true;
      }
    }
    if (temp > 600 && temp <= 675){
      if (!announced){
        //getting hot too fast
        df1101s.playSpecFile(16);//10
        delay(4000);
        announced = true;
      }
    }
    if (temp > 675){
      if (!announced){
        //getting hot too fast
        df1101s.playSpecFile(18);//10
        delay(4000);
        announced = true;
      }
    }
  }
  if (temp <= 90){
    if (temp - lasttemp <= 0.3){
      off = true;
    }
    else {
      off = false;
    }
  }
  Serial.print("Last temp:");
  Serial.println(lasttemp);
  fpm = temp - lasttemp;
  Serial.print("F per minute:");
  Serial.println(fpm);
  lasttemp = temp;
  lastmillis = millis();

}