


Assistive Technology Gadget for peoples with disabilities - Things Locator, Safety and Support for Special Needs.
UNIHIKER AIoT Innovation Challenge——Redefining AIoT Possibilities. The Category I have chosen for this challenge is Smart Terminal
"The best way to find yourself is to lose yourself in the service of others." --- Mahatma Gandhi

Project Inspiration - I have one relative who is having partial blindness and Alzheimer. At age 72 she faces many difficulties in day to day life. But recently when I visited her, I found out her one issue which I think I can make solution for. She misplaces her regularly useful important things like medicine bag, keys, wallet, her walking aid etc. anywhere in the house. (She places things somewhere in house and then forgets about it). For her, sometimes its hard to remember and find those things. And If she is alone in house(sometimes) during daytime when (others go out for work), she tries to find/search the things all around house, by roaming into each and every room in the house. Eventually in that process, she gets then very restless, irritated and exhausted.
That incident struck me very hard, as normal individuals we often take things for granted, but life of peoples with disabilities is incredibly challenging than as we see it from our perspective. I know that there are several assistive tech gadgets out there and can be helpful in situations like this, but how many of them are designed to cater or addresses the needs of individuals with special needs more comprehensively? And what is the use/benefit of our technical knowledge accumulated over the years, if it not utilized to help the peoples we care for?
"Alone we can do so little; together we can do so much." -- Helen Keller

In a world where independence is often equated with the ability to manage daily tasks effortlessly, individuals with special needs, such as those who are partially paralyzed or visually impaired, face unique challenges. Everyday activities that most people take for granted, like finding misplaced items or alerting a caregiver during an emergency, can become significant hurdles. The inspiration for this project stems from the desire to empower these individuals by providing them with a reliable and user-friendly companion that assists in locating essential items, ensures their safety, and offers support when needed the most.
Problem Statement / Need for the Project
Individuals with special needs require assistance that goes beyond conventional support systems. They often struggle with tasks that many of us take for granted, such as locating personal items, alerting caretakers in emergencies, and ensuring their own safety from falls. Traditional methods, like constant caretaker presence or basic alert systems, can be intrusive and limited in functionality. There is a pressing need for an innovative, user-friendly solution that integrates multiple assistive technologies into a single, portable device, providing peace of mind for both users and their caregivers.

Suppose, If person with limited abilities misplaced an important item in house. Currently there is no one in the house. He/She has to roam around house and search for that item in each Room. This will be very irritating and difficult to that person.
Existing Commercial Products
Several products are available in the market that offer some of the functionalities of CompanionCare, such as:
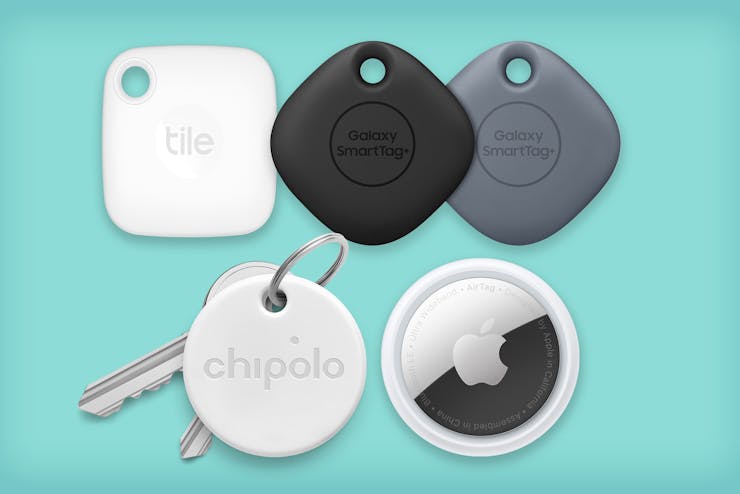
Tile and TrackR: These are Bluetooth-based item trackers that help locate misplaced items like keys and wallets.
Life Alert and Medical Guardian: These are emergency alert systems that allow users to send SOS signals to emergency services or caretakers.
Apple Watch: Includes fall detection and emergency SOS features.
Amazon Echo Show: Offers voice-activated assistance and can be integrated with various smart home devices for added security and convenience.
Proposed Solution
What We Are Going to Build - 🎯
We are developing CompanionCare, a comprehensive portable device designed to assist individuals with special needs. This device, which can be worn using a lanyard (or installed on a wheelchair), integrates multiple assistive technologies into one seamless solution. It will help users locate their misplaced items, send SOS alerts to caretakers, and detect falls, alerting caretakers immediately.

How It Is Different from Existing Solutions
CompanionCare stands out from existing solutions by integrating several essential functionalities into a single, user-friendly device. Unlike current market offerings, which often require multiple devices for different functions, CompanionCare provides a unified solution that simplifies the user experience and enhances functionality. The combination of item-finding, emergency alerting, and fall detection in one portable device is unique and addresses the needs of individuals with special needs more comprehensively.
I have seen number of such assistive technology products, like Tags, key finder, Tag keychains etc. which we can track using smartphone App.
There is lot of assistive technology around, especially Apple iPhone also offer voice based systems to understand and control the environments.
There are smartphones, Smart Watches, Smart Canes, Smart tags, Air Tags and so on plenty of products.
But they are not specifically made to cater the need of visually or physically challenged peoples.
Existing tags have features of ringer and tracking but they do not specifically tell you (voice assistant), 'in which room your item is?' You also can not say like ""Where is my Tommy?"" to track pet.
"I believe that caring for people with disabilities is essential, but empowering them to be independent can greatly enhance their confidence and self-esteem, allowing them to thrive and reach their full potential."
Why It Is Useful
CompanionCare is designed to significantly improve the quality of life for individuals with special needs. By combining essential assistive technologies into one device, it enhances their independence, ensures their safety, and provides peace of mind to both users and their caregivers. The ability to quickly find misplaced items, send immediate alerts in emergencies, and detect falls can prevent serious injuries and facilitate timely assistance, making CompanionCare an invaluable tool for those who need it most.
Functional Block Diagram
Following figure shows conceptual functional block diagram of the project.

Let me explain you briefly how this project actually going to work -
Consider above house scenario, suppose a person with limited abilities (On Wheelchair as shown in above picture) is alone in the house.
If he misplaced his Medicine bag somewhere around house, and forget about its location. So when he want to search it he has to go in each room to find it.
Instead of this, he can use CompanionCare which will be attached/installed to his wheelchair or will be worn around neck using lanyard.
There will be specific 'Tag devices' which should be attached to the important items of daily use by that person. For example - Medicine Bag, Keys, Walking Aid etc.
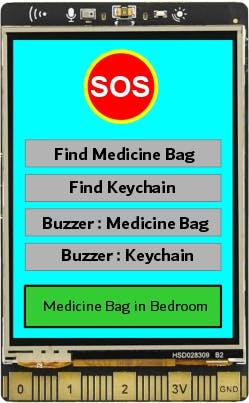
So, on CompanionCare device there is touchscreen with GUI and buttons like shown in image below
There is also voice command facility available. We will be adding facility of 'Voice assistant'. Hence whatever commands you see above in GUI, will also be available to be issued by using voice.
So as you can see, for the sake of demo purpose we have implemented 5 commands. We can implement more in future.
🆘SOS command sends panic alert to caretaker device. which you can see in above picture, will be placed in common area. So if anybody in house will know that person needs help. As caretaker device will ring the buzzer and show Lights notifications, family members/caretaker will know when they notice it.
Then next button/command - 'Find medicine Bag' - gives location of medicine bag, that is in which specific room in the house that medicine Bag is currently in. There is text placeholder bottom of screen where - all information about that misplaced item will be displayed.
For peoples with visual impairments, Voice Notifications are enabled so it will announce the name of the room in which that item is currently residing. (via loudspeaker).
Now once that person get to know about exact room location, he need not to roam around and go to each and every room to serachthat Medicine bag.
Here is another interesting Feature of CompanionCare - now suppose in above scenario, person know about the location/name of that room in which the misplaced item is residing. BUT - How he will searchand find it in that specificroom?
This means, suppose person has visual impairment also, then it will be difficult to him to find it, like in case if that items trapped below something for example -cloth/cover
So, the next commands - Buzzer commands, turns on the buzzer on 'Tag Devices' which are attached to those items (here in this case Medicine Bag'). Hence one can easily locateit by tracking its sound.
As per suggestion from contest masters in their feedback we have added different melodies/tunes for every individual items/Tags. so that person also can identify that item using sound/tune.
So this was about feature of finding misplaced item. Also added feature of 'Fall Detection'. So, if that person wearing CompanionCare, falls accidently around anywhere in house, then device detects it and immediately send Alert to caretaker device.
Now suppose that person is unable to operate touchscreen function, then he can also give voice commands like - "Hello Robot, I need help" to send SOS alert notification.
Currently, we have added support for 2 languages. So user can give commands in English and Hindi.
Currently all these features mentioned above are programmed in CompanionCare,but as this is very flexible feature rich hardware and open source software, there is big scope of improvements and updates.
There are four main parts of the project - 🚩
1. CompanionCare Device : This is main device, which will attached to the Wheelchair or will be worn around neck using lanyard by the person with limited abilities. This device features Touchscreen GUI, Voice Assistant and Manual buttons - to Call for help, Find/enquire about their misplaced items. This device also monitor for 'Fall detection'.
2. Room Anchors : These are BLE beacons, which will be broadcasting name of Room(where they will be placed) via BLE. Here in our case, these Room Anchors will be permanently placed/fixed at different rooms in house, for example - Bedroom, Kitchen, Living Room and Office. Therefore Anchor in Bedroom will be called as 'Bedroom Anchor'. and likewise for other rooms.
3. Tag Devices/Tags : These are the devices which will be attached to 'Important Things/Items' means regularly needed commodities. The scan their surrounding for Room Anchors : BLE beacons, determine nearest room (calculating RSSI), and send their position in House to CompanionCare Device (whenever enquired).
4. Caretaker Alert Device : This will be placed in 'Central Hall/Common Area'. There will be buzzer/sound device and notification Lights on it. This will respond make Alert sound whenever it receives SOS signal sent by CompanionCare Device.
The following photos were taken when I had not designed the PCBs and enclosures for the above 4 devices. so they looked like below

UNIHIKER AIoT Innovation Challenge

This is an amazing contest hosted by DFRobot aimed at developing technologies using
UNIHIKER, which is an IoT Python Single Board Computer, has provided users with a more convenient and adaptable SBC option in the AIoT (Artificial Intelligence of Things) domain since its launch in 2023. Equipped with multiple sensors, a built-in touchscreen, and robust connectivity options, UNIHIKER empowers innovators across AI, IoT, and machine learning domains.
DFRobot's ongoing commitment to promoting innovation and advancing technology, They proudly introduce the UNIHIKER AIoT Innovation Challenge in 2024. Join this exciting contest to unleash creativity, showcase projects leveraging UNIHIKER's advanced capabilities, and explore its limitless potential in shaping the future of AIoT applications.
I would like to Thank DFRobot for hosting such amazing contest. And supporting my project idea with 'UNIHIKER'. ❤️🙏
Hardware used in the Project 🛠️
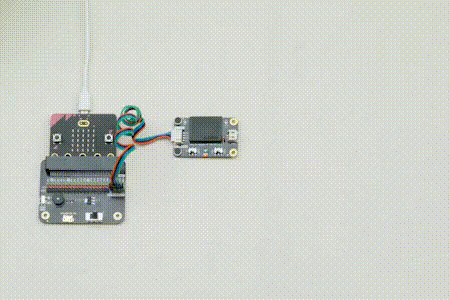
As we have seen in above image we have use different devices in our project. Lets see important devices and their interfacing and circuit diagrams.
1.UNIHIKER: IoT Python Single Board Computer with Touchscreen
UNIHIKER is a single-board computer launched by DFRobot that brings you brand new experience.

It features a 2.8-inch touchscreen, Wi-Fi and Bluetooth. It is equipped with light sensor, accelerometer, gyroscope and microphone. With built-in co-processor, it is able to communicate with various analog/digital/I2C/UART/SPI sensors and actuators.
UNIHIKER brings a whole new experience for developers with its pre-installed software, allowing for an incredibly fast and easy start. Featuring a built-in Jupyter Notebook (a browser-based programming environment), developers can program the single board computer using a smartphone or tablet.
Of course, just like other single board computers, UNIHIKER supports VS Code, VIM, and Thonny. The integrated PinPong control library allows developers to directly control UNIHIKER's built-in sensors and hundreds of connected sensors and actuators using Python.
The built-in SIoT service on UNIHIKER allows users to store data through the MQTT protocol and provides real-time web data access. The best part is that all data is stored within the device itself.
Compact, feature-rich, and user-friendly, UNIHIKER offers an innovative development experience for learning, coding, and creating. Unleash your imagination and embark on a new journey with UNIHIKER.
You can go this Wiki Page link where you will find Getting Started Guide of UNIHIKER.
📌 UNIHIKER have all above features which we are looking for our CompanionCare portable device. Hence we have used it as our main device.
2. Gravity: Offline Language Learning Voice Recognition Sensor
This Sensor is built around an offline voice recognition chip, which can be directly used without an internet connection. It comes with 121 built-in fixed command words and supports the addition of 17 custom command words. Meanwhile, this voice recognition module compatibility with multiple common controllers enables it to provide a flexible solution for makers and electronics enthusiasts in terms of voice interaction. It can be applied to any application that requires voice control or interaction, such as various smart home appliances, toys, lighting fixtures, and robotics projects, among others.
Self-learning function: Control the module to learn command words by the voice, and any audio can be trained as a command
Support I2C and UART, with a Gravity interface
Compatible with 3.3V/5V
Built-in with 121 commonly-used fixed command words and 17 custom command words.
The module has a built-in speaker and an interface for an external speaker, which can provide real-* time voice feedback on recognition results
Equipped with power indicator (red) and recognition status indicator (blue)
Dual microphones provide better noise resistance and longer recognition distance
You will find more information about this module on this Wiki Page.
📌 We have used above Gravity offline voice recognition device with UNIHIKER. You can see following schematic, how we have interfaced it with UNIHIKER

To get started with Gravity offline voice recognition device with UNIHIKER you can Download Sensor library from GitHub
Here is the Python library -
# -*- coding: utf-8 -*
"""
  @file  DFRobot_DF2301Q.py
  @note  DFRobot_DF2301Q Class infrastructure, implementation of underlying methods
  @copyright  Copyright (c) 2010 DFRobot Co.Ltd (http://www.dfrobot.com)
  @licence  The MIT License (MIT)
  @author  [qsjhyy]([email protected])
  @version  V1.0
  @date  2022-12-30
  @url  https://github.com/DFRobot/DFRobot_DF2301Q
  @date 20230705
  @此代码在原RaspberryPi的代码上调整了i2c读取方式,仅适配行空板(DFR0706)使用

"""
import sys
import time

import array
#import smbus
from pinpong.board import I2C
import serial
import numpy as np

import logging
from ctypes import *


logger = logging.getLogger()
# logger.setLevel(logging.INFO)   # Display all print information
logger.setLevel(logging.FATAL)   # If you don’t want to display too many prints, only print errors, please use this option
ph = logging.StreamHandler()
formatter = logging.Formatter("%(asctime)s - [%(filename)s %(funcName)s]:%(lineno)d - %(levelname)s: %(message)s")
ph.setFormatter(formatter)
logger.addHandler(ph)


## i2c address
DF2301Q_I2C_ADDR                  = 0x64

## Address of the register for requesting command word ID
DF2301Q_I2C_REG_CMDID             = 0x02
## Address of the register for playing audio by command word ID
DF2301Q_I2C_REG_PLAY_CMDID        = 0x03
## Register for setting mute mode
DF2301Q_I2C_REG_SET_MUTE          = 0x04
## Register for setting volume
DF2301Q_I2C_REG_SET_VOLUME        = 0x05
## Address of the register for wake-up time
DF2301Q_I2C_REG_WAKE_TIME         = 0x06

# tail
DF2301Q_I2C_MSG_TAIL              = 0x5A

## UART baud rate
DF2301Q_UART_BAUDRATE             = 9600
## Maximum data length of serial data frame
DF2301Q_UART_MSG_DATA_MAX_SIZE    = 8

# header
DF2301Q_UART_MSG_HEAD_LOW         = 0xF4
DF2301Q_UART_MSG_HEAD_HIGH        = 0xF5
DF2301Q_UART_MSG_HEAD             = 0xF5F4
# tail
DF2301Q_UART_MSG_TAIL             = 0xFB
# msg_type
DF2301Q_UART_MSG_TYPE_CMD_UP      = 0xA0
DF2301Q_UART_MSG_TYPE_CMD_DOWN    = 0xA1
DF2301Q_UART_MSG_TYPE_ACK         = 0xA2
DF2301Q_UART_MSG_TYPE_NOTIFY      = 0xA3
# msg_cmd
## Report voice recognition results
DF2301Q_UART_MSG_CMD_ASR_RESULT        = 0x91
## Play local broadcast audio
DF2301Q_UART_MSG_CMD_PLAY_VOICE        = 0x92
## Read the serial number of FLASH
DF2301Q_UART_MSG_CMD_GET_FLASHUID      = 0x93
## Read version number
DF2301Q_UART_MSG_CMD_GET_VERSION       = 0x94
## Reset the voice module
DF2301Q_UART_MSG_CMD_RESET_MODULE      = 0x95
## Settings
DF2301Q_UART_MSG_CMD_SET_CONFIG        = 0x96
## Enter update mode
DF2301Q_UART_MSG_CMD_ENTER_OTA_MODE    = 0x97
## Event notification
DF2301Q_UART_MSG_CMD_NOTIFY_STATUS     = 0x9A
DF2301Q_UART_MSG_CMD_ACK_COMMON        = 0xAA
# if user want add please add form DF2301Q_UART_MSG_CMD_USER_START
DF2301Q_UART_MSG_CMD_USER_START        = 0xB0
# msg_data  msg_cmd:DF2301Q_UART_MSG_CMD_PLAY_VOICE
DF2301Q_UART_MSG_DATA_PLAY_START            = 0x80
DF2301Q_UART_MSG_DATA_PLAY_PAUSE            = 0x81
DF2301Q_UART_MSG_DATA_PLAY_RESUME           = 0x82
DF2301Q_UART_MSG_DATA_PLAY_STOP             = 0x83
DF2301Q_UART_MSG_DATA_PLAY_BY_VOICEID       = 0x90
DF2301Q_UART_MSG_DATA_PLAY_BY_SEMANTIC_ID   = 0x91
DF2301Q_UART_MSG_DATA_PLAY_BY_CMD_ID        = 0x92
# msg_data  msg_cmd:DF2301Q_UART_MSG_CMD_GET_VERSION
## Serial protocol version number
DF2301Q_UART_MSG_DATA_VER_PROTOCOL          = 0x80
## SDK version number
DF2301Q_UART_MSG_DATA_VER_SDK               = 0x81
## ASR component version number
DF2301Q_UART_MSG_DATA_VER_ASR               = 0x82
## Audio pre-processing algorithm version number
DF2301Q_UART_MSG_DATA_VER_PREPROCESS        = 0x83
## Player version number
DF2301Q_UART_MSG_DATA_VER_PLAYER            = 0x84
## App version number
DF2301Q_UART_MSG_DATA_VER_APP               = 0x8A
# msg_data  msg_cmd:DF2301Q_UART_MSG_CMD_NOTIFY_STATUS
DF2301Q_UART_MSG_DATA_NOTIFY_POWERON        = 0xB0
DF2301Q_UART_MSG_DATA_NOTIFY_WAKEUPENTER    = 0xB1
DF2301Q_UART_MSG_DATA_NOTIFY_WAKEUPEXIT     = 0xB2
DF2301Q_UART_MSG_DATA_NOTIFY_PLAYSTART      = 0xB3
DF2301Q_UART_MSG_DATA_NOTIFY_PLAYEND        = 0xB4
# msg_data msg_cmd:DF2301Q_UART_MSG_CMD_SET_CONFIG
DF2301Q_UART_MSG_CMD_SET_VOLUME             = 0x80
DF2301Q_UART_MSG_CMD_SET_ENTERWAKEUP        = 0x81
DF2301Q_UART_MSG_CMD_SET_PRT_MID_RST        = 0x82
DF2301Q_UART_MSG_CMD_SET_MUTE               = 0x83
DF2301Q_UART_MSG_CMD_SET_WAKE_TIME          = 0x84
DF2301Q_UART_MSG_CMD_SET_NEEDACK            = 0x90
DF2301Q_UART_MSG_CMD_SET_NEEDSTRING         = 0x91
# ACK error code
DF2301Q_UART_MSG_ACK_ERR_NONE               = 0x00
DF2301Q_UART_MSG_ACK_ERR_CHECKSUM           = 0xff
DF2301Q_UART_MSG_ACK_ERR_NOSUPPORT          = 0xfe


class DFRobot_DF2301Q(object):
  '''!
    @brief Define DFRobot_DF2301Q basic class
  '''

  def __init__(self):
    '''!
      @brief Module init
    '''
    pass


class DFRobot_DF2301Q_I2C(DFRobot_DF2301Q):
  '''!
    @brief Define DFRobot_DF2301Q_I2C basic class
  '''

  def __init__(self, i2c_addr=DF2301Q_I2C_ADDR, bus=0):
    '''!
      @brief Module I2C communication init
      @param i2c_addr - I2C communication address
      @param bus - I2C bus
    '''
    print("2301Q init starts...")
    self._addr = i2c_addr
    try:
        self._i2c = I2C(bus)
    except Exception as e:
        print(f"\nError:PinPong未初始化")
        print(f"Error:{e}\n")
        raise

    super(DFRobot_DF2301Q_I2C, self).__init__()
    print("2301Q init end")

  def get_CMDID(self):
    '''!
      @brief Get the ID corresponding to the command word
      @return Return the obtained command word ID, returning 0 means no valid ID is obtained
    '''
    return self._read_reg(DF2301Q_I2C_REG_CMDID)

  def play_by_CMDID(self, CMDID):
    '''!
      @brief Play the corresponding reply audio according to the command word ID
      @param CMDID - Command word ID
      @note Can enter wake-up state through ID-1 in I2C mode
    '''
    self._write_reg(DF2301Q_I2C_REG_PLAY_CMDID, CMDID)
    time.sleep(1)

  def get_wake_time(self):
    '''!
      @brief Get the wake-up duration
      @return The current set wake-up period
    '''
    return self._read_reg(DF2301Q_I2C_REG_WAKE_TIME)

  def set_wake_time(self, wake_time):
    '''!
      @brief Set wake-up duration
      @param wakeTime - Wake-up duration(0-255)
    '''
    wake_time = wake_time & 0xFF
    self._write_reg(DF2301Q_I2C_REG_WAKE_TIME, wake_time)

  def set_volume(self, vol):
    '''!
      @brief Set voice volume
      @param vol - Volume value(1~7)
    '''
    # if (vol < 0):
    #   vol = 0
    # elif (vol > 20):
    #   vol = 20
    self._write_reg(DF2301Q_I2C_REG_SET_VOLUME, vol)

  def set_mute_mode(self, mode):
    '''!
      @brief Set mute mode
      @param mode - Mute mode; set value 1: mute, 0: unmute
    '''
    if (0 != mode):
      mode = 1
    self._write_reg(DF2301Q_I2C_REG_SET_MUTE, mode)

  def _write_reg(self, reg, data):
    '''!
      @brief writes data to a register
      @param reg - register address
      @param data - written data
    '''
    if isinstance(data, int):
      data = [data]
      #logger.info(data)
    #self._i2c.write_i2c_block_data(self._addr, reg, data)
    #print("write reg:",reg)
    #print("write buf:",data)
    self._i2c.writeto_mem(self._addr, reg, data)

  def _read_reg(self, reg):
    '''!
      @brief read the data from the register
      @param reg - register address
      @return read data
    '''
    #data = self._i2c.read_i2c_block_data(self._addr, reg, 1)
    #print("read reg:",reg)
    data = self._i2c.readfrom_mem_restart_transmission(self._addr, reg, 1)
    if data is None:
        print(f"2301Q reg:{reg},data:{data}")
        return 0
    else:
      return data[0]


# class DFRobot_DF2301Q_UART(DFRobot_DF2301Q):
#   '''!
#     @brief Define DFRobot_DF2301Q_UART basic class
#   '''

#   REV_STATE_HEAD0   = 0x00
#   REV_STATE_HEAD1   = 0x01
#   REV_STATE_LENGTH0 = 0x02
#   REV_STATE_LENGTH1 = 0x03
#   REV_STATE_TYPE    = 0x04
#   REV_STATE_CMD     = 0x05
#   REV_STATE_SEQ     = 0x06
#   REV_STATE_DATA    = 0x07
#   REV_STATE_CKSUM0  = 0x08
#   REV_STATE_CKSUM1  = 0x09
#   REV_STATE_TAIL    = 0x0a

#   class uart_msg():
#     '''!
#       @brief Class for serial data frame struct
#     '''
#     def __init__(self):
#       '''!
#         @brief sensor_status structure init
#       '''
#       self.header = 0
#       self.data_length = 0
#       self.msg_type = 0
#       self.msg_cmd = 0
#       self.msg_seq = 0
#       self.msg_data = [0] * 8

#   def __init__(self):
#     '''!
#       @brief Module UART communication init
#     '''
#     self.uart_cmd_ID = 0
#     self._send_sequence = 0
#     self._ser = serial.Serial("/dev/ttyAMA0", baudrate=DF2301Q_UART_BAUDRATE, bytesize=8, parity='N', stopbits=1, timeout=0.5)
#     if self._ser.isOpen == False:
#       self._ser.open()
#     super(DFRobot_DF2301Q_UART, self).__init__()

#   def get_CMDID(self):
#     '''!
#       @brief Get the ID corresponding to the command word
#       @return Return the obtained command word ID, returning 0 means no valid ID is obtained
#     '''
#     self._recv_packet()
#     temp = self.uart_cmd_ID
#     self.uart_cmd_ID = 0
#     return temp

#   def play_by_CMDID(self, play_id):
#     '''!
#       @brief Play the corresponding reply audio according to the command word ID
#       @param CMDID - Command word ID
#     '''
#     msg = self.uart_msg()
#     msg.header = DF2301Q_UART_MSG_HEAD
#     msg.data_length = 6
#     msg.msg_type = DF2301Q_UART_MSG_TYPE_CMD_DOWN
#     msg.msg_cmd = DF2301Q_UART_MSG_CMD_PLAY_VOICE
#     msg.msg_seq = self._send_sequence
#     self._send_sequence += 1
#     msg.msg_data[0] = DF2301Q_UART_MSG_DATA_PLAY_START
#     msg.msg_data[1] = DF2301Q_UART_MSG_DATA_PLAY_BY_CMD_ID
#     msg.msg_data[2] = play_id

#     self._send_packet(msg)
#     time.sleep(1)

#   def reset_module(self):
#     '''!
#       @brief Reset the module
#     '''
#     msg = self.uart_msg()
#     msg.header = DF2301Q_UART_MSG_HEAD
#     msg.data_length = 5
#     msg.msg_type = DF2301Q_UART_MSG_TYPE_CMD_DOWN
#     msg.msg_cmd = DF2301Q_UART_MSG_CMD_RESET_MODULE
#     msg.msg_seq = self._send_sequence
#     self._send_sequence += 1
#     msg.msg_data[0] = 'r'
#     msg.msg_data[1] = 'e'
#     msg.msg_data[2] = 's'
#     msg.msg_data[3] = 'e'
#     msg.msg_data[4] = 't'

#     self._send_packet(msg)
#     time.sleep(3)

#   def setting_CMD(self, set_type, set_value):
#     '''!
#       @brief Set commands of the module
#       @param set_type - Set type
#       @n       DF2301Q_UART_MSG_CMD_SET_VOLUME : Set volume, the set value range 1-7
#       @n       DF2301Q_UART_MSG_CMD_SET_ENTERWAKEUP : Enter wake-up state; set value 0
#       @n       DF2301Q_UART_MSG_CMD_SET_MUTE : Mute mode; set value 1: mute, 0: unmute
#       @n       DF2301Q_UART_MSG_CMD_SET_WAKE_TIME : Wake-up duration; the set value range 0-255s
#       @param set_value - Set value, refer to the set type above for the range
#     '''
#     msg = self.uart_msg()
#     msg.header = DF2301Q_UART_MSG_HEAD
#     msg.data_length = 5
#     msg.msg_type = DF2301Q_UART_MSG_TYPE_CMD_DOWN
#     msg.msg_cmd = DF2301Q_UART_MSG_CMD_SET_CONFIG
#     msg.msg_seq = self._send_sequence
#     self._send_sequence += 1
#     msg.msg_data[0] = set_type
#     msg.msg_data[1] = set_value

#     self._send_packet(msg)

#   def _send_packet(self, msg):
#     '''
#       @brief Write data through UART
#       @param msg - Data packet to be sent
#     '''
#     chk_sum = 0x0000
#     data = []
#     data.append(msg.header & 0xFF)
#     data.append((msg.header >> 8) & 0xFF)
#     data.append(msg.data_length & 0xFF)
#     data.append((msg.data_length >> 8) & 0xFF)
#     data.append(msg.msg_type & 0xFF)
#     chk_sum += msg.msg_type
#     data.append(msg.msg_cmd & 0xFF)
#     chk_sum += msg.msg_cmd
#     data.append(msg.msg_seq & 0xFF)
#     chk_sum += msg.msg_seq
#     for i in range(0, msg.data_length):
#       data.append(msg.msg_data[i] & 0xFF)
#       chk_sum += msg.msg_data[i]
#     data.append(chk_sum & 0xFF)
#     data.append((chk_sum >> 8) & 0xFF)
#     data.append(DF2301Q_UART_MSG_TAIL & 0xFF)
#     logger.info(data)
#     self._ser.write(data)
#     time.sleep(0.1)

#   def _recv_packet(self):
#     '''
#       @brief Read data through UART
#       @param msg - Buffer for receiving data packet
#     '''
#     msg = self.uart_msg()
#     rev_state = self.REV_STATE_HEAD0
#     receive_char = 0
#     chk_sum = 0
#     data_rev_count = 0
#     while self._ser.in_waiting:
#       receive_char = ord(self._ser.read(1))
#       if(self.REV_STATE_HEAD0 == rev_state):
#         if(DF2301Q_UART_MSG_HEAD_LOW == receive_char):
#           rev_state = self.REV_STATE_HEAD1
#       elif(self.REV_STATE_HEAD1 == rev_state):
#         if(DF2301Q_UART_MSG_HEAD_HIGH == receive_char):
#           rev_state = self.REV_STATE_LENGTH0
#           msg.header = DF2301Q_UART_MSG_HEAD
#         else:
#           rev_state = self.REV_STATE_HEAD0
#       elif(self.REV_STATE_LENGTH0 == rev_state):
#         msg.data_length = receive_char
#         rev_state = self.REV_STATE_LENGTH1
#       elif(self.REV_STATE_LENGTH1 == rev_state):
#         msg.data_length += receive_char << 8
#         rev_state = self.REV_STATE_TYPE
#       elif(self.REV_STATE_TYPE == rev_state):
#         msg.msg_type = receive_char
#         rev_state = self.REV_STATE_CMD
#       elif(self.REV_STATE_CMD == rev_state):
#         msg.msg_cmd = receive_char
#         rev_state = self.REV_STATE_SEQ
#       elif(self.REV_STATE_SEQ == rev_state):
#         msg.msg_seq = receive_char
#         rev_state = rev_state
#         if(msg.data_length > 0):
#           rev_state = self.REV_STATE_DATA
#           data_rev_count = 0
#         else:
#           rev_state = self.REV_STATE_CKSUM0
#       elif(self.REV_STATE_DATA == rev_state):
#         msg.msg_data[data_rev_count] = receive_char
#         data_rev_count += 1
#         if(msg.data_length == data_rev_count):
#           rev_state = self.REV_STATE_CKSUM0
#       elif(self.REV_STATE_CKSUM0 == rev_state):
#         chk_sum = receive_char
#         rev_state = self.REV_STATE_CKSUM1
#       elif(self.REV_STATE_CKSUM1 == rev_state):
#         chk_sum += receive_char << 8

#         rev_state = self.REV_STATE_TAIL
#       elif(self.REV_STATE_TAIL == rev_state):
#         if(DF2301Q_UART_MSG_TAIL == receive_char):
#           if(DF2301Q_UART_MSG_TYPE_CMD_UP == msg.msg_type):
#             self.uart_cmd_ID = msg.msg_data[0]
#         else:
#           data_rev_count = 0
#         rev_state = self.REV_STATE_HEAD0
#       else:
#         rev_state = self.REV_STATE_HEAD0

#     return data_rev_count
Create above python file and name it as DFRobot_DF2301Q.py Then create another file which you can name it as per your choice like following.
#  -*- coding: UTF-8 -*-

# MindPlus
# Python

#https://www.dfrobot.com/product-2665.html
#https://www.dfrobot.com/product-2691.html

# 1.Set the first switch on the Voice Recognition Module to the I2C side and the second switch to the SPK1 side.
# 2.Connect the Voice Recognition Module to the 4-pin interface on the UNIHIKER using the 4-pin cable provided in the UNIHIKER box.

import time
from pinpong.board import Board,Pin
from pinpong.extension.unihiker import *
from DFRobot_DF2301Q import *


Board("unihiker").begin()

p_p25_out=Pin(Pin.P25, Pin.OUT)

DF2301Q = DFRobot_DF2301Q_I2C()
DF2301Q.set_volume(5)
DF2301Q.set_mute_mode(0)
DF2301Q.set_wake_time(10)
print(DF2301Q.get_wake_time())
DF2301Q.play_by_CMDID(23)
print("-----")

while True:
    DF2301Q_CMDID = DF2301Q.get_CMDID()
    time.sleep(0.05)
    if (not DF2301Q_CMDID==0):
        if ((DF2301Q_CMDID) == 103):
            print("Turn on the light")
            p_p25_out.write_digital(1)
        if ((DF2301Q_CMDID) == 104):
            print("Turn off the light")
            p_p25_out.write_digital(0)
Keep library file and your code in same folder. once you run the above code. The try issuing different voice commands given on Wiki Page
You can also try Timothy Lovett's added support for the offline voice recognition module for Unihiker's pinpong library. On these links - Link1,Link2

For more information on this Gravity offline voice recognition device you can check out my Article on Hackster about it.
Learning Mode
Voice Control Demo
We are going to use custom 17 voice commands to enquire about different important things. For example - 'Hello Robot, Where is my Medicine Bag'
3. Fermion: BLE Sensor Beacon -
Fermion: BLE Sensor Beacon, a wireless beacon that broadcasts sensor data via Bluetooth, with built-in 11-bit ADC acquisition and I2C write/read functionality, can be connected to digital or analogue sensors for data acquisition and broadcasting. Sensor data broadcasted by the beacon can be accessed within the beacon's broadcast range using mobile phones, ESP32 and other devices that support BLE reception.
Fermion: BLE sensor beacons integrate low-power Bluetooth 5.3 technology with self-configurable data formats, such as iBeacon, Eddystone, user-defined, and more.
The data format of the beacon broadcast, the content of the broadcast, the broadcast interval and so on can be configured through the graphical interface, without the need for any code programming to complete a Bluetooth beacon.
After the configuration is completed, the device power supply is running as a Bluetooth beacon, which will automatically collect sensor data and broadcast to the outside world according to the configuration information.
For more information and getting started tutorial you can refer - Wiki Page of this module.
I have created detailed article on how to get started with this Sensor Beacon Module. You can refer it also.
We are going to use this BLE Sensor Beacon as an "Room Anchor". ⚓

We will place 4 of these types of beacons in Each room (considering house with 4 rooms).
Then configure these beacons to broadcast the name of the respective Room for every 2/3 seconds via BLE.
So whenever Tag Devices(M5StickC Plus) scan their surrounding they will find these beacons.
Then according to RSSI strength of BLE signals, Tag devices will determine which is nearest room.
And hence they will send their position to CompanionCare device about their Position in house.
To configure the Broadcast beacon we have to use InPlay NanoBeacon Config tool . We have explained all procedure in above article and video.
For that you have to connect your Fermion: BLE Sensor Beacon module to PC via USB to Serial TTL adapter. See the schematic given below

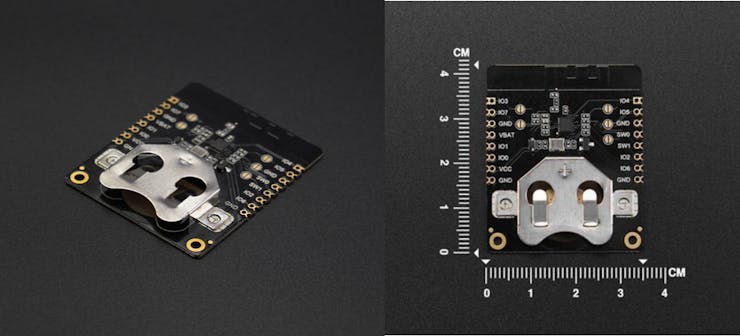
4. M5StickC Plus
M5StickC PLUS is an portable IoT development board, featuring ESP32-PICO-D4 with Wi-Fi connectivity and screen.

As one of the core devices in the M5Stack product series, M5StickC PLUS offers a rich set of hardware resources integrated into its compact body. These resources include infrared, RTC, microphone, LED, IMU, buttons, and PMU. Notably, this upgraded version introduces new features such as a buzzer, a larger 1.14-inch LCD screen with a resolution of 135 * 240, and a more stable hardware design.
ESP32-based support Wi-Fi
Built-in 6-Axis IMU
Red LED
IR transmitter
Microphone
RTC
Buttons, LCD(1.14 inch)
Built-in Lithium Polymer Battery
Extendable Socket
Built-in Passive Buzzer
Wearable & Wall mounted
Compatible with multi-platform development: UIFlow, MicroPython, Arduino.NET nanoFramework
5. M5StickC Plus 2
This is an iterative version of M5StickC PLUS, featuring the ESP32-PICO-V3-02 chip as the main controller with built-in Wi-Fi functionality.

The compact device integrates a wealth of hardware resources within its small form factor, including infrared, RTC, microphone, LED, IMU, buttons, buzzer, and more. It boasts a 1.14-inch TFT screen with a resolution of 135*240, driven by the ST7789V2. The battery capacity has been increased to 200mAh, and the interface also supports HAT and Unit series products.
This compact and versatile development tool is designed to spark limitless creative possibilities.
What is difference between M5StickC Plus and M5StickC Plus 2?
M5Stack Updates the Compact M5StickC PLUS with Double the Flash, 2MB of PSRAM, and a Bigger Battery.
You check out this excellent blog by Gareth Halfacree on Hackster.io which explains in detail about the differences and upgrades.
Why we choose M5StickC Plusdevices (As Tag Devices)
The main reasons we choose M5StickC PLUS devices are -
"These are highly compact and Feature Rich devices".
They support WiFi as well as BLE reception capabilities which is mandatory for our project.
Built-in buzzer and Buttons.
How they will work as Tag Devices ?
As we explained above in BLE sensor beacon section, We are going to use Fermion BLE Sensor Beacon as an "Room Anchor". ⚓
So whenever Tag Devices(M5StickC Plus) scan their surrounding they will find these beacons.
Then according to RSSI strength of BLE signals, Tag devices will determine which is nearest room.
And hence they will send their position to CompanionCare device about their Position in house.
There will be MQTT server running on CompanionCare device. Tag devices will determine their position
6. SEEED Studio's Xiao ESP32S3
Seeed Studio XIAO ESP32S3 leverages 240MHz Xtensa 32-bit LX7 dual-core processor, supporting both WiFi and BLE 5.0 wireless connectivities, a 2.4GHz Rod antenna, allows for deep sleep mode with power consumption as low as 14μA while supporting lithium battery charging management. Ideal for the Internet of Things, Smart Homes, Wireless wearable devices, Robotics, etc.

Seeed Studio XIAO Series are diminutive development boards, sharing a similar hardware structure, where the size is literally thumb-sized.
The code name "XIAO" here represents its half feature "Tiny", and the other half will be "Puissant".
Seeed Studio XIAO ESP32S3 Sense integrates camera sensor, digital microphone and SD card supporting. Combining embedded ML computing power and photography capability, this development board can be your great tool to get started with intelligent voice and vision AI.
You can check out this Wiki and Getting started document for Xiao ESP32S3
📌 In this project, We have used XIAO ESP32S3 to develop Caretaker Alert Device. The main reasons we choose this device are This is very compact and features-Rich hardware.0
We have interfaced Buzzer, Reset Button and Notifications LED's to Xiao ESP32S3 as shown in below schematic

Wireless technologiesused in the Project 📶
We have use two wireless technologies in this project -
1. Wi-Fi :
There will be a Wi-Fi router in house which will be covering all house area
CompanionCare Device (UNIHIKER) use Wi-Fi and connects to this network.
Tag Devices (M5StickC Plus) connects to same Wi-Fi network.
Caretaker Alert Device (XIAO ESP32S3) also connects to same Wi-Fi network.
2. BLE (Bluetooth Low Energy)
Room Anchors (Fermion: BLE sensor beacons) integratelow-power Bluetooth 5.3 technology.
Tag Devices (M5StickC Plus) also uses BLE to scan and get information about nearest Room Anchors.
📍 So, in our project Tag Devices (M5StickC Plus) uses both Wi-Fi and BLE technologies 📶
Software for the Project 💻
There are multiple devices in our project, they require different Softwares, programming tools and coding languages. Lets see one by one -
⭕ UNIHIKER - can be programmed via
Jupyter Notebook: The UNIHIKER comes with built-in Jupyter Notebook, which allows you to do Python programming on a web page using your computer or mobile device's browser. You can also use the web terminal to control the UNIHIKER.
VSCode: It is a powerful code editor. If you are familiar with it, you can use VSCode to program and control the UNIHIKER.
SSH Connection: The UNIHIKER has SSH service enabled by default. If you are accustomed to using SSH terminals to control Linux devices, it will be convenient to do so on the UNIHIKER as well.
MindPlus: It is a software that supports graphical programming and code programming. It provides easy connection and file management, making it very user-friendly for beginners.
📌 We use VSCode method to program the UNIHIKER. You can check out this guide to know more about it
⭕ M5StickC Plus - can be programmed via
UIFlow - UIFlow is a graphical programming IDE
MicroPython
Arduino
.NET nanoFramework
📌 We use Arduino method and VSCode+PlatformIO IDE to program the M5StickC Plus devices. You can check out this guide to know more about it
⭕ Fermion: BLE Sensor Beacon : can be configured using
To configure the Broadcast beacon we have to use InPlay NanoBeacon Config tool.
For more information and getting started tutorial you can refer - Wiki Pageof this module.
I have created detailed articleon how to get started with this Sensor Beacon Module. You can refer it also.
⭕ XIAO ESP32S3 -
The recommended programming tool for the XIAO ESP32S3 is the Arduino IDE.
We used Arduino method and VSCode+PlatformIO IDE to program the M5StickC Plus devices. You can check out this guide to know more about it
Indoor positioning system (IPS)
In our project we are building an indoor positioning system (IPS). There are several most commonly used technologies to achieve it:
Wi-Fi, Bluetooth Low Energy (BLE), Ultra-Wideband (UWB), Radio Frequency Identification (RFID), Infrared (IR), Ultrasound, Magnetic Positioning, Vision-based Systems, Inertial Measurement Units (IMUs) etc.
For our specific indoor positioning project setup, we thought using a combination of Wi-Fi and Bluetooth Low Energy (BLE) might be a good approach. The ESP32 boards (M5StickC Plus) can handle both Wi-Fi and BLE, making them versatile for this purpose. We can place BLE beacons in each room and use the M5StickC Plus devices as tags to detect these beacons, with the UNIHIKER collecting and processing the data to determine the position of the tags.
So we first tried HTTP Server, Flask server on UNIHIKER, but there was problem of dynamic IP allocation, to tackle that we also tried multicast DNS (mDNS) protocol (mDNS for service discovery), but didn't get satisfactory results.
Hence, To allow the UNIHIKER and M5StickC Plus to communicate without knowing each other's IP addresses and without requiring them to be on the same Wi-Fi network, we decided to use central MQTT broker(Mosquitto) for message passing.
So in our project -
CompanionCare Device UNIHIKER, runs MQTT server.
There are Unique MQTT Topics for each 'Tag device' and 'Caretaker alert device'. Like (home/medicine_bag for Medicine Bag and home/keychain for Keychain)
There are Unique MQTT Client IDs for Tag devices - like The MQTT client IDs are "MedicineBag" and "Keychain"
UNIHIKER subscribes for topics of Tag devices. Where Tag devices publishes their current positions
# MQTT settings
broker = "192.168.0.107"
port = 1883
topic_subscribe_medicine_bag = "home/medicine_bag"
topic_subscribe_keychain = "home/keychain"
topic_publish_medbag_buzzer = "home/UNIHIKER/medbag_buzzer"
topic_publish_keychain_buzzer = "home/UNIHIKER/keychain_buzzer"
topic_publish_careTaker_buzzer = "home/UNIHIKER/caretaker_buzzer"

username = "siot"
password = "dfrobot"
Client devices (Tags and Caretaker - M5StickC Plus, Xiao ESP32S3) subscribes for Alert topics
PinPong Library of UNIHIKER
UNIHIKER is equipped with a microcontroller coprocessor, whose duty is to control the onboard components and GPIO interfaces. In order to achieve hardware control, we utilize the PinPong library in Python to communicate with the coprocessor and write Python code to control the hardware.
The PinPong library is a collection of Python code for controlling open-source hardware mainboards. It is based on the Firmata protocol and compatible with MicroPython syntax, allowing you to quickly and easily control open-source hardware using Python within just five minutes.
With the assistance of the PinPong library, you can directly program various common open-source hardware using Python code. The underlying principle involves flashing a specific firmware onto the open-source hardware, enabling it to communicate with the computer via a serial port and execute various commands.
The design of the PinPong library aims to free developers from the constraints of complex hardware models during the development process, allowing them to focus on software implementation. Even if the initial development is done with Arduino and later switched to a different control board, such as Controllino, a simple modification of the hardware parameters enables the program to run smoothly, achieving "write once, run anywhere" functionality.
Installing the PinPong Library - (The PinPong library is already integrated into the factory firmware of UNIHIKER, so this step can be skipped.)
pip install pinpongImporting the PinPong Library - As the PinPong library supports various types of microcontroller boards and open-source hardware, it is divided into three packages: "board", "extension", and "libs". The "board" package comprises the commonly used libraries and functions supported by microcontroller boards, the "extension" package contains the customized libraries related to specific microcontroller boards, while the "libs" package includes expansion libraries for other sensors.
from pinpong.board import xxx   # Importing the xxx library from the board package
from pinpong.libs.xxx    # Importing the xxx library from the libs package
from pinpong.extension.xxx    # Importing the xxx module from the extension package

# Initializing the Board: connecting the coprocessor and checking firmware. If the
# Firmware is empty or the version is incorrect, automatic burning will be performed.

Board().begin()
📌 Please check out this Documentation of pinPong library for more detailed information
Graphical User Interface (GUI) design - UNIHIKER 📱
In order to facilitate the utilization of the UNIHIKER main controllers, DFRobot have developed a Python library called "unihiker" This library integrates functionalities that are either missing or inconvenient to use from third-party Python libraries required by UNIHIKER
In order to facilitate screen display and control, they have encapsulated a GUI class in the unihiker library, based on the tkinter library.
To facilitate the use of microphone and USB speakers, they have encapsulated an Audio class in the unihiker library.
Installing the unihiker Library
pip install unihikerfrom unihiker import GUI # Import the package
gui = GUI() # Instantiate the GUI class📌 Please check out this Documentation of unihiker library for more detailed information. They have given detailed examples about how to use basic widgets, create shapes, write texts, work with mouse and keyboard. Also explained about multithreading and Audio class
import time
from pinpong.board import Board, Pin
from pinpong.extension.unihiker import *
from unihiker import GUI   # Import the package
gui=GUI()  # Instantiate the GUI class

Board().begin()  # Initialize the UNIHIKER

def btclick(data):
    print(data)

#gui.draw_image(x=0, y=0, image='images/Unihiker-b2g.png')
gui.fill_rect(x=0, y=0, w=240, h=320, color="cyan", onclick=lambda: print("fill rect clicked"))
gui.fill_circle(x=120, y=40, r=35, color="red", onclick=lambda: [buzzer.play(buzzer.DADADADUM, buzzer.Once), print("fill circle clicked")])
gui.draw_circle(x=120, y=40, r=35, width=5, color="yellow", onclick=lambda: print("Out circle clicked"))
gui.draw_rect(x=20, y=280, w=200, h=35, width=2, color=(255, 0, 0), onclick=lambda: print("rect clicked"))
txt1 = gui.draw_text(text="SOS", x=120, y=40, font_size=16, origin="center", color="white", onclick=lambda: [buzzer.play(buzzer.DADADADUM, buzzer.Once), gui.draw_text(text="Help!!!", x=120, y=300, font_size=10, origin="center", color="black"),print("SOS clicked")])
txt2 = gui.draw_text(text="", x=120, y=300, font_size=10, origin="center", color="black")

# Add three buttons at different positions
# Each button calls the btclick function with a different parameter when clicked
gui.add_button(x=120, y=100, w=200, h=30, text="Find Medicine Bag", origin='center', onclick=lambda: btclick(1))
gui.add_button(x=120, y=150, w=200, h=30, text="Find Keychain", origin='center', onclick=lambda: btclick(2))
gui.add_button(x=120, y=200, w=200, h=30, text="Buzzer : Medicine Bag", origin='center', onclick=lambda: btclick(3))
gui.add_button(x=120, y=250, w=200, h=30, text="Buzzer : Keychain", origin='center', onclick=lambda: btclick(4))

while True:
    # Add a delay to prevent the program from exiting and to observe the effects
    time.sleep(1)
Above is the basic code for GUI designed for our project

🔉 Speaker for Voice Assistant output prompt
We could have used following design and build an Online AI Assistant on UNIHIKER with ChatGPT API and Azure Speech API.

But there is one issue -
We do not have credit card and that much investment to purchase the API's of ChatGPT and Azure. Since these API's are no longer free.
As Wi-Fi and Internet is available and we could have used UNIHIKER for the voice recognition purpose (using Online/cloud based or offline Trained), but our projects needs 'Offline speech recognition' Also by 'using this module we tried to reduce the coding and computational overhead' of UNIHIKER.
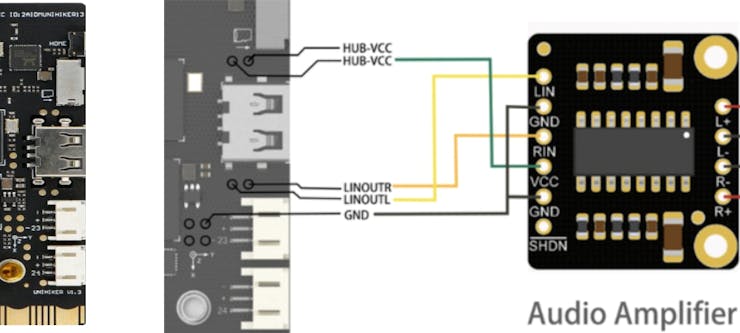
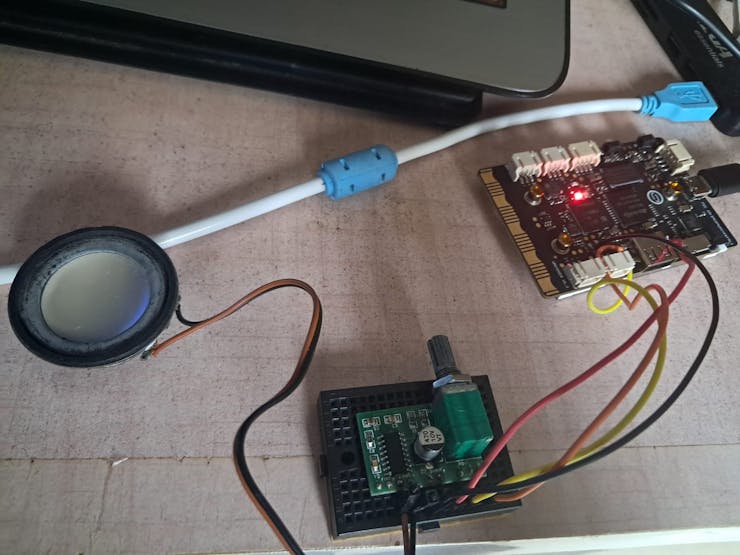
Soldering back side of UNIHIKER - As there is no any direct port to connect speaker to UNIHIKER. There are pads available to solder amplifier on back side of UNIHIKER. (See above schematic and picture shown below).
_t8MAQJmFPV.jpeg?auto=compress%2Cformat&w=740&h=555&fit=max)
🔮 In future upgrades to CompanionCare, we will make more robust and compact design.
🔉 How does UNIHIKER connect to a speaker?
We will use 'PAM8403 Mini Audio Amplifier Board with Volume Control'.

PAM8403 is an Amplifier Board that can be powered using simple 5V input and could drive two 3W + 3W stereo speakers. It is an excellent choice for, who wants a Class-D stereo audio amplifier in a small board space.

This Amplifier allows the user to achieve high-quality audio reproduction from a stereo input. Additionally, it has a special feature that is, it can drive speakers directly from its output.
All codes are given in Attachments section given below as well as on GitHub Repository of the project.
Fall Detection -
Indoor/Outdoor accidental Falls are a common concern, especially among:
Older adults (65+ years): due to age-related decline in balance, strength, and flexibility.
People with chronic conditions: such as Parkinson's disease, diabetes, or heart conditions.
Individuals with mobility issues: like those with wheelchair dependency or prosthetic limbs.

Accidental falls can have serious repercussions, especially for older adults or individuals with underlying health conditions. Like serious Injuries, Chronic pain, Loss of mobility, Emotional trauma etc.
CompanionCare device is integrated with fall detection alert system.
So whenever person who's wearing this device, if she/he falls. i.e abrupt change in movement. It detects it and send SOS signal to caretaker device.
Caretaker device will ring the buzzer and show red notification light to inform the caretaker about the situation.
🔮 In future upgradation to this project, I want to add App notification alert system for caretaker's smartphone about fall detection.

UNIHIKER is equipped with ICM20689 which is 6-axis Motion Sensor. 3-axis accelerator and 3-axis gyroscope.
We have utilized this hardware to detect accidental falls and send alert signal to Caretaker alert device.
Demo of the Project
Video of project's demonstration -
Future Plans 🔮
We have plans to make following upgradation in our project in future.
Making Lightweight CompanionCare Device : Currently our main device (prototype) for people with special needs, which is worn around neck by use of lanyard. It is comparatively little bit heavy. Since there is power-bank and speaker is included in that assembly along with UNIHIKER.
Connectivity - More robust and ubiquitous wireless connectivity options like Cellular - 4G/5G, NBIoT, LoRa, SigFox etc.
Implementation of Hybrid MQTT Broker (Combination of local and cloud-based brokers). So that person can 'ask about his/her misplaced item even from OUTSIDE of house'.
Compact enclosures for all devices included in the project assembly.
Reliable and Long lasting power solutions - As Tag Devices and Main Control device (UNIHIKER) are portable devices we need to make them more power savvy.
Project Documentation 🗎
I have shared all the documents, codes, schematics, etc. on GitHub.
Suggestions about this Tutorial/Project design, Circuits, code modifications, Optimization, Errors/Bugs findings and queries are most welcomed. Feel free to raise you queries, suggest your opinions and point out any errors or bugs.
Credits 🙏❤️
Thanks to all other peoples, fellow contestants, websites and entities who helped me (directly/indirectly) for creating this project.


