

A retro camera using the ESP32-S3 Sense for capturing images and the Unihiker for displaying, saving, and showing them.

For the UNIHIKER AIoT Innovation Challenge, I have selected the Portable Device category
A group photo of my friend and me in college, taken with this retro camera, gives off vintage vibes.

Don't know the model, but it looked pretty similar to this camera

Back in the day when I was a child, my dad had a Canon camera. I don’t remember the model exactly, but I know the shape and screen looked quite similar to the Unihiker's screen. When I received it, I decided to create a vintage retro camera that captures photos in low quality for saving data. However, in line with the current trend, these photos have an aesthetic appeal. I love these kinds of vintage products! Follow these instructions to make one
Hardware Required

![]() UNIHIKER IoT Single Board Computer with Black Silicone Case
UNIHIKER IoT Single Board Computer with Black Silicone Case
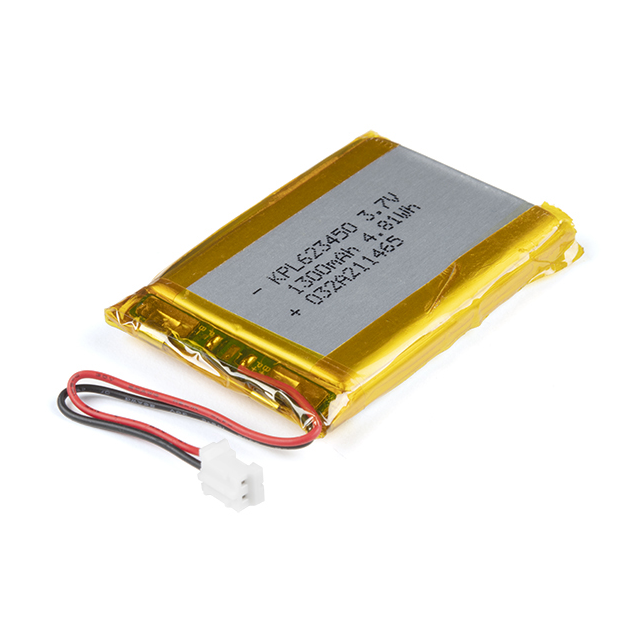 2* 3.7 Volt Li-Ion Battery from Digi key
 STMICROELECTRONICS L7805CV
 PANASONIC EEUHD1C101
 Acrylic Sheet Clear/Transparent 3MM 12"x12"
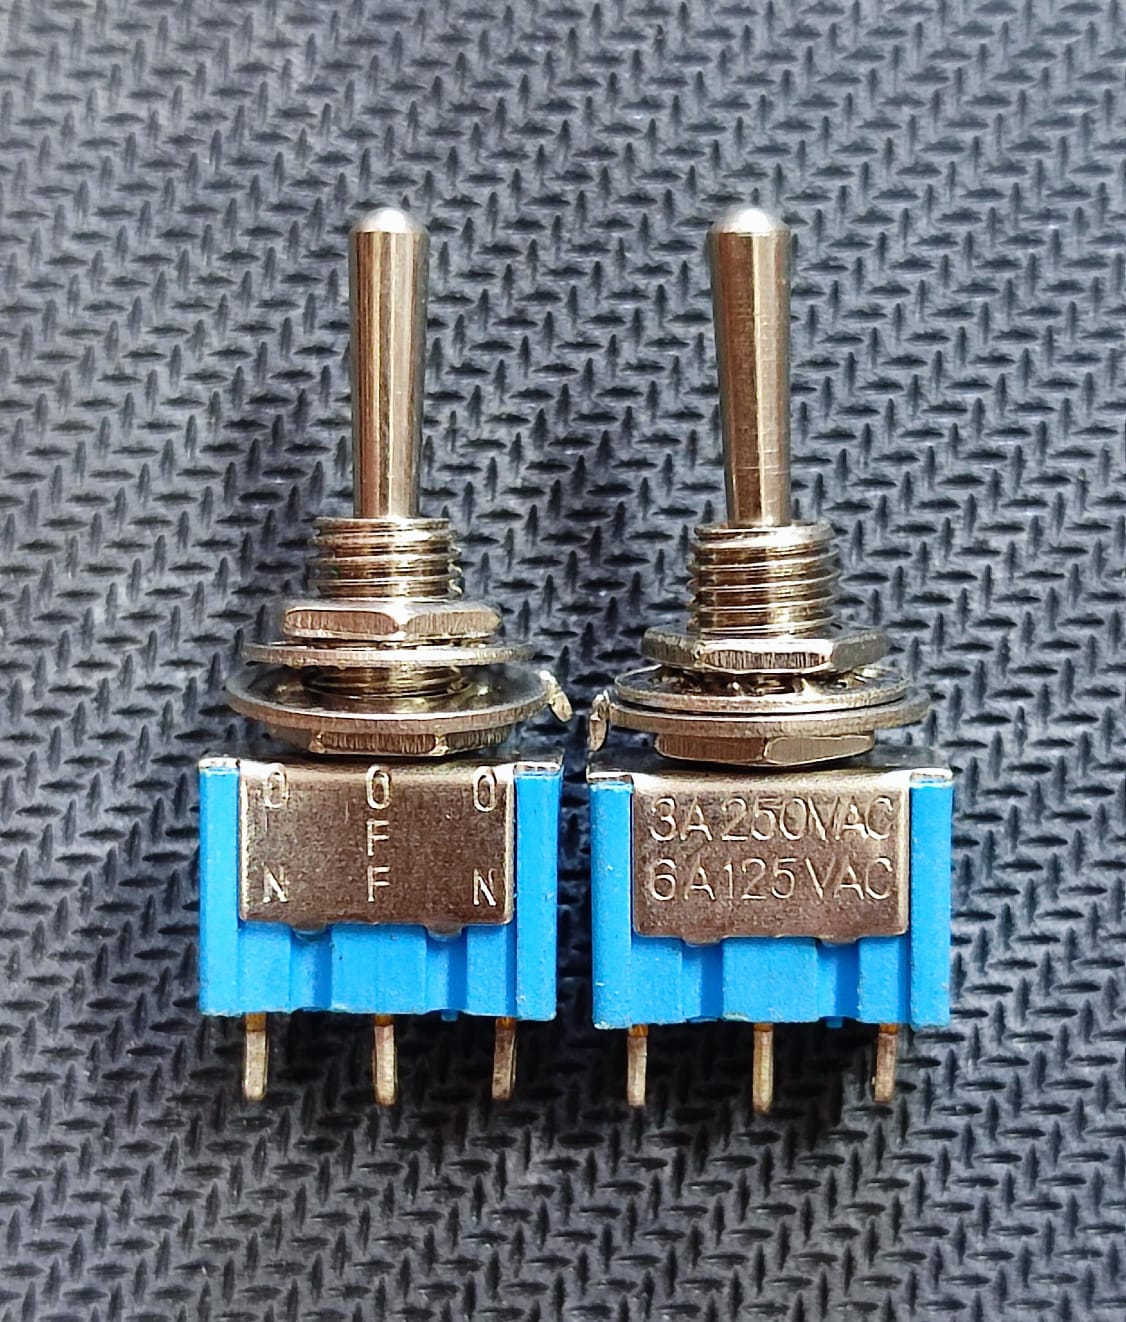 Toggle Switch
 M2 screw
 Solding Iron
 GLue Gun
Universal PCB
 Pine Wood
 Jumper Wire
Seeed Studio XIAO ESP32S3 (Sense)
What it Does ?
It simply takes a photo when we press button B on the Unihiker, and pressing button A deletes all the photos it has captured! Hilarious, I know ?. But because I haven't inserted any memory card, it's crucial to manage space efficiently. The Unihiker has 512MB of DDR3 temporary RAM, which is used for displaying the image. Afterward, the image is cleared from RAM and stored in the static memory for later reviews of images
Later reviews of clicked images
You can also check previously clicked photos by opening another program saved in the Unihiker's root folder. In this program, button A and button B function as 'next' and 'previous' image controls, while the home button is used to exit or execute the program
Lets go
The development of this device is divided into three phases:
[1] The first phase involves making hardware connections and setting everything up in a wooden enclosure box that I created from pine wood,
[2] The second phase focuses on setting up the UniHiker and ESP32-S3 Sense,
[3] The third phase showcases how to capture, save, and review the clicked images."
#Phase-1
Note: The ESP32-S3 is not connected to any signal pins on the UniHiker, as it communicates through the WebSocket communication method. In this method, the ESP32-S3 generates an IP address using the hotspot credentials provided in its program. This IP address is then used by the UniHiker to establish a wireless connection between them.
The power/battery Connections

The ESP32-S3 Sense can operate on a single-cell lithium-ion battery, making it more portable. It functions within a voltage range of 3.8 to 4.2 volts. You can check more power-related specifications for the ESP32-S3 Sense here.

The UniHiker uses a USB-C cable that provides 5 volts, with a maximum operating current capacity of 2A. While the operating voltage is 3.3V, I noticed that the display fluctuates when executing programs. Therefore, it is recommended to use a 5-volt cellphone power bank or a regulated 5-volt power supply.

For wire management, I use a universal PCB along with some male headers and female connectors, which allow for easy removal of any device. Both the UniHiker and ESP32-S3 Sense are independent of connections and only rely on power.

We can also power them via USB; for this purpose, I have exposed both USB ports on the outside for future program changes or updates.

Note: Do not turn on the toggle switch or connect both the battery and USB at the same time, as this may cause damage to the board
Bonus Functionality
Since both the UniHiker and ESP32-S3 are not connected via any signal pins, they can be used independently with just a power supply. You can remotely press button B on the UniHiker (up to 200 meters away/within signal strength) to capture a photo from the ESP32-S3, display it on the UniHiker, and save it for later review

Use cases of device
Remote Surveillance: Capture and display images from a distance for security monitoring. Portable Camera: Take and store photos in the field, without wired connections.
Educational Tool: Demonstrate wireless communication and image processing in IoT Projects Home Automation: Use it for remote home monitoring and photo capturing.
Wildlife Monitoring: Capture images in remote areas for research or observation.
BUT I PREFER TO THINK OF IT AS A RETRO CAMERA.
Fixing all the components inside the enclosure box

I use pinewood to eliminate plastic in my device and help save the environment. If you want to make pinewood box enclosures for your electronics, keep following me on DFRobot—I will create a tutorial for that too.

Part-time carpenter ??
#Phase-2
First, plug the UniHiker board into your computer using a USB-C cable. Next, install Visual Studio Code and set it up with UniHiker. After completing these initial steps, follow the instructions below
Set-up Unihiker with Visual studio (Official Forum available on website)
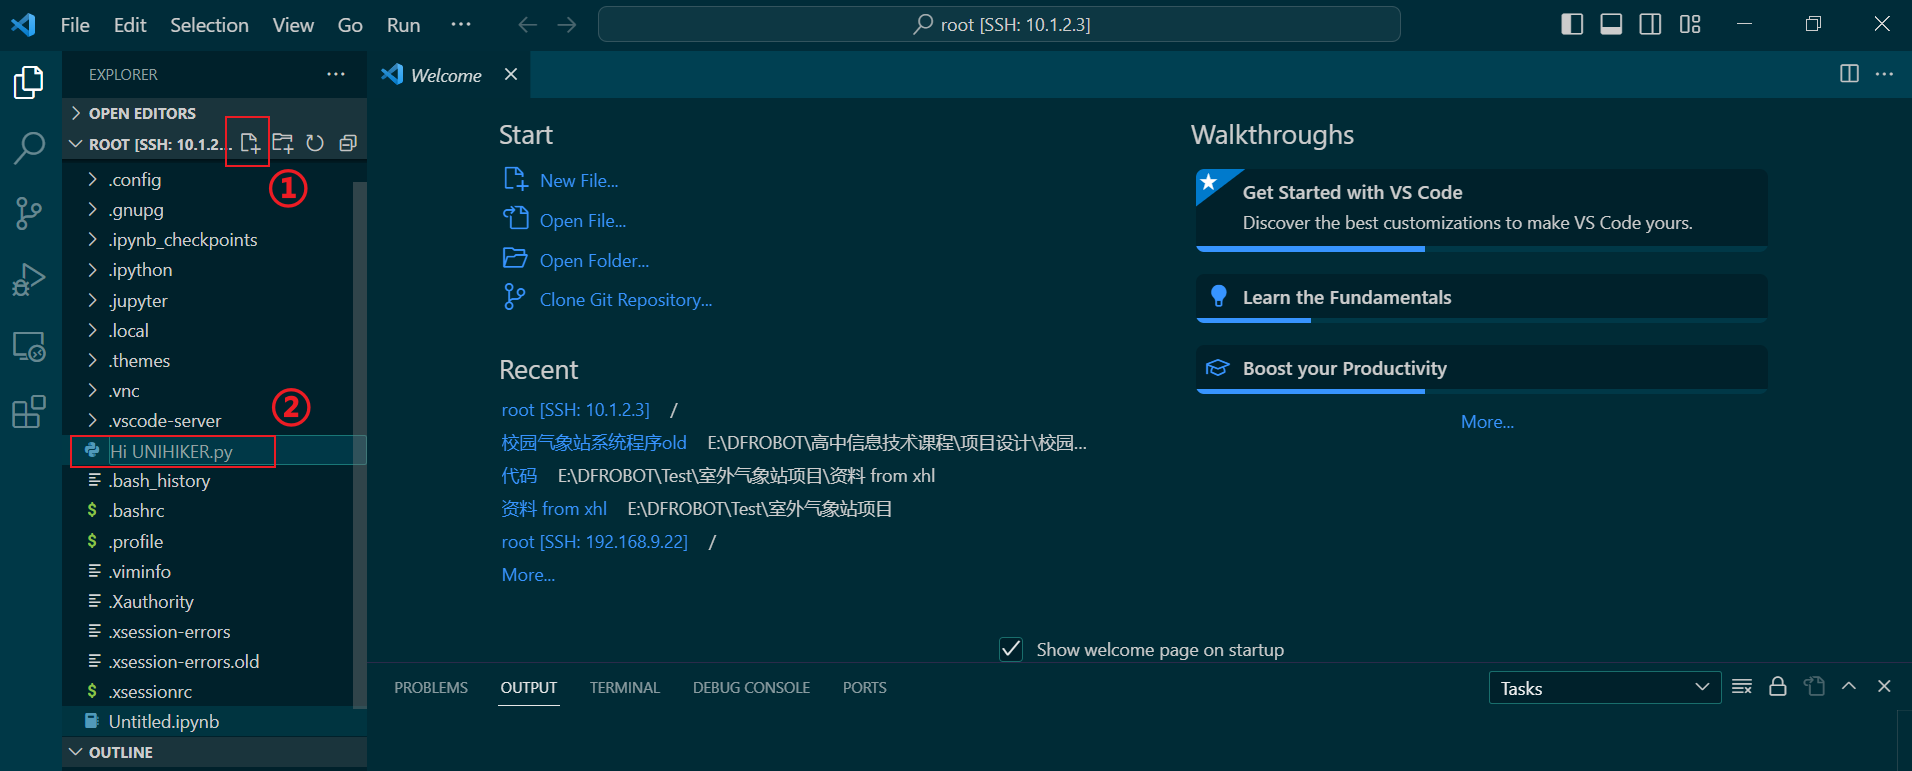
Now, I assume you have followed the official UniHiker forum's guidance for setting up Visual Studio Code. We are now in the root folder of the UniHiker
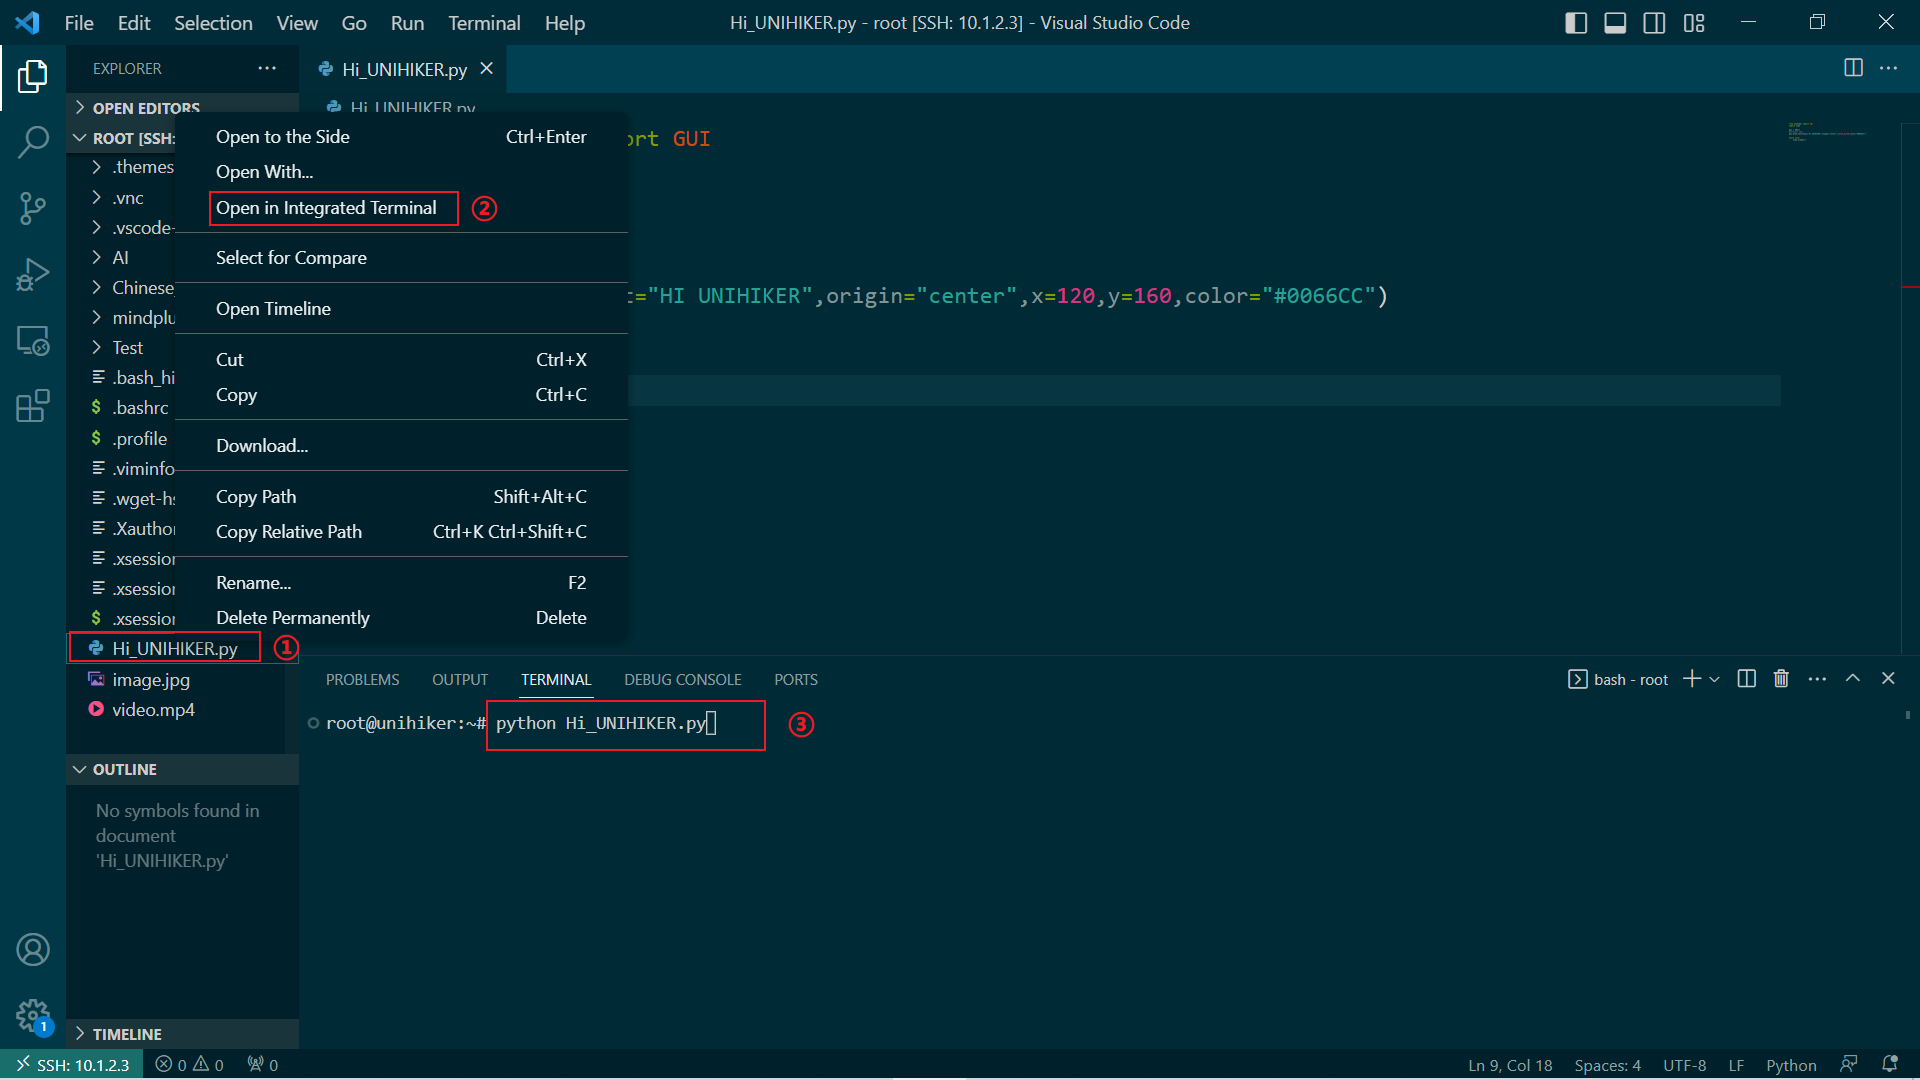
Now, when your laptop screen looks like this, create a Python file and name it camera.py, or use any name you prefer
Then, open the terminal and use the following bash commands
Troubleshooting: Before installing libraries or packages on the UniHiker, make sure it is connected to the internet. You can use your phone's hotspot as it requires an active connection.
nmcli device wifi list
List available Wi-Fi networks
nmcli device wifi connect "SSID" password "PASSWORD"
Replace SSID with the name of your Wi-Fi network and PASSWORD with the Wi-Fi password
nmcli connection show --active
You can check if the device is connected and see network details with
NOTE: To connect to a different network, first you have to disconnect from the current network
nmcli connection down "SSID"
To disconnect from the current network
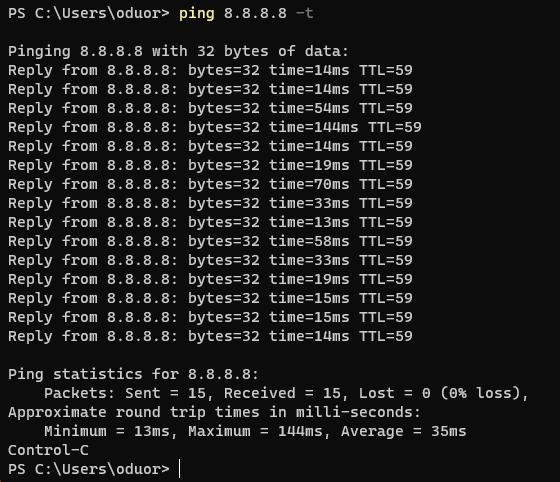
ping 8.8.8.8
You can also check if your internet is working by entering this command
Then if your screen look like this your good to go
And if your screen not looking like this then you have to cheak your ssid and password you provided to bash commands also cheak the signal strength of your internet connection
IMPORTANT: Internet is crucial for this device to communicate. To make it portable, ensure that your mobile hotspot is turned on with the same SSID and password you entered in both the UniHiker and ESP32-S3 program
Setting up the ESP32-S3 Sense:
First, connect the ESP32-S3 to your computer using a USB-C cable. Then, check the Device Manager; a new COM port will appear when you connect the ESP32-S3 Sense module.

Then, you need to make some changes. Select it, click on it, and then proceed with the following steps

Then click 'OK,' and you are ready to go for sharing serial data ?
NOTE: If the COM port is not showing or you're having trouble finding it, my suggestion is to refer to the ESP32-S3 Sense documentation.
Then, for setting up the ESP32-S3 Sense with the Arduino IDE, I recommend using the official documentation for the ESP32-S3 Sense
I recommend running the Blink program first, following the official documentation, before flashing the actual program to see whether it is communicating via the serial port.
If you are having trouble connecting to the serial port, try changing the mode from Boot Mode to Unboot Mode and then back to Boot Mode. This worked for me.
To enable and disable Boot Mode, follow these steps:
[1] Press and hold the BOOT button on the XIAO ESP32-S3 without releasing it.[2] While keeping the BOOT button pressed, connect the device to your computer via the data cable. Release the BOOT button after connecting.[3] Upload the Blink program to check the operation of the XIAO ESP32-S3, ////////according to the Seeed Studio documentation.?

Additionally, if the program runs abnormally, you can press the Reset button once during power-up to let the XIAO re-execute the uploaded program. By pressing and holding the BOOT key while powering up and then pressing the Reset key once, you can also enter Bootloader mode.
I will assume that you have downloaded the correct board manager for the ESP32-S3 Sense according to the official documentation.
After opening the Arduino IDE, you need to select the following options shown below

Then configure in exact same way

#PROGRAM for ESP32S3 Sense

ensure you downloaded the correct board manager This will give you access to both the esp_camera and WiFi libraries.

Camera Model Selection and Wi-Fi Credentials

Wi-Fi Credentials

Function Prototypes

Serial Communication Initialization

Camera Pin Configuration

Frame and Image Configuration

Handling PSRAM

Camera Initialization

Wi-Fi Connection Setup

Start the Camera Server

Output Camera IP Address
Important Note: Before flashing the program to the ESP32-S3 Sense, ensure that you include this file in the library folder in Arduino.

GITHUB repository for the file: click here.
PROGRAM FOR ESP32S3 👇👇👇👇
#include "esp_camera.h"
#include <WiFi.h>

//
// WARNING!!! PSRAM IC required for UXGA resolution and high JPEG quality
//            Ensure ESP32 Wrover Module or other board with PSRAM is selected
//            Partial images will be transmitted if image exceeds buffer size
//
//            You must select partition scheme from the board menu that has at least 3MB APP space.
//            Face Recognition is DISABLED for ESP32 and ESP32-S2, because it takes up from 15
//            seconds to process single frame. Face Detection is ENABLED if PSRAM is enabled as well

// ===================
// Select camera model
// ===================
#define CAMERA_MODEL_XIAO_ESP32S3 // Has PSRAM
#include "camera_pins.h"

// ===========================
// Enter your WiFi credentials
// ===========================
const char *ssid = "vishal";
const char *password = "iamironman@1234";

void startCameraServer();
void setupLedFlash(int pin);

void setup() {
  Serial.begin(115200);
  Serial.setDebugOutput(true);
  Serial.println();

  camera_config_t config;
  config.ledc_channel = LEDC_CHANNEL_0;
  config.ledc_timer = LEDC_TIMER_0;
  config.pin_d0 = Y2_GPIO_NUM;
  config.pin_d1 = Y3_GPIO_NUM;
  config.pin_d2 = Y4_GPIO_NUM;
  config.pin_d3 = Y5_GPIO_NUM;
  config.pin_d4 = Y6_GPIO_NUM;
  config.pin_d5 = Y7_GPIO_NUM;
  config.pin_d6 = Y8_GPIO_NUM;
  config.pin_d7 = Y9_GPIO_NUM;
  config.pin_xclk = XCLK_GPIO_NUM;
  config.pin_pclk = PCLK_GPIO_NUM;
  config.pin_vsync = VSYNC_GPIO_NUM;
  config.pin_href = HREF_GPIO_NUM;
  config.pin_sccb_sda = SIOD_GPIO_NUM;
  config.pin_sccb_scl = SIOC_GPIO_NUM;
  config.pin_pwdn = PWDN_GPIO_NUM;
  config.pin_reset = RESET_GPIO_NUM;
  config.xclk_freq_hz = 20000000;
  config.frame_size = FRAMESIZE_UXGA;
  config.pixel_format = PIXFORMAT_JPEG;  // for streaming
  //config.pixel_format = PIXFORMAT_RGB565; // for face detection/recognition
  config.grab_mode = CAMERA_GRAB_WHEN_EMPTY;
  config.fb_location = CAMERA_FB_IN_PSRAM;
  config.jpeg_quality = 12;
  config.fb_count = 1;

  // if PSRAM IC present, init with UXGA resolution and higher JPEG quality
  //                      for larger pre-allocated frame buffer.
  if (config.pixel_format == PIXFORMAT_JPEG) {
    if (psramFound()) {
      config.jpeg_quality = 10;
      config.fb_count = 2;
      config.grab_mode = CAMERA_GRAB_LATEST;
    } else {
      // Limit the frame size when PSRAM is not available
      config.frame_size = FRAMESIZE_SVGA;
      config.fb_location = CAMERA_FB_IN_DRAM;
    }
  } else {
    // Best option for face detection/recognition
    config.frame_size = FRAMESIZE_240X240;
#if CONFIG_IDF_TARGET_ESP32S3
    config.fb_count = 2;
#endif
  }

#if defined(CAMERA_MODEL_ESP_EYE)
  pinMode(13, INPUT_PULLUP);
  pinMode(14, INPUT_PULLUP);
#endif

  // camera init
  esp_err_t err = esp_camera_init(&config);
  if (err != ESP_OK) {
    Serial.printf("Camera init failed with error 0x%x", err);
    return;
  }

  sensor_t *s = esp_camera_sensor_get();
  // initial sensors are flipped vertically and colors are a bit saturated
  if (s->id.PID == OV3660_PID) {
    s->set_vflip(s, 1);        // flip it back
    s->set_brightness(s, 1);   // up the brightness just a bit
    s->set_saturation(s, -2);  // lower the saturation
  }
  // drop down frame size for higher initial frame rate
  if (config.pixel_format == PIXFORMAT_JPEG) {
    s->set_framesize(s, FRAMESIZE_QVGA);
  }

#if defined(CAMERA_MODEL_M5STACK_WIDE) || defined(CAMERA_MODEL_M5STACK_ESP32CAM)
  s->set_vflip(s, 1);
  s->set_hmirror(s, 1);
#endif

#if defined(CAMERA_MODEL_ESP32S3_EYE)
  s->set_vflip(s, 1);
#endif

// Setup LED FLash if LED pin is defined in camera_pins.h
#if defined(LED_GPIO_NUM)
  setupLedFlash(LED_GPIO_NUM);
#endif

  WiFi.begin(ssid, password);
  WiFi.setSleep(false);

  while (WiFi.status() != WL_CONNECTED) {
    delay(500);
    Serial.print(".");
  }
  Serial.println("");
  Serial.println("WiFi connected");

  startCameraServer();

  Serial.print("Camera Ready! Use 'http://");
  Serial.print(WiFi.localIP());
  Serial.println("' to connect");
}

void loop() {
  // Do nothing. Everything is done in another task by the web server
  delay(10000);
}
You will get an IP address by uploading the program. Note the IP address, as it will be used to establish a socket connection with the UniHiker

You need to turn on your phone's hotspot with the same SSID and password you wrote in the Program, and make sure to do this before uploading the program to the ESP32S3
There are two programs involved:
First Program: It handles clicking, deleting, displaying, or saving images in the photo folder. Button A is used for deleting all the photos, and button B is used for clicking a new photo.
Second Program: This is for reviewing the clicked photos, just like in a real camera. Button A is used for the 'previous' image, and button B is used for the 'next' image.
#1st PROGRAM
As I mentioned above too Internet is crucial for this device to communicate. To make it portable, ensure that your mobile hotspot is turned on with the same SSID and password you entered in both the UniHiker and ESP32-S3 program

Importing libraries

Paste the IP address you noted from the ESP32-S3 Arduino IDE serial monitor ,here.

A folder "Photo" is created by this section of program

Capturing and Displaying process is done by this section of program (including capture , rotating 90 degree ,and saving the image )

Deletion of images is done buy this section

Function calling while pressing button "A" and “B” is done by this section {button A for Deletion of images and B for clicking ,rotating, displaying and saving the image in photo directory}
FIRST PROGRAM FOR UNIHIKER 👇👇👇👇
# -*- coding: utf-8 -*-
from pinpong.board import *
from pinpong.extension.unihiker import *
from unihiker import GUI  # Import GUI from the unihiker module
import cv2
import requests
import numpy as np
from datetime import datetime
import time
import os  # Import os module to handle directory operations

# Initialize the UniHiker and the screen GUI
Board().begin()
gui = GUI()  # Create a GUI object to handle the display

# Use the correct capture URL from your ESP32 camera
stream_url = "http://192.168.122.70/capture"  # Update with your ESP32 IP address

# Directory to save captured images
photo_directory = "/root/photo"

# Create the photo directory if it doesn't exist
if not os.path.exists(photo_directory):
    os.makedirs(photo_directory)
    print(f"Created directory: {photo_directory}")

last_button_b_press = 0  # To handle debounce
debounce_time = 0.3  # 300 milliseconds debounce time

def capture_and_display_image():
    """Capture an image from the ESP32 camera, display it on the UniHiker screen, and save it."""
    try:
        response = requests.get(stream_url, timeout=5)  # Set a timeout for the request
        if response.status_code == 200:
            img_array = np.array(bytearray(response.content), dtype=np.uint8)
            frame = cv2.imdecode(img_array, cv2.IMREAD_COLOR)

            if frame is not None:
                # Rotate the frame 90 degrees counterclockwise
                frame = cv2.rotate(frame, cv2.ROTATE_90_COUNTERCLOCKWISE)

                # Create a unique filename using a timestamp
                timestamp = datetime.now().strftime("%Y%m%d_%H%M%S")
                file_name = os.path.join(photo_directory, f"captured_image_{timestamp}.jpg")  # Save in the photo directory

                # Save the rotated image in the UniHiker photo folder
                success = cv2.imwrite(file_name, frame)  # Attempt to save the image

                if success:
                    print(f"Image captured, rotated, and saved as '{file_name}'")
                else:
                    print(f"Failed to save the image as '{file_name}'")

                # Clear the screen and display the saved image on the UniHiker screen
                gui.clear()  # Clear previous drawings
                time.sleep(0.05)

                gui.draw_image(x=120, y=160, w=420, h=320, image=file_name, origin='center', onclick=lambda: print("Image clicked"))

                # Add a delay to allow the image to be displayed before the next capture
                time.sleep(1.5)  # 1.5 seconds delay for better visibility

            else:
                print("Failed to decode image")
        else:
            print(f"Failed to connect to the camera stream. Status code: {response.status_code}")
    except requests.exceptions.Timeout:
        print("Request timed out. Please check the ESP32 connection.")
    except Exception as e:
        print(f"An error occurred: {e}")

def delete_all_images():
    """Delete all images in the photo directory."""
    try:
        for filename in os.listdir(photo_directory):
            file_path = os.path.join(photo_directory, filename)
            if os.path.isfile(file_path):
                os.remove(file_path)  # Remove the file
                print(f"Deleted image: {file_path}")
        print("All images deleted successfully.")
    except Exception as e:
        print(f"An error occurred while deleting images: {e}")

while True:
    current_time = time.time()

    # Check if button A is pressed (for deleting images)
    if button_a.is_pressed():
        print("Button A is pressed. Deleting all images...")
        delete_all_images()  # Call the function to delete images

    # Check if button B is pressed, with debounce handling
    if button_b.is_pressed():
        print("Button B is pressed.")  # Debug print
        if current_time - last_button_b_press > debounce_time:
            last_button_b_press = current_time  # Update last press time
            print("Button B pressed. Capturing, rotating, and displaying image...")
            capture_and_display_image()  # Capture and display the image

    # Sleep for a short time to avoid overloading CPU
    time.sleep(0.1)  # 100 milliseconds pause to reduce CPU load
#2nd PROGRAM
The functionality of this Program is to review the photo from the photo directory after capturing and saving it to that directory

Importing and initializing unihiker's screen

This function retrieves all .jpg files from the specified folder, sorts them by their last modification time, and returns the sorted list.

From this Section of Program The images on the Unihiker's screen can be displayed by pressing buttons

This Section of Program is navigating the photos if there is no photos in photo directory it will print 'no images found in the photo folder'

This section of the program invokes the function to scroll through photos by pressing button A for the next photo and button B for the previous photo,

This section addresses the functioning of UniHiker's built-in buzzer, which activates with every click of buttons A and B.
You can adjust the sound frequency by modifying the program; frequencies below 250 Hz are generally comfortable for hearing, while those above 250 Hz may be irritating to humans. The choice is yours to select the frequency that suits your preference
Additionally, I added a lot of delay between every function so that it will be responsive while preventing excessive CPU usage
SECOND FOR PROGRAM UNIHIKER 👇👇👇👇
# -*- coding: utf-8 -*-

import os
import time
from pinpong.board import *
from pinpong.extension.unihiker import *
from unihiker import GUI

# Initialize the UniHiker and the GUI
Board().begin()
gui = GUI()

# Define the folder where the images are stored
photo_folder = "/root/photo/"

# Get the list of image files sorted by modification time
def get_sorted_image_files():
    """Get a list of image files sorted by modification time."""
    try:
        files = [f for f in os.listdir(photo_folder) if f.endswith(".jpg")]
        files.sort(key=lambda x: os.path.getmtime(os.path.join(photo_folder, x)))
        return files
    except Exception as e:
        print(f"Error reading photo folder: {e}")
        return []

# Display an image on the screen
def display_image(file_name):
    """Display the given image on the UniHiker screen."""
    image_path = os.path.join(photo_folder, file_name)
    try:
        gui.clear()  # Clear previous image
        gui.draw_image(x=120, y=160, w=420, h=320, image=image_path, origin='center')
        print(f"Displaying image: {file_name}")
    except Exception as e:
        print(f"Error displaying image: {e}")

# Display a message on the screen
def display_message(message):
    """Display a message on the UniHiker screen."""
    gui.clear()
    gui.draw_text(x=120, y=160, text=message, font_size=8, origin='center')
    time.sleep(2)  # Display the message for 2 seconds

# Make the buzzer beep on button press
def beep_buzzer():
    """Play a short beep sound using the built-in buzzer."""
    buzzer.pitch(250, 1)  # Play a short beep sound at 250 Hz for 100 milliseconds

# Main function to handle image navigation
def navigate_images():
    """Navigate through the images in the 'photo' folder."""
    image_files = get_sorted_image_files()
    if not image_files:
        print("No images found in the photo folder.")
        return

    current_index = 0
    display_image(image_files[current_index])

    while True:
        if button_a.is_pressed():  # Check for button A (next image)
            print("Button A pressed - Next image")
            beep_buzzer()  # Play beep sound
            current_index = (current_index + 1) % len(image_files)
            display_image(image_files[current_index])
            time.sleep(0.1)  # Shorter delay to make navigation feel more responsive

            if current_index == 0:  # Looping back to the start
                display_message("End of images. Starting over...")

        elif button_b.is_pressed():  # Check for button B (previous image)
            print("Button B pressed - Previous image")
            beep_buzzer()  # Play beep sound
            current_index = (current_index - 1) % len(image_files)
            display_image(image_files[current_index])
            time.sleep(0.1)  # Shorter delay for responsiveness

            if current_index == len(image_files) - 1:  # Looping back to the end
                display_message("End of images. Starting back...")

        time.sleep(0.1)  # Short delay to reduce CPU load but keep it responsive

# Start the image navigation
navigate_images()


