


This project describes the implementation of a simple audible UV index meter using the the DFRobot Gravity:Analog UV Sensor V2

and the DFRobot UNIHIKER

Introduction
Prolonged exposure to ultraviolet (UV) radiation from the sun poses a health risk to the skin and eyes that can lead to premature aging and even cancer.
Individuals with visual impairment may not perceive visual cues like shadows or changes in sunlight intensity. They might not realize when they are exposed to direct sunlight or when UV levels are high. While people usually may get a 'visual impression' of their exposure to intense sunlight, blind people might miss this especially when e.g. cool air, windchill, etc. also prevents the sensation of warmth on exposed skin. Without visual cues, it's harder to assess the need for sun protection and to recognize the importance of sunscreen, hats, or sunglasses. With this in mind, the idea is to design a prototype of a wearable or portable UV index meter with audible notification for blind people.
The proposed solution implements the prototype of an UV radiation exposure monitoring application to assist in the prevention of diseases caused by over exposition to solar UV radiation. Like a usual UV meter, it measures the current intensity level of ultraviolet radiation and (optionally) displays it together with the corresponding UV index and risk level. Additionally it also gives an audible representation of the UV index as sequence of tones.
The solution can be build with a MCU board (operational power 3.3v - 5.v, at least one available analog pin and two available digital pins), a GUVA-S12D UV sensor board, a button, a (rechargeable) battery and optional: a graphical display / a RGB LED.
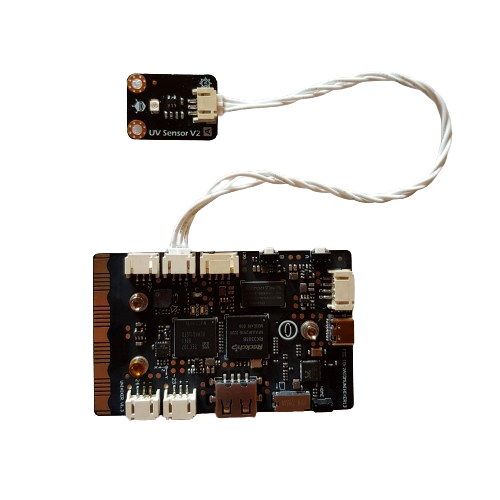
This project shows the implementation with the UNIHIKER and the Gravity:Analog UV Sensor V2 made by DFRobot.
UV light measuring
Ultraviolet (UV) "light" is a form of electromagnetic radiation with wavelength from 200 nm to 400 nm, shorter than that of visible light (400 nm to 750 nm), but longer than X-rays. UV radiation is present in sunlight and constitutes about 10% of the total electromagnetic radiation output from the Sun. Short-wave ultraviolet light can damage DNA and sterilize surfaces with which it comes into contact. For humans, suntan and sunburn are familiar effects of exposure of the skin to UV light, along with an increased risk of skin cancer. UV radiation is divided into three bands of wavelength:
UVA (315-400 nm)
UVB (280-315 nm)
UVC (100-280 nm).
Through absorption of the earth's atmosphere in the ozone layer, the UVC spectrum is completely blocked and the solar radiation in the UVB spectrum does barely reach the earth's surface. The less dangerous UVA radiation is far less absorbed by the atmosphere. UVA radiation is less powerful than UVB radiation, but highly penetrating. It can reach the skin and is responsible for photoaging and the onset of different forms of skin cancer
UV radiation intensity is measured in milliwatts per square-meter (mW/m^2).
UV Index & Risk Level
In order to estimate the energy behind UV radiation and the risk level associated with it, the UV Index was established. The UV Index describes the expected daily peak level of the erythemal UV irradiance at ground level (The word 'erythema' means an abnormal redness of the skin, such as is caused by spending too much time in the sun - a sunburn is damage to your skin cells caused by UV radiation). It is an open-top linear scale - 0 to 11+, giving guideline values for the UV irradiance. The higher the UV Index, the higher the UV irradiance and the faster / the more severe a sunburn can occur when skin is not protected.
The UV Index has been defined by the WHO and is uniform worldwide - e.g., a UV Index of 7 in Europe means exactly the same as the same value in Africa or North America. For more information see the "Global solar UV index : a practical guide" published by the WHO.
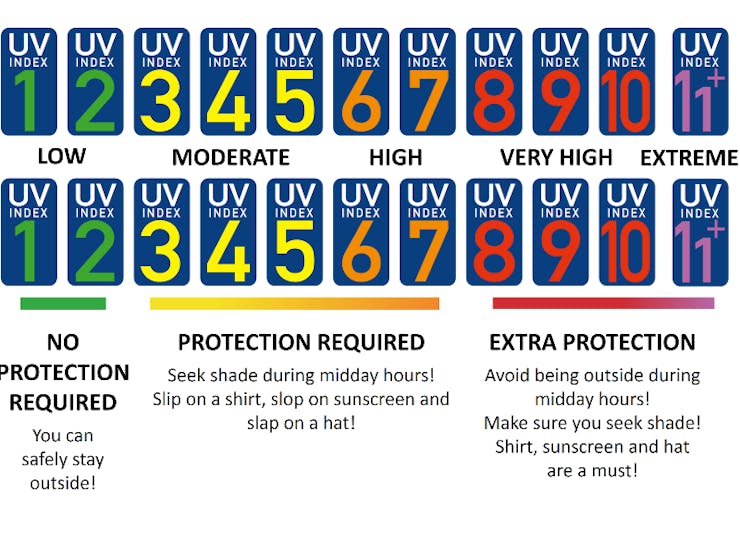
The safe UV index depends on the individual's skin type and the duration of exposure. However, as a general rule,
an UV index of 2 or lower is considered safe for all skin types.
An UV index of 3 to 5 is considered moderate and requires some protection.
An UV index of 6 to 7 is considered high and requires protection such as a hat, sunglasses, and sunscreen.
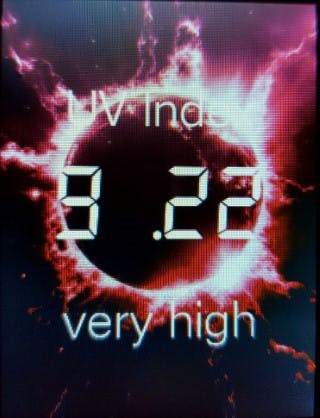
An UV index of 8 to 10 is considered very high and requires extra protection such as seeking shade during midday hours and wearing protective clothing.
An UV index of 11 or higher is considered extreme and requires all possible precautions to be taken.
For more information see e.g.,
WHO - Newsroom - Q&A - Radiation: The ultraviolet (UV) index ,
US EPA - Health Effects of UV Radiation and
Measurement Presentation
The UV index derived from the measured UV level and and the associated risk level are presented visually and acoustical.
Visual Representation
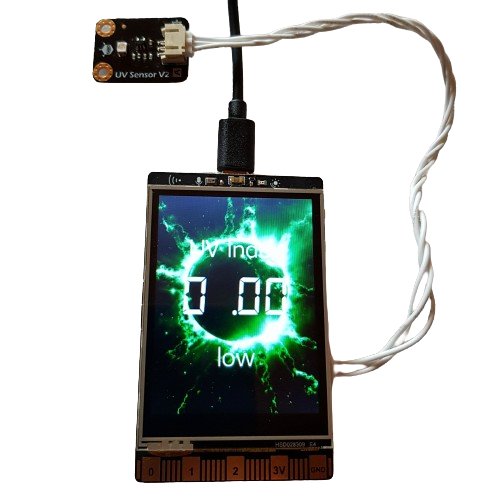
If a graphical display is available a GUI displays the UV index value and the associated risk level on a background image with a touch of the color associated with the risk level.
Alternatively a single RGB LED can show a color associated with the risk level.
Acoustical Representation
The UV index is presented as a sequence of tones:
One base tone C at the beginning of each sequence followed by
a number of F tones corresponding to (rounded) UV index levels 1 - 5 or
a number of A tones corresponding to (rounded) UV index levels 6 - 10 minus 5, following a sequence of five F tones or
a sequence of five F tone followed by five A tone and one C tone (next octave) for (rounded) UV index levels 11+.
For example, if the UV index is 4 the tone sequence is C,F,F,F,F and if the UV index is 6.7 the tone sequence is C,F,F,F,F,F,A,A
Represented as score the tone sequence looks like shown in the following image:

The following video provides a sample of the tone sequences:
Implementation
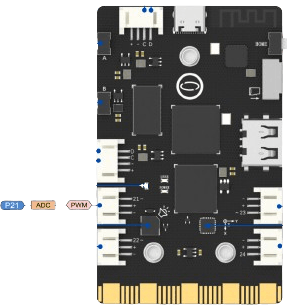
The DFRobot Gravity:Analog UV Sensor V2 must be connected to the UNHIKER on P21:
The solution is implement in Python and uses the UNIHIKER library and the PinPong library.
The complete code (standalone or Jupyter Notebook) can be found in the Git repository.
# -*- coding: UTF-8 -*-
# Experiment Effect: Print the analog value of the UNIHIKER P21 pin
# Wiring: Connect a DFRobot Gravity:Analog UV Sensor V2 to the UNIHIKER P21 pin
import time
from pinpong.board import Board, Pin
from unihiker import GUI
UV Index
The output voltage of the GUVA-S12D sensor module is proportional to the intensity of the UV light detected by the sensor. The output voltage is:
Vo = 4.3 * Diode-Current-in-uA.
So if the photocurrent is 1uA (9 mW/cm²), the output voltage is 4.3V.
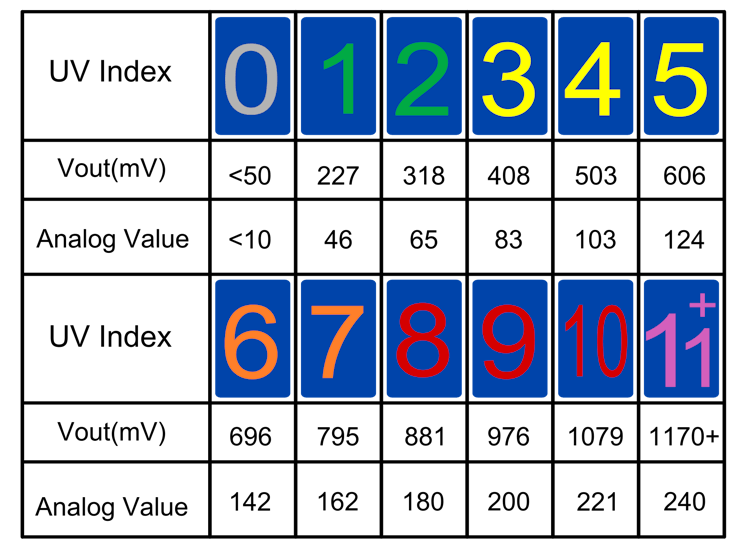
The UV index is calculated by comparing the voltage value read from the sensor to the following mapping table for the GUVA-S12D sensor
# Function to convert sensor output voltage (mV) to UV index
# for a GUVA-S12D based analog UV sensor based on a conversion table.
# See http://www.esp32learning.com/code/esp32-and-guva-s12sd-uv-sensor-example.php
# for conversion table ...
def uv_index(mv):
    uvi_mv_thresholds = [50, 227, 318, 408, 503, 606, 696, 795, 881, 976, 1079, 1170];

    for threshold in uvi_mv_thresholds:
        if (mv < threshold ):
            break

    i = uvi_mv_thresholds.index(threshold)

    if (i < 11 ):
        uvi = mv/threshold*(i+1)
    else:
        uvi = 11

    return uvi
UV Level
For a GUVA-S12D based analog UV sensor: "The output voltage is: Vo = 4.3 * Diode-Current-in-uA. So if the photocurrent is 1uA (~ 9 mW/cm^2), the output voltage is 4.3V."
# Function to convert sensor output voltage (mV) to mW/m^2
# for a GUVA-S12D based analog UV sensor: "The output voltage is: Vo = 4.3 * Diode-Current-in-uA.
# So if the photocurrent is 1uA (~ 9 mW/cm^2), the output voltage is 4.3V."
def uv_level(mv):
    return ( mv / 43 * 9 ) # 1 uA per 9 mW/cm^2 at 4.3V
Risk level

def uv_risk_level(uvi):
    # UV risk level mapping (UV index threshold,risk level,display color)
    risk_levels=[(2,"low","green"),(5,"moderate","yellow"),(7,"high","orange"),(10,"very high","red"),(11,"extreme","violet")]

    for risk_level in risk_levels:
        if (uvi <= risk_level[0]):
            break

    return risk_level
Audible UV Index
The UV index is presented as a sequence of tones played via the internal buzzer:
One base tone C at the beginning of each sequence followed by a number of F tones corresponding to (rounded) UV index levels 1 - 5 or a number of A tones corresponding to (rounded) UV index levels 6 - 10 minus 5, following a sequence of five F tones or a sequence of five F tone followed by five A tone and one C tone (next octave) for (rounded) UV index levels 11+.
def buzzer_play_uv_index_melody(uvi):
    # Play the corresponding tone sequence for the measured UV index on the buzzer:
    # C5 (F5){UV index} for an UV index < 6,
    # C5 (F5){5} (A5){UV index - 5} for an UV index 6 - 10 and
    # C5 (F5){5} (A5){5} C6 for UV index 11 ...
    buzzer.set_tempo(4, 160)
    buzzer.pitch(523, 4) # C5
    for i in range(0,uvi):
        if i < 5:
            buzzer.pitch(698, 4) # F5
        elif i < 10:
            buzzer.pitch(880, 4) # A5
        else:
buzzer.pitch(1046, 4) # C6Interrupt handler for button
def btn_a_rasing_handler(pin):  # Interrupt event callback function for button A rising edge
    global btn_a_pressed
    btn_a_pressed = True
Initialization
# ADC analog input pins supported: P0 P1 P2 P3 P4 P10 P21 P22
# adc21 = ADC(Pin(Pin.P21))  # Use Pin object with ADC to enable analog input - Method 1
adc21 = Pin(Pin.P21, Pin.ANALOG)  # Initialize the pin as an analog input - Method 2
Interrupt handling for button
btn_a_pressed = False
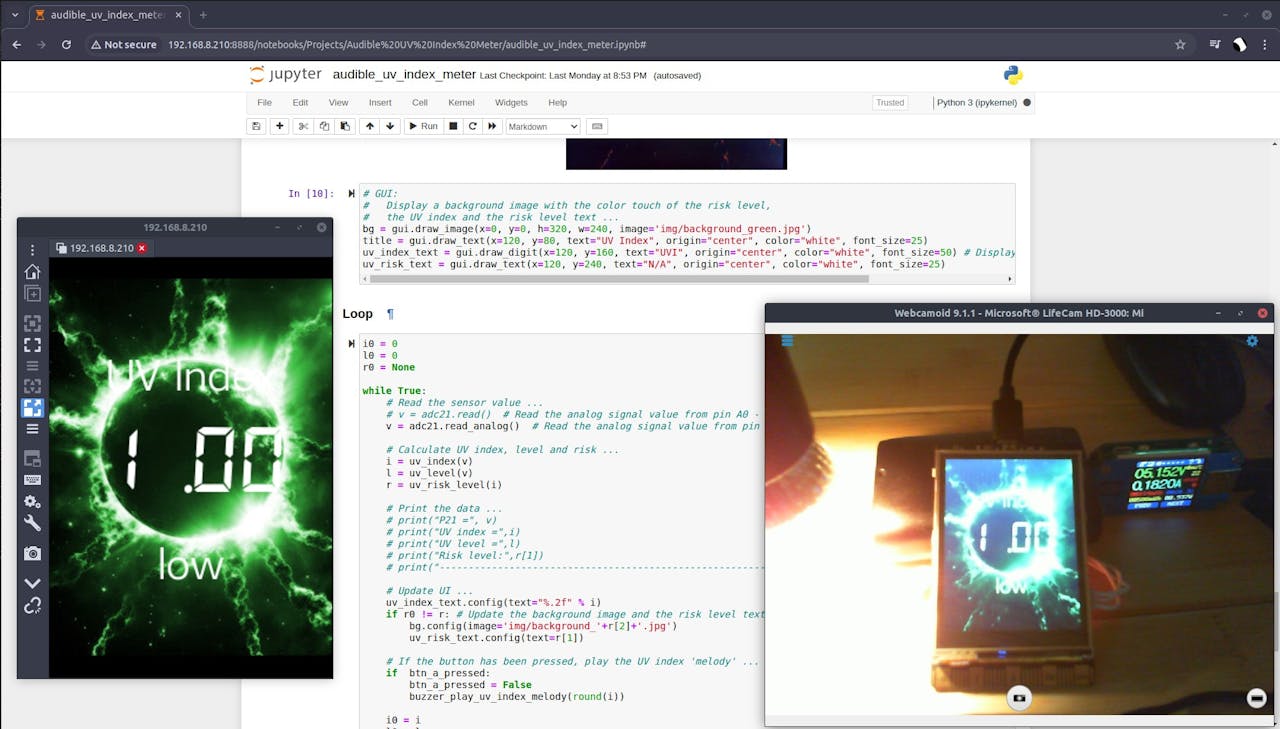
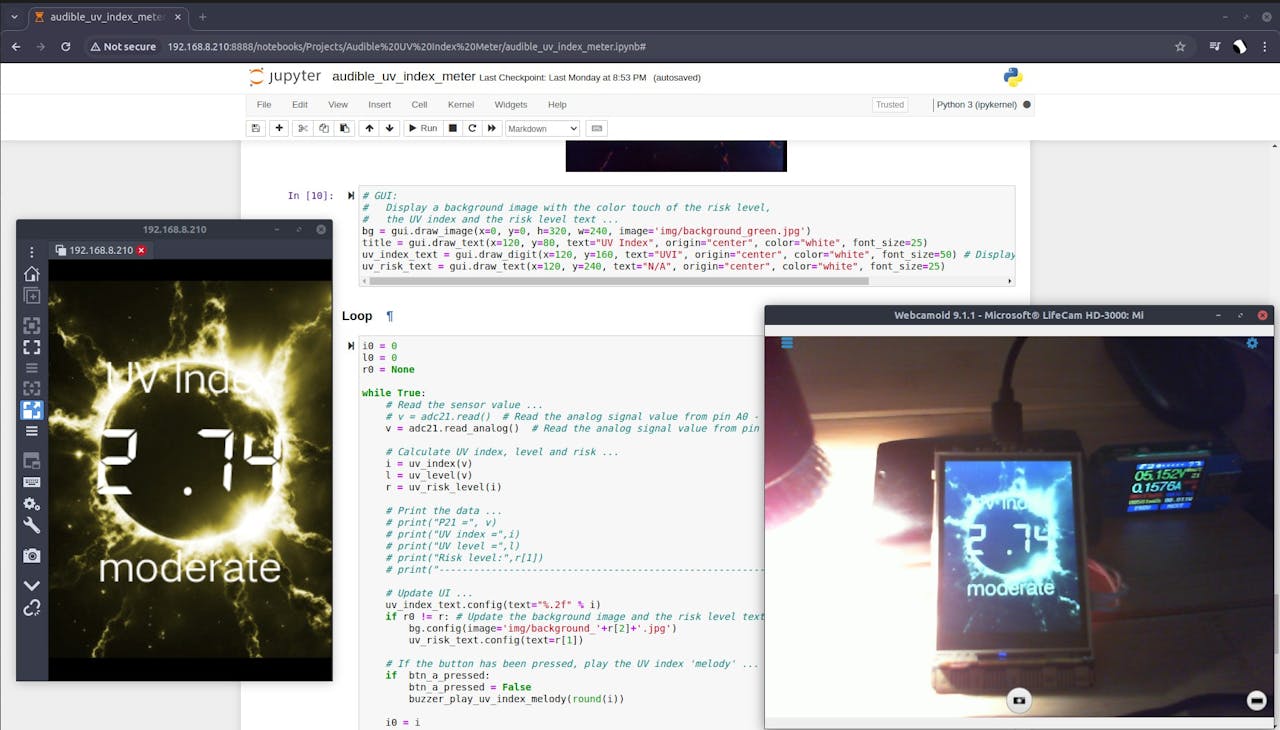
button_a.irq(trigger=Pin.IRQ_RISING, handler=btn_a_rasing_handler) # Trigger on rising edgeThe GUI displays the measured UV index and the associated risk level on a background image with a touch of the color associated with the risk level:
# GUI:
#   Display a background image with the color touch of the risk level,
#   the UV index and the risk level text ...
bg = gui.draw_image(x=0, y=0, h=320, w=240, image='img/background_green.jpg')
title = gui.draw_text(x=120, y=80, text="UV Index", origin="center", color="white", font_size=25)
uv_index_text = gui.draw_digit(x=120, y=160, text="UVI", origin="center", color="white", font_size=50) # Display UV index using 7-segment font
uv_risk_text = gui.draw_text(x=120, y=240, text="N/A", origin="center", color="white", font_size=25)r0 = None
while True:
# Read the sensor value ...
# v = adc21.read() # Read the analog signal value from pin A0 - Method 1
v = adc21.read_analog() # Read the analog signal value from pin A0 - Method 2
# Calculate UV index, level and risk ...
i = uv_index(v)
l = uv_level(v)
r = uv_risk_level(i)
# Print the data ...
# print("P21 =", v)
# print("UV index =",i)
# print("UV level =",l)
# print("Risk level:",r[1])
# print("-----------------------------------------------------------------------")
# Update UI ...
uv_index_text.config(text="%.2f" % i)
if r0 != r: # Update the background image and the risk level text only if the risk level changed ...
bg.config(image='img/background_'+r[2]+'.jpg')
uv_risk_text.config(text=r[1])
# If the button has been pressed, play the UV index 'melody' ...
if btn_a_pressed:
btn_a_pressed = False
buzzer_play_uv_index_melody(round(i))
i0 = i
l0 = l
r0 = r

Resources
The complete code, background image files and a Jupyter Notebook are available from the Git repository.


