

Imagine holding a device the size of a deck of cards that shows you every WiFi network nearby – their signal strength, security level, even which channel they use. Sounds like tech magic, right? But it's actually quite simple!
_sBwqW9om5Z.jpeg?auto=compress%2Cformat&w=740&h=555&fit=max)
In this guide, we'll build a portable WiFi scanner using:
· A tiny but powerful ESP32-S3 microcontroller
· A bright 2-inch color display
· A rechargeable 3.7V battery
· About $35 worth of parts
The result? A handheld device that continuously scans WiFi networks and displays them in two cool ways: as colorful bar graphs or a detailed information list. Perfect for troubleshooting your home WiFi, exploring your neighborhood's networks, or just learning how wireless works.
Why Build This?
Real-World Uses
Home WiFi Troubleshooting
- Find dead zones in your house
- See if your router is being interfered with by neighbors
- Optimize your router placement
Network Security
- Identify unencrypted networks (yours or neighbors)
- Check if your WiFi is broadcasting correctly
- Ensure no unwanted networks are appearing
Tech Learning
- Understand how WiFi actually works
- See signal strength in real numbers (RSSI)
- Learn about WiFi channels and encryption
Professional Use
- WiFi site surveys before installing equipment
- Network planning and optimization
- IoT device diagnostics
School Projects
- Electronics and embedded systems learning
- Data visualization
- Wireless networking concepts
Get PCBs for Your Projects Manufactured

You must check out PCBWAY for ordering PCBs online for cheap!
You get 10 good-quality PCBs manufactured and shipped to your doorstep for cheap. You will also get a discount on shipping on your first order. Upload your Gerber files onto PCBWAY to get them manufactured with good quality and quick turnaround time. PCBWay now could provide a complete product solution, from design to enclosure production. Check out their online Gerber viewer function. With reward points, you can get free stuff from their gift shop. Also, check out this useful blog on PCBWay Plugin for KiCad from here. Using this plugin, you can directly order PCBs in just one click after completing your design in KiCad.
How It Works (The Simple Explanation)
Your WiFi router constantly broadcasts its existence, saying "Hey, I'm here!" and "These are my details!" Our device listens to all these broadcasts and organizes them into a nice visual display.
Here's the flow:
1. Device powers on
2. Tells WiFi radio: "Start scanning for networks"
3. Waits for scan to complete
4. Gets list of networks with signal strength
5. Displays as either: Graph (tall bars for strong networks, short bars for weak ones) or List (text with SSID, signal strength, channel, encryption)
6. Shows this for 3.5 seconds, then repeats
7. Alternates between graph and list view
8. Battery keeps it running for 4-5 hours
Understanding WiFi Signal Strength
One of the coolest things about this project is seeing actual WiFi signal strength numbers. Here's what they mean:

Cool fact: The numbers are negative because WiFi signals get weaker as they travel. The bigger the negative number, the weaker the signal!
Building It (Step by Step)
Step 1: Get Your Parts
Order from your favorite electronics store or online:
· FireBeetle ESP32-S3
· DFR0664 2.0" TFT Display
· GDL FPC Cable (comes with some displays)
· 3.7V Lithium battery with JST connector
· USB-C cable
Step 2: Connect the Display
- Find the 18-pin GDL connector on the FireBeetle
- Take the flat FPC cable
- Align it with the connector (blue line faces you)
- Push it in until you hear a click
_zcKruzwL4K.jpeg?auto=compress%2Cformat&w=740&h=555&fit=max)
- That's it! Done!

Step 3: Connect the Battery
- Find the BAT+ and GND labels on the FireBeetle
- Connect battery red wire to BAT+
- Connect battery black wire to GND
- If soldering, use a soldering iron for 2-3 seconds each connection
Step 4: Upload the Code
- Download the Arduino IDE (free from arduino.cc)
- Install ESP32-S3 support
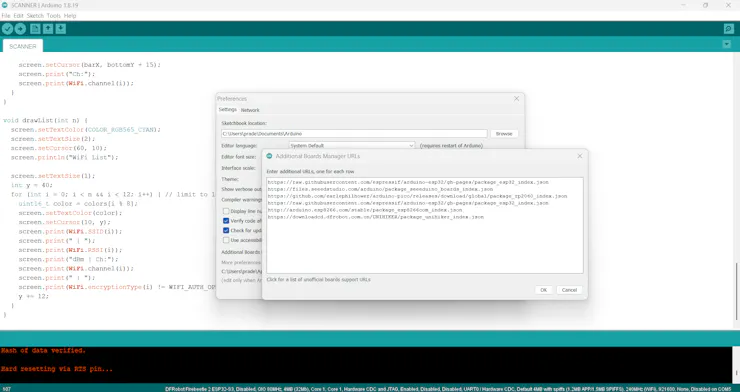
- Copy our code into Arduino IDE
#include "DFRobot_GDL.h"
#include <WiFi.h>

#define TFT_DC  D2
#define TFT_CS  D6
#define TFT_RST D3

DFRobot_ST7789_240x320_HW_SPI screen(TFT_DC, TFT_CS, TFT_RST);

uint16_t colors[] = {
  COLOR_RGB565_GREEN, COLOR_RGB565_YELLOW, COLOR_RGB565_RED,
  COLOR_RGB565_BLUE, COLOR_RGB565_CYAN, COLOR_RGB565_MAGENTA,
  COLOR_RGB565_ORANGE, COLOR_RGB565_WHITE
};

bool showGraph = true;

void setup() {
  Serial.begin(115200);
  screen.begin();
  screen.setRotation(1);
  screen.fillScreen(COLOR_RGB565_BLACK);
  screen.setTextColor(COLOR_RGB565_WHITE);
  screen.setTextSize(2);
  screen.setCursor(40, 20);
  screen.println("ESP32-C3 WiFi Scanner");

  WiFi.mode(WIFI_STA);
  WiFi.disconnect();
  delay(500);
}

void loop() {
  // Start async scan
  WiFi.scanNetworks(true, true);

  // Wait until scan completes (non-blocking loop)
  while (WiFi.scanComplete() == WIFI_SCAN_RUNNING) {
    delay(100);
  }

  int n = WiFi.scanComplete();
  if (n < 0) return; // scan failed

  screen.fillScreen(COLOR_RGB565_BLACK);

  if (n == 0) {
    screen.setTextColor(COLOR_RGB565_RED);
    screen.setCursor(40, 120);
    screen.println("No networks found");
  } else {
    if (showGraph) {
      drawGraph(n);
    } else {
      drawList(n);
    }
  }

  showGraph = !showGraph;
  delay(3500); // faster refresh
}

void drawGraph(int n) {
  screen.setTextColor(COLOR_RGB565_CYAN);
  screen.setTextSize(2);
  screen.setCursor(60, 10);
  screen.println("WiFi Graph");

  int bottomY = screen.height() - 30;
  int leftX = 30;
  int rightX = screen.width() - 30;
  int gridSpacing = 20;

  screen.drawFastVLine(leftX, 30, bottomY - 30, COLOR_RGB565_DGRAY);
  for (int y = 30; y <= bottomY; y += gridSpacing) {
    screen.drawFastHLine(leftX, y, rightX - leftX, COLOR_RGB565_DGRAY);
    int rssiValue = map(y, 30, bottomY, -30, -100);
    screen.setTextSize(1);
    screen.setTextColor(COLOR_RGB565_WHITE);
    screen.setCursor(5, y - 5);
    screen.print(rssiValue);
  }

  int barWidth = (screen.width() - 60) / min(n, 8) - 5; // limit to 8
  int barSpacing = 5;
  int startX = 40;

  for (int i = 0; i < n && i < 8; i++) {
    int signalStrength = WiFi.RSSI(i);
    int barHeight = map(signalStrength, -100, -30, 10, bottomY - 30);
    uint16_t color = colors[i % 8];
    int barX = startX + i * (barWidth + barSpacing);

    screen.fillRect(barX, bottomY - barHeight, barWidth, barHeight, color);

    screen.setTextSize(1);
    screen.setTextColor(color);
    screen.setCursor(barX, bottomY - barHeight - 15);
    screen.print(signalStrength);

    String ssid = WiFi.SSID(i);
    if (ssid.length() > 4) ssid = ssid.substring(0, 4);
    screen.setCursor(barX, bottomY + 5);
    screen.print(ssid);

    screen.setCursor(barX, bottomY + 15);
    screen.print("Ch:");
    screen.print(WiFi.channel(i));
  }
}

void drawList(int n) {
  screen.setTextColor(COLOR_RGB565_CYAN);
  screen.setTextSize(2);
  screen.setCursor(60, 10);
  screen.println("WiFi List");

  screen.setTextSize(1);
  int y = 40;
  for (int i = 0; i < n && i < 12; i++) { // limit to 12
    uint16_t color = colors[i % 8];
    screen.setTextColor(color);
    screen.setCursor(10, y);
    screen.print(WiFi.SSID(i));
    screen.print(" | ");
    screen.print(WiFi.RSSI(i));
    screen.print("dBm | Ch:");
    screen.print(WiFi.channel(i));
    screen.print(" | ");
    screen.print(WiFi.encryptionType(i) != WIFI_AUTH_OPEN ? "Secured" : "Open");
    y += 12;
  }
}- Plug FireBeetle into computer via USB
- Click Upload
- Wait 30 seconds
- Done! Code is now installed
Step 5: Go Wireless
- Unplug USB cable
- Power via battery
- Device starts scanning immediately
- See WiFi networks appear!
Final Thoughts

This WiFi scanner is more than just a cool gadget – it's a window into the invisible WiFi world around you. Every time you use it, you're learning about radio waves, signal propagation, and wireless protocols.
Plus, you get bragging rights: "Yeah, I built this WiFi scanner from scratch."





