

Scan barcode to identify medicine and play audio file with medicine name, dosage, expiration date and instructions.

Things used in this project
Software apps and online services
Arduino IDE
Story
Build2Gether Focus Area: VISUAL IMPAIRMENTS
Track 2:Adaptation for INDOOR Activities for People with Visual Impairments.
I used to prepare several medicine tablets or capsules for my elderly parent that she needed to take every morning, afternoon, and evening. For me, since I have no visual impairments, I can identify the medicines that my elderly parent needs to take and put the medicine tablets in a medicine cup. For a visually impaired person, identifying medicines would be difficult or not possible.
This project helps a visually impaired person identify medicines by playing an audio file that says the medicine name, dosage, expiration date and instructions.
The requirement for this solution to work is to be able to hear. However, this project will not work if a person has both visual and hearing impairments. If a person has both visual and hearing impairments, then a refreshable braille display would be used instead of playing an audio file.
Medicine Name and Expiry Date Identification:
The initial design for this project involves using machine learning vision recognition to identify the medicine name and expiration date. However, medicine name and expiry date varies. Also, where they are printed or located.

The above picture shows the medicine name and expiration date printed per tablet location at the back of medicine blister packs.


The above pictures shows that the medicine expiration date is at the front and the medicine name is at the back of the medicine blister packs.


The above pictures shows the medicine name printed at the back of the medicine blister packs. The medicine expiration date is located at one side of the back of the medicine blister packs. Also, the expiration date print has faded due to handling.
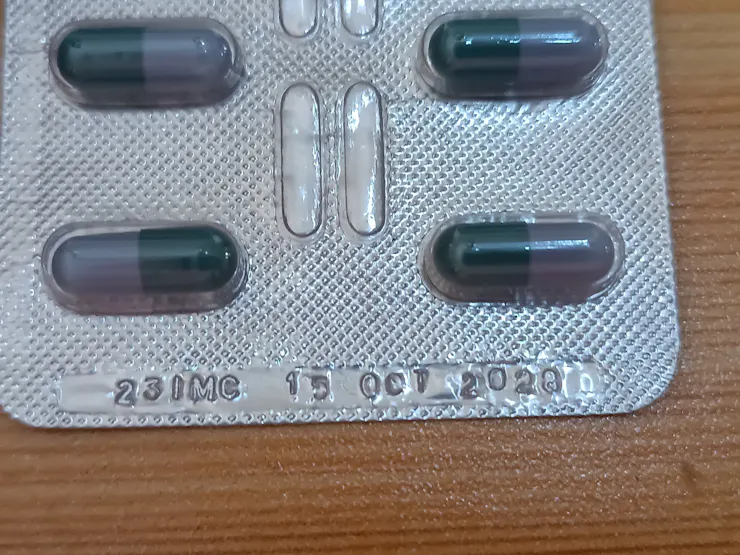

The above pictures shows that the medicine expiration date is stamped. It is located at one side of the back of medicine blister packs. The medicine name is printed at the back of the medicine blister packs.
Incorrect medicine identification could result in serious consequences for the person taking it. So, It has been decided to use barcode scanning to improve accuracy for medicine identification.
Barcode Scanner:
For scanning barcodes, I will use a non-contact barcode scanner.

I tested this barcode scanner by connecting it to my laptop and output to Microsoft Word document.
If the barcode is 202402280047 and you scan the same barcode several times, the output would have no space between barcode reads.
202402280047202402280047202402280047202402280047202402280047
If the barcode scanner output is continuous, there is no way to distinguish each barcode scanner output.


The above pictures show setup instructions for the barcode scanner. I set the barcode scanner to have the terminator suffix . I also set the barcode scanner to "Auto Sense Scanning Mode". Having a terminator suffix the output of the barcode scanner will be like this below if the same barcode is scanned several times.
202402280047
202402280047
202402280047
202402280047
202402280047
The program can now detect the or "Enter Key", to distinguish each barcode scan output.
Playing Audio Files:
To play audio files, I am going to use DFRobot DFPlayer Pro.


I connected two, 3-Watts speakers to the DFRobot DFPlayer Pro. Serial communication will be used to communicate with the DFRobot DFPlayer Pro.
To create audio mp3 files, I just use the recorder on my smart phone and say the medicine name, dosage, expiration date and instructions. It is also an option to use text-to-speech services to create audio files.
Connect the DFRobot DFPlayer Pro to the PC using a USB cable and save the audio mp3 files.

The file Para.mp3 is for Paracetamol. For whatever reason, the program cannot read the filename Paracetamol.mp3, so I renamed it Para.mp3 and it worked.
The medicines used for this project are what I usually take.
Centrum Advanced Multi Vitamins 500 mg tablet.
Vitamin C 500 mg tablet.
Decolgen 500 mg tablet.
Paracetamol 500 mg tablet.
Claritin 10 mg tablet.
Imodium 2 mg tablet.
Hemostan 500 mg tablet.
M5Stack Core2 for AWS and USB v1.2 Module:
For the main controller, I am going to use M5Stack Core2 for AWS, which is ESP32 based. To read the output of the barcode scanner, I am going to use the M5Stack USB v1.2 module.

The M5Stack Core ecosystem is stackable. The M5Stack Core2 for AWS stacks is below.
M5Stack Core2.
M5GO Bottom2 for AWS.
In between the stacks above, I am going to place the M5Stack USB v1.2 module.


To make the M5Stack USBv1.2 module compatible with the M5Stack Core2 for AWS, I set the SPI INT to G35 and the SPI SS to G5.

DFRobot DFPlayer Pro UART will be connected to the M5Go Bottom2 for AWS Port C UART. A large circle push button will be connected to the M5Go Bottom 2 for AWS Port B GPIO. The large circle push button will restart the program and play audio file with instructions.


The pictures shown above are of the M5Stack Core2 for AWS and USB v1.2 module stacked together.
Connection Setup:

Above picture shows the entire connection setup for this project.
Barcode scanner is connected to USB port of M5Stack USB v1.2 module.
DFRobot DFPlayer Pro is connected to M5Go Bottom 2 for AWS Port C UART.
Push button is connected to M5Go Bottom 2 for AWS Port B GPIO.
(Note: The schematic diagram was not made as the connection is simple and has been explained in detail.)
Triangle Frame for Cable Organization:


Using a PVC sintra board, I created a triangle frame to hide the long cables of DFRobot DFPlayer Pro. This would also make the M5Stack Core2 for AWS easily viewable instead of being flat on the table. The speakers are also facing the user, so the audio files can be much better heard.
Creating Barcodes:

To create barcodes, I used a free online barcode generator. The barcode type that I created is QR code. I set the QR code data to the name of the medicine.
Medicine Containers:

The medicine containers are rectangular and has a lock at the top. It has QR codes at both sides of the container.
Guide Rails:

Guide rails are placed on the table for proper alignment when scanning the QR code on the medicine containers. The barcode scanner will be directly on top of the guide rails. The guide rails are cut from PVC electrical trunking.
Barcode Scanner Attached to Flexible Desk Arm:

The barcode scanner is attached to a flexible desk arm. It is positioned above the guide rails. Slide the medicine containers onto the guide rails to scan the QR code. An audio file will be played mentioning the medicine name, dosage, expiration date and instructions.
Creating Braille Message:

Pressing the round push button will play an audio file with instructions on how to use the medicine identification station. To help a visually impaired person get started on how to use the medicine identification station, a braille message will be placed on the table with the message "PUSH BUTTON FOR INSTRUCTIONS". To create a braille message for a visually impaired person to be able to read using their fingers, I bought a plastic braille slate with a stylus.

I researched on the internet how to create a braille message using a braille slate and stylus. The above picture shows a braille diagram for the alphabet. Each braille letter has six dots, or holes, in the paper. Using the stylus, you press down at the back of the paper to create an impression at the front of the paper. Since the braille message will be created at the back of the paper, the braille letter or message needs to be in reverse.

The braille message that I created is:
First line: "PRESS BUTTON FOR"
Second line: "INSTRUCTIONS"
Since this is the back of the paper, the P for PRESS is at the top right and created in reverse.

Here is the front of the paper. The braille message is "PUSH BUTTON FOR INSTRUCTIONS".

Here is the braille message "PRESS MESSAGE FOR INSTRUCTIONS", placed on the table using double sided tape.
Project Demo:
Code
https://github.com/mtrobregado/M5Stack-Medicine-Identification
Original Project:“Medicine Identification for the Visually Impaired” by Markel Robregado, originally published on Hackster.io under the GPL-3.0+ license.





