
A complete wire quiz buzzer system for 4 players using nRF24L01 radios with included TP4056 based battery charger and sound effects

Things used in this project
Hardware components
Hand tools and fabrication machines
3D Printer (generic)
Story
This is a four player Quiz buzzer system. The controller is designed with Ready & Reset buttons and will let you know who answered first, There's also the option to pass the question to the remaining players that haven't answered yet!
This makes use of the nRF24L01 wireless devices which use 2.4GHz to transmit and receive.
I have also included an integrated lithium charge module based on the TP4056 chip to charge an internal 18640 battery.
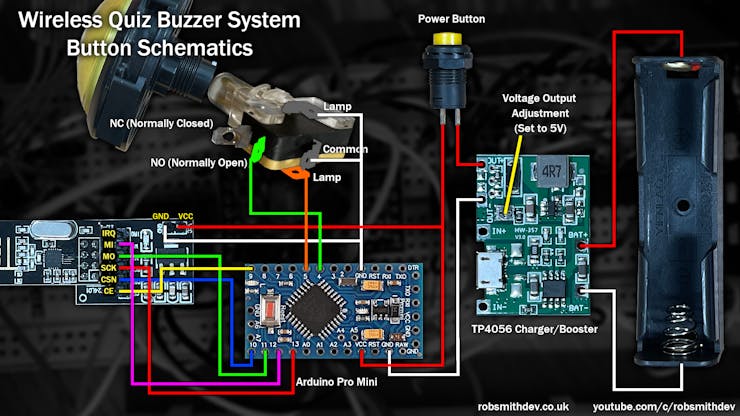
The four buttons each contain an Arduino Pro MINI.
The buttons are wired up like this:
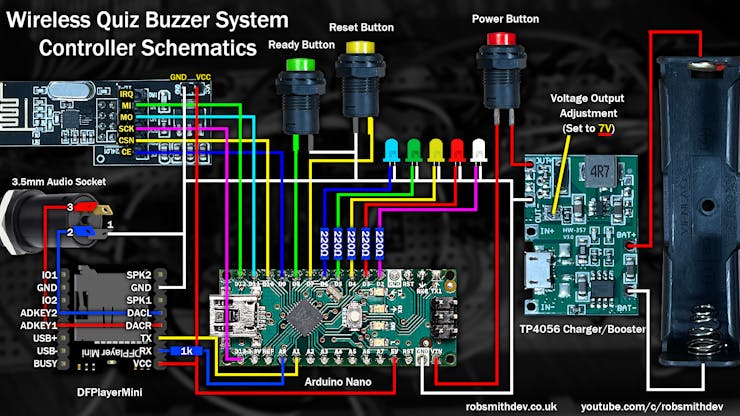
The main controller uses an Arduino Nano, although it could use a mini instead. This controller also connects to a DFPlayerMini board to provide sound effects every time a button is pressed.
The controller is wired up like this:
The source code can be downloaded from https://robsmithdev.co.uk/youtube/wirelessbuzzer.zip
For more information, and full build, see the YouTube Video:
3D models for Printing:
Thingiverse: https://www.thingiverse.com/thing:5396155Tinkercad: https://www.tinkercad.com/things/k7JUDiFv1wr?sharecode=BaPiGkdqKju71d5xkFrCgnxJhQCo4WVAP1QIDcCe1sk
Parts List (Affiliate links)
nRF24L01+: https://amzn.to/3GxN7Hz (x10), https://amzn.to/3LLdtqn (x5)nRF24L01+PA+LNA (Longer Range):
https://amzn.to/3lKRe9inRF24L01+ 8-Pin Adapter: https://amzn.to/3z2A4MiTP4056 Based Charge/Boost Converter: https://amzn.to/3sYHXyx or https://amzn.to/3sWtLGt18650 Battery Compartment:
https://amzn.to/3GgvOdIArduino Pro Mini (16Mhz, 5V): https://amzn.to/3x8pnFFFT232RL USB to TTL Converter (for programming the Arduino): https://amzn.to/3wLZRpfOfficial Arduino Nano (Recommended):
https://amzn.to/3FVaEBXArduino Nano (CH340 Version): https://amzn.to/3L3FLfvDFPlayer Mini:
https://amzn.to/38t9dOxRed 10cm (4 inch) Arcade Button: https://amzn.to/39QotoZYellow 10cm (4 inch) Arcade Button: https://amzn.to/38ueTI2Green 10cm (4 inch) Arcade Button: https://amzn.to/3PgEMf6Blue 10cm (4 inch)
Arcade Button: https://amzn.to/3sx4jaaSmaller Arcade Buttons (6cm) Alternative: https://amzn.to/3L8IT9Y5V LED
Lamps: https://www.arcadeworlduk.com/products/awuk-5v-10mm-wedge-base-led.html (not a sponsor)M3
10mm Countersunk Screws: https://amzn.to/3MejVqMM3 Metal Threadded Screw Inserts:
https://amzn.to/3rgwhqBRed PLA Plastic Filament: https://amzn.to/3yz7Bh2Yellow PLA Plastic Filament:
https://amzn.to/3swjccUGreen PLA Plastic Filament: https://amzn.to/37Ez45KBlue PLA Plastic Filament:
https://amzn.to/3yvmdxSSpade Connectors: https://amzn.to/3w7GpUQAssorted 5mm LEDs:
https://amzn.to/3LMT3gDPlastic Chrome LED Panel Mount Holder: https://amzn.to/39QnrtfAssorted Resistors:
https://amzn.to/3MRX6thWire Stripping Tool: https://amzn.to/321om6g
Custom parts and enclosures
3D Printed Boxes
Schematics
Schematics for Buttons

Schematics for Controller

Code
Controller Source Code for Arduino
C/C++
////////////////////////////////////////////////////////////////
// Wireless Quiz Buzzer System                                //
// Copyright (C) RobSmithDev 2022                             //
// GPL3 Licence                                               //
////////////////////////////////////////////////////////////////
// Video: https://youtu.be/b3iqji1DUG0
// https://robsmithdev.co.uk
// https://youtube.com/c/robsmithdev

#include <RF24.h>
#include <DFRobotDFPlayerMini.h>
#include <SoftwareSerial.h>


//   2 -> White LED to GND  (Status)
//   3 -> RED LED to GND    (Button Status)
//   4 -> YELLOW LED to GND (Button Status)
//   5 -> GREEN LED to GND  (Button Status)
//   6 -> BLUE LED to GND   (Button Status)
//   7 -> RESET btn to GND
//   8 -> READY btn to GND
//   9 -> CE  (nRF24)
//  10 -> CSN (nRF24)
//  11 -> MO  (nRF24)
//  12 -> MI  (nRF24)
//  13 -> SCK (nRF24)
//  A0 -> 1K Reststor -> RX on DFPlayerMini
//  A1 -> TX on DFPlayerMini


RF24 radio(9, 10); // CE, CSN

#define LED_STATUS      2     // Status LED
#define BTN_RESET       7
#define BTN_READY       8

#define DFMINI_TX       A0   // connect to pin 2 on the DFPlayer via a 1K resistor
#define DFMINI_RX       A1   // connect to pin 3 on the DFPlayer
SoftwareSerial softwareSerial(DFMINI_RX, DFMINI_TX);

// Player
// Tip: If you have any problems with the DFPlayerMini, power it from the Arduino's 3.3v pin rather than 5v.
DFRobotDFPlayerMini player;

// LED pins
unsigned char BTN_LEDS[4] = {3, 4, 5, 6};

// LED status type
enum LedStatus : unsigned char { lsOff = 0, lsOn = 1, lsFlashing = 2 };

// Status we want to share with the buttons
LedStatus ledStatus[4]  = {lsOff, lsOff, lsOff, lsOff};
bool buttonEnabled[4]   = {false, false, false, false};
bool buttonConnected[4] = {false, false, false, false};
bool hasAnswered[4]     = {false, false, false, false};
unsigned long lastContact[4] = {0, 0, 0, 0};

// Last loop time
unsigned long lastLoopTime = 0;

// System status
bool isReady = false;

// Is audio playing?
bool isPlaying = false;
bool dfPlayerReady = false;

// searches the radio spectrum for a quiet channel
bool findEmptyChannel() {
  Serial.write("Scanning for empty channel...\n");
  char buffer[10];

  // Scan all channels looking for a quiet one.  We skip every 10
  for (int channel = 125; channel > 0; channel -= 10) {
    radio.setChannel(channel);
    delay(20);

    unsigned int inUse = 0;
    unsigned long testStart = millis();
    // Check for 400 ms per channel
    while (millis() - testStart < 400) {
      digitalWrite(LED_STATUS, millis() % 500 > 400);
      if ((radio.testCarrier()) || (radio.testRPD())) inUse++;
      delay(1);
    }

    // Low usage?
    if (inUse < 10) {
      itoa(channel, buffer, 10);
      Serial.write("Channel ");
      Serial.write(buffer);
      Serial.write(" selected\n");
      return true;
    }
  }
  return false;
}

// Sends a new ACK payload to the transmitter
void setupACKPayload() {
  // Update the ACK for the next payload
  unsigned char payload[4];
  for (unsigned char button=0; button<4; button++)
      payload[button] = (buttonEnabled[button] ? 128 : 0) | ledStatus[button];
  radio.writeAckPayload(1, &payload, 4);
}

// Check for messages from the buttons
void checkRadioMessageReceived() {
  // Check if data is available
  if (radio.available()) {
    unsigned char buffer;
    radio.read(&buffer, 1);

    // Grab the button number from the data
    unsigned char buttonNumber = buffer & 0x7F; // Get the button number
    if ((buttonNumber >= 1) && (buttonNumber <= 4)) {
      buttonNumber--;

      // Update the last contact time for this button
      lastContact[buttonNumber] = lastLoopTime;

      // And that it's connected
      buttonConnected[buttonNumber] = true;

      // If the button was pressed, was enabled, hasn't answered and the system is ready for button presses
      if ((buffer & 128) && (buttonEnabled[buttonNumber]) && (!hasAnswered[buttonNumber]) && (isReady)) {
        // No longer ready
        isReady = false;

        if (dfPlayerReady) {
          player.play(buttonNumber + 1);
          isPlaying = true;
        }

        // Signal the button was pressed
        hasAnswered[buttonNumber] = true;

        // Change button status
        for (unsigned char btn = 0; btn < 4; btn++)
          ledStatus[btn] = (btn == buttonNumber) ? lsOn : lsOff;

        // Turn off the ready light
        digitalWrite(LED_STATUS, LOW);
      }
    }

    setupACKPayload();
  }
}

// Setup the controller
void setup() {
  // put your setup code here, to run once:
  Serial.begin(57600);
  while (!Serial) {};

  // small delay to allow the DFPlayerMini to boot
  delay(1000);

  // For the DFPlayerMini
  softwareSerial.begin(9600);
  if (player.begin(softwareSerial)) {
    player.volume(30);
    dfPlayerReady = true;
  }

  // Setup the radio device
  radio.begin();
  radio.setPALevel(RF24_PA_LOW);
  radio.enableDynamicPayloads();
  radio.enableAckPayload();
  radio.setDataRate(RF24_250KBPS);
  radio.setRetries(4, 8);
  radio.maskIRQ(false, false, false);  // not using the IRQs

  // Setup our I/O
  pinMode(LED_STATUS, OUTPUT);
  pinMode(BTN_RESET, INPUT_PULLUP);
  pinMode(BTN_READY, INPUT_PULLUP);


  if (!radio.isChipConnected()) {
    Serial.write("RF24 device not detected.\n");
  } else {
    Serial.write("RF24 detected.\n");

    // Trun off the LED
    digitalWrite(LED_STATUS, LOW);

    // Now setup the pipes for the four buttons
    char pipe[6] = "0QBTN";
    radio.openWritingPipe((uint8_t*)pipe);
    pipe[0] = '1';
    radio.openReadingPipe(1, (uint8_t*)pipe);
    for (char channel = 0; channel < 4; channel++) {
      pinMode(BTN_LEDS[channel], OUTPUT);
      digitalWrite(BTN_LEDS[channel], LOW);
    }

    // Start listening for messages
    radio.startListening();

    // Find an empty channel to run on
    while (!findEmptyChannel()) {};

    // Start listening for messages
    radio.startListening();

    // Ready
    digitalWrite(LED_STATUS, LOW);

    setupACKPayload();
  }
}

// Main loop
void loop() {
  lastLoopTime = millis();


  if (digitalRead(BTN_RESET) == LOW) {                 // Reset button pressed?
    // Turn all buttons off
    for (unsigned char button = 0; button < 4; button++) {
      ledStatus[button] = lsOff;
      buttonEnabled[button] = false;
      hasAnswered[button] = false;
      if (isPlaying) {
        player.stop();
        isPlaying = false;
      }
    }
    isReady = false;
    digitalWrite(LED_STATUS, LOW);
  } else if (digitalRead(BTN_READY) == LOW) {                // Ready button pressed
    // Make the buttons flash that havent answered yet
    for (unsigned char button = 0; button < 4; button++) {
      buttonEnabled[button] = !hasAnswered[button];
      ledStatus[button] = hasAnswered[button] ? lsOff : lsFlashing;
    }
    isReady = true;
    if (isPlaying) {
      player.stop();
      isPlaying = false;
    }
    digitalWrite(LED_STATUS, HIGH);
  }

  // Update our LEDs and monitor for ones that are out of contact
  for (unsigned char button = 0; button < 4; button++) {
    // If the button is connected
    if (buttonConnected[button]) {
      // If its been 1 second since we heard from it
      if (lastLoopTime - lastContact[button] > 1000) {
        // Disconnect it
        buttonConnected[button] = false;
        digitalWrite(BTN_LEDS[button], LOW);
      } else {
        // Set the LED to match the state we have it in
        digitalWrite(BTN_LEDS[button], (ledStatus[button] == lsOn) || ((ledStatus[button] == lsFlashing) && (lastLoopTime & 255) > 128));
      }
    } else {
      // For disconnected ones we just give a short 'blip' once per few second
      digitalWrite(BTN_LEDS[button], (lastLoopTime & 2047) > 2000);
    }
  }

  // Check for messages on the 'network'
  checkRadioMessageReceived();
}
Buttons Code for Arduino
C/C++
////////////////////////////////////////////////////////////////
// Wireless Quiz Buzzer System                                //
// Copyright (C) RobSmithDev 2022                             //
// GPL3 Licence                                               //
////////////////////////////////////////////////////////////////
// Video: https://youtu.be/b3iqji1DUG0
// https://robsmithdev.co.uk
// https://youtube.com/c/robsmithdev


#include <RF24.h>
#include <EEPROM.h>

//   4 -> Button to GND
//   5 -> LED to GND (Button)
//   9 -> CE  (nRF24)
//  10 -> CSN (nRF24)
//  11 -> MO  (nRF24)
//  12 -> MI  (nRF24)
//  13 -> SCK (nRF24)
RF24 radio(9, 10); // CE, CSN

#define PIN_BUTTON   4
#define PIN_LED      5

// LED status options
enum LedStatus : unsigned char { lsOff = 0, lsOn = 1, lsFlashing = 2 };

// Last loop start time
unsigned long lastLoopTime = 0;

// If this is in contact with the controller
bool isConnected = false;
// Last time we sent some status
unsigned long lastStatusSend = 0;
// When the button was pressed down
unsigned long buttonDownTime = 0;
// If the button is enabled
bool buttonEnabled = false;
// Status of the LED
LedStatus ledStatus = lsOff;

// Which button number we are
unsigned char buttonNumber = EEPROM.read(0);

// Main setup function
void setup() {
  // put your setup code here, to run once:
  pinMode(PIN_BUTTON, INPUT_PULLUP);
  pinMode(PIN_LED, OUTPUT);

  // put your setup code here, to run once:
  Serial.begin(57600);
  while (!Serial) {};

  while ((buttonNumber<1) || (buttonNumber>4)) {
    // A dirty PWM for dim brightness
    digitalWrite(PIN_LED, HIGH);
    delay(1);
    digitalWrite(PIN_LED, LOW);
    delay(10);
    if (Serial.available()) {
      char id = Serial.read();
      if ((id >= '1') && (id<='4')) {
        buttonNumber = id - '0';
        EEPROM.write(0, buttonNumber);
      }
    }
  }

  // Setup the radio device
  if (!radio.begin()) {
    Serial.write("RF24 device failed to begin\n");
  }
  radio.setPALevel(RF24_PA_LOW);     // Max power
  radio.enableDynamicPayloads();
  radio.enableAckPayload();
  radio.setDataRate(RF24_250KBPS);
  radio.setRetries(2, 2);
  radio.maskIRQ(false, false, false);  // not using the IRQs

   if (!radio.isChipConnected()) {
     Serial.write("RF24 device not detected.\n");
   } else {
     Serial.write("RF24 device found\n");
   }

   // Configure the i/o
   char pipe[6] = "1QBTN";
   radio.openWritingPipe((uint8_t*)pipe);
   pipe[0] = '0';
   radio.openReadingPipe(1, (uint8_t*)pipe);
   radio.stopListening();
}

// Search for the button controller channel
bool findButtonController() {
   Serial.write("Searching for controller...\n");

   for (int a = 125; a > 0; a-=10) {
      radio.setChannel(a);
      delay(15);
      // Send a single byte for status
      if (sendButtonStatus(false)) {
        Serial.write("Quiz Controller found on channel ");
        char buffer[10];
        itoa(a,buffer,10);
        Serial.write(buffer);
        Serial.write("\n");
        return true;
      }
      digitalWrite(PIN_LED, (millis() & 2047) > 2000);
   }

   // Add a 1.5 second pause before trying again (but still flash the LED)
   unsigned long m = millis();
   while (millis() - m < 1500) {
     digitalWrite(PIN_LED, (millis() & 2047) > 2000);
     delay(15);
   }

   return false;
}

// Attempt to send the sttaus of the button and receive what we shoudl be doing
bool sendButtonStatus(bool isDown) {
  unsigned char message = buttonNumber;
  if (isDown) message |= 128;

  for (unsigned char retries=0; retries<4; retries++) {
    // This delay is used incase transmit fails.  We will assume it fails because of data collision with another button.
    // This is inspired by https://www.geeksforgeeks.org/back-off-algorithm-csmacd/
    unsigned int randomDelayAmount = random(1,2+((retries*retries)*2));
    if (radio.write(&message, 1)) {
      if (radio.available()) {
       if (radio.getDynamicPayloadSize() == 4) {
          unsigned char tmp[4];
          radio.read(&tmp, 4);

          buttonEnabled = (tmp[buttonNumber-1] & 128) != 0;
          ledStatus = (LedStatus)(tmp[buttonNumber-1] & 3);
          Serial.write("Write OK, ACK Payload\n");

          return true;
        } else {
          // Remove redundant data
          int total = radio.getDynamicPayloadSize();
          unsigned char tmp;
          while (total-- > 0) radio.read(&tmp, 1);
          Serial.write("Write OK, ACK wrong size\n");
          delay(randomDelayAmount);
        }
      } else {
          // This shouldn't really happen, but can sometimes if the controller is busy
          Serial.write("Write OK, no ACK\n");
          return true;
      }
    } else {
       delay(randomDelayAmount);
    }
  }

  Serial.write("Write Failed\n");
  return false;
}

// Main loop
void loop() {
  lastLoopTime = millis();

  if (radio.isChipConnected()) {

    // If connectin ACK timeout or not connected
    if ((lastLoopTime - lastStatusSend > 1000) || (!isConnected)) {
        // A short blip meaning its powered up, but not working
        while (!findButtonController()) {};
        digitalWrite(PIN_LED, LOW);
        isConnected = true;
        lastStatusSend = lastLoopTime;
    }

    // If the button was pressed down (and its been 300ms since last check)
    if ((digitalRead(PIN_BUTTON) == LOW) && (lastLoopTime - buttonDownTime>300) && (buttonEnabled)) {
      // This ensures we get a random number sequence unique to this player.  The random number is used to prevent packet collision
      randomSeed(lastLoopTime);
      // Send the DOWN state
      if (sendButtonStatus(true)) {
        buttonDownTime = lastLoopTime;
        lastStatusSend = lastLoopTime;
      }
    }

    // If its been 150ms since last TX send status
    if (lastLoopTime-lastStatusSend > 150) {
      if (sendButtonStatus(false)) {
        lastStatusSend = lastLoopTime;
      } else delay(10);
    }

     digitalWrite(PIN_LED, (ledStatus == lsOn) || ((ledStatus == lsFlashing) && ((lastLoopTime & 255)>128)));
  } else {
     // Error flash sequence
     digitalWrite(PIN_LED, (lastLoopTime & 1023) < 100);
  }

  // Slow the main loop down
  delay(1);
}
The article was first published in hackster, June 7, 2022
cr: https://www.hackster.io/RobSmithDev/wireless-quiz-buzzer-system-with-nrf24l01-arduino-29b1ce
author: RobSmithDev


