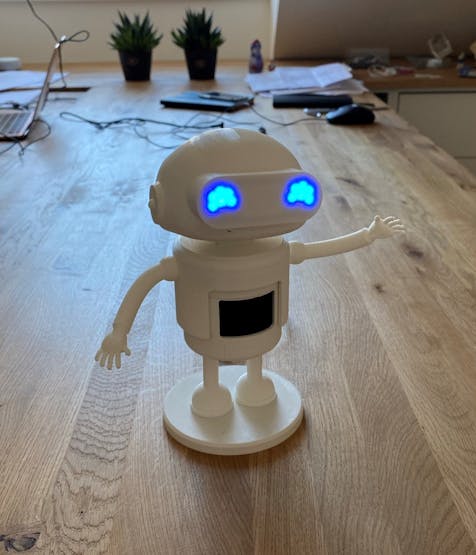
We combined our new BGT60 Radar Sensor with a "real" Infineon Chatbot and created a sweet little doorman, talking to people, passing by.

Things used in this project
Hardware components
Hand tools and fabrication machines
3D Printer (generic)
Soldering iron (generic)
Hot glue gun (generic)
Story
You might came across our chatbot avatar looking around at our Infineon webpages.
We turned our Chatbot into a real companion robot, acting as a doorman greeting people passing by.
Infineon's Chatbot made real
By using our new BGT60 Radar Sensor, some LEDs and a speaker, we brought him to life so he greets you, when you enter the room and says good bye when you leave it again.
How to hack the Chatbot
The brain of our project is an Arduino Nano placed in the torso. With an micro USB board in the baseplate and a mini USB cable fed through one of the legs, we created a micro USB connection to the Arduino, by which you can power it and upload new sketches. Get rid of the USB plug from the cable and clear away the isolation of the single wires. Thread it through the leg and the baseplate and solder the wires on the adapter board. Fix the adapter with some adhesive on the baseplate inlay and close it with the baseplate.
_MVQBasLgQU.jpg?auto=compress%2Cformat&w=740&h=555&fit=max)
Micro USB plug for power and programming
To track your movement, we placed the new BGT60 Radar Sensor right between the Chatbot's eyes. As radar waves shoot through the mask you can fully hide the sensor. It triggers if you walk either towards or away from him and signals the movement to the Arduino via a 2 pin GPIO interface. If you want to know more about our sensor, take a look at its Hackster article.
Furthermore, to make the Chatbot look alive, we imitate eyes by adding some LEDs. Both, the sensor and the LEDs are connected parallel to the 3.3V output and ground of the Arduino. Make sure you print the LED mask in black and also use black hot glue to attach the LEDs, or the entire head will be illuminated.
_nF5EZteT6k.jpeg?auto=compress%2Cformat&w=740&h=555&fit=max)
Sensor between LEDs
If the radar sensor tracks a movement, a build in mini mp3 player from DFRobot turns on and plays an appropriate audio track through the speaker. Those tracks are saved on a micro SD card inside the mp3 player. For a detailed instruction how to use the DFplayer and how to save the audio tracks visit DFROBOT. Fix the components with hot glue in order to prevent short circuits and damage through the heavy speaker and your companion bot is ready to rock!
_BFHgRhIGyz.jpeg?auto=compress%2Cformat&w=740&h=555&fit=max)
inner part, showing arduino, MP3 module and speaker in the Chatbots belly
What's your favourite robot to bring to life? Let us know in the comments below!!!
Schematics
Connection
This diagram shows how to connect your electric components in order to make your Chatbot work.

Code
Sketch
C/C++
This Arduino sketch makes your little doorman talk to you.
Make sure you use the right pins for TD/PD and RX/TX.
#include "SoftwareSerial.h" //library for serial communication
#include "DFRobotDFPlayerMini.h"//library for the DFplayer mini
#include <Arduino.h>
/* Include library main header */
#include <bgt60-ino.hpp>
/* Include Arduino platform header */
#include <bgt60-platf-ino.hpp>

/*
* In case no supported platform is defined, the
* PD and TD pin are set to the values below.
*/
#ifndef TD
#define TD  18
#endif

#ifndef PD
#define PD  19
#endif

Bgt60Ino radarShield(TD, PD);

SoftwareSerial mySoftwareSerial(10, 11); // RX, TX
DFRobotDFPlayerMini myDFPlayer;//creating an object for the library
//const int pdpin = A4;//direction pin on shield
//const int tdpin = A5; //target pin on shield
int state_curr =0;
int state_prev =1;
int state_s1=0;

void setup()
{
  initIO(); // function that declares the setup

    // Configures the GPIO pins to input mode
    Error_t init_status = radarShield.init();
    /* Check if the initialization was successful */
    if (OK != init_status) {
        Serial.println("Init failed.");
    }
    else {
        Serial.println("Init successful.");
    }
}

void loop(){

  SM_det();//state machine function declaration

}

void initIO(){
  mySoftwareSerial.begin(9600);
  Serial.begin(9600);
  Serial.println();
  Serial.println(F("DFRobot DFPlayer Mini"));
  Serial.println(F("Initializing DFPlayer module ... Wait!"));
  if (!myDFPlayer.begin(mySoftwareSerial))
  {
    while (true);
  }
  Serial.println();
  Serial.println(F("DFPlayer Mini module initialized!"));
  myDFPlayer.setTimeOut(500); //Timeout serial 500ms
  myDFPlayer.volume(20);//volume 10
  myDFPlayer.EQ(0); //Equalizer normal

}

void SM_det()// state machine function
{

    unsigned long myTime1;
    unsigned long myTime2;
    const long interval = 2000;
    Bgt60::Motion_t motion = Bgt60::NO_MOTION;
    Bgt60::Direction_t direction = Bgt60::NO_DIR;

    Error_t err = radarShield.getMotion(motion);

    /* Check if API execution is successful */
    if (err == OK)
    {
    switch(state_s1)
    {
      case 0:
      if(Bgt60::MOTION == motion){

      err = radarShield.getDirection(direction);

      if(OK == err)
      {
        switch(direction){
          case Bgt60::APPROACHING:
          Serial.println("Approaching");
          myTime1 = millis();
          Serial.println(myTime1);

          while(direction==Bgt60::APPROACHING)
          {
               Error_t err2 = radarShield.getDirection(direction);
               if(OK == err2)
               {
                Serial.println("hj");

                myTime2 = millis();

                }

               if((myTime2-myTime1)>interval)
               {
                break;
               }
            }

        Serial.println(myTime2);
        Serial.println(myTime2-myTime1);

        if((myTime2-myTime1)>interval)
        {
          Serial.println("Chal beta print");
          state_curr=1;
          if(state_prev!=state_curr){
          state_s1=1;
          Serial.println("\n states1=1 detected");
          }
        }
        break;

        case Bgt60::DEPARTING:

        myTime1 = millis();
        Serial.println(myTime1);

        while(direction==Bgt60::DEPARTING)
        {
          Error_t err2 = radarShield.getDirection(direction);
          if(OK == err2)
          {
            Serial.println("hj2");

            myTime2 = millis();

           }

          if((myTime2-myTime1)>interval)
          {
            break;
           }

          }

        Serial.println(myTime2);
        Serial.println(myTime2-myTime1);
        if((myTime2-myTime1)>=interval)
        {
          state_curr=0;
          if(state_prev!=state_curr)
          {
          state_s1=2;
          }
         }

        break;
        }
        }
    }
    break;

    case 1:
    // approach
    myDFPlayer.playMp3Folder(1);// play the first mp3 file
    delay(2000);//occupy micro controller for 2S
    state_s1=3;//go to state 3
    break;

    case 2:
    //depart
    myDFPlayer.playMp3Folder(2);// play the second mp3 file
    delay(2000);
    state_s1=3;
    break;

    case 3:
    myDFPlayer.pause();// pause the miniplayer
    state_s1=0;
    if(state_curr!=state_prev){
    state_prev=state_curr;
    }
    else{
      state_s1=0;
    }
    break;
  }
        }
           else{
        Serial.println("Error occurred!");
    }


}
The article was first published in hackster, June 6, 2022
cr: https://www.hackster.io/Infineon_Team/greeting-chatbot-0bbd9d
author: Infineon Team


