
Learn how to build a "jump scare" skeleton that is remotely triggered using the Blues Wireless Notecard (without a host MCU!).

Things used in this project
Hardware components
Software apps and online services
Blues Wireless Notehub.io [https://www.hackster.io/blues-wireless/products/blues-wireless-notehub-io?ref=project-6b9f41]
Story
Who doesn't love Halloween? The candy. The costumes. The decorations. Traumatizing small children with scary props. 🎃💀
https://hackster.imgix.net/uploads/attachments/1512339/scared-kiddo.gif?auto=compress&gifq=35&w=740&h=555&fit=max&fm=mp4
In this project, I'll show you how to remotely trigger a jump-scare skeleton with cellular IoT, giving you the opportunity to be the most hated grown-up on your block!
The Very Scary Skeleton
This jump-scare skeleton lets you to trigger its "jump" action via detected motion or a footpad. Unfortunately the motion-triggering is a little too sensitive, often ruining the opportunity for a real surprise when kids are inspecting what's in the bag.
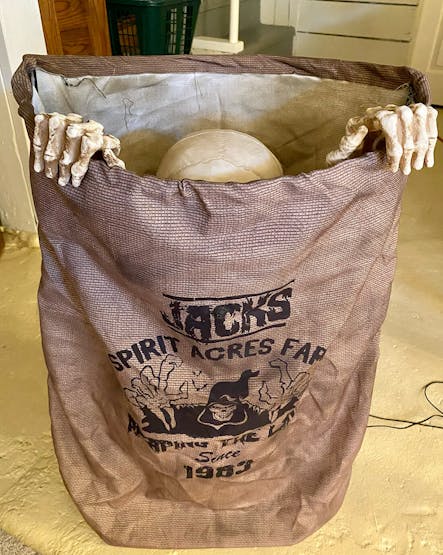
Take a peek...if you dare!
Ideally we want to activate the skeleton by replacing the footpad action with a relay switch that can be remotely triggered. Therefore, we need a way to send a signal to toggle said relay from any distance.
Since this IoT deployment will be outdoors, a reasonable connectivity option is cellular, specifically the prepaid cellular Notecard from Blues Wireless. To minimize cost, we will use a new Notecard feature to set the state of a Notecard AUX pin to toggle the relay switch, removing the need for a host MCU at the skeleton.
In summary we will remotely trigger an AWS Lambda function, the Lambda function will call an API to send an event to the Cellular Notecard attached to the skeleton, and then, SURPRISE!
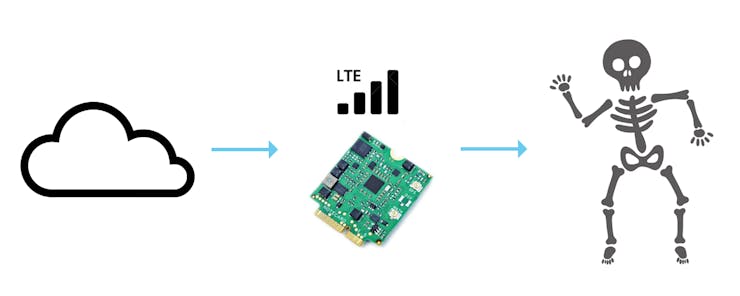
From cloud to skeleton via low-power cellular.
Later on in the project, I'll show you how to (optionally) add a button, host MCU, and another Notecard to let you trigger the skeleton by literally pressing a button (technically from anywhere in the world).
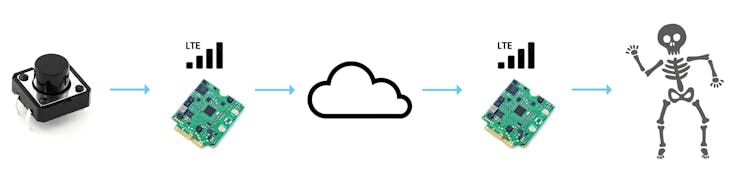
From host to cloud to skeleton via low-power cellular.
The Cloud
Let's start with what needs doing in the cloud to make this project a reality.
Blues Wireless Notehub
Blues Wireless Notehub is a thin cloud service that is effectively a secure router between the Notecard and your cloud app (which today will be AWS, but can be any cloud service).
The benefit of this pairing is the Notecard literally knows to how communicate with Notehub as soon as it's powered on. The Notecard is extremely secure as it doesn't have a public IP address and communicates with Notehub through private VPN tunnels.
After setting up a free account and a new project in Notehub, we are going to use a feature of Notehub's API to remotely configure a setting on the Notecard to toggle the relay switch.
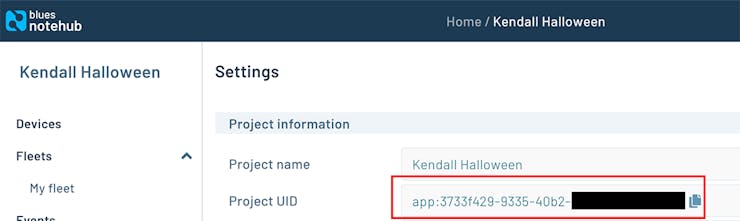
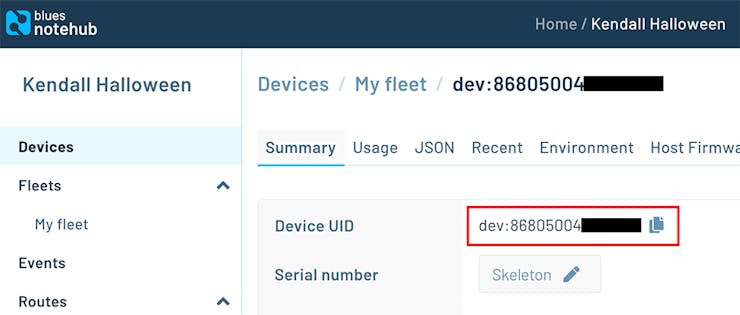
But for right now, all we need are the ProjectUID (the unique identifier of the Notehub project) and the DeviceUID (the unique identifier of the Notecard, discoverable by connecting the Notecard to the in-browser terminal at dev.blues.io or after the Notecard connects to your Notehub project).
Find your Notehub project's ProjectUID:
Find your Notecard's DeviceUID in Notehub (available after connecting with a hub.set request - see instructions later on in this tutorial):
AWS Lambda Function
Switching gears into AWS, let's write the Lambda function in Python (because why not):
import requests
import time

def lambda_handler(event, context):
    url = 'https://api.notefile.net/v1/projects/<project-uid>/devices/<device-uid>/environment_variables'
    timestamp = int(time.time())
    payload = '{"environment_variables":{"_aux_gpio_set":",,low,,1000,' + str(timestamp) + ',60"}}'
    headers = {'content-type': 'application/json', 'Accept-Charset': 'UTF-8', 'X-SESSION-TOKEN': '<your-auth-token>'}
    r = requests.put(url, data=payload, headers=headers)
The url variable is a call to the Notehub API. It includes placeholders for the aforementioned ProjectUID and DeviceUID you should have from Notehub.
The payload variable sets a specific environment variable on the Notecard. Environment variables are key-value pairs that are shared between Notehub and Notecards.
They can be edited via the Notehub UI or the Notehub API (like we are doing today) and are useful for creating shared variables between a single device or a fleet of devices.
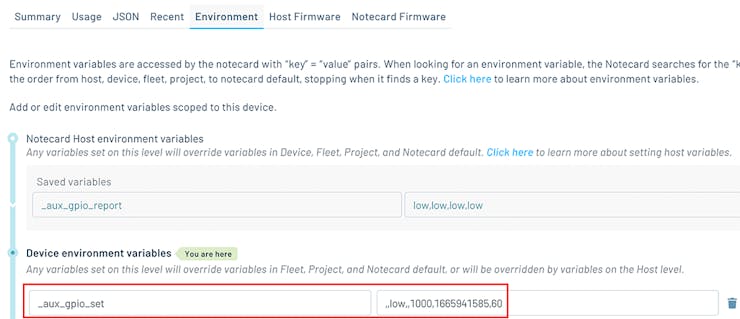
In our case, we are going to set the state of a Notecard AUX pin without using an MCU attached to the skeleton by using the _aux_gpio_set environment variable.
Specifically, we are setting the _aux_gpio_set environment variable to:
,,low,,1000,1665941585,60While at first a bit odd, this tells the Notecard to pulse the AUX3 pin LOW for 1000 ms (after which it will return to HIGH), valid from the current UNIX epoch time for 60 seconds. The empty spaces between the commas are where you could specify the states of the other AUX pins, 1, 2, or 4.
Please consult the full AUX mode docs provided by Blues Wireless for additional details.
Finally, the "session token" is a secure token we can create by following these instructions.
To summarize, our Lambda function sets the _aux_gpio_set environment variable on the Skeleton Notecard. The variable we send triggers a "pulse" by setting AUX3LOW for 60 seconds (toggling the relay switch). Once it's done, the Notecard will reset AUX3 back to its original HIGH state.
The Skeleton Notecard
Since our skeleton doesn't have a host MCU, we need to configure its Notecard to automatically pull in that environment variable and be ready to set the state of its AUX pins.
However, we haven't properly introduced the Notecard yet!
The Notecard provides an easy path to low-power cellular IoT through a prepaid system-on-module (including 500MB of data and 10 years of global service) AND its paired cloud service, Notehub. The Notecard starts at $49. No monthly fees, unless you plan on routing more than 5, 000 events per month (then pricing starts at $0.00075/event).
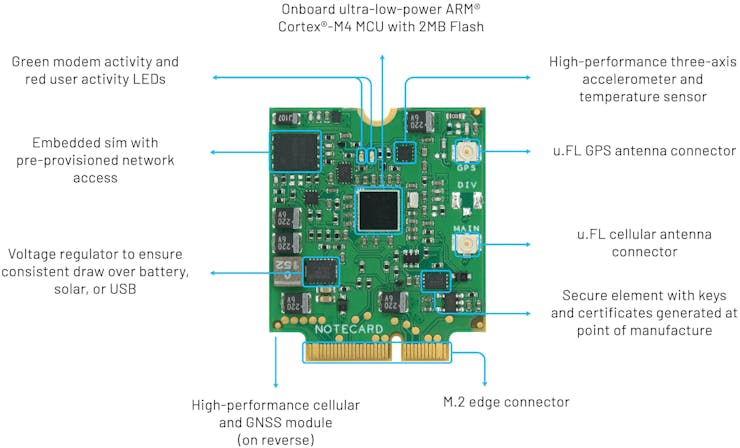
Notecard-NBGL (Narrowband Global)
With the Notecard, gone are the days of archaic AT commands to manage your cellular modem. The Notecard is all JSON, all the time.
For example, if you want to access the onboard GPS module to get your Notecard's location, just use the card.location API like so:
# Request
{ "req": "card.location" }

# Response
{
  "status": "GPS updated (58 sec, 41dB SNR, 9 sats),
  "mode":   "periodic",
  "lat":    42.577600,
  "lon":    -70.871340,
  "time":   1598554399
}
To perform the one-time configuration of the Skeleton Notecard, we need to send two JSON commands directly to it. Using the Skeleton Notecard's carrier board, we connect it over Micro USB to our computer and use the in-browser serial terminal provided at dev.blues.io.
First, we want to configure the Skeleton Notecard to associate with our Notehub project via a hub.set request. Note that the ProductUID is different than your ProjectUID used above!
{"req":"hub.set","product":"<your-product-uid>","mode":"continuous","sync":true}We then need to tell the Skeleton Notecard to listen for AUX GPIO changes with a card.aux request (in this case, set AUX3HIGH):
{"req":"card.aux","mode": "gpio","state": [{},{},{"high": true},{}]}Custom Relay Carrier Board
Next, we need to connect the old footpad connector on the skeleton to a custom Notecarrier board that hosts the Skeleton Notecard.

Ignore the extra relay connection, it's not actually in use...whoops.
This "relay carrier" allows you to control any normal outlet or high voltage product from anywhere. The carrier comes with two relays that are rated at a max of 220V@10Amp allowing you to control any electric appliance rated at under 2000 watts.
The design of the relay carrier is open source and available here on GitHub.
Skeleton in Action
Now, if we hit the public URL of the Lambda function, the appropriate environment variable will get set to:
,,low,,1000,<current UNIX epoch time>,60...and the skeleton should jump!
But let's take the next step by building out another IoT solution that lets us push a button from anywhere to trigger the Lambda function instead!
Configuring the Button Host
Using the STM32-based Blues Wireless Swan as our "button host" MCU, we can wire up a simple push button.
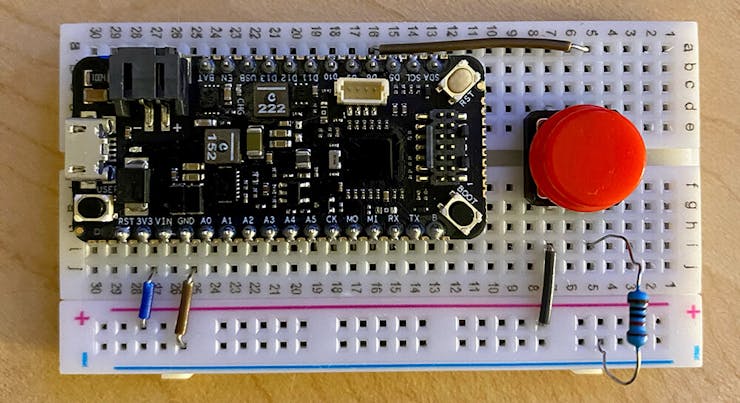
Blues Wireless Swan + a momentary push button
Our Arduino sketch starts out quite simple, verifying the push button is wired up properly by lighting the onboard LED of the Swan when the button is pressed:
const int buttonPin = 6; // the digital pin of the push button
int buttonState = 0;     // variable for reading button status

void setup()
{
  // initialize digital pin LED_BUILTIN as an output
  pinMode(LED_BUILTIN, OUTPUT);
  // initialize the push button pin as an input
  pinMode(buttonPin, INPUT);
}

void loop()
{
  // read the state of the push button value:
  buttonState = digitalRead(buttonPin);

  // check if the push button is pressed
  if (buttonState == HIGH)
  {
    // turn LED on
    digitalWrite(LED_BUILTIN, HIGH);
  }
  else
  {
    // turn LED off
    digitalWrite(LED_BUILTIN, LOW);
  }
}
Send the Button Press Event over Cellular
Next, we want to wire up another Notecard and its carrier board (this time the Notecarrier-A) to our button host MCU over I2C via a Qwiic cable.
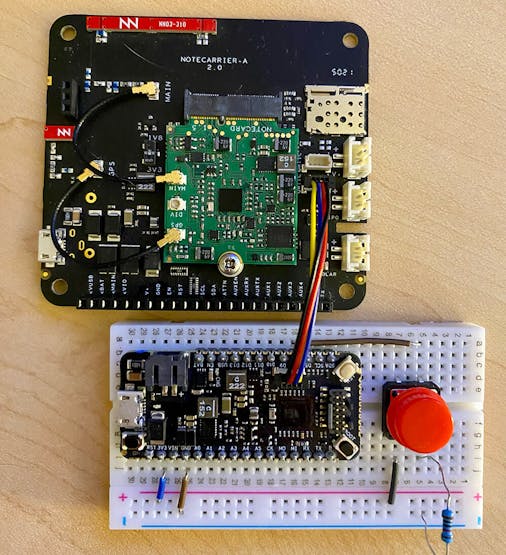
Notecard + Notecarrier-A
Make some code updates to the setup() method by associating the Notecard with our Notehub project (the product arg below which is the ProductUID of the Notehub project):
J *req = NoteNewRequest("hub.set");
JAddStringToObject(req, "mode", "continuous");
JAddStringToObject(req, "product", "<your-unique-productuid>");
JAddBoolToObject(req, "sync", true);
notecard.sendRequest(req);
But where is the JSON? This code snippet uses the note-arduino library which makes it easier to produce the following JSON for the Notecard:
{
  "req": "hub.set",
  "mode": "continuous",
  "product": "<your-unique-productuid>",
  "sync": true
}
NOTE: You'll want to consult the full sketch, which is available in this GitHub repository.
When the push button is pressed, we want to send an event (a.k.a. a Note) to our Notehub project. We can do this in the loop() method:
J *req = NoteNewRequest("note.add");
JAddStringToObject(req, "file", "surprise.qo");
JAddBoolToObject(req, "sync", true);
J *body = JCreateObject();
JAddBoolToObject(body, "jump", true);
JAddItemToObject(req, "body", body);
notecard.sendRequest(req);
Again, the output of this Arduino code is simple JSON that is delivered automatically to the Notecard:
{
  "req": "note.add",
  "file": "surprise.qo",
  "body": {"jump": true},
  "sync": true
}
Now, when the button is pressed, a Note is sent to Notehub along with some additional metadata about the cell tower used, timestamps, and so on:
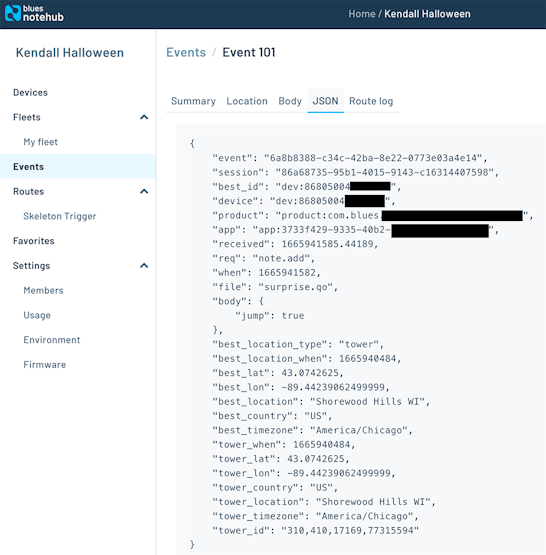
Route to AWS Lambda with Notehub
This Note in Notehub doesn't really do us much good (yet), because we need to hit our AWS Lambda endpoint.
To do so, we need to route the Note we just created to the Lambda function. We'll do this with a Notehub route, which allows us to send event data to any arbitrary endpoint.
NOTE: Learn more about Notehub routes with these cloud-specific tutorials.
In the Notehub UI, we can create an AWS route that hits the Lambda function whenever a Note named surprise.qo is sent from our button host:
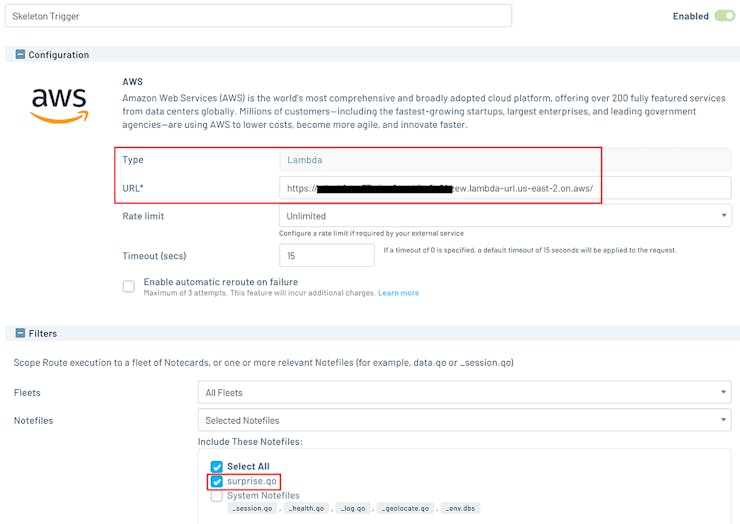
Now when the button is pressed, a Note is sent to Notehub, Notehub routes that to AWS, and the Lambda function tells the Skeleton Notecard to JUMP!
The Scary Results 🙀
To summarize, here are the steps we took to make this work:
(Optional) We wired up a simple push button to our host MCU. (Optional) We wired a Notecard to our MCU and sent an event/note to Notehub when the button was pressed.(Optional) Notehub routed that event to a Lambda function. The Lambda function used the Notehub API to set an environment variable on the Skeleton Notecard. The Skeleton Notecard toggled the relay switch to elicit Halloween scares!
Looking for some next steps?
Consult this GitHub repo for the full project code. Take 15% off your own Blues Wireless Starter Kit. Use the Notecard Simulator to try before you buy!
Happy Hack-o-ween! 🎃


