
To avoid the Germ infection The team has designed the "Touchless Doorbell"
Things used in this project
Hardware components
Hand tools and fabrication machines
Box, General Purpose
Story
Motivation
The team decided it would be better to design this project because the society was struggling with the issue of people becoming infected through physical contact and closeness. To solve this, we are implementing Touchless Door Bells, which will lessen physical contact and sense the stranger’s distance and temperature so that the owner can be alerted that someone has arrived.
Objective
The ultrasonic sensor recognize the gesture of person and then employs an LM35 sensor to assess the temperature if the distance satisfies the specifications. The system buzzes, displays the relevant message, and notifies the owner whether or not to let the individual inside the house based on the temperature. The data is subsequently uploaded to Thingspeak, from which it is tweeted to the account of the owner on Twitter.
Algorithum
Step 1 : Power the nodemcu and connect the sensors
Step 2: check the working of all the sensors like ultrasonic sensor, Lm35, buzzer, lcd
Step 3:- The ultrasonic Sensor and the Lm35 Should be mounted properly
Step 4 :- Dump the code to nodemcu
Step 5:- As the gesture is detected by the ultrasonic Sensor the buzzer beeps once.
Step 6 :- The temperature is sensed by the LM35 and the data is send to the nodemcu
(Note : the temperature is only sensed whenever the ultrasonic sensor detects the gesture.)
Step 7: The indications are give according to the conditions satisfied 1. If the temperature is below 340C the buzzer tons a sound indicating that the temperature of the person is normal and a message is displayed on the lcd screen.
2.If the temperature is above 340C the red led blinks indicating that the temperature of the person is high and a message is displayed on the lcd screen alerting the owner.
Step 8: If the person temperature is normal then the person is allowed inside and the entry of the person is stored
Step 9: the entry of the person is reported to thingspeak and the data to thingspeak is updated every 20 seconds
Step 10: for every entry of a person, the count of the people in the room is tweeted to the twitter account.
Step 11: open twitter login and refresh the page the tweets are seen.
Conclusion
This system is built keeping in mind for the better, advanced and fearless environment even in the critical situation.This will intimate the house owner that either he should allow the stranger inside or not without coming in physical contact with him.This can be installed outside the doors now, as it is tested with all the possible inputs/conditions with best and worst case scenarios, we have built this using the basic and user friendly devices so that every person can be aware of it. So finally this system gives indication and also clarifies the house owner that somebody is at the entry of the house and even the persons temperature is shown.
Future Scope
Future plans for this project include integrating with cutting-edge hardware such camera modules that record live video and developing an application that allows users to see the footage.The same approach may be applied in situations when there is a risk to life, and we can monitor the situation appropriately and safely as the world goes digital.
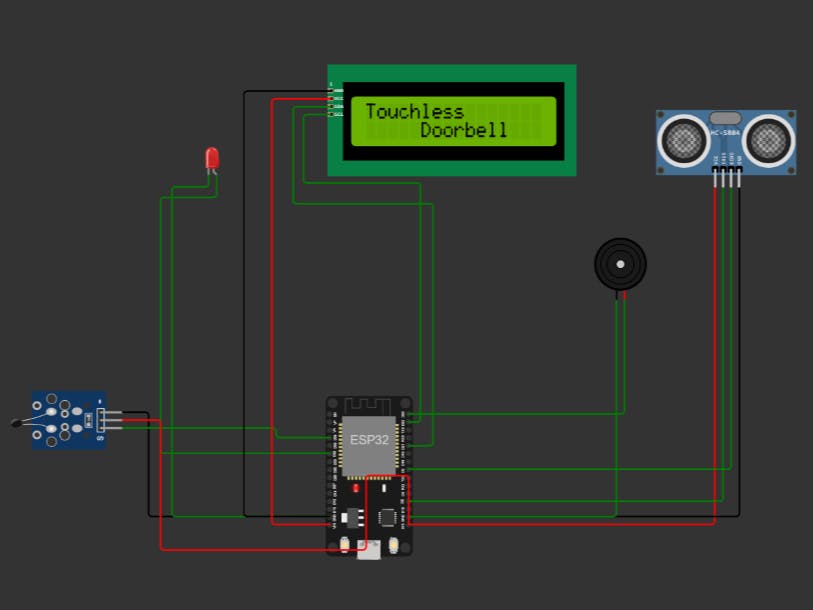
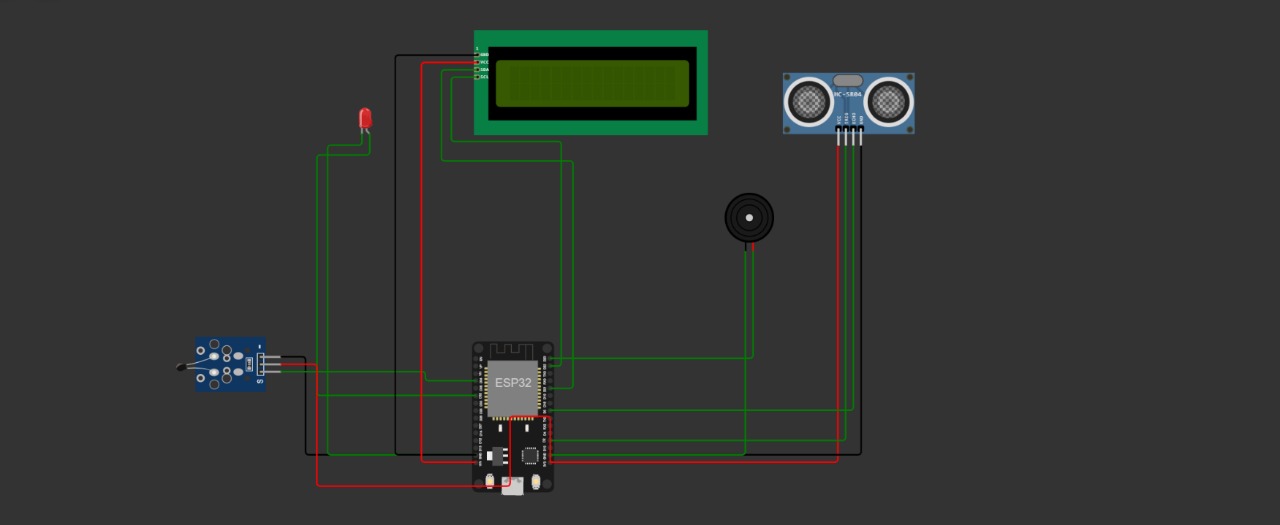
Schematics
Circuit diagram
This diagram shows the connections of the sensors
Code
Arduino
This code consist of Sending data to things speak and getting tweet
#define SECRET_SSID    "Anmol-4g"
#define SECRET_PASS    "sark@1968"
#define CHANNEL_ID     CID
#define WRITE_APIKEY   "KEY"
#define TRIGGER D7
#define ECHO  D8
#include <LiquidCrystal_I2C.h>
#include "ThingSpeak.h"

LiquidCrystal_I2C lcd(0x27, 16, 2);
unsigned long myChannelNumber =  1894990;
const char * myWriteAPIKey = "TIBX52T8E173RFDR";

#include <ESP8266WiFi.h>

char ssid[] = SECRET_SSID;   // your network SSID (name)
char pass[] = SECRET_PASS;   // your network password
int keyIndex = 0;            // your network key index number (needed only for WEP)
const int REF_VIN=3.3;
int i=0;
int count=0;
const int buzzer = D3;
WiFiClient  client;

void setup() {
  Serial.begin(115200);
  pinMode(TRIGGER, OUTPUT);
  pinMode(ECHO, INPUT);
  pinMode(D0, OUTPUT);//red light
  pinMode(buzzer, OUTPUT);
    lcd.begin();
  lcd.backlight();
  delay(100);
Serial.println();
  WiFi.mode(WIFI_STA);

  ThingSpeak.begin(client);
}

float project()
{
 float voltage= analogRead(A0);
 float tmpVal= {(voltage/1023.0)*REF_VIN*100};
 long duration, distance;


  digitalWrite(TRIGGER, LOW);
  delayMicroseconds(2);
  digitalWrite(TRIGGER, HIGH);
  delayMicroseconds(10);
  digitalWrite(TRIGGER, LOW);
  duration = pulseIn(ECHO, HIGH);
  distance = (duration/2) / 29.1;
  lcd.clear();
  if(distance <=20) // If the sensor detects an obstacle less than 20 cm in distance, the LED will start to blink.
  {   tone(buzzer, 2000); // Send 1KHz sound signal...
      delay(1000);        // ...for 1 sec
      noTone(buzzer);     // Stop sound...
      delay(1000);


  if(tmpVal>54){
      digitalWrite (D0, HIGH);
     lcd.setCursor(4, 0);
    lcd.print("Red Alert: ");
    lcd.setCursor(0,1); //Next Line
    lcd.print("High Temperature");

    }
 else{
      digitalWrite (D0, LOW);
    for( i=0;i<=15;i++)
     {
      tone(buzzer, 800); // Send 1KHz sound signal...
      delay(100);        // ...for 1 sec
      noTone(buzzer);     // Stop sound...
      delay(100);
      }
    lcd.setCursor(0, 0);
    lcd.print("Alert:Open Door ");
    lcd.setCursor(5,1); //Next Line
    lcd.print("Normal Temperature");
      count++;
   }

   }
  delay(50);

  Serial.println(tmpVal);
  //Serial.println("Duration is:  " + String(duration));
  //Serial.print("Distance is:  ");
  //Serial.print(distance);
  //Serial.println("  Centimeter:");
  Serial.print("No of People in Room are : ");
  Serial.println(count);
  return count;

  delay(1000);

}

void loop() {
int tempVal;
  // Connect or reconnect to WiFi
  if (WiFi.status() != WL_CONNECTED) {
    Serial.print("Attempting to connect to SSID: ");
    Serial.println(SECRET_SSID);
    while (WiFi.status() != WL_CONNECTED) {
      WiFi.begin(ssid, pass); // Connect to WPA/WPA2 network. Change this line if using open or WEP network
      Serial.print(".");
      delay(5000);
    }
    Serial.println("\nConnected.");
  }

  // Get temperature value from sensor
  tempVal =  project();

  // Write value to Field 1 of a ThingSpeak Channel
  int httpCode =
  httpCode = ThingSpeak.writeField(myChannelNumber, 1,  tempVal, myWriteAPIKey);


  if (httpCode == 200) {
    Serial.println("Channel write successful.");
  }
  else {
    Serial.println("Problem writing to channel. HTTP error code " + String(httpCode));
  }

  // Wait 20 seconds to update the channel again
  delay(20000);
}
The article was first published in hackster, December 18, 2022
cr: https://www.hackster.io/01fe20bei007/touchless-doorbell-150975
author: Anmol S Bhosale


