Things used in this project
Hardware components
Espressif ESP32S
Adafruit Waterproof DS18B20 Digital temperature sensor
DFRobot Gravity: Analog Spear Tip pH Sensor / Meter Kit
Turbidity Sensor, Phototransistor Output
Software apps and online services
Arduino IDE
Qubitro
Story
In the 21st century, there were lots of inventions, but at the same time when pollution, global warming, and so on are being formed, because of this, there is no safe drinking water for the world’s pollution. Nowadays, water quality monitoring in real-time faces challenges because of global warming limited water resources, growing population, etc. Hence, there is a need of developing better methodologies to monitor the water quality parameters in real-time. Water pollution is one of the biggest fears of green globalization.
To ensure a safe supply of drinking water, the quality needs to be monitored in real-time. In this project, we present a design and development of a low-cost system for real-time monitoring of the water quality in IOT (internet of things). The system consists of several sensors used to measure the physical and chemical parameters of the water. The parameters such as temperature, PH, turbidity, and flow sensor of the water can be measured. The measured values from the sensors can be processed by the core controller.
The ESP32 model can be used as a core controller. Finally, the sensor data can be viewed on the internet using a WI-FI system.
Get PCBs For Your Projects Manufactured

You must check out PCBWAY for ordering PCBs online for cheap!
You get 10 good-quality PCBs manufactured and shipped to your doorstep for cheap. You will also get a discount on shipping on your first order. Upload your Gerber files onto PCBWAY to get them manufactured with good quality and quick turnaround time. PCBWay now could provide a complete product solution, from design to enclosure production. Check out their online Gerber viewer function. With reward points, you can get free stuff from their gift shop.
Components:
PH Sensor:
A pH sensor is one of the most essential tools that’s typically used for water measurements. This type of sensor can measure the amount of alkalinity and acidity in water and other solutions. When used correctly, pH sensors can ensure the safety and quality of a product and the processes that occur within a wastewater or manufacturing plant.
In most cases, the standard pH scale is represented by a value that can range from 0-14. When a substance has a pH value of seven, this is considered to be neutral. Substances with a pH value above seven represent higher amounts of alkalinity, whereas substances with a pH value that’s lower than seven are believed to be more acidic. For instance, toothpaste typically comes with a pH value of 8-9. On the other hand, stomach acid has a pH value of two.
The difference between an alkaline substance and an acidic substance is very important for any company that uses a cooling tower, boiler, manufacturing processes, swimming pool control, and various types of environmental monitoring. The human body has a standard pH level of 7.4, which is essential for the body to run effectively. If the composition of the body ever becomes too acidic or overly alkaline, it will look to return to the neutral state.
No matter what application you’re using it for, a pH sensor allows you to keep pH levels at a level most ideal for the process. This could be anywhere from strong acids to caustics. There are many types of pH sensors that you can obtain for your application in the course of liquid measurement; these could include combination pH sensors, laboratory pH sensors, process pH sensors, and differential pH sensors.
1. A combination pH sensor uses a reference electrode and a measuring electrode. The reference electrode is used to provide a stable signal, while the measuring electrode is designed to detect any changes that have occurred with the pH value.
2. Differential sensors are comprised of three distinct electrodes, the third of which is a metal ground electrode. These sensors are unique in that they can prevent reference fouling.
3. Laboratory sensors can be made with combination sensors that are contained within plastic bodies and 12mm glass. These sensors are designed for lighter applications such as pool monitoring and environmental sampling.
4. Process pH sensors are made from combination sensors but built in large and durable bodies that contain a process connection for continuous pH monitoring.
Different pH sensors are built for different applications, which you should fully understand before purchasing one of these sensors.

Turbidity Sensor:

The Turbidity sensor detects water quality by measuring turbidity levels. It detects dissolved particles in water using light by measuring light transmittance and scattering rate, which vary with the amount of total suspended solids (TSS) in the water. The level of liquid turbidity rises as the TTS rises.
DS18B20 Temperature Sensor
DS18B20 is a pre-wired and waterproofed version of the DS18B20 sensor. It is handy for use when you need to measure something far away, or in wet conditions. The Sensor can measure the temperature between -55 to 125 °C (-67 °F to +257 °F). The cable is jacketed in PVC. Check the datasheet here: DS18B20 Sensor Datasheet.
Since it is digital, there is no signal degradation even over long distances. These 1-wire digital temperature sensors are fairly precise, i.e., ±0.5 °C over much of the range. It can give up to 12 bits of precision from the onboard digital-to-analog converter. They work great with any microcontroller using a single digital pin.
DS18B20 sensor, manufactured by Dallas Semiconductor Corp., uses only one data line (and GND) to communicate with the microcontroller, thus it is also named a 1-Wire® digital temperature sensor. This is it easy to connect it with Arduino and other microcontrollers which takes only 1 GPIO pin as no other components are required except a 4.7k ohm resistor which is connected in series to the data pin from a 5V supply.
Technical Specifications:
Operating voltage: 3V to 5.5VCurrent consumption: 1mAPrecision : 0.5 °C, 0.25 °C, 0.125 °C, and 0.0625 °C (9,10,11and 12 bits)Accuracy: ±0.5 °Cconversion time: <750ms
DS18B20 pinout diagram:

As per the above pin-out diagram, there are two versions, the transistor-type version, and the waterproof-type version. And both have 3 pins, 2 pins for VCC and GND and Another for DATA, In transistor type the pins are in the following manner 1. GND, 2. DATA, 3. VCC. In the waterproof version, the wire colors represent pins, Red=VCC, Black =GND, and Yellow = Data.

Cloud Setup:
A cloud platform is necessary to make a wireless weather monitoring system or any other wireless IoT system. For a good, and reliable cloud, certain criteria must be met.
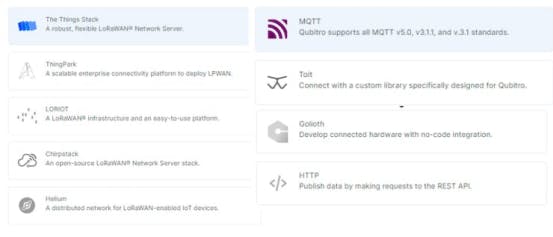
With Qubitro, users can build a simple, reliable, and cost-effective cloud solution. One of the most important features of Qubitro is its integration options. Some cloud solutions only support MQTT, someone else that only supports TTN, and someone else that only supports HTTP, but how about a provider that offers all integration options from LoRa to HTTP? There are several options for integrating with Qubitro.
So, we have a cloud provider, but to view or share your IoT data with others or to make a personal application, we need an API that lets users create and share IoT sensor data.
Qubitro has its API services, so you can do whatever you want with your data.
Configuring the Qubitro platform

Once you opened the portal, If you require any help just navigate to the documentation section, and you will find more interesting things.

Next, move to the project section. It will ask you to create a new project. Type your project name and your project description.

As we mentioned, Qubitro allows you to set up multiple connectivity options like MQTT, TTN, Blues Notehub, Helium, and Actility. In this tutorial, we are going to set up an MQTT Connection, so choose the MQTT and hit continue.

Now you need to add your first device to the portal. Enter the all required device details.
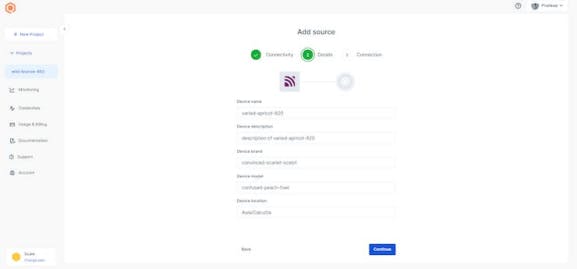
Once you enter all the necessary information, click continue, and it will show you the MQTT Connection credentials, save these because we require this for our next module.

Now all the setups were completed, let's jump into the Hardware part. You can access the Github Repository of this project from here.
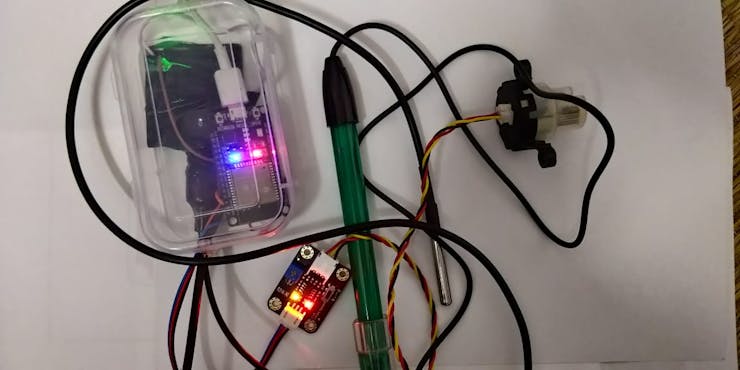
Circuit Connection:

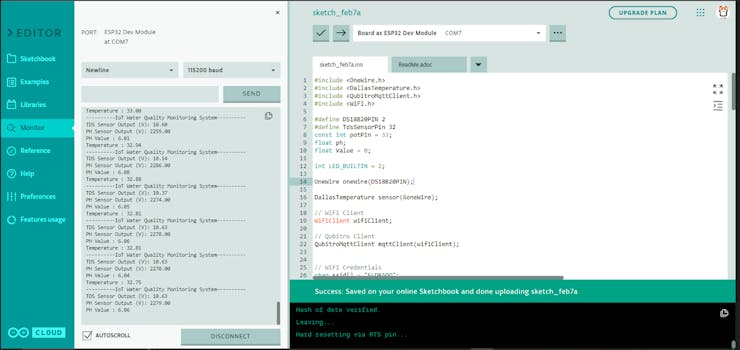
Once done with the circuit connection try to upload this below Arduino code to ESP32, note: change the MQTT and Wi-Fi Credentials as per yours. You can access the Github Repository of this project from here.
#include <OneWire.h>
#include <DallasTemperature.h>
#include <QubitroMqttClient.h>
#include <WiFi.h>

#define DS18B20PIN 2
#define TdsSensorPin 15
const int potPin = 4;
float ph;
float Value = 0;

int LED_BUILTIN = 2;

OneWire oneWire(DS18B20PIN);

DallasTemperature sensor(&oneWire);

// WiFi Client
WiFiClient wifiClient;

// Qubitro Client
QubitroMqttClient mqttClient(wifiClient);


// WiFi Credentials
char ssid[] = "xxx";
char pass[] = "xxx";

char deviceID[] = "xxx";
char deviceToken[] = "xxx";
const char host[] = "broker.qubitro.com";
int port = 1883;

unsigned long next = 0;

void setup() {
  Serial.begin(115200);
  pinMode(potPin, INPUT);
  pinMode(TdsSensorPin, INPUT);
  sensor.begin();
  pinMode (LED_BUILTIN, OUTPUT);

  wifi_init();
  qubitro_init();

}
void loop() {
  Serial.println("----------IoT Water Quality Monitoring System----------");
  int sensorValue = analogRead(TdsSensorPin);
  float voltage = sensorValue * (5.0 / 1024.0);

  Serial.print("TDS Sensor Output (V): ");
  Serial.print(voltage);
  Serial.println();

  Value = analogRead(potPin);
  Serial.print("PH Sensor Output (V): ");
  Serial.println(Value);

  float voltage1 = Value * (3.3 / 4095.0);
  ph = (3.3 * voltage1);
  Serial.print("PH Value : ");
  Serial.println(ph);

  sensor.requestTemperatures();
  float tempinC = sensor.getTempCByIndex(0);
  Serial.print("Temperature : ");
  Serial.println(tempinC);


  digitalWrite(LED_BUILTIN, HIGH);
  delay(1000);
  digitalWrite(LED_BUILTIN, LOW);
  delay(1000);

   String payload = "{\"TDS Sensor Output (V)\": " + String(voltage) + ",\"PH Sensor Output (V)\":" + String(Value) + ",\"PH Value\":" + String(ph) + ",\"Temperature\":" + String(tempinC) + "}";
    mqttClient.poll();
    mqttClient.beginMessage(deviceID);
    mqttClient.print(payload);
    mqttClient.endMessage();
}

void wifi_init() {
  // Set WiFi mode
  WiFi.mode(WIFI_STA);

  // Disconnect WiFi
  WiFi.disconnect();
  delay(100);

  // Initiate WiFi connection
  WiFi.begin(ssid, pass);

  // Print connectivity status to the terminal
  Serial.print("Connecting to WiFi...");
  while (true)
  {
    delay(1000);
    Serial.print(".");
    if (WiFi.status() == WL_CONNECTED)
    {
      Serial.println("");
      Serial.println("WiFi Connected.");

      Serial.print("Local IP: ");
      Serial.println(WiFi.localIP());
      Serial.print("RSSI: ");
      Serial.println(WiFi.RSSI());
      break;
    }
  }
}

void qubitro_init() {
  char host[] = "broker.qubitro.com";
  int port = 1883;
  mqttClient.setId(deviceID);
  mqttClient.setDeviceIdToken(deviceID, deviceToken);
  Serial.println("Connecting to Qubitro...");

  if (!mqttClient.connect(host, port))
  {
    Serial.print("Connection failed. Error code: ");
    Serial.println(mqttClient.connectError());
    Serial.println("Visit docs.qubitro.com or create a new issue on github.com/qubitro");
  }
  Serial.println("Connected to Qubitro.");
  mqttClient.subscribe(deviceID);
  delay(2000);

}
Here are the serial monitor results:
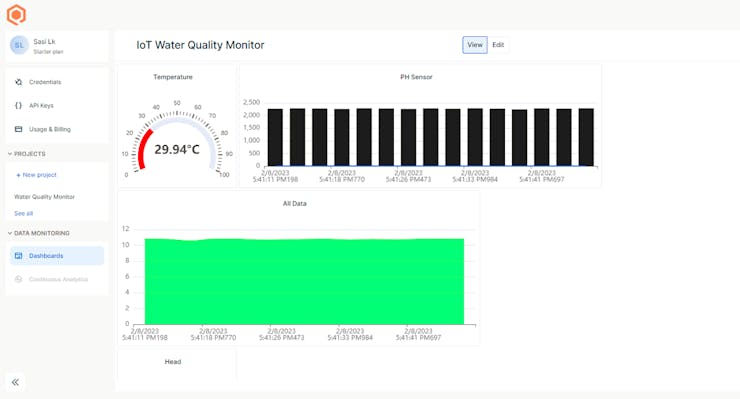
Final Cloud View: