Use MQTT on Amazon Web Services with a Hardware Device (ESP32) and use the IoT Data for further analysis on AWS itself
Things used in this project
Espressif ESP32 Development Board - Developer Edition
What is AWS IoT Cloud?
The AWS IoT is a cloud platform ☁ that provides services and solutions to connect and manage billions of devices. Since it is a part of Amazon Web Services, we can pipeline it with other products and services which will open more possibilities -
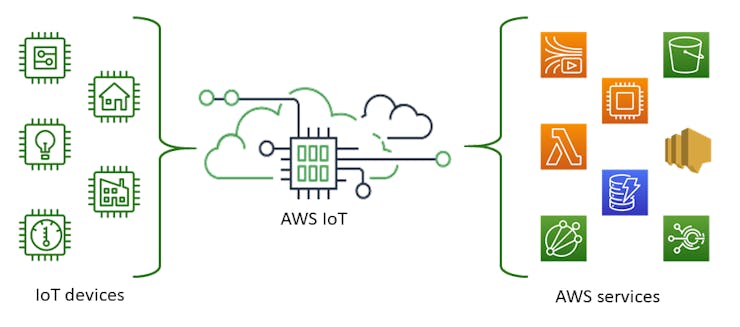
fig 1: Inter-Connectivity of AWS services
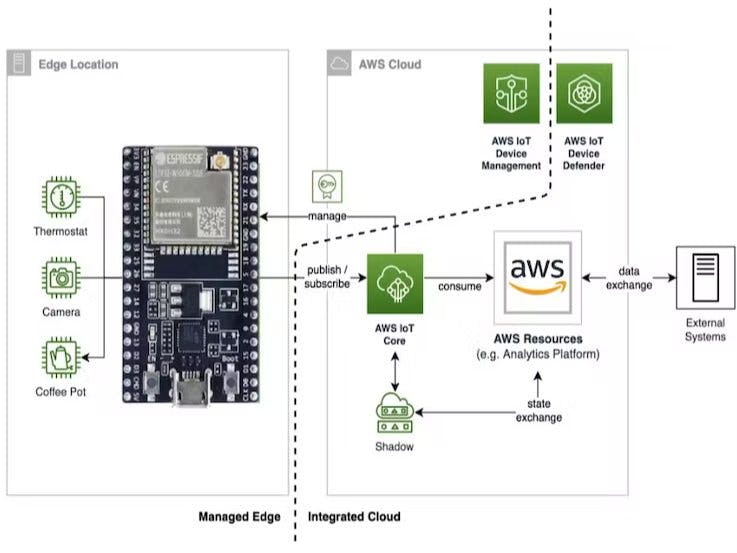
Collect, Store, and Analyze IoT data for industrial, consumer, commercial, and automotive devices 🚡 . To manage and support these IoT devices in the real world, AWS IoT Core supports below protocols -
MQTT (Message Queuing and Telemetry Transport)MQTT over WSS (WebSockets Secure)HTTPS (Hypertext Transfer Protocol - Secure)LoRaWAN (Long Range Wide Area Network)
Get PCBs For Your Projects Manufactured
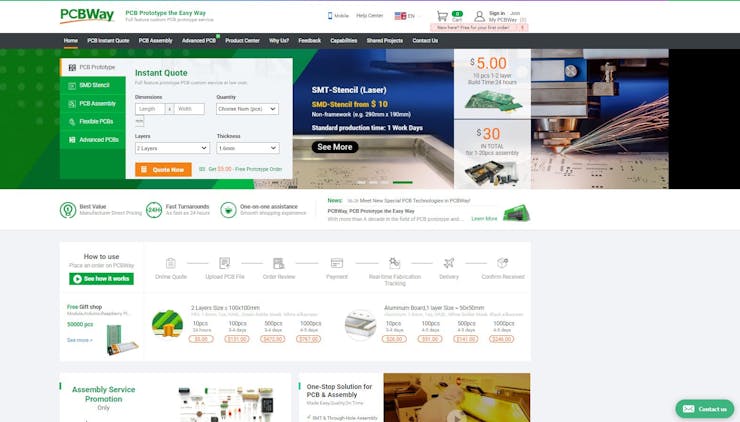
You must check out PCBWAY for ordering PCBs online for cheap!
You get 10 good-quality PCBs manufactured and shipped to your doorstep for cheap. You will also get a discount on shipping on your first order. Upload your Gerber files onto PCBWAY to get them manufactured with good quality and quick turnaround time. PCBWay now could provide a complete product solution, from design to enclosure production. Check out their online Gerber viewer function. With reward points, you can get free stuff from their gift shop
Getting Started 🗽
AWS IoT is an application that can be accessed through different methods - Device SDKs, Command Line Interface (CLI), Application Programming Interface (API), or Console (Dashboard).
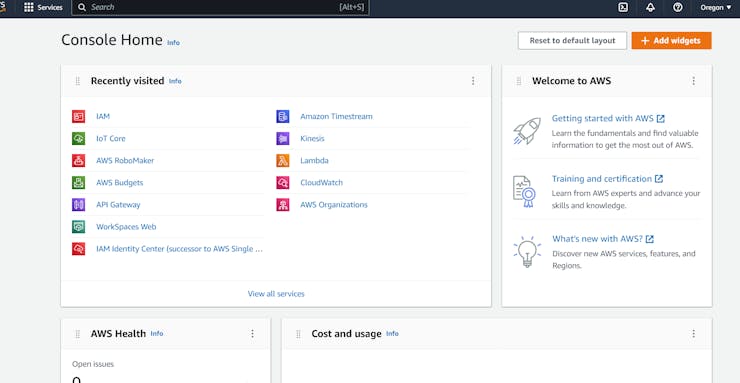
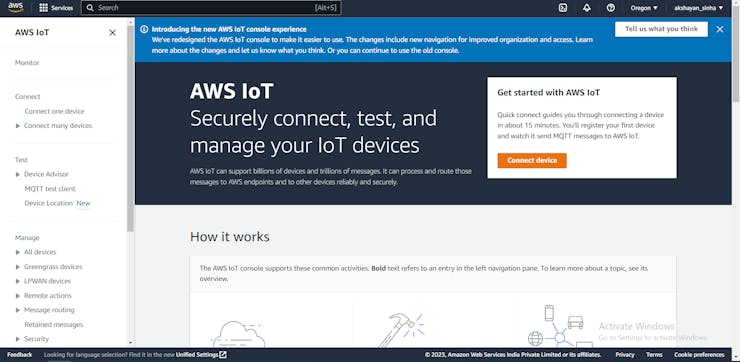
fig 2: AWS Console
In our case, we shall be using the AWS Console for a visual representation which is a better way to use an IoT Cloud Platform for connecting with the device.
The 👨💻 Console has a message broker that allows the devices and clients that use MQTT and MQTT over WSS protocols to publish and subscribe to messages. It also supports devices and clients that use the HTTPS protocol to publish messages.
Before we continue further, let us understand the concept of MQTT which shall be used as a communication protocol in this application.
MQTT - Message Queuing and Telemetry Transport 🔀
It is a publish/subscribe protocol for machine-to-machine communication. This simple protocol, is easy to implement for any client. Termed as the Pub and Sub, both are used for same purpose but different method.
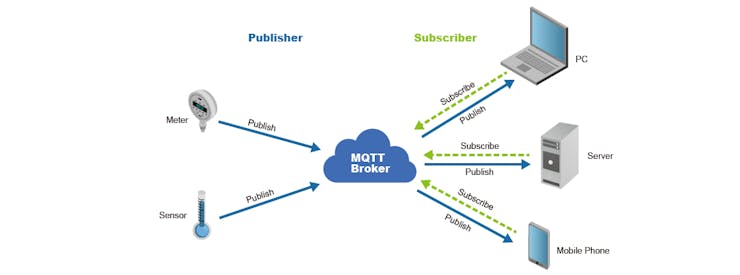
Above we can see there are 2 sections (left & right) - Publish and Subscribe. And then there is a middleman - Broker.
IoT Devices play the role to collect sensor data and send to the cloud (broker). While PC / Server / Mobile devices play the role to monitor and receive the sensor data to be viewed - Here, IoT Device is a Publisher, and PC Devices are a Subscriber.

[EXAMPLE] When a user1 publishes an image on social media, then only the user2 subscribed to user1 can view/receive the image. Here, the user1 is the PUBLISHER, user2 is the SUBSCRIBER, and the user1's account is the BROKER.
According to the above analogy, the image that is published is the data, that was transferred from user1 to user2 📤. And that is the exact scenario in an MQTT Pub/Sub model.


We have a more secure layer 🔒 to make sure the data is shared through a specific path, we call that 'topic', When user1 publishes data on topic, the subscriber automatically receives if already connected to the broker. Hence, the LOW latency.
Sign-In to AWS IoT 🔐
To start using AWS IoT, it is necessary to create and sign in to AWS, and open the console for the proper navigation of AWS IoT.
[ With International Credit/Debit Card ] 💳
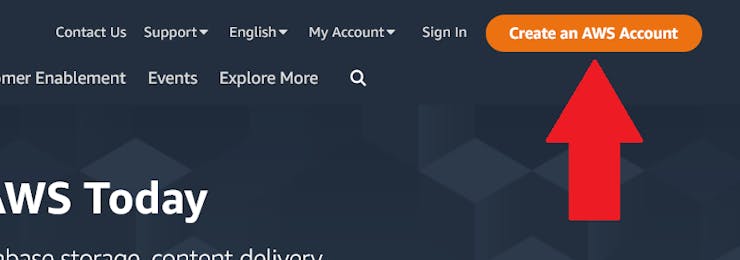
Visit aws.amazon.com/ and click on 'Create an AWS Account'.
Enter an Email ID and name to be used for Root access. Enter the verification code and provide a password

Make sure to select 'Personal' to get access to free tiers

Provide a Payment method (International Credit/Debit card only) and you should be good to go.Provide basic details and select the 'Basic Plan' for free usage tier of the AWS account.Within 1 hour the account will be created.
[ Without Card Details ] 🚫
Visit aws.amazon.com/education/awseducate/ and click on 'Register Now'Provide the basic details and verify the email address.A couple of hours later, the account will be created and a temporary password will be shared in the Email ID. Then the same email ID can be used to access AWS Console from aws.amazon.com.
The GitHub page of the project can be accessed from here.
Setting up AWS IoT Core
After creating the AWS account, IoT Core is one of the many services that needs to be accessed for the purpose of IoT Platform.
Visit aws.amazon.com and then click 'My Account' dropdown to select 'AWS Management Console'

If logged in, it will open the AWS Console page

Now search 'IoT Core' in the search bar and open the IoT Core window.
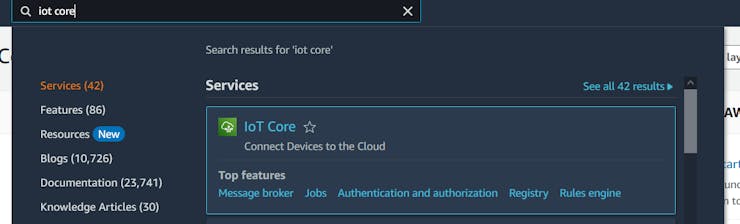
You can explore the IoT core before moving forward
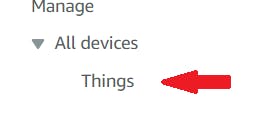
On left-side panel, go to Manage > All devices >Things
Click on 'Create thing' > 'Create Single Thing' > Enter a 'Thing name' > Choose 'Named shadow' and enter a name.
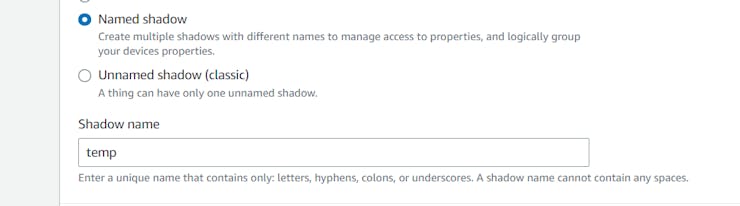
Shadow name serves the purpose to have a general topic that can be used for sharing data across the device and cloud.
Choose 'Auto-generate a new certificate (recommended)' > Create a new Policy > In the new page of Policies, under Policy statements > Policy Document > Choose JSON, and paste the below script -
{
    "Version": "2012-10-17",
    "Statement": [
      {
        "Effect": "Allow",
        "Action": [
          "iot:Connect",
          "iot:Publish",
          "iot:Receive",
          "iot:Subscribe"
        ],
        "Resource": [
          "*"
        ]
      }
    ]
}
After creating the policy, come back to the page and selected the policy to create the Thing.Now, download the 📃 device certificate (pem.crt), 🔑 private key & public key (pem.key) and rootCA1 (pem) files from the pop-up.
The GitHub page of the project can be accessed from here.
Congratulations! AWS IoT Core Thing is created! 🎉
Manage 'Things' in IoT Core
Things section will handle all the topics and message across our platform and device. Therefore, let us manage it to function and receive message/data from the device to the platform.
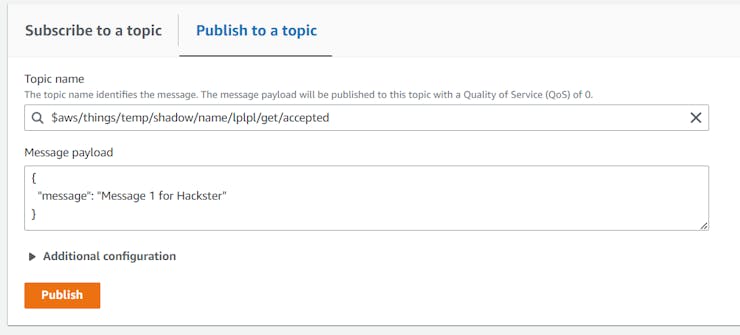
Click on the previously created 'named shadow' > MQTT topics.Here, we can see the the topics that are used to share message/data through platform
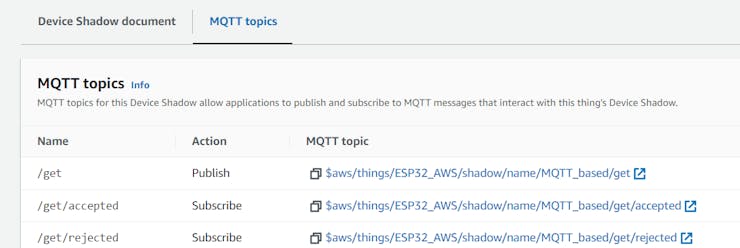
Select and open 'get/accepted' of the thing. And there we will be able to see the message/data published by the user.

To test it from within the Console, we can publish a message to the topic.
Now since the testing is complete and it functions properly, let us prepare the hardware code to send data to IoT Core.
Hardware Device -> IoT Core
Before we proceed and upload the code, we require to save the certificates and private key to the device's file system, so that while running the code it can fetch the certificate.
We shall require the SPIFFS (SPI Flash File Storage) library to upload file to the ESP32 device. (To know how)
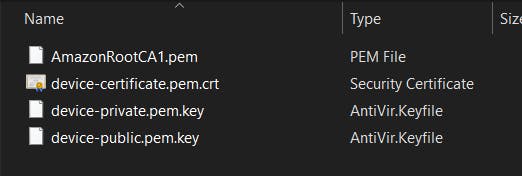
After installing the flash system, paste all the below files in a folder with thename 'data' -
1. Device Certificate (pem.crt)
2. Private key & Public key (pem.key)
3. RootCA1 (pem)
These files were previously downloaded during creation of our 'Thing' on IoT Core. And it is required to establish a secure connection with the cloud.
Let us now begin with the hardware section -
Go to Arduino IDE, and create a new project.Go to sketch > show sketch folder. Move the data folder (with certificates) to this folder.On Arduino IDE, upload the folder to the ESP32 using this method.Now, ESP32 should have the device certificates and private key in the device storage.

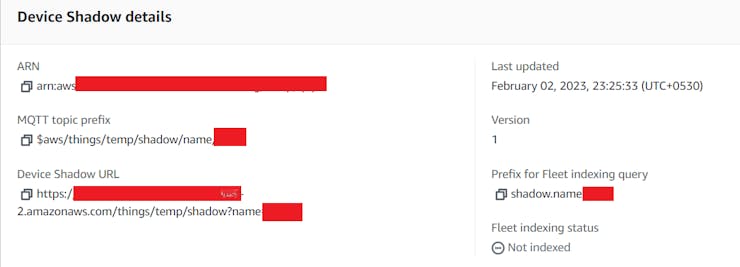
Visit the things dashboard and click on the device shadow we created. And copy the Device Shadow URL to a notepad.
Install the libraries - PubSubClient and WiFiClientSecure1. Provide the SSID and Password of the WiFi Hotspot, to connect it to internet enabled wifi.
2. Paste the 'Device shadow URL' on the 'mqtt_server' string.
3. Add the thingname and shadowname in the configuration. (preferably copy-paste from AWS IoT Core.Once we insert the initialization in the final code -
#include "SPIFFS.h"
#include <WiFiClientSecure.h>
#include <PubSubClient.h>
// Enter your Device Configuration
const char* ssid = " "; // Provide your SSID
const char* password = " "; // Provide Password
const char* mqtt_server = " "; // Replace with your MQTT END point
String thingname = " ";
String shadowname = " ";
const int mqtt_port = 8883;
String publish_topic = "$aws/things/"+thingname+"/shadow/name/"+shadowname+"/update";
String subscribe_topic = "$aws/things/"+thingname+"/shadow/name/"+shadowname+"/get/accepted";
String Read_rootca, Read_cert, Read_privatekey;
#define BUFFER_LEN 256
long lastMsg = 0;
char msg[BUFFER_LEN];
int Value = 0;
byte mac[6];
char mac_Id[18];
int count = 1;
WiFiClientSecure espClient;
PubSubClient client(espClient);
float temperature = 0;
float humidity = 0;
void setup_wifi() {
delay(10);
Serial.println();
Serial.print("Connecting to ");
Serial.println(ssid);
WiFi.begin(ssid, password);
while (WiFi.status() != WL_CONNECTED) {
digitalWrite(2, LOW);
delay(500);
Serial.print(".");
digitalWrite(2,HIGH);
}
randomSeed(micros());
Serial.println("");
Serial.println("WiFi connected");
Serial.println("IP address: ");
Serial.println(WiFi.localIP());
}
void callback(char* topic, byte* payload, unsigned int length) {
Serial.print("Message arrived [");
Serial.print(topic);
Serial.print("] ");
for (int i = 0; i < length; i++) {
Serial.print((char)payload[i]);
}
Serial.println();
}
void reconnect() {
// Loop until we're reconnected
while (!client.connected()) {
Serial.print("Attempting MQTT connection...");
// Create a random client ID
String clientId = "ESP32-";
clientId += String(random(0xffff), HEX);
// Attempt to connect
WiFi.mode(WIFI_STA);
if (client.connect(clientId.c_str())) {
Serial.println("connected");
// Once connected, publish an announcement...
client.publish(publish_topic.c_str(), "hello world");
// ... and resubscribe
client.subscribe(subscribe_topic.c_str());
} else {
Serial.print("failed, rc=");
Serial.print(client.state());
Serial.println(" try again in 5 seconds");
// Wait 5 seconds before retrying
delay(5000);
}
}
}
void setup() {
Serial.begin(115200);
// initialize digital pin LED_BUILTIN as an output.
pinMode(2, OUTPUT);
setup_wifi();
delay(1000);
//=============================================================
if (!SPIFFS.begin(true)) {
Serial.println("An Error has occurred while mounting SPIFFS");
return;
}
//=======================================
//Root CA File Reading.
File file2 = SPIFFS.open("/AmazonRootCA1.pem", "r");
if (!file2) {
Serial.println("Failed to open file for reading");
return;
}
//Serial.println("Root CA File Content:");
Serial.println("Root CA File Read");
while (file2.available()) {
Read_rootca = file2.readString();
//Serial.println(Read_rootca);
}
//=============================================
// Cert file reading
File file4 = SPIFFS.open("/device-certificate.pem.crt", "r");
if (!file4) {
Serial.println("Failed to open file for reading");
return;
}
//Serial.println("Cert File Content:");
Serial.println("Cert File Read");
while (file4.available()) {
Read_cert = file4.readString();
//Serial.println(Read_cert);
}
//=================================================
//Privatekey file reading
File file6 = SPIFFS.open("/device-private.pem.key", "r");
if (!file6) {
Serial.println("Failed to open file for reading");
return;
}
//Serial.println("privateKey File Content:");
Serial.println("privateKey File Read");
while (file6.available()) {
Read_privatekey = file6.readString();
//Serial.println(Read_privatekey);
}
//=====================================================
char* pRead_rootca;
pRead_rootca = (char *)malloc(sizeof(char) * (Read_rootca.length() + 1));
strcpy(pRead_rootca, Read_rootca.c_str());
char* pRead_cert;
pRead_cert = (char *)malloc(sizeof(char) * (Read_cert.length() + 1));
strcpy(pRead_cert, Read_cert.c_str());
char* pRead_privatekey;
pRead_privatekey = (char *)malloc(sizeof(char) * (Read_privatekey.length() + 1));
strcpy(pRead_privatekey, Read_privatekey.c_str());
espClient.setCACert(pRead_rootca);
espClient.setCertificate(pRead_cert);
espClient.setPrivateKey(pRead_privatekey);
client.setServer(mqtt_server, mqtt_port);
client.setCallback(callback);
delay(2000);
}
void loop() {
float h = random(25,30); // Reading Temperature
float t = random(70,80); // Reading Humidity
float tF = (t * 1.8) + 32;
if (!client.connected()) {
reconnect();
}
client.loop();
long now = millis();
if (now - lastMsg > 2000) {
lastMsg = now;
//=============================================================================================
String Temperature = String(t);
String Humidity = String(h);
snprintf (msg, BUFFER_LEN, "{\"state\":{\"reported\":{\"Temperature\":\"%s\",\"Moisture\":\"%s\"}, \"desired\":{\"Temperature\":\"30\",\"Moisture\":\"80\"}}}", Temperature.c_str(), Humidity.c_str());
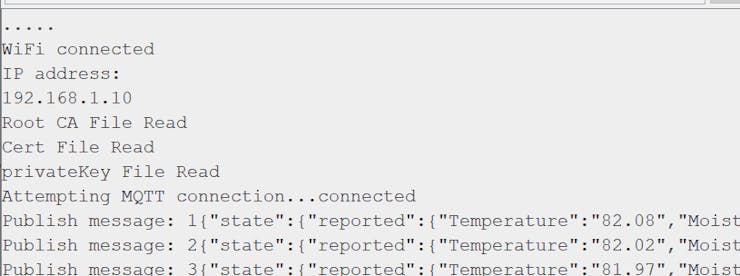
Serial.print("Publish message: ");
Serial.print(count);
Serial.println(msg);
client.publish(publish_topic.c_str(), msg);
count = count + 1;
//================================================================================================
}
}float h = random(25,30);
float t = random(70,80);
snprintf (msg, BUFFER_LEN, "{\"state\":{\"reported\":{\"Temperature\":\"%s\",\"Moisture\":\"%s\"}, \"desired\":{\"Temperature\":\"30\",\"Moisture\":\"80\"}}}", Temperature.c_str(), Humidity.c_str());snprintf (msg, BUFFER_LEN, "{\"state\":{\"reported\":{\"Data1\":\"%s\",\"Data2\":\"%s\"}, \"desired\":{\"Data1\":\"30\",\"Data2\":\"80\"}}}", data1.c_str(), data2.c_str());We are ready to Upload the code now!
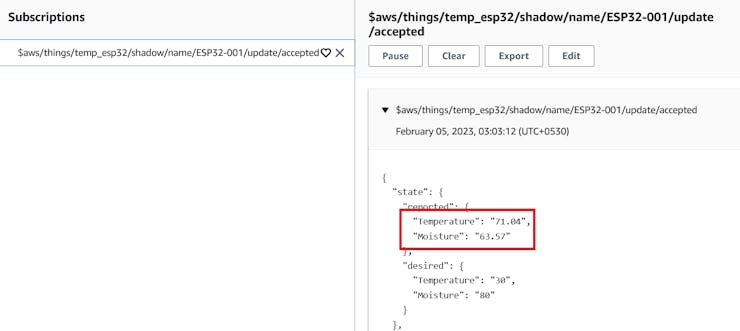
Monitor Data on IoT Core
After hardware configuration, it is necessary to know where to view this data, and how it can be used for a specific purpose. Let us know how to view the data -
Open Things > Select your Thing.Choose and open Device shadow > under MQTT Topics select the 'update/accepted' string with the 'Subscribe' action type.In the new window, while the device is running, it updates the data on Cloud as well.