
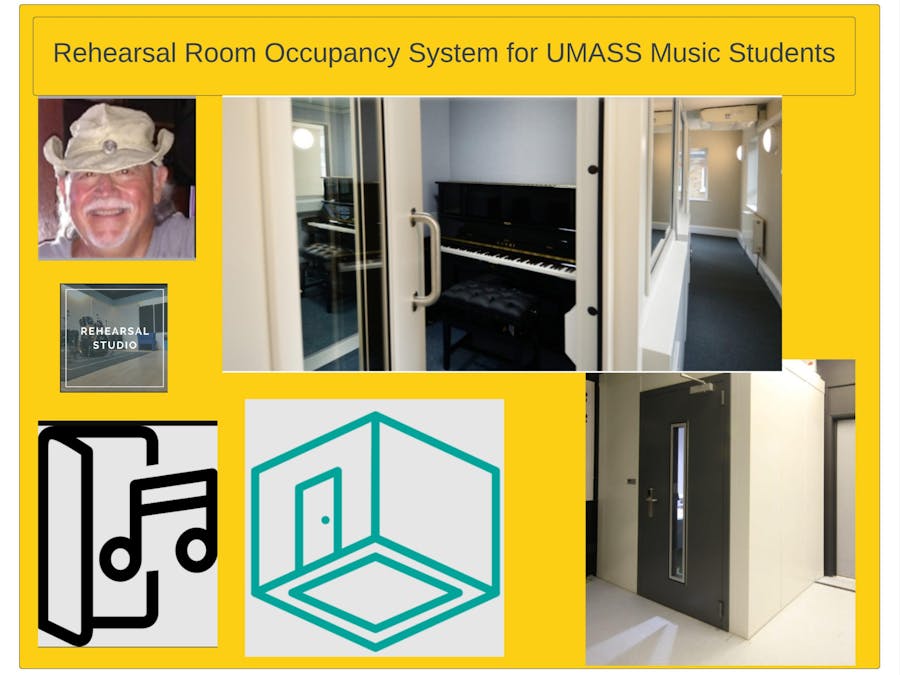
The aim of this project is to create a Rehearsal Room Occupancy System to solve the problem of scheduling conflicts for music students.
Things used in this project
Hardware components
Software apps and online services
Story
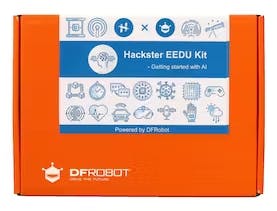
A project utilizing the Hackster EEDU Kit - Getting Started with AI,
The aim of this project is to create a Rehearsal Room Occupancy System to solve the problem of scheduling conflicts for music students at the University of Massachusetts in Amherst. The system will allow students to easily sign up for time in rehearsal rooms and provide real-time occupancy tracking to ensure that students are aware of available rooms.
The Rehearsal Room Occupancy System is an innovative solution designed to enhance the student experience at the University of Massachusetts in Amherst. By allowing students to easily sign up for time in rehearsal rooms and providing real-time occupancy tracking, the system streamlines the process and ensures that students have access to the necessary resources to pursue their musical studies.

I was awarded the Hackster EEDU Kit - Getting Started with AI, The kit contains a HuskyLens AI Vision sensor, a Firebeetle ESP32-E controller, an IO shield, a relay module, a DFPlayer Pro-A mini MP3 player, a speaker, and 10 packs of jumper wires. It is designed to help users jumpstart their AI projects.
At the heart of the system are the Firebeetle ESP32+ IO Shield and the HuskyLens.
The system will consist of an ESP32 board connected to the HuckyLens to recognize students. The board will communicate with the Arduino Cloud to provide real-time occupancy data that will be displayed on a screen. the relay will be used to unlock the rehearsal room door. And the DFPlay+MP3 Speaker, will be used to welcome the student Additionally, if time permits, the system will be integrated with a web application that will display real-time room availability and allow students to reserve time slots in the rehearsal rooms. The system will also track occupancy and provide alerts when the rooms are full, preventing students from reserving a room that is already occupied.
The main features of this system include real-time occupancy tracking, a web application for reservations, and alerts for full rooms.
The University of Massachusetts Amherst is the school where the system will be implemented, and the project is a proof of concept design and implementation using the contents of the EEDU AI kit.
I am presently a retired senior software engineer with a background in computer science I have extensive experience with embedded systems, firmware development environments, and open-source embedded development tools, along with knowledge of various programming languages and communication protocols.
I received the EEDU AI Kit on April 14, 2023. There is a great unboxing video by Alex, that really describes the kit. The AI kit start at timestamp: 3:40
Follow the following project
Getting Started with Hackster EEDU Kits & Arduino IoT Cloud
Experiment with the kit components;
I read through the Getting Started Guidewhich shows how to develop with ESP32 / ESP8266 development board and the Arduino Cloud. I tried 2 of the projects that pertain to my design. Number 1. Face Recognition Switch and Number 4 VOC Index Monitoring

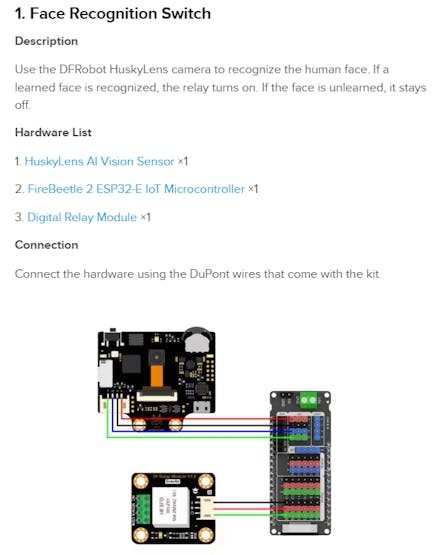
Face Recognition Switch
Experiment with the Face Recognition Switch project, which uses the DFRobot HuskyLens camera to recognize the human face. If a learned face is recognized, the relay turns on. If the face is unlearned, it stays off. The project is an excellent example demonstrating how to wire the HuskeyLens to the IO Shield and program the ESP-32 on the Arduino. This is the project of the three which uses the components in the AI kit.
Face Recognition Switch project Results:
Connect all components, get example code to my cloud account, Build and program firmware to the ESP32 board.Run and Display example running.
VOC Index Monitoring
I used this project on the page to figure out how to wire the ESP32 to the DFPlayer Pro. There was a little more than I needed here, but it is a good example of how to wire the module and program the DFPlayer to trigger, MP3 files.
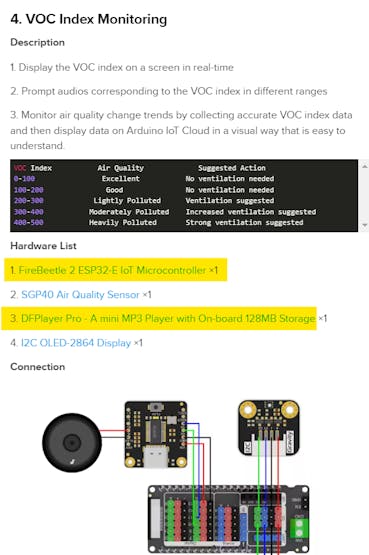
I had to solder the headers onto the DFPlayer and mount it on a Breadboard to make the connections to the ESP32 Shield. I used the following wire diagram in the example to connect the DFPlayer.

RED WIRE - DFPplayer VIN Pin to Shield + Pin
BLK WIRE - DFPlayer GND Pin Shield - Pin
GREEN WIRE - DFPlayer RX Pin Shield D10 Pin
BLUE WIRE - DFPlayer TX Pin Shield D11 Pin
After wiring these I used the code in the example to play a MP3 file.
The code is TEST-DFPlayer
Using the HuskeyLens with Edge Impulse
I decided to try and use EDGE Impulse platform to build a dataset and deploy ML to use the Huskylens to learn the ID card and Face recognition..Hopefully this section will qualify for a chance at the "Best Use of AI Award - Sponsored by Edge Impulse"
I researched how to use Huskeylens With Edge impulse and these are the steps I followed.
Set up HuskyLens: Make sure you have properly set up and connected your HuskyLens device. You can refer to the HuskyLens documentation for instructions on how to connect it to your computer or microcontroller. Create an Edge Impulse account: Go to the Edge Impulse website (https://www.edgeimpulse.com/) and create a new account if you don't have one already. Edge Impulse is a platform for building machine learning models for edge devices. Create a project: Once you're logged in to your Edge Impulse account, create a new project by clicking on "Create a new project." Give your project a name and proceed to the next step.Collect training data: In the Edge Impulse studio, you need to collect training data for your machine learning model. You can use the HuskyLens to capture images and label them accordingly. For example, if you want to detect different objects, capture images of those objects and assign appropriate label Upload and label the data: Upload the training images to Edge Impulse and assign the corresponding labels. This step helps the system understand the patterns and train a model based on the provided data. Train the model: Once you have uploaded and labeled your training data, proceed to train the model. Edge Impulse provides various machine learning algorithms and options to train your model. Select the appropriate settings and start the training process. Evaluate and test the model: After the training is complete, evaluate the performance of your model using the provided metrics and tools. You can also test the model with new images to see how well it performs. Export the model: Once you are satisfied with the model's performance, export the model from Edge Impulse. You will receive a file or files containing the trained model that can be used with your HuskyLens. Implement the model on HuskyLens: Take the exported model and follow the instructions provided by HuskyLens on how to integrate custom machine learning models. This typically involves uploading the model to the device and configuring it to use the model for inference.Deploy and use the model: With the model integrated into HuskyLens, you can now deploy it and use it for real-time object detection or any other tasks you trained it for. The specifics of deploying and utilizing the model will depend on the capabilities and APIs provided by HuskyLens.To implement the model on HuskyLens, you'll need to follow the device-specific instructions provided by the HuskyLens documentation. Here's a general outline of the steps you may need to follow:
Prepare the model: Ensure that you have the model file exported from Edge Impulse in a compatible format. HuskyLens typically supports models in formats like TensorFlow Lite (.tflite) or ONNX (.onnx). Check the HuskyLens documentation to confirm the supported model formats. Connect HuskyLens to your computer: Connect your HuskyLens device to your computer using the appropriate interface, such as USB or Wi-Fi, as specified by the device's documentation. Ensure that the device is powered on and recognized by your computer. Access the HuskyLens interface: Open the HuskyLens graphical user interface (GUI) or use the command-line interface (CLI) provided by the device. The interface allows you to configure and manage the device's settings, including deploying custom models Upload the model: Using the HuskyLens interface, locate the option to upload or deploy a custom model. This may be in the form of a button or a command. Follow the instructions provided by HuskyLens to upload the model file you exported from Edge Impuls Configure the model settings: Once the model is uploaded, you may need to configure additional settings, such as input/output dimensions, preprocessing options, or any specific requirements of the HuskyLens device. Refer to the HuskyLens documentation for guidance on configuring the mStart the model deployment: After the model and settings are configured, initiate the deployment process through the HuskyLens interface. This step will activate the model and enable it to perform inference on the input data it receives. Test the model: With the model deployed on HuskyLens, you can now test its performance. Use the device's camera or input sensors to capture images or input data, and observe the model's output or predictions. Ensure that the results align with your expectations and meet the desired accuracy.
PROJECT: Rehearsal Room Occupancy System
Design
System Diagram
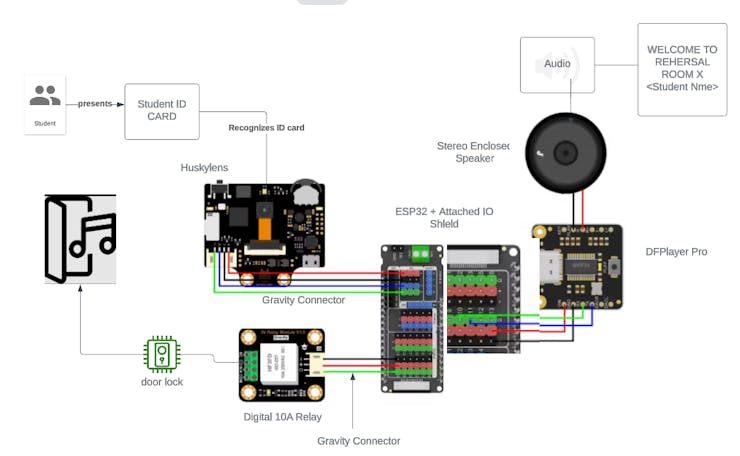
This section includes a design diagram of the Rehearsal Room Occupancy System. The diagram depicts the kit components wiring and the action and reactions when a music student presents there Student ID to the HuskeyLens camera.
Functional Design Specification
When a music student presents there Student ID to the HuskeyLens camera, the ID is processed using the object recognition logic in the husky lens. Results of the Scan are sent to the ESP32 for processing. The data is sent over the Gravity connector supplied. The ESP32 processes the data by selecting conditions based on the ID card. Valid Card Condition: If the Id card is recognized as a valid college Id card then the picture on the card is processed by using Face Recognition on the HuskeyLens.. If the Picture is recognized as a valid Music student, then the esp32 will unlock the rehearsal room door and welcome the student to the room by using audio from the MP3 player over the attached speaker. Invalid Card Conditions: There are several conditions that indicate an invalid ID card.: A invalid Colleges ID, A valid ID but the student is not a music major, the ID card is not recognized as a ID card at all. For these conditions the Door does not unlock and the audio from the speaker, gives the reason for not allowing access.
Technical specification
The HuskeyLens is programmed to recognize Valid or invalid ID cards. The HuskeyLens is trained to recoginize A valid college id and r The ESP32 is programmed to handle several conditions sent from the HuskeyLens.Based on a valid ID card (Valid College ID card and the Student is a Music major) the Really is sent a command to switch the door lock Also based on the condition results of the scan the DFPlayer is sent the proper MP3 file to play over the speaker.
Implementation
Testing
For the testing I created 2 sketches based on the 2 example above I also tested the training of the ID cards.
The CODE
NAME: Test-ID-Recognition - example code
This code was used to test the Huskeylens and was taken from "Face Recognition Switch" example described above. It can be found in the code section on this page.
NAME: Test-DFPlayer-Messages - example code.
This was used to test the DFPlayer and was used to test the connections mentioned above in the "VOC Index Monitoring"
Running the system
For the final sketch, I combined the two test into one sketch.
The CODE
NAME: RehearsalRoomOccupancy
Project Conclusions
What did I learn from this experience?
I did learn a lot from this experience. I was able to experiment with AI Face and Object recognition, ESP32 using the Arduino Cloud, DFRobot Gravity connectors, ESP32 I/O Shield, and the DFPlayer.
What Problems did I face implementing the project?
I had a little trouble connecting the FireBeetle ESP32-e to the Arduino Cloud. I have extensive experience using it with Arduino Boards. I had trouble getting the correct board definition. I could not program the firmware onto the board. I was getting the following error pictured below.
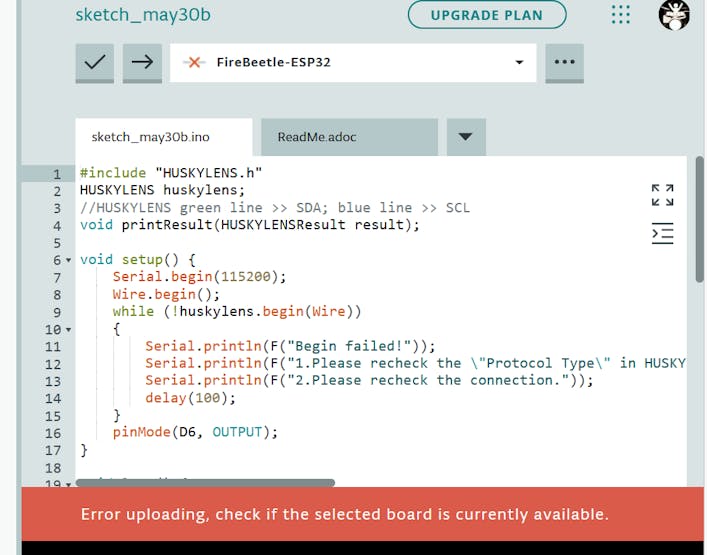
I was able to get help from the community and resolved my issue.
Possible Future Enhancement
List other functionality that could be added to make the system better.
Originally I mentioned a database and a web interface to schedule rooms. This functionality was not designed into the present system due to time constraints. This would make sense for the next iteration of the system.
OTHER Resources
1.Gravity: Huskylens - An Easy-to-use AI Camera Vision Sensor WikiPage
Projects:1. AI Projects made simple by Huskylens2. DIY Line Tracking Robot with Huskylens and Romeo3. Easy Machine Learning on Arduino/Raspberry Pi with HuskyLens!4. DIY Amazing Object Tracking Robot using Huskylens5. Can a $4 Raspberry Pi Pico Run an AI Project?
2.FireBeetle 2 ESP32-E IoT Microcontroller with Header (Supports Wi-Fi & Bluetooth) WikiPage
Projects:1. Make a Home-made Network Clock with ESP32-E2. DIY 3D Printed IoT Weather Station Using an ESP32
3.Gravity: IO Shield for FireBeetle 2 (ESP32-E/M0) WikiPage
4.Fermion: DFPlayer Pro - A mini MP3 Player with On-board 128MB Storage) WikiPage
5.Stereo Enclosed Speaker - 3W 8Ω Product Webpage
6.Gravity: Digital 10A Relay Module WikiPage
Code
Test_ID_Recognition.ino
Arduino
#include "HUSKYLENS.h"
HUSKYLENS huskylens;
//HUSKYLENS green line >> SDA; blue line >> SCL
void printResult(HUSKYLENSResult result);

void setup() {
    Serial.begin(115200);
    Wire.begin();
    while (!huskylens.begin(Wire))
    {
        Serial.println(F("Begin failed!"));
        Serial.println(F("1.Please recheck the \"Protocol Type\" in HUSKYLENS (General Settings>>Protocol Type>>I2C)"));
        Serial.println(F("2.Please recheck the connection."));
        delay(100);
    }
    pinMode(D6, OUTPUT);
}

void loop() {
    if (!huskylens.request()) Serial.println(F("Fail to request data from HUSKYLENS, recheck the connection!"));
    else if(!huskylens.isLearned()) Serial.println(F("Nothing learned, press learn button on HUSKYLENS to learn one!"));
    else if(!huskylens.available()) Serial.println(F("No block or arrow appears on the screen!"));
    else
    {
        Serial.println(F("###########"));
        while (huskylens.available())
        {
            HUSKYLENSResult result = huskylens.read();
            printResult(result);
        }
    }
}

void printResult(HUSKYLENSResult result){
    if (result.command == COMMAND_RETURN_BLOCK){
        Serial.println(String()+F("Block:xCenter=")+result.xCenter+F(",yCenter=")+result.yCenter+F(",width=")+result.width+F(",height=")+result.height+F(",ID=")+result.ID);
       if(result.ID==1){
         digitalWrite(D6, HIGH);
         delay(2000);
         digitalWrite(D6, LOW);
        }
    }
}
Test-DFPlayer-Messages.ino
Arduino
#include <SoftwareSerial.h>
#include "HUSKYLENS.h"
#include <DFRobot_DF1201S.h>

HUSKYLENS huskylens;
//SoftwareSerial PSerial(25, 26);
DFRobot_DF1201S DF1201S;

float PERSON, LABCOAT;

void printResult(HUSKYLENSResult result);

//HUSKYLENS green line >> Pin 10; blue line >> Pin 11
//DF1201S TX,RX——> ESP32-E TX,RX
void setup() {
  Serial.begin(115200);
      while(!DF1201S.begin(Serial))
    {
      Serial.println("Init failed, please check the wire connection!");
      delay(1000);
    }
    DF1201S.setVol(20);
      Serial.print("VOL:");
  /*Get volume*/
  Serial.println(DF1201S.getVol());
  /*Enter music mode*/
  DF1201S.switchFunction(DF1201S.MUSIC);
  /*Wait for the end of the prompt tone */
  delay(2000);
  /*Set playback mode to "repeat all"*/
  DF1201S.setPlayMode(DF1201S.ALLCYCLE);
  Serial.print("PlayMode:");
  /*Get playback mode*/
  Serial.println(DF1201S.getPlayMode());

  Wire.begin();
  while (!huskylens.begin(Wire))
  {
    Serial.println(F("Begin failed!"));
    Serial.println(F("1.Please recheck the \"Protocol Type\" in HUSKYLENS (General Settings>>Protocol Type>>I2C)"));
    Serial.println(F("2.Please recheck the connection."));
    delay(100);
  }
    //PSerial.begin(9600);


}
void loop()
{
     if (!huskylens.request()) Serial.println(F("Fail to request data from HUSKYLENS, recheck the connection!"));
    else if(!huskylens.isLearned()) Serial.println(F("Nothing learned, press learn button on HUSKYLENS to learn one!"));
    else if(!huskylens.available()) Serial.println(F("No block or arrow appears on the screen!"));
    else
    {
        Serial.println(F("###########"));
        while (huskylens.available())
        {
            HUSKYLENSResult result = huskylens.read();
            printResult(result);
        }
    }

    Serial.println("Start playing");
  /*Start playing*/
  DF1201S.start();
  delay(3000);
  }


void printResult(HUSKYLENSResult result){
    if (result.command == COMMAND_RETURN_BLOCK){
        Serial.println(String()+F("Block:xCenter=")+result.xCenter+F(",yCenter=")+result.yCenter+F(",width=")+result.width+F(",height=")+result.height+F(",ID=")+result.ID);
    }
    else if (result.command == COMMAND_RETURN_ARROW){
        Serial.println(String()+F("Arrow:xOrigin=")+result.xOrigin+F(",yOrigin=")+result.yOrigin+F(",xTarget=")+result.xTarget+F(",yTarget=")+result.yTarget+F(",ID=")+result.ID);
    }
    else{
        Serial.println("Object unknown!");
    }
}
The article was first published in hackster, April 16, 2023
cr: https://www.hackster.io/skruglewicz/rehearsal-room-occupancy-system-for-umass-music-students-9dfb15
author: skruglewicz


