
This project aims to build a system that allows you to know the situation of the seats on the regional train in real-time!
Things used in this project
Hardware components
Software apps and online services
The Things Network [https://www.hackster.io/the-things-network/products/the-things-network?ref=project-525f37]
Google Angular
Ionic Framework
Story
Useful Links
We are Alessandro Giannetti, Andrea Napoletani and Stefano Milani, students of the Master Course of Engineering in Computer Science at "La Sapienza" The University of Rome.
Here you can find further information about us and our project:
Linkedin profiles: Alessandro Giannetti, Andrea Napoletani, Stefano Milani GitHub organization page: https://github.com/findyourseat GitHub project page: https://github.com/findyourseat/find-your-seat Idea presentation: https://www.slideshare.net/AndreaNapoletani/find-your-seat-idea Project overview presentation: https://www.slideshare.net/AndreaNapoletani/find-your-seat
Our Idea
What is Find Your Seat? It wants to be a useful tool able to help passengers of regional trains to easily find their seats using their smartphones!
Starting from real life need...
Every day, in Italy, millions of people use regional trains to go to work/university and to come back to their home. This kind of trains doesn't allow you to book a single seat on it, you just have to buy a ticket for your destination and take the train.
Given the fact that lots of people use this service every day, a free seat is not always available for all the passengers and some of them must stay standing for all the duration of the ride, especially in the rush hours.
... to help passengers
From this born Find Your Seat project. It represents a full solution including two main parts: one technical implementation part and the other client-side with an Android/IOS application.
What you can do with our application?
find one (or more) free seats on the train; find the right position on the train platform according to the availability of the seats; find your perfect seat according to the temperature of the wagon.
Project overview

Like we introduce in the previous paragraph, the project is divided into two main parts:
the first part includes all the technical details used to implement the system. Starting from the hardware used on the train (to recognize if a seat is free or not) to the software services used to manage messages from the sensors; the second part includes the details for the implementation of the application, both for Android and IOS, developed to allow the user to use the system.
Hardware/software components
Before starting describing all the steps to configure our system we must have an introduction on which are the hardware devices/technologies that we are going to use and how they work.
RP-S40-STForce sensor
This is a square flexible thin film pressure sensor of short legs with a side length of 40mm, which can be used to realize highly sensitive detection of pressure. The sensor is durable and designed to sense static and dynamic pressure in high response speed. Its advantages of recording the intensity and frequency of force make it widely used in all kinds of applications, such as pressure switch, bed monitoring system, intelligent sneaker and medical device system. These sensors are also very easy to use.
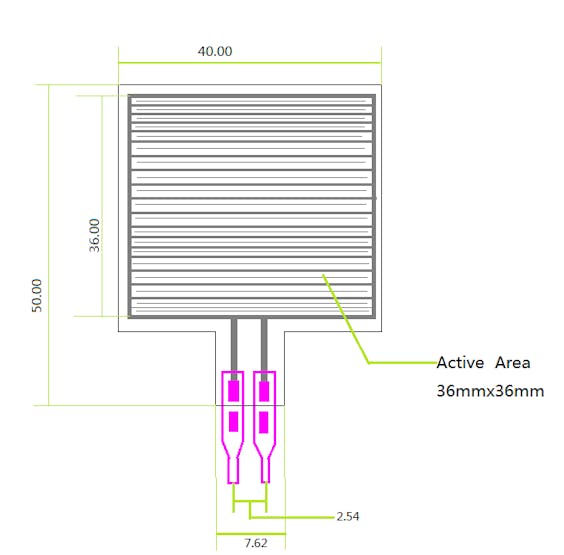
Force Square sensor schema
RP-S40-ST flexible pressure sensor is made of an ultra-thin film of excellent mechanical property, excellent conductive materials and nanometre pressure sensitive layers. There are a thin film and pressure sensitive layer on the upper layer of the sensor, and thin film and conductive circuit on the lower layer. These two layers are glued together by double-sided tape. When outside pressure applies to the active area, the disconnected circuit of the lower layer will be connected through the pressure sensitive layer of the upper layer, by which to convert pressure into resistance. The output resistance decreases as pressure increases. (More info)
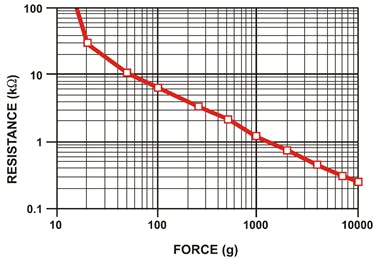
Resistance - Force graph
NTCThermistor
NTC stands for “Negative Temperature Coefficient”. NTC thermistors are resistors with a negative temperature coefficient, which means that the resistance decreases with increasing temperature. They are primarily used as resistive temperature sensors and current-limiting devices. The temperature sensitivity coefficient is about five times greater than that of silicon temperature sensors (silistors) and about ten times greater than those of resistance temperature detectors (RTDs). NTC sensors are typically used in a range from −55°C to 200°C.
The temperature sensitivity of an NTC sensor is expressed as “percentage change per degree C”. Depending on the materials used and the specifics of the production process, the typical values of temperature sensitivities range from -3% to -6% per °C. (More info)
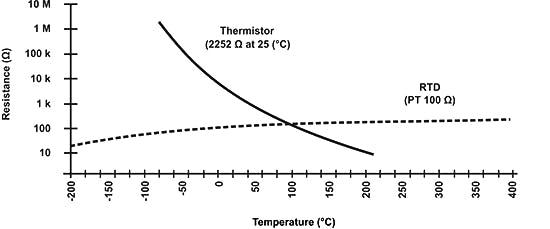
Temperature sensor schema
Compared to RTDs, the NTCs have a smaller size, faster response, greater resistance to shock and vibration at a lower cost. They are slightly less precise than RTDs. When compared to thermocouples, the precision obtained from both is similar; however, thermocouples can withstand very high temperatures (in the order of 600°C) and are used in such applications instead of NTC thermistors, where they are sometimes referred to as pyrometers. Even so, NTC thermistors provide greater sensitivity, stability and accuracy than thermocouples at lower temperatures and are used with less additional circuitry and therefore at a lower total cost. The cost is additionally lowered by the lack of need for signal conditioning circuits (amplifiers, level translators, etc.) that are often needed when dealing with RTDs and always needed for thermocouples.
B-L072Z-LRWAN1 Kit Discovery-LoRa
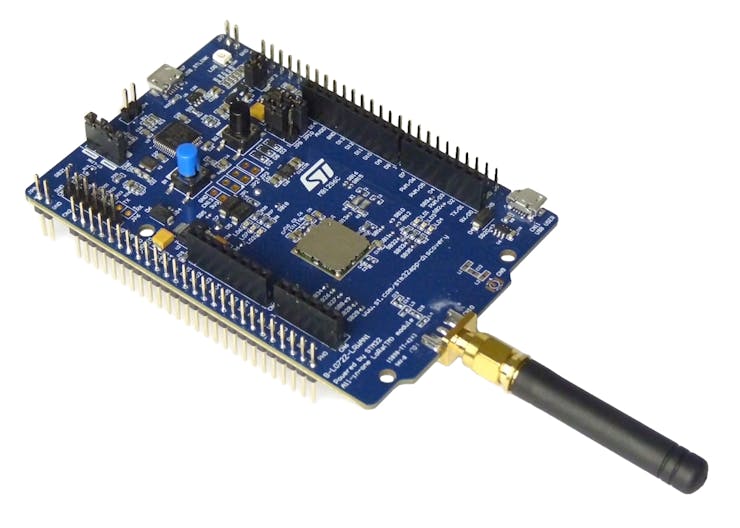
B-L072Z-LRWAN1 board
The B-L072Z-LRWAN1 from STMicroelectronics is a low power wireless STM32L0 LoRa discovery kit. This kit for LoRaWAN and LPWAN protocols with STM32L0. It is a development tool to learn and develop solutions based on LoRa and FSK/OOK technologies. It features an all-in-one open module CMWX1ZZABZ-091 (by Murata). The module is powered by an STM32L072CZ and an SX1276 transceiver. The transceiver features the LoRa long-range modem, providing ultra long range spread spectrum communication and high interference immunity, minimizing current consumption. Since CMWX1ZZABZ-091 is an open module, the user has access to all STM32L072 peripherals such as ADC, 16bit timer, LP-UART, I2C, SPI and USB 2.0 FS (supporting BCD and LPM). It also features an onboard ST-LINK/V2-1 supporting USB re-enumeration capability, USB ST-LINK functions, through USB bus or external VIN /3.3V supply voltage or batteries, 3xAAA-type-battery holder for standalone operation. The LoRaWAN stack is certified class A and C compliant. (More info)
LG01-S IoT Gateway featuring LoRa technology
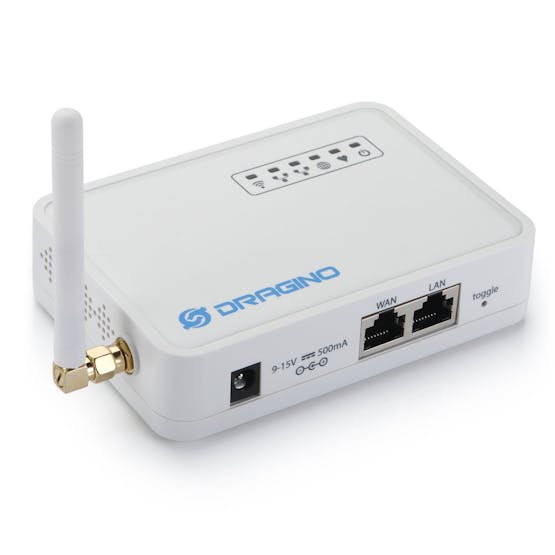
LG01-S gateway
The LG01-S is an open source single channel LoRa Gateway. It lets you bridge LoRa wireless network to an IP network via WiFi, Ethernet, 3G or 4G cellular. The LoRa wireless allows users to send data and reach extremely long ranges at low data-rates. It provides ultra-long range spread spectrum communication and high interference immunity.
LG01-S has WiFi interface, Ethernet port and USB host port. These Interfaces provide flexible methods for users to connect their sensor networks to the Internet.
LG01-S runs Open Source OpenWrt system, the user is free to modify the source file or compile the system to support their customized applications. (More info) [https://www.dragino.com/products/lora/item/119-lg01-s.html]
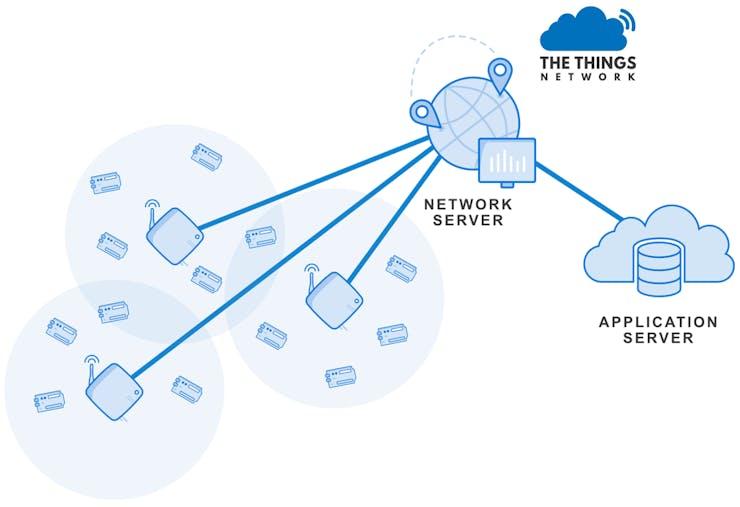
The Things Network
The Things Network is about enabling low power Devices to use long-range Gateways to connect to an open-source, decentralized Network to exchange data with Applications. (More info)
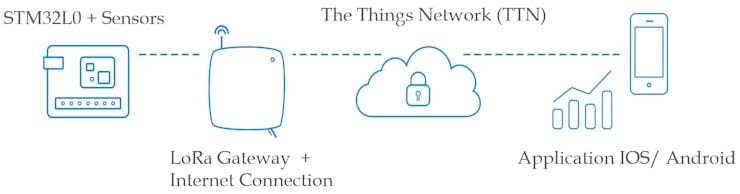
The Things Network supports LoRaWAN for long range (5 to 15 km), low power (months to years on battery), but also low bandwidth (51 bytes/message) communication.
Part 1: Train and network setup
In this first part we are going to show how to setup the system:
force and temperature sensor details; connect the sensors to the board;
cover the entire train with sensors; send data from sensors to LoRa gateway and store it on The Things Network (TTN).
1.1: Force sensor to recognize seat availability and temperature sensor
RP-S40-STForce sensor
In order to recognize if a seat is available or not we have decided to insert the RP-S40-ST Force sensor under the seat. Each seat of the train will have a force sensor. This sensor has a threshold of 6.3 Kg (not extremely precise) that, once passed, it considers the seat occupied.
From the technical point of view, the sensor works on the resistance generated on it. Every 5 seconds it scans the value of the resistance on it and sends a JSON format message to the relative gateway. This message is composed of two fields: the seat_id that uniquely identifies the seat of the wagon, and the free binary field: 1 if the seat is available, 0 otherwise.
Sensor Threshold
Temperature sensor
Another functionality of our project provides the possibility to see the temperature of the train coach in order to choose the best seat according to it. To do that we decided to use an NTC thermistor.
Differently, from the force sensors, we use just one temperature sensor for each coach that is connected with a board, every 5 seconds the sensor will send the detected temperature to the LoRa network.
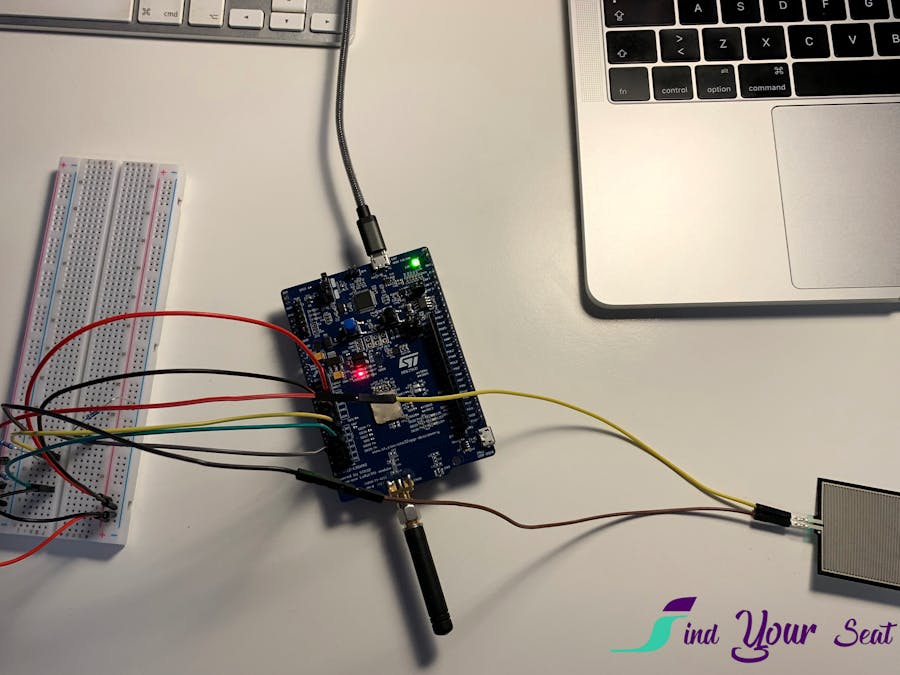
1.2: Connect sensors to B-L072Z-LRWAN1 board
RP-S40-STForce sensor
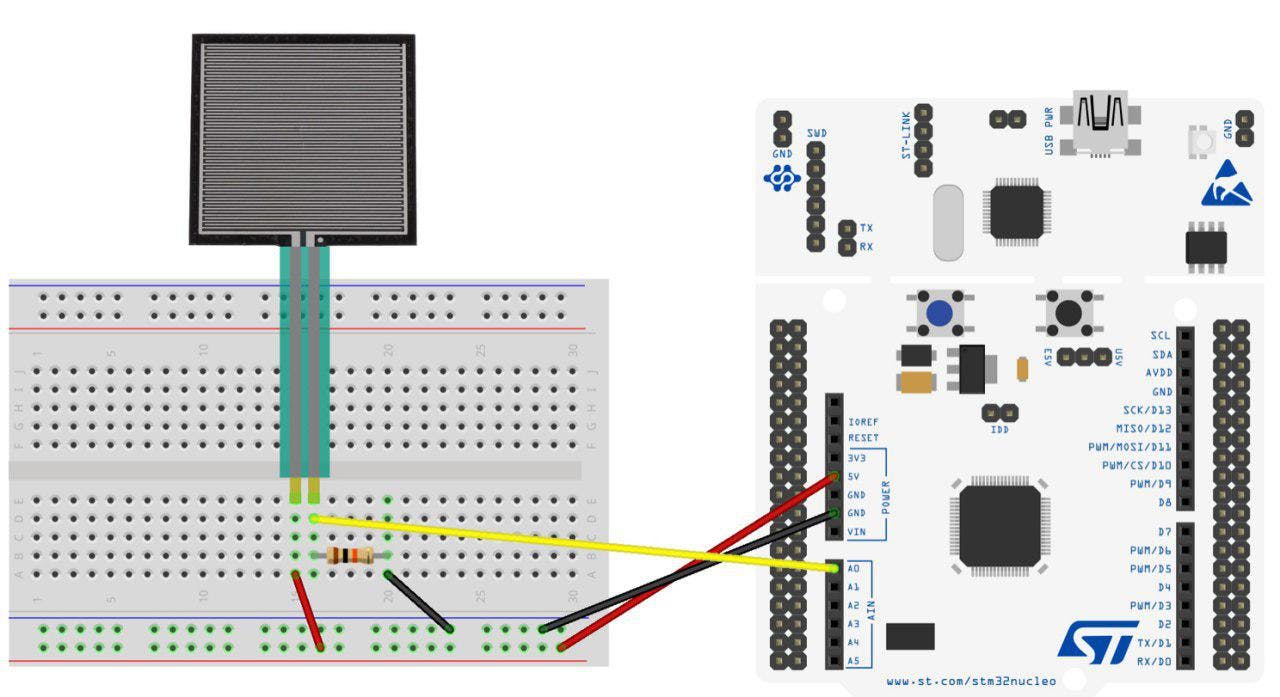
In order to send messages about the availability of the seat, each sensor must be connected to a B-L072Z-LRWAN1 board. The schema of the connection is the following:
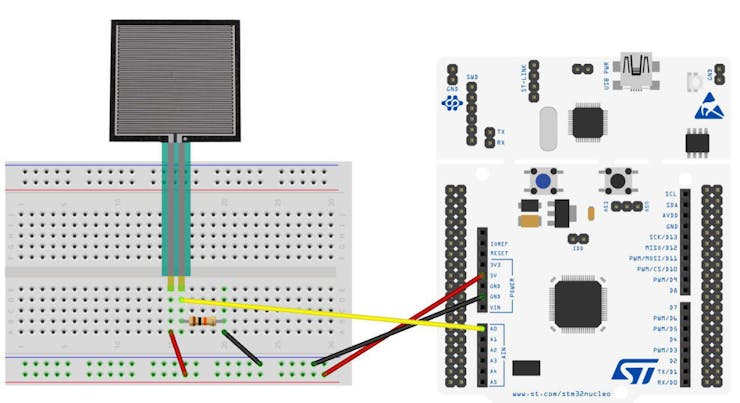
Connection schema
The board provides supply to the sensor, particular attention must be given to the 10 kΩ resistor that is fundamental for the circuit to not break the sensor due to the power supply.
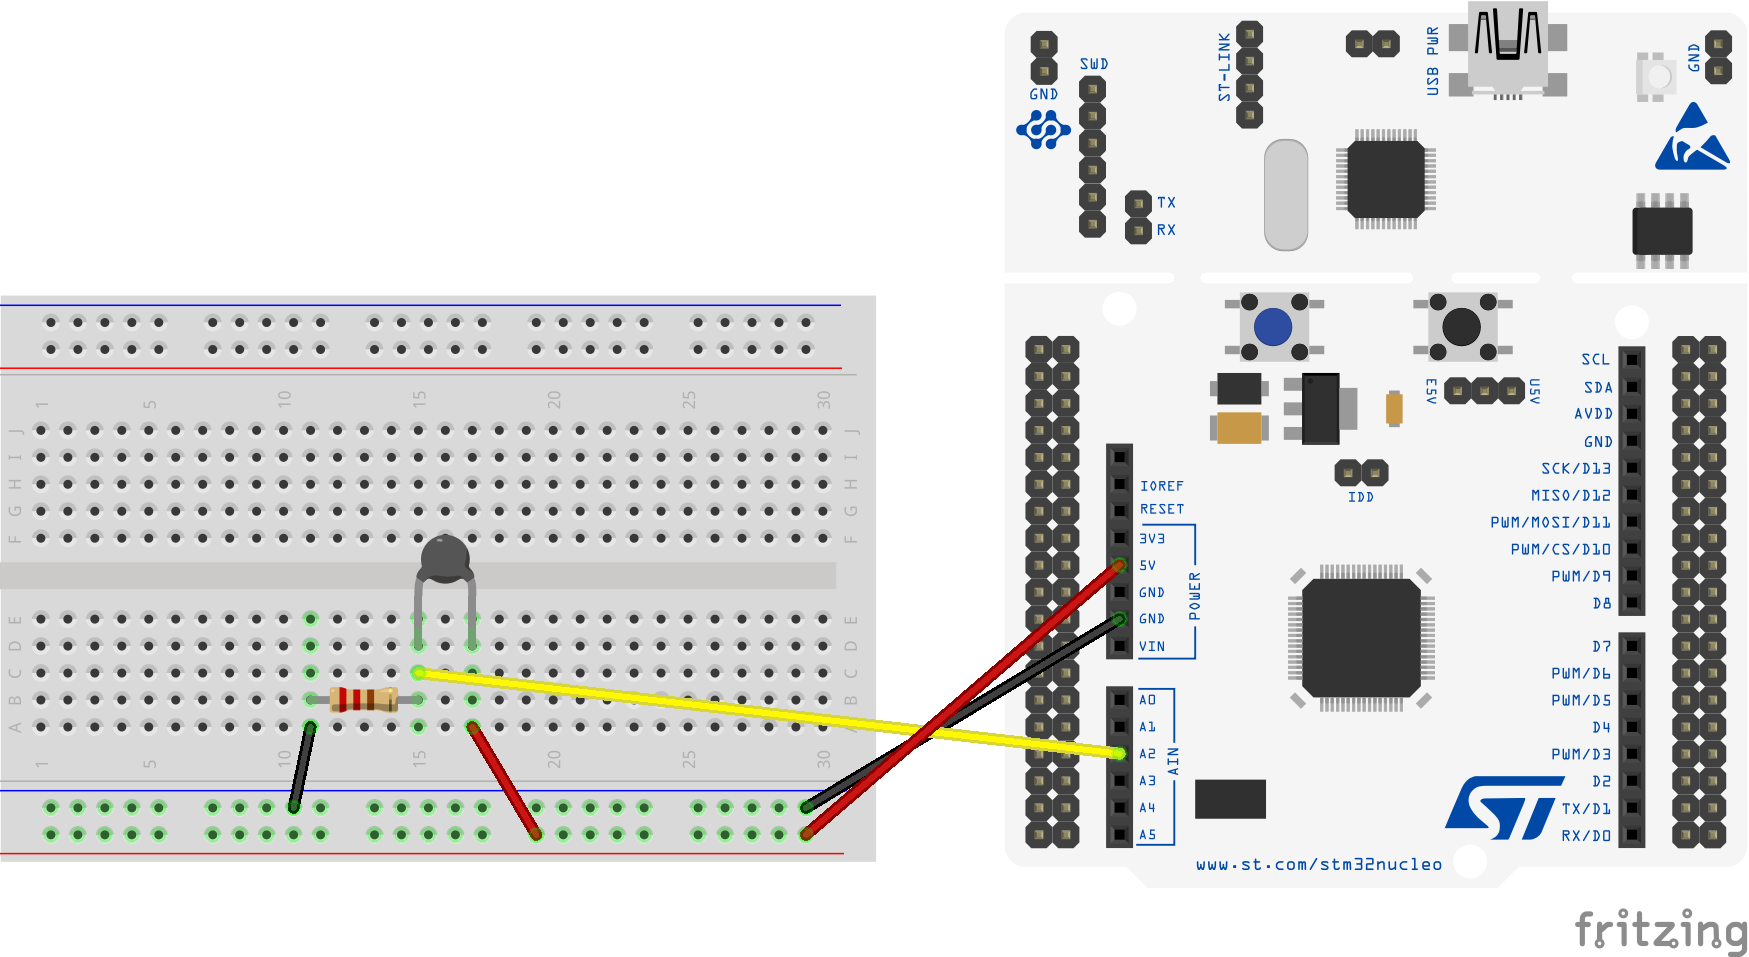
Temperature sensor
The schema of the connection of the NTC thermistor to the B-L072Z-LRWAN1 board is shown below:
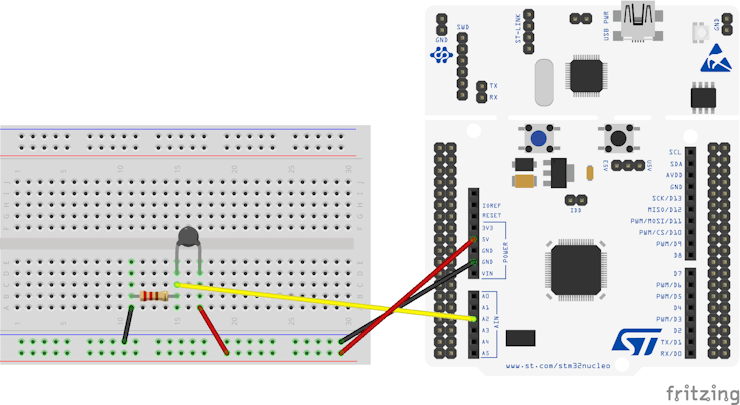
Connection schema
Even for this sensor the importance of the resistor is crucial to not damage components. In this case we use a 10 kΩ resistor.
1.3: Train coverage with sensors
In order to cover all the seats of the train with force sensors, we must use more than one board. In particular, we have decided to equip each train coach with a single board that will be able to receive messages coming from all the seats (and from the temperature sensor) and send it to LoRa network.
Train Coverage
The story
Connection of more sensors to a single B-L072Z-LRWAN1 board
A particular focus must be done on two aspects:
the connection management of more sensors on a single board; how to distinguish messages from different carriages.
Given that we want to use one STM board for each coach, we need to connect to it more or less 50 force sensors. Obviously, the board doesn't provide so much analogue pins, so it is necessary to use something that permits to extend the number of them. Therefore we think to use a multiplexer, for example, the Arduino Playground - 4051, that allows extending one analogue pin to 8.
What about energy consumption? Given the fact that all the component are supplied by train energy, the energy consumption doesn't represent a problem for our project.
We choose this setup because it is scalable and simple to manage. Each board identifies a single wagon of a specific train, and each force sensor attached to this board identifies a single seat in a specific wagon of a specific train.
1.4: Send sensors data to LoRa network and store it to TTN
The sketch we devolop is based on the mbed-os-example-lorawan, that use the Mbed-OS LoRaWAN protocol APIs. These APIs provide obviously a method to send messages over LoRa network. In this method, we can specify the port number in a range from 0 to 224. The port numbers 0 and 224 are reserved, so basically we have 223 port numbers on which we can send messages.
We want to send the value retrieved by a sensor on a specific port, in that way we can assign each sensor of a board to one and only one port number.
With this approach we identifies a coach of a train with the device_id provided by The Thing Network, and finally a specific seat on this wagon by the port number where we send the message over LoRa.
Send data to TTN
1.5: Route network coverage
In order to cover the entire route of a train with the LoRa network, we decide to adopt a particular strategy that allows us to save money and energy for the project. Cover the entire route with LoRa gateways would be expensive and useless for our goal, for this reason, we decide to put one LoRa gateway for each station.
These gateways can cover up to 15 km from the point where they are situated, it means that each time a train is arriving at the station the boards inside it start sending messages at least 2/3 km before it arrives. It allows the user to know with a reasonable advance the availability of the seats on the incoming train.
This advance depends from several factors like the range of the gateways (that depends on the characteristics of the surrounding landscape) and the time-response of the components (sensors, boards) that strictly depend on their quality.
Route Coverage
LG01-S IoT Gateway
We have used this gateway for our testing of the project. All the information about the configuration of this device and how to connect to The Things Network are available here [https://wiki.dragino.com/index.php?title=Connect_to_TTN].
Obviously, this is not the only one LoRa gateway that can be used for this project. More powerful gateways can be used in each station in order to extend the network range and to improve the time-response.
Part 2: Application Development
We develop a mobile application using Ionic, a Cross-Platform mobile app development. This tool is based on Angular a powerful framework for developing a web application for desktop and mobile, in that way, with a single code we can develop mobile application both for iOS and Android.

Ionic offers a vast library of User Interface components, compatible with Material Style (Android) and iOS, automatically rendered depending on which devices you are using.
To get started with these two technologies we recommend the officials tutorials, in this order:
Angular installation and getting startedAngular tutorialIonic introduction and installation
Three demo layouts of trains are available in our mobile application. The first layout is the working demo of our app, and it is composed of 4 seats. Two of them change dynamically according to the data sent to The Thing Network by the board.
The other layouts don't change dynamically, cause we haven't access to a train to make it possible, and they represent the trains with one and two floors.
So, the only things we need is a database that offers APIs to get the data that it store. We can use an integration offered by The Thing Network, called Data Storage. It permits to store all the data arrived on our application on TTN for seven days, and it offers simple APIs to retrieve the data.
2.1 Create the application on TTN
To create an application on The Things Network you need an account, so sign up!
![]()
Then go to Console, in the right-top corner, open the menu and click console. Select Application, and then "add application" button. Choose the Application ID and the Description. Leave the Application EUI as it is, and if you are in Europe leave the Handler registration on 'ttn-handler-eu'. Click on Add Application, you will be redirected on the application overview page. Here you can find (at the bottom of the page) the access key, needed to authenticate us and to use the Data Storage integration.
To create a device go to the device page and click on 'register device'. Then insert the Device ID (unique for the specific application), allow ttn to generate the device EUI for you and leave the other fields as they are. Then click 'Register'. Now you have the device, the activation method is set to OTAA, but we ABP that is compatible with our gateway. Go to Setting, scroll down until activation methods and select ABP. The Thing Network will generate the keys for you. Another useful step before saving the changes is to disable 'Frame Counter Checks', then click 'Save'.
Finally, we add the Data Storage integration. Click on the name of your application on the top of the screen, then navigate to 'Integrations'. Click 'add integrations' and select Data Storage. Now click 'Add integration' to complete the process.
If you want to click on 'go to platform' to play with the APIs that provide. Remember to make it work you need to insert the access key (you can find it on the overview page of the application) in the alert that appears when you click on 'Authorize'.
Now you need something that converts you the bytes sent over LoRa in a JSON object. For this reason, we modify the decoder method on The Thing Network. Go to 'Payload Format', select 'Custom' from the payload format menu. then copy and paste this method on the decoder section:
function Decoder(bytes, port) {
 var decoded = {};
 switch(port){
   case 1:
     decoded.seat_id = 1;
     decoded.free = parseInt(bytes);
     break;
   case 2:
     decoded.seat_id = 2;
     decoded.free = parseInt(bytes);
     break;
   case 3:
     decoded.temp = parseInt(bytes);
     break;
 }
 return decoded;
}
As we said before, we are gonna use the port number to distinguish the single sensor of each board. In addition to these fields we added, the JSON object has some default metadata like device_id, time, etc...
To know how to use these keys in the code follow the steps on the GitHub README.
Schematics
Force Sensor Breadboard
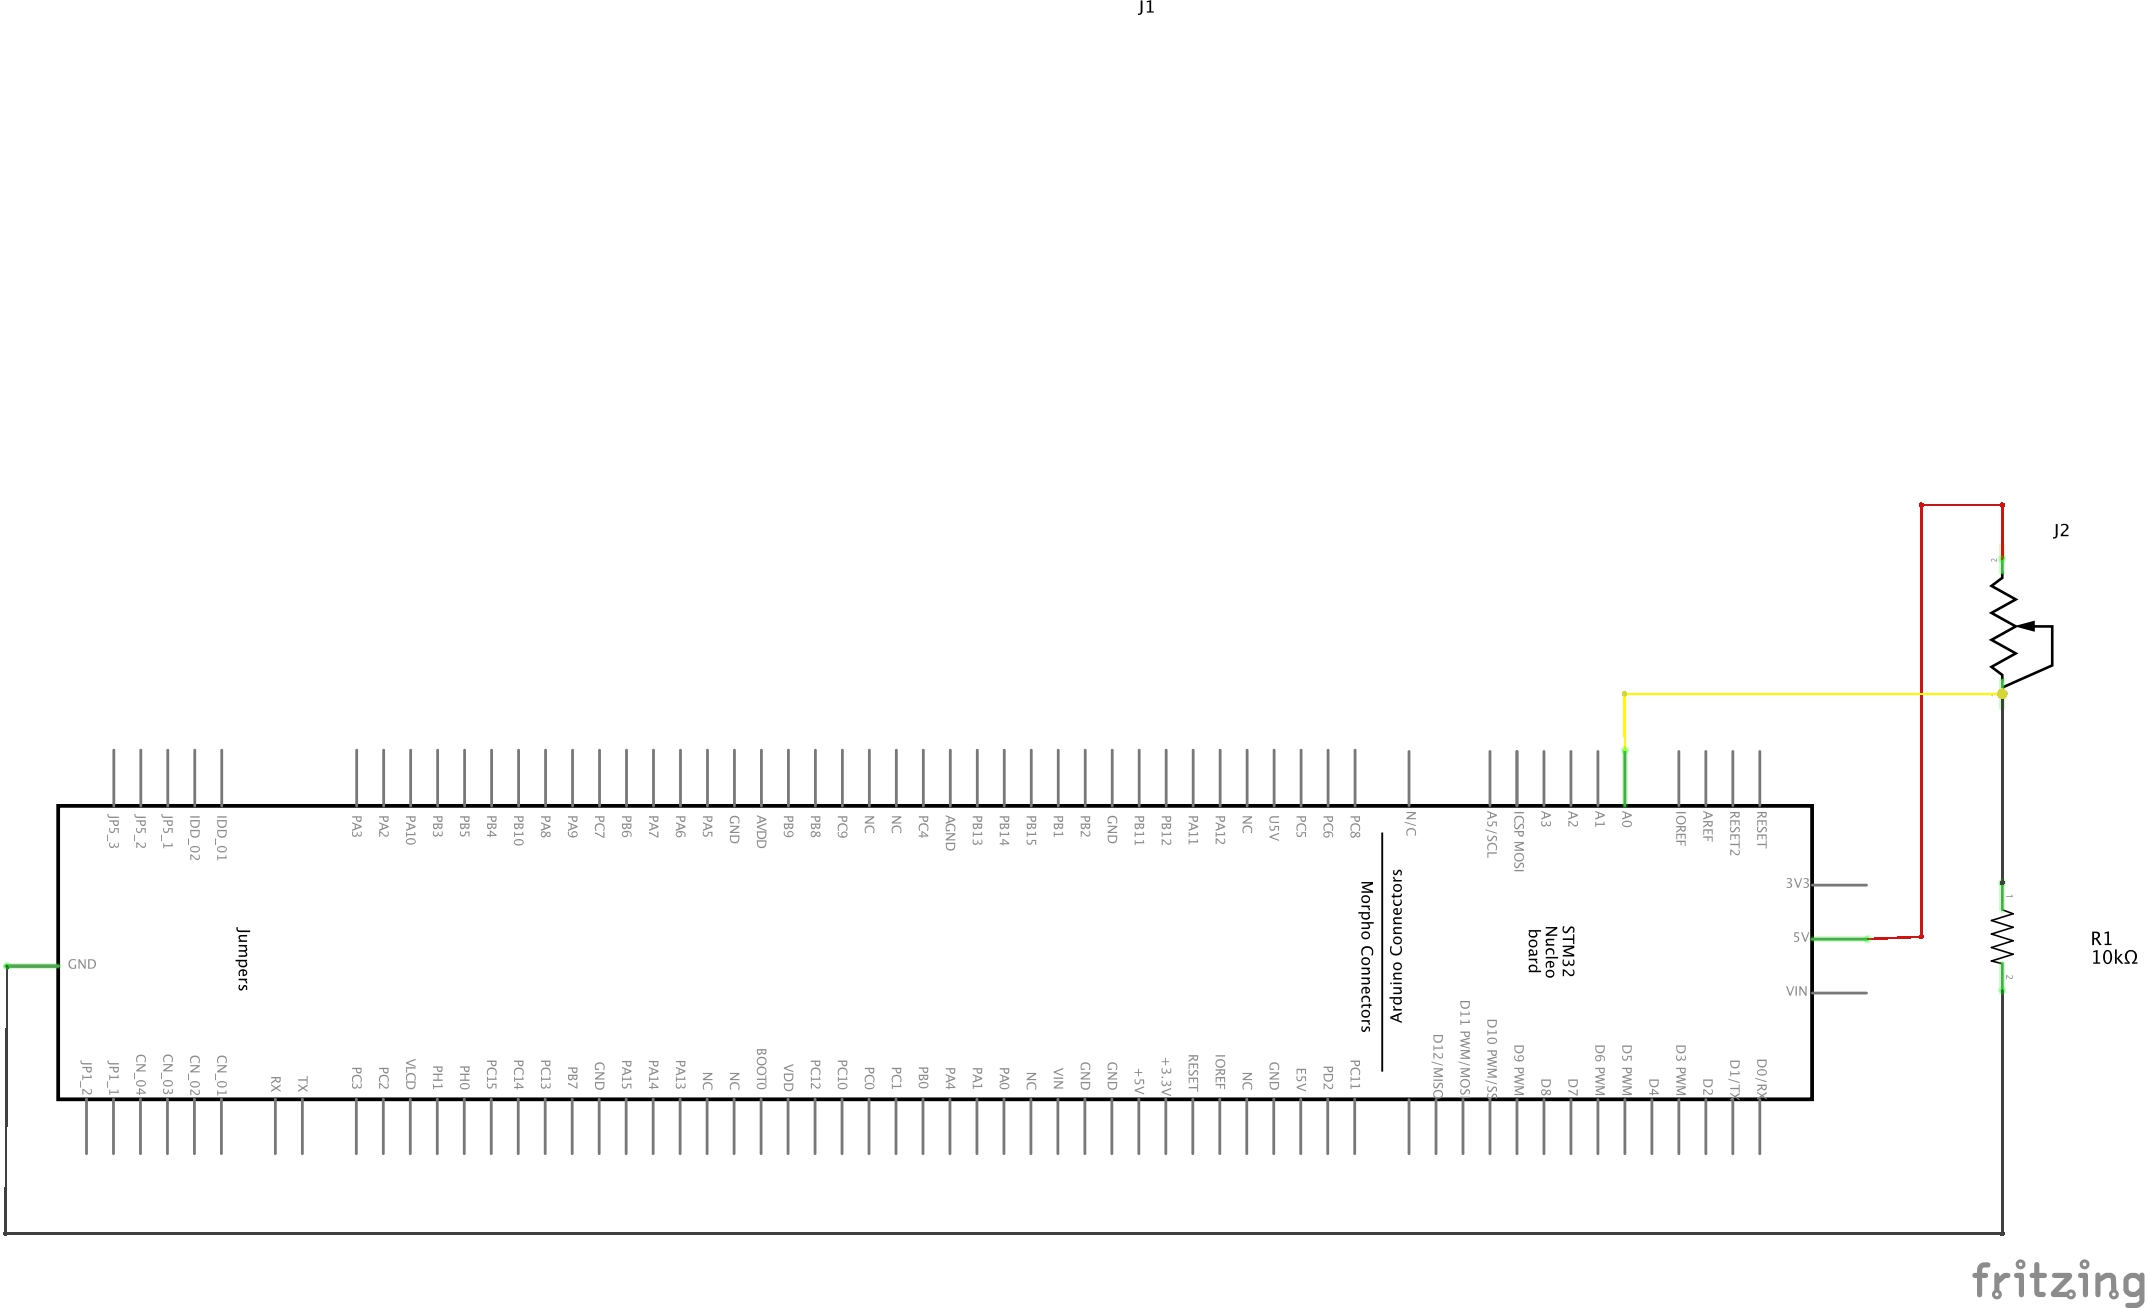
Force Sensor Schematics
NTC Thermistor Breadboard
NTC Thermistor Schematics

The article was first published in hackster, May 29, 2019
cr: https://www.hackster.io/andreanapoletani/find-your-seat-on-the-regional-train-using-your-app-525f37
author: Andrea Napoletani, Milani Stefano, Alessandro Giannetti


