
Use the new Pixy2 and a DFRobot ESP32 FireBeetle to create a robot that can find and retrieve items!

Things used in this project
SOFTWARE APPS AND ONLINE SERVICES
· PixyMon
HAND TOOLS AND FABRICATION MACHINES
· Soldering iron (generic)
· 3D Printer (generic)
· Hot glue gun (generic)
Story
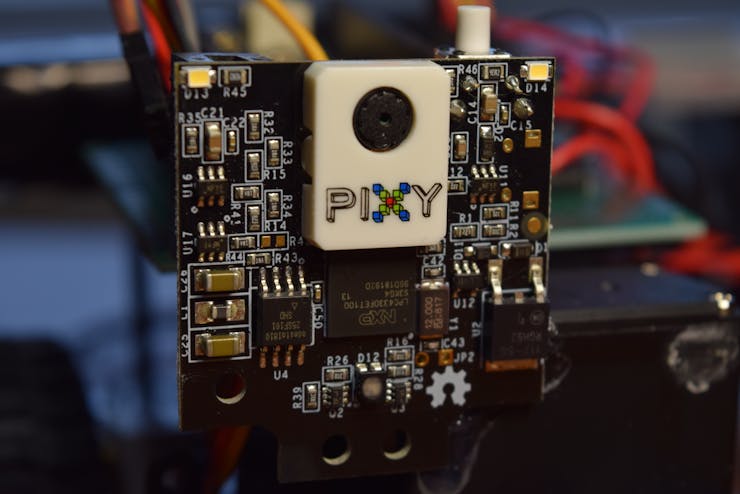
Pixy recently came out with their next version of their Pixy Camera, which can recognize objects and track them. DFRobot sent me one, so I decided to create a robot that can grab an item and then bring it back.
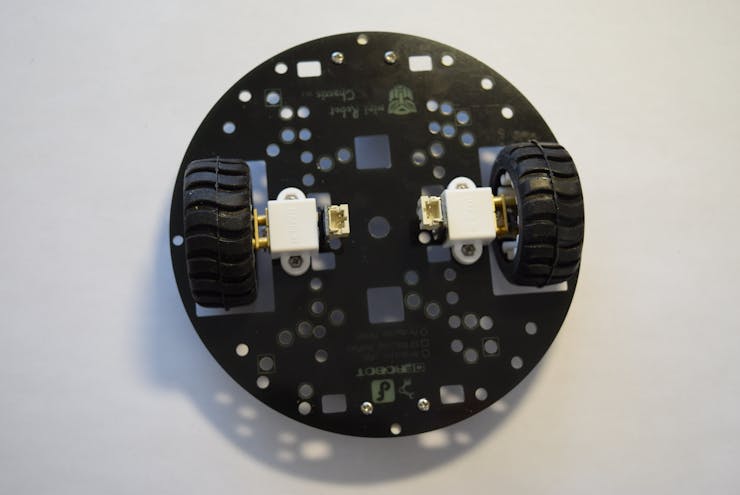
Robot Platform
I used a MiniQ robot chassis from DFRobot as the platform that the robot would be built upon. It comes with multiple mounting holes, so I designed a battery riser using Fusion 360 that attaches to a set of holes. Then I mounted the gripper to the front.
Pixy Camera Setup
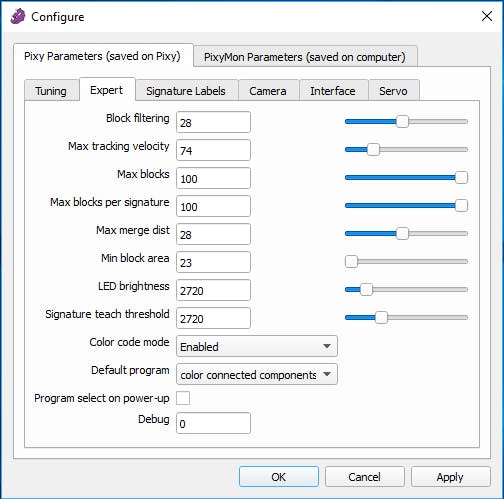
The makers of the Pixy Camera provide a software called PixyMon, which shows what the camera "sees" and lets users adjust parameters, set interfaces, and create color codes. I downloaded and installed PixyMon from their website here. Then I connected the Pixy2 to my PC via USB and went to the File menu and selected Configure.
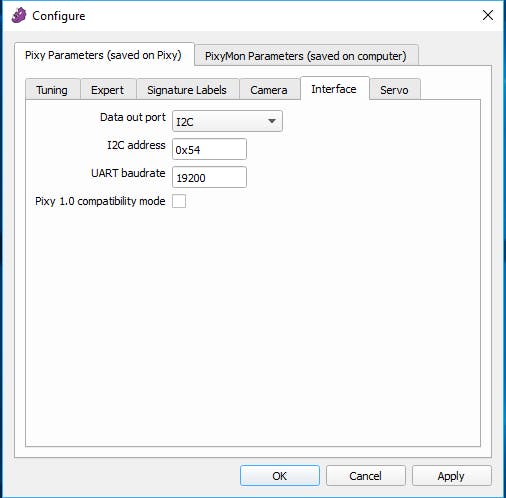
First, I set the interface to I2C, as I will be using a non-Arduino board.
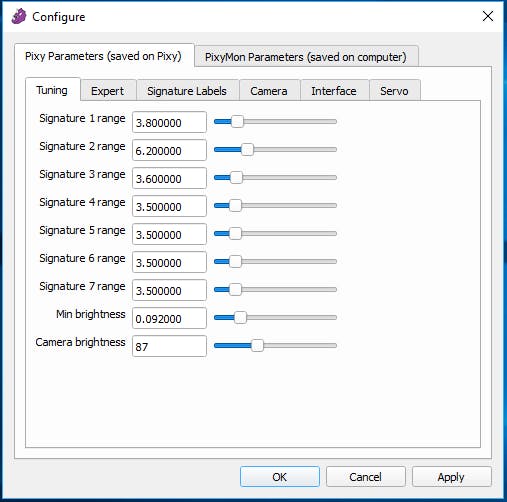
Next, I tuned some miscellaneous settings in the expert menu, as seen in the image.
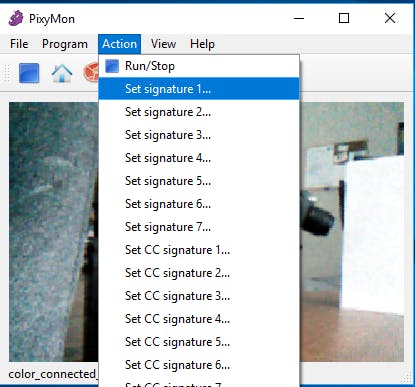
Finally, I got out the block I wanted to use and clicked "Set signature 1" under the Action menu. This sets what the Pixy looks for.
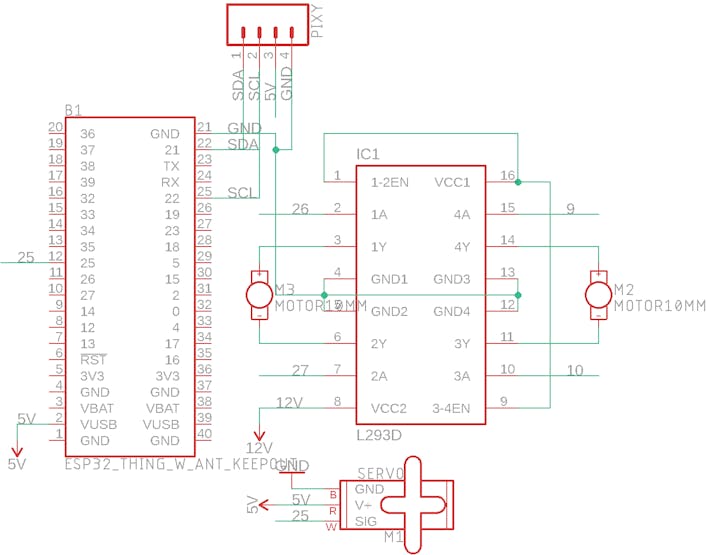
Wiring
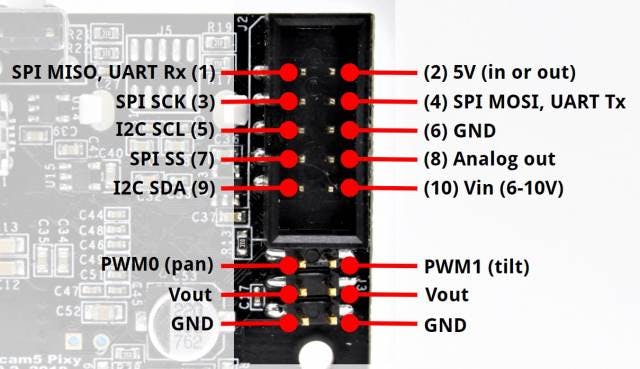
Since I setup the Pixy to use the I2C mode, only 4 wires are needed to connect it to the ESP32 FireBeetle. Just connect SDA, SCL, 5V, and GND.
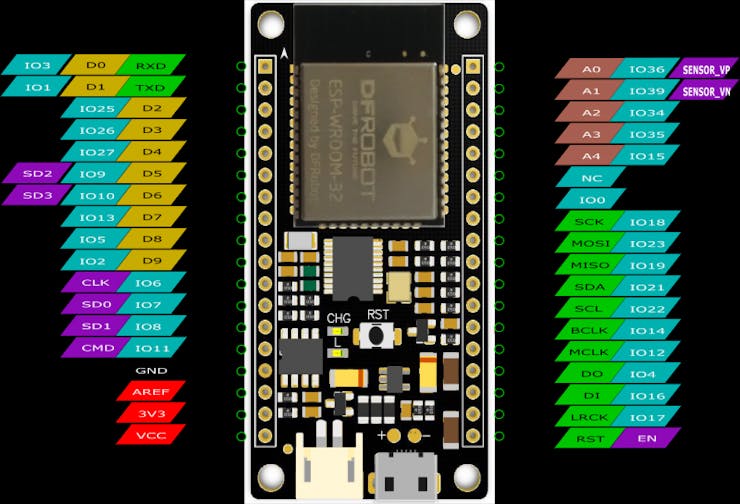
Then I wired up the L293D dual H-bridge DC motor driver to pins IO26, IO27, IO9, and IO10, along with power and output, as seen in this image.
Creating the Program
The program "flow" goes as follows:
· Find target block
· Get width and position
· Adjust robot position based on where the block is
· Move forward until it gets close enough
· Grab object
· Reverse backwards
· Release object
Using the Robot
I first put up a piece of white paper for the background to prevent other objects from being accidentally detected. Then, I reset the ESP32 and watched it drive towards the object, grab it, and then return it, as seen in the video.
Custom parts and enclosures
Battery Platform
https://sketchfab.com/3d-models/battery-platform-nngheyczsp-5d70a477f3be45f981e8c667e7d5982f
Schematics
Board Schematic

ESP32 Code
#include <ESP32_Servo.h>
#include <Pixy2I2C.h>
#include "esp32-hal-ledc.h"
Pixy2I2C pixy;

#define CENTER 100
#define DEADZONE 10

int motor_pins[] = {26,27,9,10};

Servo gripper;
int servo_pin = 25;
int pos;
int state = 1;

const int freq = 490, resolution = 8;

void setup()
{
  Serial.begin(115200);
  Serial.print("Starting...\n");

  pixy.init();
  gripper.attach(servo_pin);
  for(int i=0;i<4;i++){
    ledcAttachPin(motor_pins[i],i+2);
    ledcSetup(i+2,freq,resolution);

  }
  set_gripper(0);
  delay(2000);
  set_gripper(1);
}

void loop()
{
  int i;
  // grab blocks!
  pixy.ccc.getBlocks();

  // If there are detect blocks, print them!
  if (pixy.ccc.numBlocks)
  {
    //Serial.print("Detected ");
    //Serial.println(pixy.ccc.numBlocks);
    for (i=0; i<pixy.ccc.numBlocks; i++)
    {
      /*Serial.print(pixy.ccc.blocks[i].m_width);
      Serial.print(" ");
      Serial.println(pixy.ccc.blocks[i].m_height);
      /*Serial.print("  block ");*/
      //Serial.print(i);
      //Serial.print(": ");
      //pixy.ccc.blocks[i].print();
      if(pixy.ccc.blocks[i].m_width > 220){
        set_gripper(2);
        move(0);
        state = 0;
        move(4);
        delay(3000);
        move(0);
        set_gripper(1);
        while(1);
      }
    Serial.print(pixy.ccc.blocks[i].m_x);
    Serial.print(",");
    Serial.println(pixy.ccc.blocks[i].m_width);
    }
    if(state==1){
    if(pixy.ccc.blocks[i].m_x >= CENTER-DEADZONE || pixy.ccc.blocks[i].m_x <= CENTER+DEADZONE){
      move(3);
      delay(2);
      move(0);
    }
    else if(pixy.ccc.blocks[i].m_x > CENTER){
      //while(pixy.ccc.blocks[i].m_x > CENTER){
        move(1);
        delay(2);
        move(0);
      //}
    }

    else if(pixy.ccc.blocks[i].m_x < CENTER){
      //while(pixy.ccc.blocks[i].m_x < CENTER){
        move(2);
        delay(2);
        move(0);
      //}
    }
  }
  }
  if(Serial.available()>0){
    pos = Serial.parseInt();
    Serial.println(pos);
    if(pos != 0){
      gripper.write(pos);
    }
  }

}

void move(int dir){
  switch(dir){
    case 0: //stop
      ledcWrite(2, 0);
      ledcWrite(3, 0);
      ledcWrite(4, 0);
      ledcWrite(5, 0);
      break;
    case 1: //left
      ledcWrite(2, 120);
      ledcWrite(3, 0);
      ledcWrite(4, 120);
      ledcWrite(5, 0);
      break;
    case 2: //right
      ledcWrite(2, 0);
      ledcWrite(3, 120);
      ledcWrite(4, 0);
      ledcWrite(5, 120);
      break;
    case 3: //forward
      ledcWrite(2, 0);
      ledcWrite(3, 120);
      ledcWrite(4, 120);
      ledcWrite(5, 0);
      break;
    case 4: //back
      ledcWrite(2, 120);
      ledcWrite(3, 0);
      ledcWrite(4, 0);
      ledcWrite(5, 120);
      break;
  }
}

void set_gripper(int state){
  switch(state){
    case 0:
      gripper.write(180);//closed
      break;
    case 1:
      gripper.write(0);//open
      break;
    case 2:
      gripper.write(60);//grip
      break;
  }
}
The article was first published in Hackster, January 8, 2019
cr: https://www.hackster.io/gatoninja236/making-a-robot-play-fetch-657ebc
author: Arduino “having11” Guy


