
Will guide you to build a ML based people detection with FireBeetle 2 and Blues Cellular IoT.
Things used in this project
Story
IoT stands for Internet of Things, which refers to the network of devices that can collect and exchange data over the Internet. Machine learning is a branch of artificial intelligence that can learn from data and make predictions or decisions. IoT and machine learning can work together to create smart applications that can optimize performance, detect anomalies, and provide insights from large amounts of data.
There are many examples of IoT and machine learning applications across various industries, such as:
· Smart home devices that can adjust the temperature, lighting, and security settings based on user preferences and behavior.
· Wearable technologies that can track health and fitness data, such as heart rate, calories burned, and sleep quality.
· Personal medical devices that can monitor vital signs, alert doctors of emergencies, and provide personalized treatment recommendations1.
· Autonomous vehicles that can navigate traffic, avoid obstacles, and optimize routes using sensors and cameras.
· Predictive maintenance in manufacturing, where machine learning algorithms analyze sensor data from industrial machines to predict when maintenance is needed, reducing downtime and improving efficiency.
· Face ID authentication by Apple uses machine learning to recognize the features of users’ faces and unlock their devices.
· Wildlife conservation projects that use machine learning to identify and track animal populations based on photographs.
· Image recognition services that can detect objects, people, text, and activities in images and videos.
Some of the benefits of IoT and machine learning are:
· Improved business efficiency. The use of IoT and machine learning can automate a range of business processes, freeing up time and resources for other tasks. For example, machine learning can help optimize the production and maintenance of industrial machines by analyzing sensor data and predicting failures.
· Enhanced customer experience. The use of IoT and machine learning can provide personalized and interactive services to customers based on their preferences and behavior. For example, machine learning can help recommend products, content, or services that match the customer’s interests and needs.
· Increased data security. The use of IoT and machine learning can help detect and prevent cyberattacks on IoT devices and networks by analyzing network traffic and identifying anomalies. For example, machine learning can help identify malicious activities or unauthorized access to IoT devices and alert the users or administrators.
· Advanced data analytics. The use of IoT and machine learning can help extract meaningful insights from large and complex data sets generated by IoT devices. For example, machine learning can help classify, cluster, or predict data patterns and trends that can help with decision-making or problem-solving.
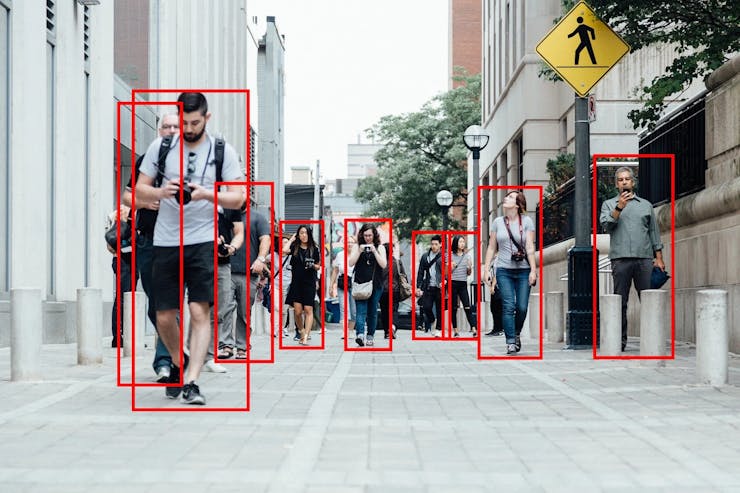
This tutorial will guide you to build a person detection system that can classify people and send an alert via Blues Cellular IoT and Qubitro.
Step 1 - Building Edge Impulse Model Classification:
The first step is we need to build a person classification using Edge Impulse. Edge Impulse is a leading development platform for machine learning on edge devices.
Enter your account credentials (or create a free account) at Edge Impulse. Next, create a new project or you can import the open-source projects.
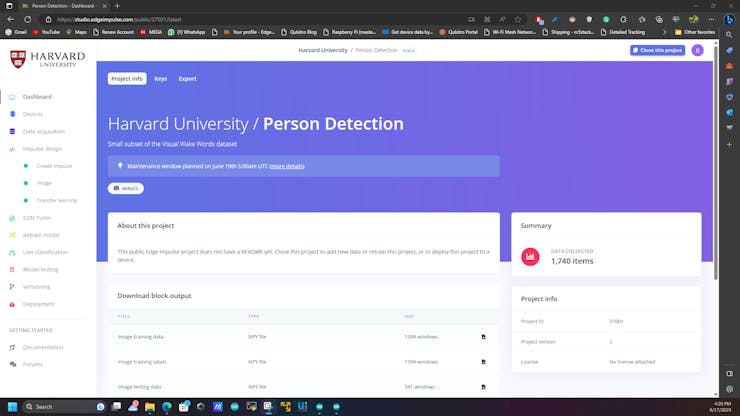
Here I'm using this open project- Person Detection - Edge Impulse
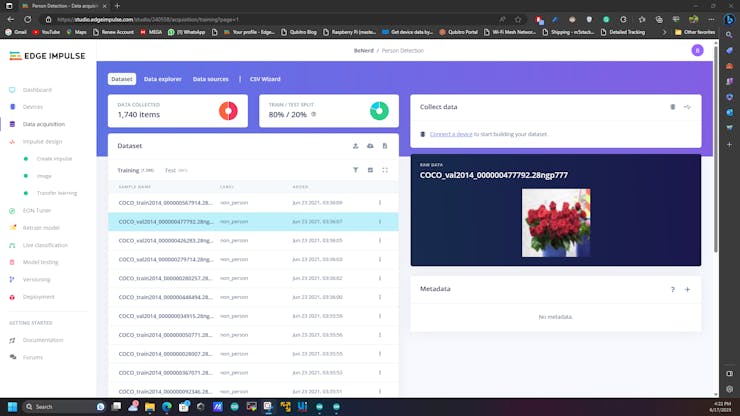
Then navigate to the data collection and upload or revisit your data set.
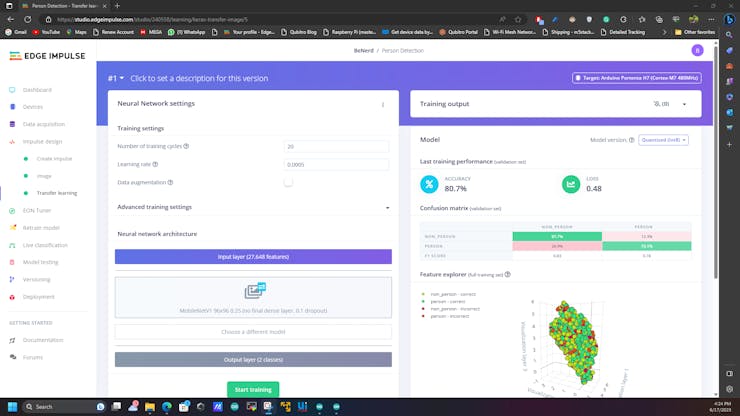
The next step is just impulse design to do the image classification.

The next step is to save parameters.

And do the transfer.
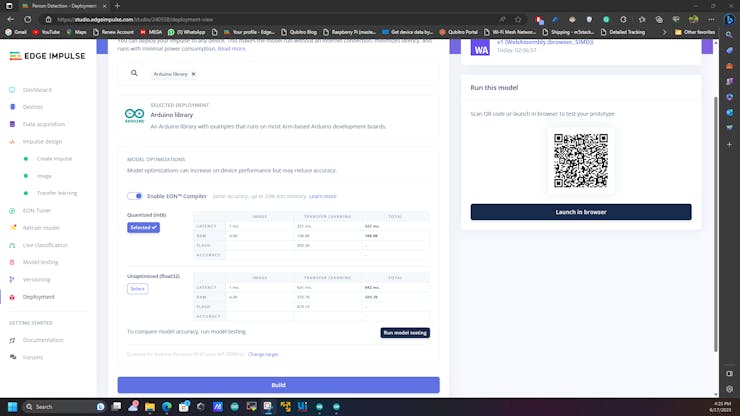
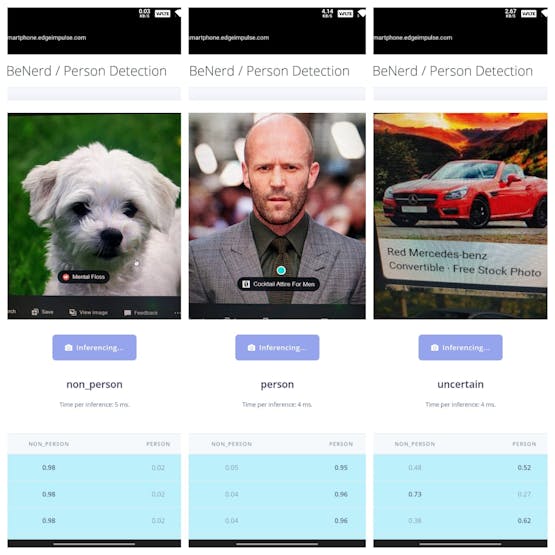
Then go to the deployment and scan the QR with your mobile phone and check the model performance.
Here is the model response, it's okay. Maybe we can use some additional settings and we can improve the performance.
Finally, select the deployment type as Arduino and build the model.

You will get an EI Model Classification library for Arduino.

Step 2 - Deployment of Edge Impulse Model Classification:
Open up the Arduino IDE and just import the library. Then use the esp32-Cam example. Here is my Arduino sketch for FireBeetle 2 ESP32 S3.
/* Includes ---------------------------------------------------------------- */
#include <Person_Detection_inferencing.h>
#include "edge-impulse-sdk/dsp/image/image.hpp"
#include "esp_camera.h"
#include "DFRobot_AXP313A.h"
Notecard notecard;
DFRobot_AXP313A axp;
#include "DFRobot_GDL.h"
#define TFT_DC D2
#define TFT_CS D6
#define TFT_RST D3
int proplecount=0;
DFRobot_ST7789_240x320_HW_SPI screen(/*dc=*/TFT_DC,/*cs=*/TFT_CS,/*rst=*/TFT_RST);
// Select camera model - find more camera models in camera_pins.h file here
// https://github.com/espressif/arduino-esp32/blob/master/libraries/ESP32/examples/Camera/CameraWebServer/camera_pins.h
#define PWDN_GPIO_NUM -1
#define RESET_GPIO_NUM -1
#define XCLK_GPIO_NUM 45
#define SIOD_GPIO_NUM 1
#define SIOC_GPIO_NUM 2
#define Y9_GPIO_NUM 48
#define Y8_GPIO_NUM 46
#define Y7_GPIO_NUM 8
#define Y6_GPIO_NUM 7
#define Y5_GPIO_NUM 4
#define Y4_GPIO_NUM 41
#define Y3_GPIO_NUM 40
#define Y2_GPIO_NUM 39
#define VSYNC_GPIO_NUM 6
#define HREF_GPIO_NUM 42
#define PCLK_GPIO_NUM 5
#define LED_GPIO_NUM 21
#define FLASH_LED_PIN 21
/* Constant defines -------------------------------------------------------- */
#define EI_CAMERA_RAW_FRAME_BUFFER_COLS 320
#define EI_CAMERA_RAW_FRAME_BUFFER_ROWS 240
#define EI_CAMERA_FRAME_BYTE_SIZE 3
/* Private variables ------------------------------------------------------- */
static bool debug_nn = false; // Set this to true to see e.g. features generated from the raw signal
static bool is_initialised = false;
uint8_t *snapshot_buf; //points to the output of the capture
static camera_config_t camera_config = {
.pin_pwdn = PWDN_GPIO_NUM,
.pin_reset = RESET_GPIO_NUM,
.pin_xclk = XCLK_GPIO_NUM,
.pin_sscb_sda = SIOD_GPIO_NUM,
.pin_sscb_scl = SIOC_GPIO_NUM,
.pin_d7 = Y9_GPIO_NUM,
.pin_d6 = Y8_GPIO_NUM,
.pin_d5 = Y7_GPIO_NUM,
.pin_d4 = Y6_GPIO_NUM,
.pin_d3 = Y5_GPIO_NUM,
.pin_d2 = Y4_GPIO_NUM,
.pin_d1 = Y3_GPIO_NUM,
.pin_d0 = Y2_GPIO_NUM,
.pin_vsync = VSYNC_GPIO_NUM,
.pin_href = HREF_GPIO_NUM,
.pin_pclk = PCLK_GPIO_NUM,
//XCLK 20MHz or 10MHz for OV2640 double FPS (Experimental)
.xclk_freq_hz = 20000000,
.ledc_timer = LEDC_TIMER_0,
.ledc_channel = LEDC_CHANNEL_0,
.pixel_format = PIXFORMAT_JPEG, //YUV422,GRAYSCALE,RGB565,JPEG
.frame_size = FRAMESIZE_QVGA, //QQVGA-UXGA Do not use sizes above QVGA when not JPEG
.jpeg_quality = 12, //0-63 lower number means higher quality
.fb_count = 1, //if more than one, i2s runs in continuous mode. Use only with JPEG
.fb_location = CAMERA_FB_IN_PSRAM,
.grab_mode = CAMERA_GRAB_WHEN_EMPTY,
};
/* Function definitions ------------------------------------------------------- */
bool ei_camera_init(void);
void ei_camera_deinit(void);
bool ei_camera_capture(uint32_t img_width, uint32_t img_height, uint8_t *out_buf) ;
/**
@brief Arduino setup function
*/
void setup()
{
// put your setup code here, to run once:
Serial.begin(115200);
//comment out the below line to start inference immediately after upload
// while (!Serial);
while (axp.begin() != 0) {
Serial.println("init error");
delay(1000);
}
axp.enableCameraPower(axp.eOV2640);//设置摄像头供电
Serial.println("Edge Impulse Inferencing Demo");
if (ei_camera_init() == false) {
ei_printf("Failed to initialize Camera!\r\n");
}
else {
ei_printf("Camera initialized\r\n");
}
ei_printf("\nStarting continious inference in 2 seconds...\n");
ei_sleep(2000);
// Set LED Flash as output
pinMode(FLASH_LED_PIN, OUTPUT);
screen.begin();
}
/**
@brief Get data and run inferencing
@param[in] debug Get debug info if true
*/
void loop()
{
digitalWrite(FLASH_LED_PIN, HIGH);
// instead of wait_ms, we'll wait on the signal, this allows threads to cancel us...
if (ei_sleep(5) != EI_IMPULSE_OK) {
return;
}
snapshot_buf = (uint8_t*)malloc(EI_CAMERA_RAW_FRAME_BUFFER_COLS * EI_CAMERA_RAW_FRAME_BUFFER_ROWS * EI_CAMERA_FRAME_BYTE_SIZE);
// check if allocation was successful
if (snapshot_buf == nullptr) {
ei_printf("ERR: Failed to allocate snapshot buffer!\n");
return;
}
ei::signal_t signal;
signal.total_length = EI_CLASSIFIER_INPUT_WIDTH * EI_CLASSIFIER_INPUT_HEIGHT;
signal.get_data = &ei_camera_get_data;
if (ei_camera_capture((size_t)EI_CLASSIFIER_INPUT_WIDTH, (size_t)EI_CLASSIFIER_INPUT_HEIGHT, snapshot_buf) == false) {
ei_printf("Failed to capture image\r\n");
free(snapshot_buf);
return;
}
// Run the classifier
ei_impulse_result_t result = { 0 };
EI_IMPULSE_ERROR err = run_classifier(&signal, &result, debug_nn);
if (err != EI_IMPULSE_OK) {
ei_printf("ERR: Failed to run classifier (%d)\n", err);
return;
}
// print the predictions
ei_printf("Predictions (DSP: %d ms., Classification: %d ms., Anomaly: %d ms.): \n",
result.timing.dsp, result.timing.classification, result.timing.anomaly);
#if EI_CLASSIFIER_OBJECT_DETECTION == 1
bool bb_found = result.bounding_boxes[0].value > 0;
for (size_t ix = 0; ix < result.bounding_boxes_count; ix++) {
auto bb = result.bounding_boxes[ix];
if (bb.value == 0) {
continue;
}
ei_printf(" %s (%f) [ x: %u, y: %u, width: %u, height: %u ]\n", bb.label, bb.value, bb.x, bb.y, bb.width, bb.height);
}
if (!bb_found) {
ei_printf(" No objects found\n");
}
#else
for (size_t ix = 0; ix < EI_CLASSIFIER_LABEL_COUNT; ix++) {
ei_printf(" %s: %.5f\n", result.classification[ix].label,
result.classification[ix].value);
if (result.classification[ix].value >= 0.5)
{
int16_t color = 0x00FF;
screen.setTextWrap(false);
screen.setRotation(1);
screen.fillScreen(COLOR_RGB565_BLACK);
screen.setTextColor(COLOR_RGB565_GREEN);
screen.setFont(&FreeMono9pt7b);
screen.setTextSize(1.5);
screen.setCursor(0, 30);
screen.println("Model: ");
screen.setCursor(0, 60);
screen.println("Trigger: ");
screen.setCursor(0, 90);
screen.println("Voltage: ");
screen.setCursor(0, 120);
screen.println("Temperature: ");
screen.setCursor(130, 30);
if (result.classification[ix].label == "non_person")
{
screen.setTextColor(COLOR_RGB565_RED);
screen.println(result.classification[ix].label);
screen.setCursor(130, 60);
screen.println("no");
}
else {
screen.setTextColor(COLOR_RGB565_GREEN);
proplecount=proplecount+1;
screen.println(result.classification[ix].label);
screen.setCursor(130, 60);
screen.println("yes");
}
delay(2000);
}
}
#endif
#if EI_CLASSIFIER_HAS_ANOMALY == 1
ei_printf(" anomaly score: %.3f\n", result.anomaly);
#endif
free(snapshot_buf);
digitalWrite(FLASH_LED_PIN, LOW);
}
/**
@brief Setup image sensor & start streaming
@retval false if initialisation failed
*/
bool ei_camera_init(void) {
if (is_initialised) return true;
#if defined(CAMERA_MODEL_ESP_EYE)
pinMode(13, INPUT_PULLUP);
pinMode(14, INPUT_PULLUP);
#endif
//initialize the camera
esp_err_t err = esp_camera_init(&camera_config);
if (err != ESP_OK) {
Serial.printf("Camera init failed with error 0x%x\n", err);
return false;
}
sensor_t * s = esp_camera_sensor_get();
// initial sensors are flipped vertically and colors are a bit saturated
if (s->id.PID == OV3660_PID) {
s->set_vflip(s, 1); // flip it back
s->set_brightness(s, 1); // up the brightness just a bit
s->set_saturation(s, 0); // lower the saturation
}
#if defined(CAMERA_MODEL_M5STACK_WIDE)
s->set_vflip(s, 1);
s->set_hmirror(s, 1);
#elif defined(CAMERA_MODEL_ESP_EYE)
s->set_vflip(s, 1);
s->set_hmirror(s, 1);
s->set_awb_gain(s, 1);
#endif
is_initialised = true;
return true;
}
/**
@brief Stop streaming of sensor data
*/
void ei_camera_deinit(void) {
//deinitialize the camera
esp_err_t err = esp_camera_deinit();
if (err != ESP_OK)
{
ei_printf("Camera deinit failed\n");
return;
}
is_initialised = false;
return;
}
/**
@brief Capture, rescale and crop image
@param[in] img_width width of output image
@param[in] img_height height of output image
@param[in] out_buf pointer to store output image, NULL may be used
if ei_camera_frame_buffer is to be used for capture and resize/cropping.
@retval false if not initialised, image captured, rescaled or cropped failed
*/
bool ei_camera_capture(uint32_t img_width, uint32_t img_height, uint8_t *out_buf) {
bool do_resize = false;
if (!is_initialised) {
ei_printf("ERR: Camera is not initialized\r\n");
return false;
}
camera_fb_t *fb = esp_camera_fb_get();
if (!fb) {
ei_printf("Camera capture failed\n");
return false;
}
bool converted = fmt2rgb888(fb->buf, fb->len, PIXFORMAT_JPEG, snapshot_buf);
esp_camera_fb_return(fb);
if (!converted) {
ei_printf("Conversion failed\n");
return false;
}
if ((img_width != EI_CAMERA_RAW_FRAME_BUFFER_COLS)
|| (img_height != EI_CAMERA_RAW_FRAME_BUFFER_ROWS)) {
do_resize = true;
}
if (do_resize) {
ei::image::processing::crop_and_interpolate_rgb888(
out_buf,
EI_CAMERA_RAW_FRAME_BUFFER_COLS,
EI_CAMERA_RAW_FRAME_BUFFER_ROWS,
out_buf,
img_width,
img_height);
}
return true;
}
static int ei_camera_get_data(size_t offset, size_t length, float *out_ptr)
{
// we already have a RGB888 buffer, so recalculate offset into pixel index
size_t pixel_ix = offset * 3;
size_t pixels_left = length;
size_t out_ptr_ix = 0;
while (pixels_left != 0) {
out_ptr[out_ptr_ix] = (snapshot_buf[pixel_ix] << 16) + (snapshot_buf[pixel_ix + 1] << 8) + snapshot_buf[pixel_ix + 2];
// go to the next pixel
out_ptr_ix++;
pixel_ix += 3;
pixels_left--;
}
// and done!
return 0;
}
#if !defined(EI_CLASSIFIER_SENSOR) || EI_CLASSIFIER_SENSOR != EI_CLASSIFIER_SENSOR_CAMERA
#error "Invalid model for current sensor"
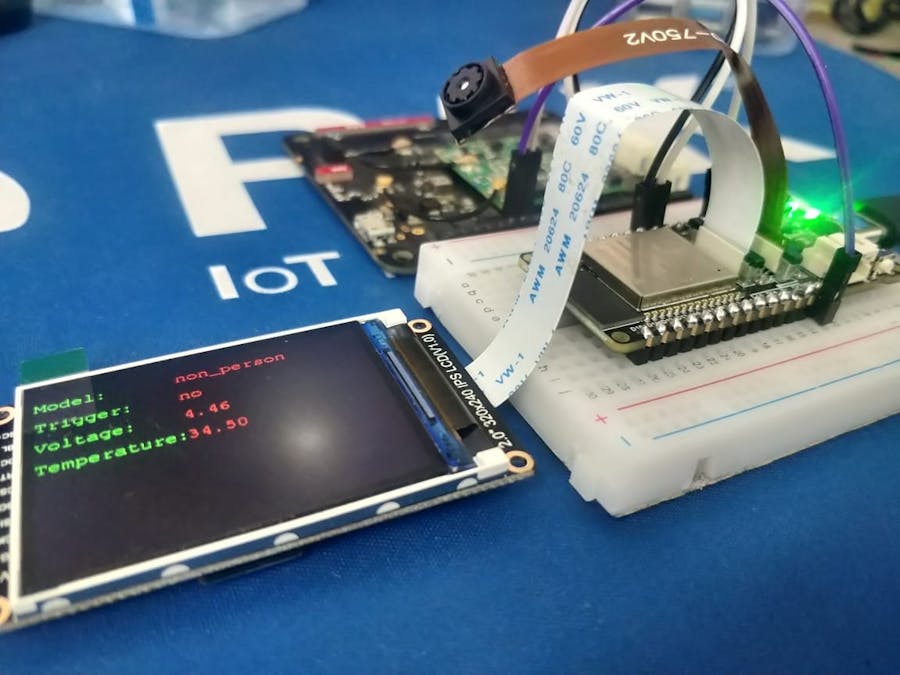
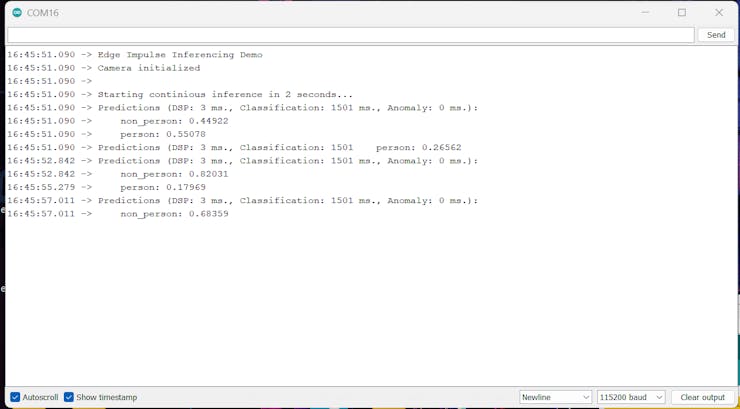
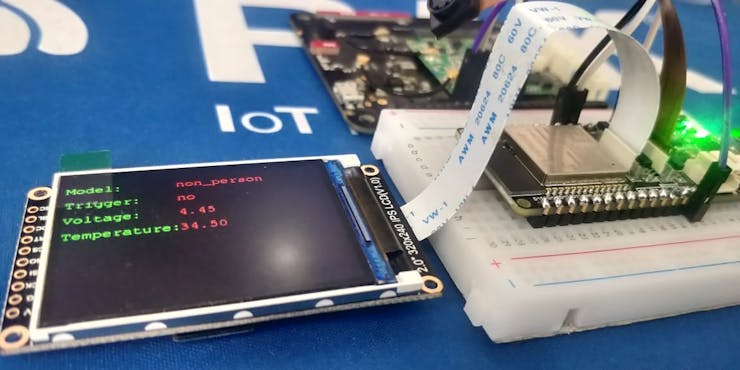
#endifI have added a camera and LCD display with the FireBeetle 2 ESP32 S3.

It will give model results in the LCD Display.
Step 3 - Integrating Cellular IoT:
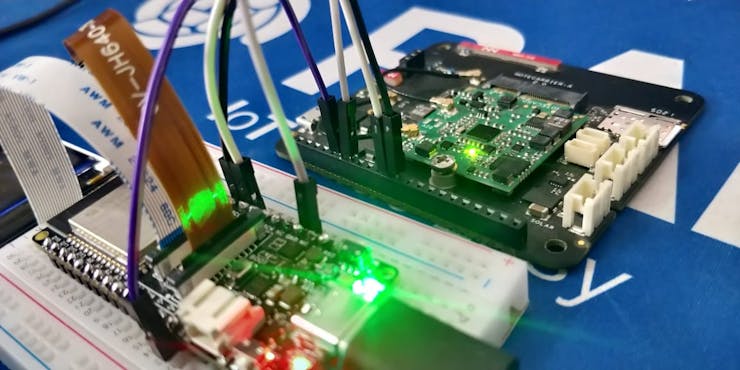
Now our FireBeetle can detect the persons but we need to add a cellular IoT to make it easier. For that, I have added a Blues Notecard to implement an IoT connection.
Just connect the Blues Notecarrier with the Firebeetle via the I2C interface.
Here is my complete sketch with Edge Impulse and Blues IoT.
/* Includes ---------------------------------------------------------------- */
#include <Person_Detection_inferencing.h>
#include "edge-impulse-sdk/dsp/image/image.hpp"
#include "esp_camera.h"
#include "DFRobot_AXP313A.h"
#include <Notecard.h>
#include <Wire.h>
#define PRODUCT_UID "com.gmail.pradeeplogu26:df_people_detecor"
#define myProductID PRODUCT_UID
Notecard notecard;
DFRobot_AXP313A axp;
#include "DFRobot_GDL.h"
#define TFT_DC D2
#define TFT_CS D6
#define TFT_RST D3
int proplecount=0;
DFRobot_ST7789_240x320_HW_SPI screen(/*dc=*/TFT_DC,/*cs=*/TFT_CS,/*rst=*/TFT_RST);
// Select camera model - find more camera models in camera_pins.h file here
// https://github.com/espressif/arduino-esp32/blob/master/libraries/ESP32/examples/Camera/CameraWebServer/camera_pins.h
#define PWDN_GPIO_NUM -1
#define RESET_GPIO_NUM -1
#define XCLK_GPIO_NUM 45
#define SIOD_GPIO_NUM 1
#define SIOC_GPIO_NUM 2
#define Y9_GPIO_NUM 48
#define Y8_GPIO_NUM 46
#define Y7_GPIO_NUM 8
#define Y6_GPIO_NUM 7
#define Y5_GPIO_NUM 4
#define Y4_GPIO_NUM 41
#define Y3_GPIO_NUM 40
#define Y2_GPIO_NUM 39
#define VSYNC_GPIO_NUM 6
#define HREF_GPIO_NUM 42
#define PCLK_GPIO_NUM 5
#define LED_GPIO_NUM 21
#define FLASH_LED_PIN 21
/* Constant defines -------------------------------------------------------- */
#define EI_CAMERA_RAW_FRAME_BUFFER_COLS 320
#define EI_CAMERA_RAW_FRAME_BUFFER_ROWS 240
#define EI_CAMERA_FRAME_BYTE_SIZE 3
/* Private variables ------------------------------------------------------- */
static bool debug_nn = false; // Set this to true to see e.g. features generated from the raw signal
static bool is_initialised = false;
uint8_t *snapshot_buf; //points to the output of the capture
static camera_config_t camera_config = {
.pin_pwdn = PWDN_GPIO_NUM,
.pin_reset = RESET_GPIO_NUM,
.pin_xclk = XCLK_GPIO_NUM,
.pin_sscb_sda = SIOD_GPIO_NUM,
.pin_sscb_scl = SIOC_GPIO_NUM,
.pin_d7 = Y9_GPIO_NUM,
.pin_d6 = Y8_GPIO_NUM,
.pin_d5 = Y7_GPIO_NUM,
.pin_d4 = Y6_GPIO_NUM,
.pin_d3 = Y5_GPIO_NUM,
.pin_d2 = Y4_GPIO_NUM,
.pin_d1 = Y3_GPIO_NUM,
.pin_d0 = Y2_GPIO_NUM,
.pin_vsync = VSYNC_GPIO_NUM,
.pin_href = HREF_GPIO_NUM,
.pin_pclk = PCLK_GPIO_NUM,
//XCLK 20MHz or 10MHz for OV2640 double FPS (Experimental)
.xclk_freq_hz = 20000000,
.ledc_timer = LEDC_TIMER_0,
.ledc_channel = LEDC_CHANNEL_0,
.pixel_format = PIXFORMAT_JPEG, //YUV422,GRAYSCALE,RGB565,JPEG
.frame_size = FRAMESIZE_QVGA, //QQVGA-UXGA Do not use sizes above QVGA when not JPEG
.jpeg_quality = 12, //0-63 lower number means higher quality
.fb_count = 1, //if more than one, i2s runs in continuous mode. Use only with JPEG
.fb_location = CAMERA_FB_IN_PSRAM,
.grab_mode = CAMERA_GRAB_WHEN_EMPTY,
};
/* Function definitions ------------------------------------------------------- */
bool ei_camera_init(void);
void ei_camera_deinit(void);
bool ei_camera_capture(uint32_t img_width, uint32_t img_height, uint8_t *out_buf) ;
/**
@brief Arduino setup function
*/
void setup()
{
// put your setup code here, to run once:
Serial.begin(115200);
//comment out the below line to start inference immediately after upload
// while (!Serial);
while (axp.begin() != 0) {
Serial.println("init error");
delay(1000);
}
axp.enableCameraPower(axp.eOV2640);//设置摄像头供电
Serial.println("Edge Impulse Inferencing Demo");
if (ei_camera_init() == false) {
ei_printf("Failed to initialize Camera!\r\n");
}
else {
ei_printf("Camera initialized\r\n");
}
ei_printf("\nStarting continious inference in 2 seconds...\n");
ei_sleep(2000);
// Set LED Flash as output
pinMode(FLASH_LED_PIN, OUTPUT);
screen.begin();
Wire.begin();
notecard.begin();
J *req = notecard.newRequest("hub.set");
if (myProductID[0]) {
JAddStringToObject(req, "product", myProductID);
}
JAddStringToObject(req, "mode", "continuous");
notecard.sendRequest(req);
}
/**
@brief Get data and run inferencing
@param[in] debug Get debug info if true
*/
void loop()
{
double temperature = 0;
J *rsp = notecard.requestAndResponse(notecard.newRequest("card.temp"));
if (rsp != NULL) {
temperature = JGetNumber(rsp, "value");
notecard.deleteResponse(rsp);
}
double voltage = 0;
rsp = notecard.requestAndResponse(notecard.newRequest("card.voltage"));
if (rsp != NULL) {
voltage = JGetNumber(rsp, "value");
notecard.deleteResponse(rsp);
}
digitalWrite(FLASH_LED_PIN, HIGH);
// instead of wait_ms, we'll wait on the signal, this allows threads to cancel us...
if (ei_sleep(5) != EI_IMPULSE_OK) {
return;
}
snapshot_buf = (uint8_t*)malloc(EI_CAMERA_RAW_FRAME_BUFFER_COLS * EI_CAMERA_RAW_FRAME_BUFFER_ROWS * EI_CAMERA_FRAME_BYTE_SIZE);
// check if allocation was successful
if (snapshot_buf == nullptr) {
ei_printf("ERR: Failed to allocate snapshot buffer!\n");
return;
}
ei::signal_t signal;
signal.total_length = EI_CLASSIFIER_INPUT_WIDTH * EI_CLASSIFIER_INPUT_HEIGHT;
signal.get_data = &ei_camera_get_data;
if (ei_camera_capture((size_t)EI_CLASSIFIER_INPUT_WIDTH, (size_t)EI_CLASSIFIER_INPUT_HEIGHT, snapshot_buf) == false) {
ei_printf("Failed to capture image\r\n");
free(snapshot_buf);
return;
}
// Run the classifier
ei_impulse_result_t result = { 0 };
EI_IMPULSE_ERROR err = run_classifier(&signal, &result, debug_nn);
if (err != EI_IMPULSE_OK) {
ei_printf("ERR: Failed to run classifier (%d)\n", err);
return;
}
// print the predictions
ei_printf("Predictions (DSP: %d ms., Classification: %d ms., Anomaly: %d ms.): \n",
result.timing.dsp, result.timing.classification, result.timing.anomaly);
#if EI_CLASSIFIER_OBJECT_DETECTION == 1
bool bb_found = result.bounding_boxes[0].value > 0;
for (size_t ix = 0; ix < result.bounding_boxes_count; ix++) {
auto bb = result.bounding_boxes[ix];
if (bb.value == 0) {
continue;
}
ei_printf(" %s (%f) [ x: %u, y: %u, width: %u, height: %u ]\n", bb.label, bb.value, bb.x, bb.y, bb.width, bb.height);
}
if (!bb_found) {
ei_printf(" No objects found\n");
}
#else
for (size_t ix = 0; ix < EI_CLASSIFIER_LABEL_COUNT; ix++) {
ei_printf(" %s: %.5f\n", result.classification[ix].label,
result.classification[ix].value);
if (result.classification[ix].value >= 0.5)
{
int16_t color = 0x00FF;
screen.setTextWrap(false);
screen.setRotation(1);
screen.fillScreen(COLOR_RGB565_BLACK);
screen.setTextColor(COLOR_RGB565_GREEN);
screen.setFont(&FreeMono9pt7b);
screen.setTextSize(1.5);
screen.setCursor(0, 30);
screen.println("Model: ");
screen.setCursor(0, 60);
screen.println("Trigger: ");
screen.setCursor(0, 90);
screen.println("Voltage: ");
screen.setCursor(0, 120);
screen.println("Temperature: ");
screen.setCursor(130, 30);
if (result.classification[ix].label == "non_person")
{
screen.setTextColor(COLOR_RGB565_RED);
screen.println(result.classification[ix].label);
screen.setCursor(130, 60);
screen.println("no");
screen.setCursor(130, 90);
screen.println(voltage);
screen.setCursor(130, 120);
screen.println(temperature);
J *req = notecard.newRequest("note.add");
if (req != NULL) {
JAddBoolToObject(req, "sync", true);
J *body = JCreateObject();
if (body != NULL) {
JAddStringToObject(body, "Status", "Non-Person");
JAddNumberToObject(body, "LogLevel", 0);
JAddNumberToObject(body, "temp", temperature);
JAddNumberToObject(body, "voltage", voltage);
JAddNumberToObject(body, "count", proplecount);
JAddItemToObject(req, "body", body);
}
notecard.sendRequest(req);
}
}
else {
screen.setTextColor(COLOR_RGB565_GREEN);
proplecount=proplecount+1;
screen.println(result.classification[ix].label);
screen.setCursor(130, 60);
screen.println("yes");
screen.setCursor(130, 90);
screen.println(voltage);
screen.setCursor(130, 120);
screen.println(temperature);
J *req = notecard.newRequest("note.add");
if (req != NULL) {
JAddBoolToObject(req, "sync", true);
J *body = JCreateObject();
if (body != NULL) {
JAddStringToObject(body, "Status", "Person");
JAddNumberToObject(body, "LogLevel", 1);
JAddNumberToObject(body, "temp", temperature);
JAddNumberToObject(body, "voltage", voltage);
JAddNumberToObject(body, "count", proplecount);
JAddItemToObject(req, "body", body);
}
notecard.sendRequest(req);
}
}
delay(2000);
}
}
#endif
#if EI_CLASSIFIER_HAS_ANOMALY == 1
ei_printf(" anomaly score: %.3f\n", result.anomaly);
#endif
free(snapshot_buf);
digitalWrite(FLASH_LED_PIN, LOW);
}
/**
@brief Setup image sensor & start streaming
@retval false if initialisation failed
*/
bool ei_camera_init(void) {
if (is_initialised) return true;
#if defined(CAMERA_MODEL_ESP_EYE)
pinMode(13, INPUT_PULLUP);
pinMode(14, INPUT_PULLUP);
#endif
//initialize the camera
esp_err_t err = esp_camera_init(&camera_config);
if (err != ESP_OK) {
Serial.printf("Camera init failed with error 0x%x\n", err);
return false;
}
sensor_t * s = esp_camera_sensor_get();
// initial sensors are flipped vertically and colors are a bit saturated
if (s->id.PID == OV3660_PID) {
s->set_vflip(s, 1); // flip it back
s->set_brightness(s, 1); // up the brightness just a bit
s->set_saturation(s, 0); // lower the saturation
}
#if defined(CAMERA_MODEL_M5STACK_WIDE)
s->set_vflip(s, 1);
s->set_hmirror(s, 1);
#elif defined(CAMERA_MODEL_ESP_EYE)
s->set_vflip(s, 1);
s->set_hmirror(s, 1);
s->set_awb_gain(s, 1);
#endif
is_initialised = true;
return true;
}
/**
@brief Stop streaming of sensor data
*/
void ei_camera_deinit(void) {
//deinitialize the camera
esp_err_t err = esp_camera_deinit();
if (err != ESP_OK)
{
ei_printf("Camera deinit failed\n");
return;
}
is_initialised = false;
return;
}
/**
@brief Capture, rescale and crop image
@param[in] img_width width of output image
@param[in] img_height height of output image
@param[in] out_buf pointer to store output image, NULL may be used
if ei_camera_frame_buffer is to be used for capture and resize/cropping.
@retval false if not initialised, image captured, rescaled or cropped failed
*/
bool ei_camera_capture(uint32_t img_width, uint32_t img_height, uint8_t *out_buf) {
bool do_resize = false;
if (!is_initialised) {
ei_printf("ERR: Camera is not initialized\r\n");
return false;
}
camera_fb_t *fb = esp_camera_fb_get();
if (!fb) {
ei_printf("Camera capture failed\n");
return false;
}
bool converted = fmt2rgb888(fb->buf, fb->len, PIXFORMAT_JPEG, snapshot_buf);
esp_camera_fb_return(fb);
if (!converted) {
ei_printf("Conversion failed\n");
return false;
}
if ((img_width != EI_CAMERA_RAW_FRAME_BUFFER_COLS)
|| (img_height != EI_CAMERA_RAW_FRAME_BUFFER_ROWS)) {
do_resize = true;
}
if (do_resize) {
ei::image::processing::crop_and_interpolate_rgb888(
out_buf,
EI_CAMERA_RAW_FRAME_BUFFER_COLS,
EI_CAMERA_RAW_FRAME_BUFFER_ROWS,
out_buf,
img_width,
img_height);
}
return true;
}
static int ei_camera_get_data(size_t offset, size_t length, float *out_ptr)
{
// we already have a RGB888 buffer, so recalculate offset into pixel index
size_t pixel_ix = offset * 3;
size_t pixels_left = length;
size_t out_ptr_ix = 0;
while (pixels_left != 0) {
out_ptr[out_ptr_ix] = (snapshot_buf[pixel_ix] << 16) + (snapshot_buf[pixel_ix + 1] << 8) + snapshot_buf[pixel_ix + 2];
// go to the next pixel
out_ptr_ix++;
pixel_ix += 3;
pixels_left--;
}
// and done!
return 0;
}
#if !defined(EI_CLASSIFIER_SENSOR) || EI_CLASSIFIER_SENSOR != EI_CLASSIFIER_SENSOR_CAMERA
#error "Invalid model for current sensor"
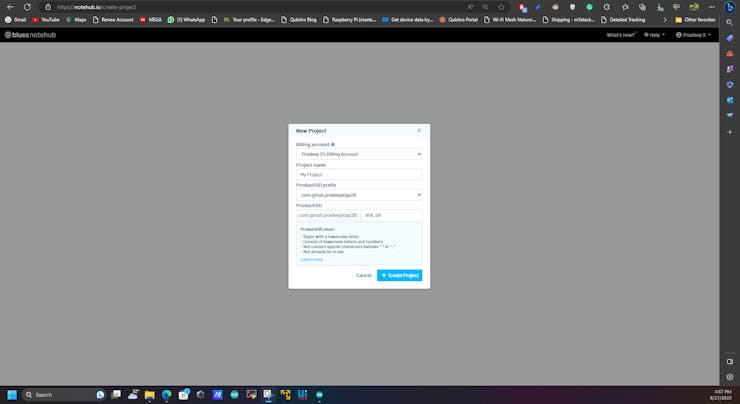
#endifBefore uploading the sketch to the board first, create a new project in Blues Notehub and paste the project UID in the Arduino sketch.
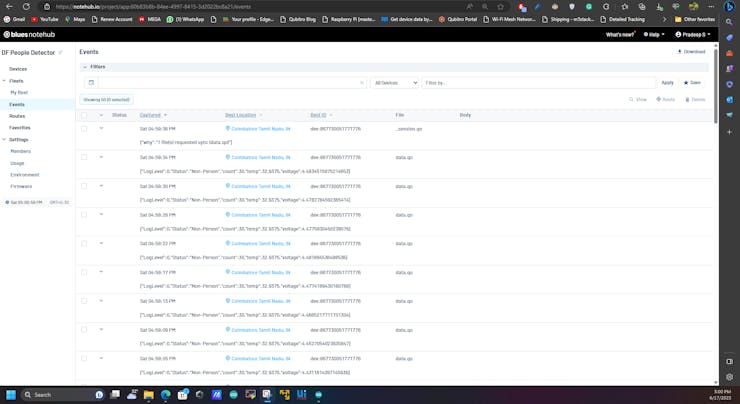
Once uploading the code you can see the information in the LCD display.

Next, open the notehub and look at the incoming data.
Step 4 - Cloud Data Routing⛅:
First, let's connect Qubitro with Notehub. Go to the Qubitro portal and create a new MQTT-based connection.
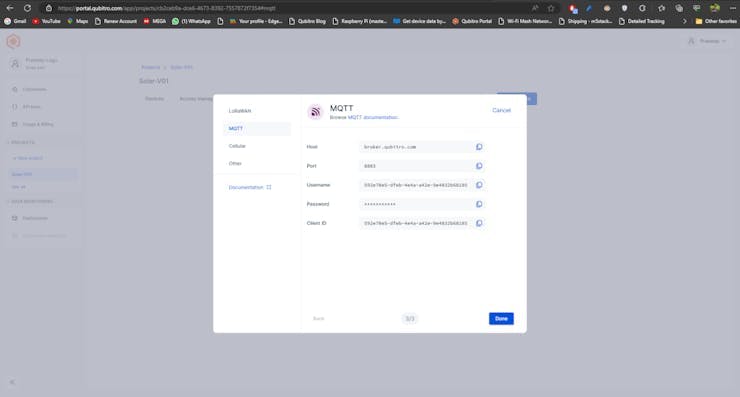
Then copy the credentials, next open the Notehub and navigate to the routes page.

Create a new MQTT route and insert your Qubitro credentials.
Note: In Qubitro MQTT topic is MQTT username.
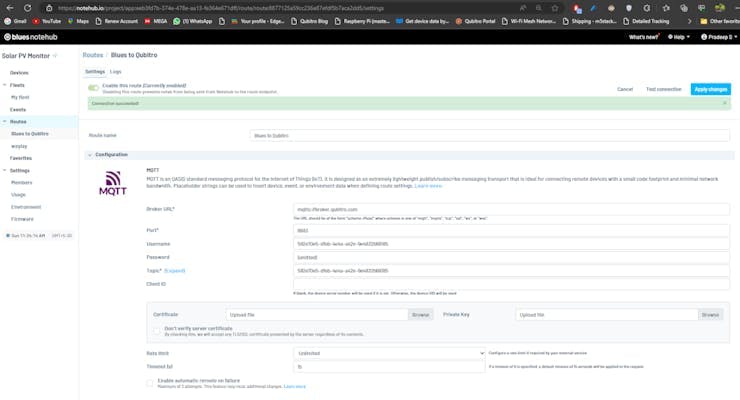
Next, set the data as body only.

Check back the Qubitro portal and look for the incoming data.

Step 5 - Wrap Up:
Qubitro also allows us to implement the rule engines to trigger custom endpoints like SMS and email. You can use those to implement the alarm actions.
The article was first published in hackster, June 17, 2023
cr: https://www.hackster.io/pradeeplogu0/ml-person-detection-with-firebeetle-2-and-blues-cellular-c28f7a
author: Pradeep


 DFR0868DFR0706-ENSEN0501SEN0193DFR0063DFR0888-12DFR0981DFR0478DFR0658SEN0321SEN0170SEN0471DFR0058FIT0895SEN0305ROB0128DFR0305DFR0282DFR0745FIT0502DFR0554DFR0558FIT0585DFR0181FIT0793DFR0937DFR0439DFR0759SEN0304DFR0483DFR0868DFR0706-ENSEN0501SEN0193DFR0063DFR0888-12DFR0981DFR0478DFR0658SEN0321SEN0170SEN0471DFR0058FIT0895SEN0305ROB0128DFR0305DFR0282DFR0745FIT0502DFR0554DFR0558FIT0585DFR0181FIT0793DFR0937DFR0439DFR0759SEN0304DFR04833160


