
Smart management of the Università della Calabria's study rooms using DFRobot AI Starter EEDU Kit to detect people through computer vision.
Story
In the residence of the University of Calabria there are study rooms available for students. In the months of June and July these classrooms are highly demanded by students for their self-study for exams. These classrooms have a limited capacity and so far, there is no way to know if they are full or not until you get there.
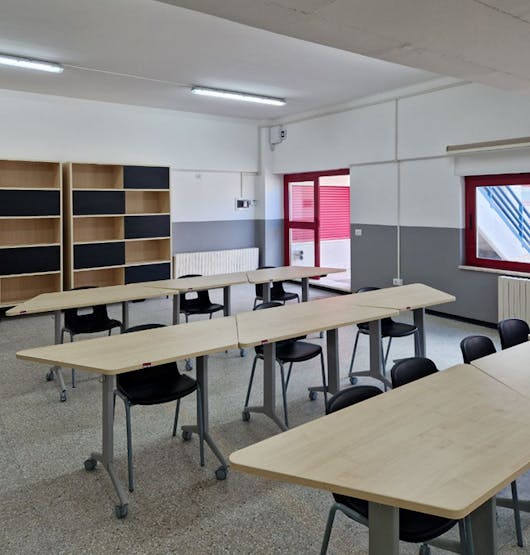
Fig 1. The study room
Using the Hackster & DFRobot AI Starter EEDU Kit it would be possible to detect and count how many people are in the classroom at any given time through vision applications and ML models. Also using the Arduino Cloud, this information would be available in real time. In this way, students can know in real time and remotely the occupancy of the study room.
What are we going to build?
Using Gravity: Huskylens the number of people present in the classroom could be counted at any given time by pointing the camera to the door. The WiFi connection of the FireBeetle 2 ESP32-E can be used to connect to the WiFi network of the university to establish and send the data to the Arduino Cloud. Through a public dashboard everyone would have access to the information.
Hardware and software development
For this project, the FireBeetle ESP32-E board (https://www.dfrobot.com/product-2195.html) will be used. This is a board based on the ESP32E microcontroller, which makes it very versatile and useful for IoT projects since it has a WiFi and Bluetooth connection.
To detect people entering and leaving the study room, the Gravity: Huskylens board (https://www.dfrobot.com/product-1922.html ), an easy-to-use artificial intelligence vision sensor module is used. Huskylens is designed to recognize and detect objects, colors, and tags, making it useful for various applications in robotics, automation, and education. It uses a built-in camera and a powerful AI chip to process images and provide real-time feedback.
The interconnection of this board with the FireBeetle is carried out through the I2C port, although the serial port is also an option. For more information about the rest of the applications consult the information available in this link: https://wiki.dfrobot.com/HUSKYLENS_V1.0_SKU_SEN0305_SEN0336.
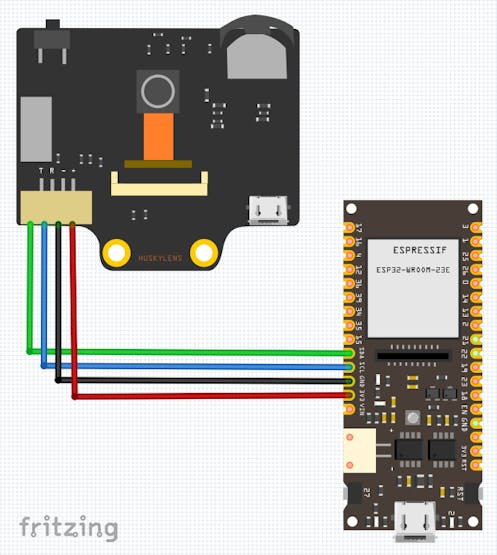
Fig 2. Interconnections
The system must perform three actions:
· Detect people.· Keep track of the number of people entering and leaving the classroom.· Send the data to the cloud.Let's break down each of these functions in the code. The complete code will not be presented, since it is available in the repository (see the link at the end).
Action 1: Detect people
The element used to detect people is the Gravity: Huskylens board through the Object Recognition application, so our code must be able to connect to this board and obtain the information of the recognized objects using the interface provided by the manufacturer. For this, the HUSKYLENS.h library is used.
#include "HUSKYLENS.h"
HUSKYLENS huskylens;
int ID1 = 1;
// …
void setup() {
    Serial.begin(115200);
    Wire.begin();
    while (!huskylens.begin(Wire)){
        Serial.println(F("Begin failed!"));
        Serial.println(F("1.Please recheck the \"Protocol Type\" in HUSKYLENS (General     Settings>>Protocol Type>>I2C)"));
        Serial.println(F("2.Please recheck the connection."));
        delay(100);
    }
    huskylens.writeAlgorithm(ALGORITHM_OBJECT_RECOGNITION);
    // setup code continues
}
In this code segment, we initialize the connection through the serial port in order to be able to debug the algorithm. Since the connection between Huskylens and Firebeetle is via I2C, we configure our object using the Wire type and start the operation with the ALGORITHM_OBJECT_RECOGNITION parameter, which is what allows us to detect people in the captured video frames.
Then in our loop function we continuously ask to the Huskylens for the blocks correctly detected as people, which are returned inside a HUSKYLENSResult object, which has the following properties: height, width, xCenter and yCenter. Each person detected in the frame is highlighted within a square, and information about the position and size of this square is available for use in our code.
Action 2: Keep track of the number of people entering and leaving the classroom
To know the number of people in the classroom at any given time, a tracking of all the people detected at the door in the previous step must first be carried out to determine if a person is entering or leaving. For this, a tracking of the objects returned by the previous step must be carried out. An excellent article on this process and how to implement it can be seen at this link: https://pyimagesearch.com/2018/07/23/simple-object-tracking-with-opencv/. Here we will only summarize the idea behind the process.
Object tracking involves the process of detecting objects in an initial frame of a video and assigning a unique ID to each detection. It then tracks the objects as they move across subsequent frames, ensuring that the assigned IDs remain consistent.
An effective object tracking algorithm should minimize the need for repeated object detection, as it can be computationally expensive. It should also be significantly faster than running the object detector itself. Additionally, the algorithm should handle situations where the tracked object disappears or moves outside the boundaries of the video frame. It should be robust against occlusion, and able to reacquire objects that were temporarily lost between frames.
The object tracking in this project is based on the centroid tracking algorithm. Here's a summary of the steps of the algorithm:
· Object Detection and Centroid Computation: This step is already done in the previous action. The results are returned in a HUSKYLENSResult object.
· Object Matching: In subsequent frames, the algorithm matches the centroids of the current frame with the centroids of the previous frame. This is done by minimizing the distances between the centroids.
The primary assumption of the centroid tracking algorithm is that a given object will potentially move in between subsequent frames, but the distance between the centroids for adjacent frames will be smaller than all other distances between objects. Therefore, if we choose to associate centroids with minimum distances between subsequent frames we have already our object tracking. For this purpose, the Euclidean distance is calculated (https://en.wikipedia.org/wiki/Euclidean_distance ).
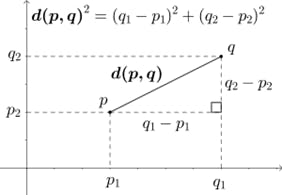
Fig 3. Euclidian distance (from Wikipedia)
// function to calculate euclidian distance
double euclidianDistance(int x0, int y0, int x1, int y1){
    return sqrt(abs((x0-x1)*(x0-x1)+(y0-y1)*(y0-y1)));
}
To maintain a list of previously detected points, a Linked List type data structure is used to store instances of the PointTracked class and allows us to access and remove elements from it efficiently.
For every subsequent frame in the video stream instead of assigning a new unique ID to each detected object, we first need to determine if we can associate the new object centroids with a previous detected object. To accomplish this process, we compute the Euclidean distance between each pair of existing object centroids and input object centroids.
· Assigning IDs: The algorithm assigns a unique ID to each object based on the centroid matching. New objects are assigned new IDs, while existing objects retain their IDs.
· Updating Object Positions: As the video progresses, the algorithm continuously updates the object positions based on the newly calculated centroids.
The centroid tracking algorithm is computationally efficient and performs well in scenarios where objects have consistent motion patterns. However, it may encounter challenges in cases of occlusion or when the objects change their shape significantly.
Action 3: Send the data to the cloud
Finally, we need to count the number of people present and update the value in the cloud. For this, in the loop function, the following code segment is implemented:
// checking for object leaving the room
for (int j=0; j< myLinkedList.size();j++){
    PointTracked *p = myLinkedList.get(j);
    if (p->already_visited == false){
        p->refresh_counter++;
    }
    p->already_visited = false;
    if (p->refresh_counter == FRAME_TO_REMOVE){
    // the object is removed because left the room
        Serial.print("Point removed ");
        Serial.print(p->id);
        Serial.print(" was moving to ");
        Serial.println(p->direction);
        myLinkedList.remove(j);
        if (p->direction == 'r'){
        // we asume that the right is the entrance and the left is the exit
            peopleCounter++;
        }
        else{
            peopleCounter--;
        }
        inFrameCounter--;
    }
}
If an object in the Linked List could not be updated in a certain number of frames set in the FRAME_TO_REMOVE variable, then it is removed from the list, because it presumably left the frame of the sensor, and the people counter variable is updated in correspondence.
To know the number of people in real time in the study room, we are going to use an Arduino Cloud dashboard using the editor at https://create.arduino.cc. We start by creating a new project configured to work with the FireBeetle-ESP32 board.
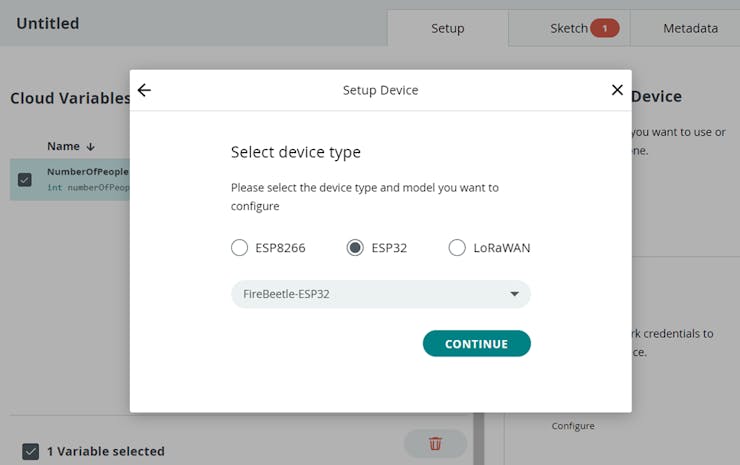
Fig 4. New project in Arduino Cloud
For this project we only need an integer type variable to store the number of people, and it is enough that it be of the Read-Only type, since its value will only be modified from the board and not from the cloud.
Once the project is set up, we can finish writing the code in the cloud editor or download the files and make them in our local IDE.
Results and future work
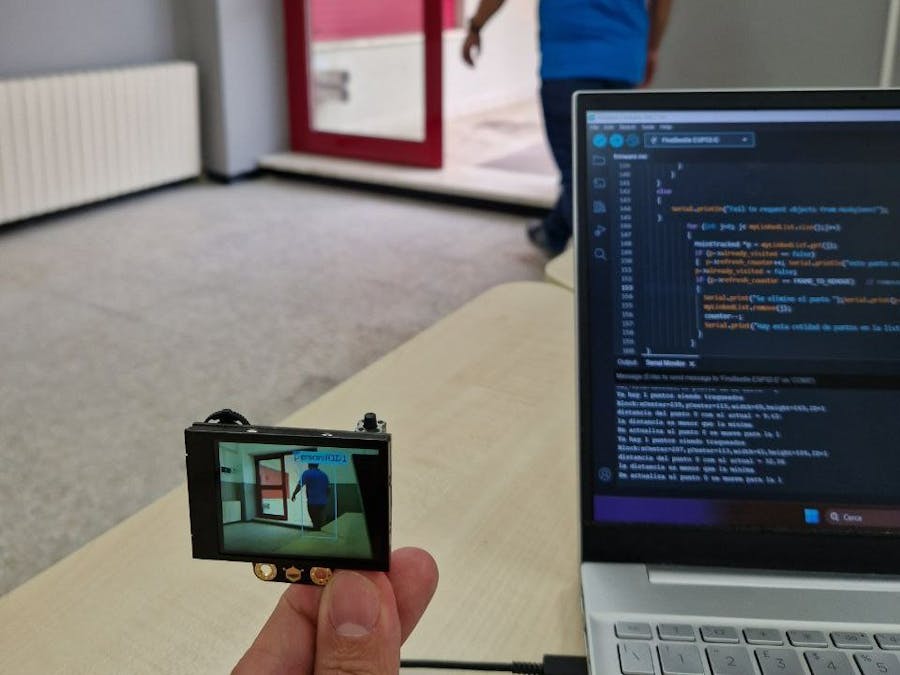
The following picture shows the system in operation. On the screen of the Huskylens board it can see a rectangle that means the correct identification of a person.
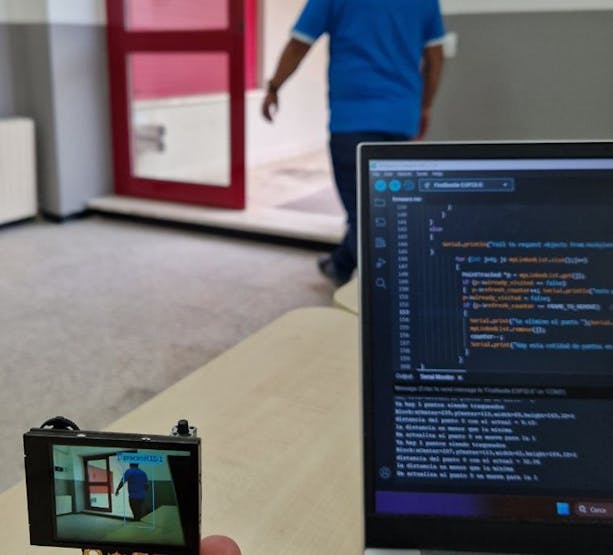
Fig 5. Project in action
The following figure shows the dashboard.
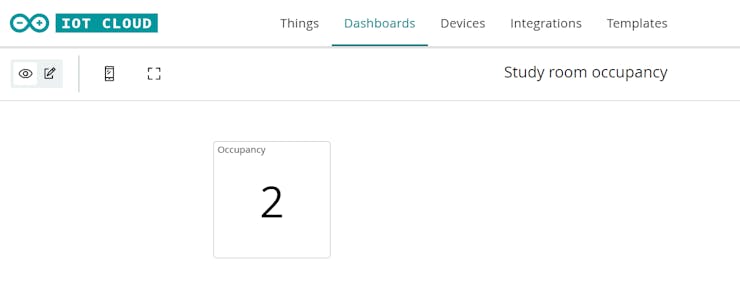
Fig 6. Dashboard
The results obtained in this project can be considered positive since the system is capable of detecting in most cases people entering or leaving the room. But in some cases, such as when there is occlusion between several people, the system cannot detect the correct number, this can be solved by using more than one Huskylens sensor with different angles of focus on the door. Also, it's possible to substitute the centroid algorithm for some other more robust one. Our next steps will be in that direction.
Finally, thanks to DFRobot and Hackster.io for providing the hardware used in the realization of this project. If you have any questions or recommendations, feel free to leave a comment below!
RoomCounter.ino(C/C++)
The ino file
/***************************************************

 Use of the Hackster & DFRobot AI Starter EEDU Kit and Arduino Cloud to detect and count how many people are in a room at any given time through vision applications.

 Created 2023-June
 By [Yunior Cabrera](https://yvcabrerago.com/)

 This code is in the public domain.

 ****************************************************/

#include "arduino_secrets.h"
#include "thingProperties.h"
#include "HUSKYLENS.h"
#include <LinkedList.h>

// meta parameters
#define MIN_DIST 100                    // used to adjust the min distance to asociate objects
#define FRAME_TO_REMOVE 10              // used to adjust the min number of frame to remove object

int inFrameCounter = 0;

// object to save the points detected
class PointTracked
{
	public:
    int id;
    int x;
    int y;
    int refresh_counter;
    bool already_visited;
    char direction;
};

HUSKYLENS huskylens;
//HUSKYLENS green line >> SDA; blue line >> SCL
int ID1 = 1; //first learned results, colored result on HUSKYLENS screen

void printResult(HUSKYLENSResult result);
double euclidianDistance(int x0, int y0, int x1, int y1);

LinkedList<PointTracked*> myLinkedList = LinkedList<PointTracked*>();

void setup() {
  // Initialize serial:
  Serial.begin(115200);

  delay(1500);

  // Defined in thingProperties.h
  initProperties();

  // Connect to Arduino IoT Cloud
  ArduinoCloud.begin(ArduinoIoTPreferredConnection);

  /*
     The following function allows you to obtain more information
     related to the state of network and IoT Cloud connection and errors
     the higher number the more granular information you’ll get.
     The default is 0 (only errors).
     Maximum is 4
 */
  setDebugMessageLevel(2);
  ArduinoCloud.printDebugInfo();

  Wire.begin();
  while (!huskylens.begin(Wire)){
    Serial.println(F("Begin failed!"));
    Serial.println(F("1.Please recheck the \"Protocol Type\" in HUSKYLENS (General Settings>>Protocol Type>>I2C)"));
    Serial.println(F("2.Please recheck the connection."));
    delay(100);
  }

  peopleCounter = 0;
  huskylens.writeAlgorithm(ALGORITHM_OBJECT_RECOGNITION);
}

void loop() {
  ArduinoCloud.update();
  // Your code here
  delay(200);
  if (huskylens.requestBlocksLearned()){    //request blocks tangged ID != ID0 from HUSKYLENS
    if (huskylens.count(ID1) > 0){
      if (inFrameCounter == 0){     // the room is empty
        Serial.println("List is empty");
        // we put all points in the linked list
        for (int i = 0; i < huskylens.count(ID1); i++){
          HUSKYLENSResult result = huskylens.get(ID1, i);
          printResult(result);

          PointTracked *p = new PointTracked();
          p->id = inFrameCounter;
          p->x = result.xCenter;
          p->y = result.yCenter;
          p->direction = '0';     // 0 = new point, we don't have the direction yet
          p->already_visited = true;
          p->refresh_counter = 0;
          myLinkedList.add(p);
          inFrameCounter++;
          Serial.print("There are ");Serial.print(myLinkedList.size());Serial.println(" points being tracked");
        }
      }
      else{
        Serial.print("There are ");Serial.print(myLinkedList.size());Serial.println(" points being tracked");
        for (int i = 0; i < huskylens.count(ID1);i++){
          HUSKYLENSResult result = huskylens.get(ID1, i);
          printResult(result);
          int new_point = -1;
          double min_distance = 300;  //  a large number
          for (int j=0; j< myLinkedList.size();j++){
            PointTracked *p = myLinkedList.get(j);
            double dist = euclidianDistance(p->x, p->y, result.xCenter, result.yCenter);
            Serial.print("Distance from point ");Serial.print(p->id);Serial.print(" to actual point = ");Serial.println(dist);
            if (dist <= min_distance){
              min_distance = dist;
              new_point = j;
            }
          }

          if (min_distance <= MIN_DIST){ // is the distance is less than MIN_DIST, then is the same point
            PointTracked *p = myLinkedList.get(new_point);
            if (p->x < result.xCenter){
              p->direction = 'r';         // based on the position of the centroid, can detect the direction of movement.
            }
            else{
              p->direction = 'l';
            }
            p->x = result.xCenter;
            p->y = result.yCenter;
            p->already_visited = true;
            Serial.print("Point ");Serial.print(p->id);Serial.print(" is updated, is moving to ");Serial.println(p->direction);
            p->refresh_counter = 0;
          }
          else{        // is a new point
            PointTracked *p = new PointTracked();
            p->id = inFrameCounter;
            p->x = result.xCenter;
            p->y = result.yCenter;
            p->direction = '0';
            p->already_visited = true;
            p->refresh_counter = 0;
            myLinkedList.add(p);
            inFrameCounter++;
          }
        }
      }
    }
  }
  else{
    Serial.println("Fail to request objects from Huskylens!");
  }

  // checking for object leaving the room
  for (int j=0; j< myLinkedList.size();j++){
    PointTracked *p = myLinkedList.get(j);
    if (p->already_visited == false){
      p->refresh_counter++;
    }
    p->already_visited = false;
    if (p->refresh_counter == FRAME_TO_REMOVE){   // the object is removed because left the room
      Serial.print("Point removed ");Serial.print(p->id);Serial.print(" was moving to ");Serial.println(p->direction);
      myLinkedList.remove(j);
      if (p->direction == 'r'){    // we asume the right is the entrance and the left the exit
        peopleCounter++;
      }
      else{
        peopleCounter--;
      }
      inFrameCounter--;
    }
  }
}

// function to calculate euclidian distance (https://en.wikipedia.org/wiki/Euclidean_distance)
double euclidianDistance(int x0, int y0, int x1, int y1){
  return sqrt(abs((x0-x1)*(x0-x1)+(y0-y1)*(y0-y1)));
}

// useful function to debug in serial port
void printResult(HUSKYLENSResult result){
    if (result.command == COMMAND_RETURN_BLOCK){//result is a block
        Serial.println(String()+F("Block:xCenter=")+result.xCenter+F(",yCenter=")+result.yCenter+F(",width=")+result.width+F(",height=")+result.height+F(",ID=")+result.ID);
    }
    else{//result is unknown.
        Serial.println("Object unknown!");
    }
}Arduino_Secrets.h(C/C++)
The secret to connect to WiFi network and Arduino Cloud
#define SECRET_SSID "put your network name here"
#define SECRET_OPTIONAL_PASS "put your network password here"
#define SECRET_DEVICE_KEY "put your Arduino Cloud Key here"
ThingProperties.h(C/C++)
Configuration to use with Arduino Cloud
// Code generated by Arduino IoT Cloud

#include <ArduinoIoTCloud.h>
#include <Arduino_ConnectionHandler.h>

const char DEVICE_LOGIN_NAME[]  = "put your device id here";

const char SSID[]               = SECRET_SSID;    // Network SSID (name)
const char PASS[]               = SECRET_OPTIONAL_PASS;    // Network password (use for WPA, or use as key for WEP)
const char DEVICE_KEY[]  = SECRET_DEVICE_KEY;    // Secret device password


int peopleCounter;                              // the cloud variable

void initProperties(){

  ArduinoCloud.setBoardId(DEVICE_LOGIN_NAME);
  ArduinoCloud.setSecretDeviceKey(DEVICE_KEY);
  ArduinoCloud.addProperty(peopleCounter, READ, ON_CHANGE, NULL);

}

WiFiConnectionHandler ArduinoIoTPreferredConnection(SSID, PASS);
The article was first published in hackster, June 8, 2023
cr: https://www.hackster.io/507517/smart-management-of-the-study-rooms-through-computer-vision-b2de88
author: Yunior Vicente Cabrera González&Danelis Garrido


