
UNIHIKER - Bio Limb : A bot to collect human samples without human touch

Introduction

This is a Bio-Limb a Biomedical robotics arm which is used to take samples from infected patients to help doctors to get samples without human contact.
Why this is?
The Automatic Sample Collector: A Biomedical Robot Currently, there are many viruses in our surroundings. The pandemic COVID - 19 for instance, was there which infected people by physical contact with one another, leaving them infected too, Even that time around 70M health workers lost their lives due to this pandemic. At that time, Doctors and healthcare workers seemed to collect saliva in the manual way or traditional way, which depended on physical contact, and they often used Personal Protective Equipment (PPE)s to shield themselves. Despite using these, the probability of them being infected was still be there. However, when this perilous work will be done by a machine, that time the chances are quite low and we can save their lives. We are working to make this for any kind of sample collection such as collecting samples from a particular injured place and diabetics from a patient.
The detailed project paper is here.


Working Proccess
There is all about machine learning. A machine learning model will instruct a human from entering the room to the end of the process. When the person or patient enters the room, this automatic saliva collector will instruct them to have a seat, open their masks if worn, rest their hands, and tell them to open their mouth to collect saliva. This process includes them to open their mouth, then the bot will take a cotton bud and hold the cotton bud on their mouth for a while and collect the saliva. After the saliva has been collected, the bot will pass the collected saliva to another safe place with the help of machine learning. After the process has been done, the bot will disinfect itself with the help of UV light, so that the upcoming person will not be infected.


Let's assemble the arm. Here I am using matel finished arm you can also use the 3d printed arm. If you need the 3d printed design, lemme know. Here is the assembling video below ??
Now let's connect all the servo motors with the microcontroller (Arduino Mega ), and don't
forget to power all the servos with an extra power supply. Also, remember to connect the GND to the whole circuit.


After this connect the USB Hub and then connect the camera, Arduino mega and USB speaker through the cable with UNIHIKER. Now this is good to go with image processing.

Now that's everything is assembled and working, let's program the board:
Download and code from here.
Connect your Unihiker (or "Enhiker"!) to your PC using a USB cable.


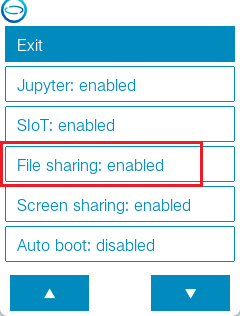
Now We need to upload all the code to unihiker. So to do that we will use SMB sharing.To enable the file-sharing function on the UNIHIKER, simply access the Home menu and select the file-sharing option.
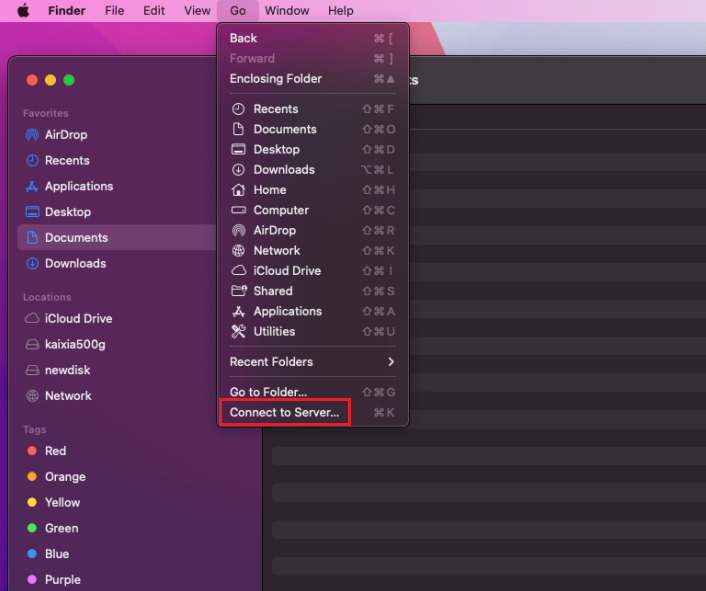
As I am using mac os, if you are in the same place come with me, otherwise, check the documentation for more.
. Open Finder, select Connect to Server... from the menu.
. Then enter smb://UNIHIKER's IP
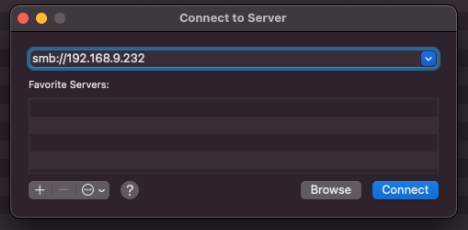
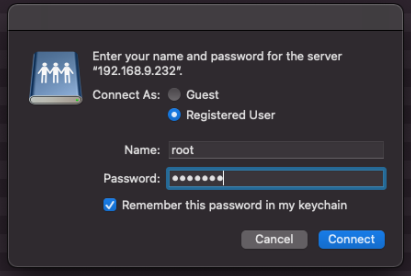
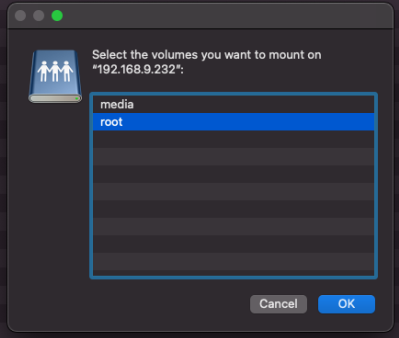
.Select the root folder and open it. we have to upload the codes here.
After download the code, move on to the “ Bio-limb-UNIHIKER-AIoT-Innovation-Challenge
/imageProcc/
” directory and copy all the files and paste them into the root directory. Don't forget to change to port number . You can change them in this file - “ serialCommunication.py ” and change the threshold values from - “ config.py ”.
Well, now we need to install some Python libraries. Now let's explore the UNIHIKER through SSH. Type “ ssh root@ip ” then enter the password, the default pass is “ dfrobot ”.
login to the UNIHIKER

Now you need to update Python.
2. Download the miniforge conda installer file for python 3.10 -
wget https://github.com/conda-forge/miniforge/releases/latest/download/Miniforge3-Linux-aarch64.sh
3. Navigate to the downloaded directory and look for the miniforge installation file you just downloaded.

4. Install the miniforge conda with: sudo bash Miniforge3-Linux-aarch64.sh

5. Press enter

6. Accept the license

7. Select installation path. When asked, select the default install location or any location you want. For example - >>> /root/miniforge3

8. Initialize miniforge conda by adding it in your bash file to select conda python as your default python environment. Select “yes” to initialize or “no” to reject.
-> Do you wish the installer to initialize Miniforge3 >>> yes
![]()
9. Edit the .bashrc profile “ vim .bashrc ” and Source the bashrc to reload the environment variables: source ~/.bashrc
__conda_setup="$('/root/miniforge3/bin/conda 'shell.bash 'hook' 2> /dev/null)"
if [ $? -eq 0 ]; then
eval "$__conda_setup"
else
if [ -f "/root/miniforge3/etc/profile.d/conda.sh" ]; then
. "/root/miniforge3/etc/profile.d/conda.sh"
else
export PATH = "/root/miniforge3/bin:$PATH"
fi
fi
unset __conda_setup

You will see conda has been initialized in your bash file.
10. Check whether miniforge conda is working correctly, type: conda

Now type “ conda activate ”. Now we will install the dependencies by typing “ pip install mediapipe playsound pyserial ”. UNIHIKER setup is done.
Now we will code for the Arduino Mega,
Move to the folder “ Bio-limb-UNIHIKER-AIoT-Innovation-Challenge
/Arduino/” and upload the code to the arduino mega.
Select proper Board and Port and hit the upload button

All right, everything is done. now you can run the programmer.
Just run the “ covidTestRobotImageProcessing.py ” file and the bot will start. Here is the video of how the bot will work.


