

Introduction

The advent of assistive technologies has brought about transformative changes in the lives of individuals with disabilities. Among these innovations, mobility aids like wheelchairs play a crucial role. However, traditional wheelchairs often limit the independence of users, particularly those with paralysis who can only move one hand. This project seeks to address this limitation by developing a smart wheelchair that leverages machine learning for gesture recognition, gyroscope technology for tilt control, and remote control capabilities. This multi-faceted approach aims to provide a highly adaptable solution that enhances mobility, promotes independence, and significantly improves the quality of life for users.
Project Description
Objectives
The main objectives of this project are:
• Develop an Intelligent Control System: Create a wheelchair that can be controlled through hand gestures, gyroscopic tilt, and a remote control.• Enhance User Experience: Ensure the system is intuitive and easy to use, catering to various levels of physical ability.• Promote Independence: Empower users to navigate their environments autonomously, reducing reliance on caregivers.
Technical Components
1. Gesture Recognition System
• Machine Learning Algorithms: • The system employs machine learning models trained on a diverse dataset of hand gestures. Algorithms such as convolutional neural networks (CNNs) can effectively recognize patterns in real-time. •Sensors and Cameras: •Depth cameras (e.g., Intel RealSense) or RGB cameras capture hand movements. The data is processed to identify specific gestures that correlate with directional commands.
2. Remote Control Module
• User-Friendly Interface: • The remote control will feature large, tactile buttons designed for easy use. Buttons will correspond to forward, backward, left, right, and stop commands. •Wireless Communication: •Communication will utilize RF or Bluetooth technology to ensure a reliable connection between the remote and the wheelchair.
3. Gyroscope Integration
•Tilt Sensors: •A gyroscope is mounted on the user’s hand or wrist, detecting tilt angles. This data is translated into directional movement of the wheelchair. •Feedback Mechanism: • A haptic feedback system will provide users with real-time feedback, confirming the command received by the wheelchair.
4. Microcontroller
• Central Processing Unit: •A microcontroller (e.g., UNIHIKER Pi or Arduino) will process inputs from the gesture recognition system, remote control, and gyroscope, managing the overall functionality of the wheelchair. •Data Integration: •The microcontroller will integrate sensor data and ensure smooth operation of the motors driving the wheelchair.
5. Wheelchair Chassis
•Customizable Frame: •The wheelchair will be designed for comfort and stability, accommodating various user sizes and weights.Integration of the electronic components will be done without compromising the structural integrity of the wheelchair.
User Interface
The user interface will prioritize accessibility:
•Visual Indicators: •LEDs will indicate the status of the wheelchair (e.g., powered on, moving, stopped). •Auditory Cues: •The system will provide auditory feedback to confirm user commands and alerts.
Safety Features
• Obstacle Detection: • Ultrasonic sensors will be installed to detect obstacles in the wheelchair’s path, preventing collisions.
Emergency Stop: • A dedicated emergency stop button on both the remote and the wheelchair will allow for •immediate halting of movement in case of an emergency.
Benefits of the Project
2. Greater Inclusivity: The multi-modal control options cater to a broader range of abilities, making the wheelchair accessible to more individuals.
3. Improved Social Interaction: By facilitating easier movement, users can engage more actively in social and recreational activities, promoting mental well-being.
4. Customizable Experience: The wheelchair can be tailored to meet the specific needs and preferences of individual users, enhancing user satisfaction.
5. Technological Advancement: This project contributes to the growing field of assistive technology, inspiring future innovations that further enhance the lives of individuals with disabilities.
Connect the motor driver with the Arduino as shown in the diagram below. ??


After this connect the USB Hub and then connect the camera, Arduino mega and USB speaker through the cable with UNIHIKER. Now this is good to go with image processing.
Now that's everything is assembled and working, let's program the board:
Connect your Unihiker (or "Enhiker"!) to your PC using a USB cable.


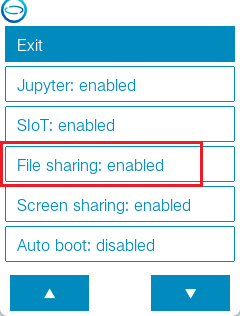
Now We need to upload all the code to unihiker. So to do that we will use SMB sharing.To enable the file-sharing function on the UNIHIKER, simply access the Home menu and select the file-sharing option.
As I am using mac os, if you are in the same place come with me, otherwise, check the documentation for more.
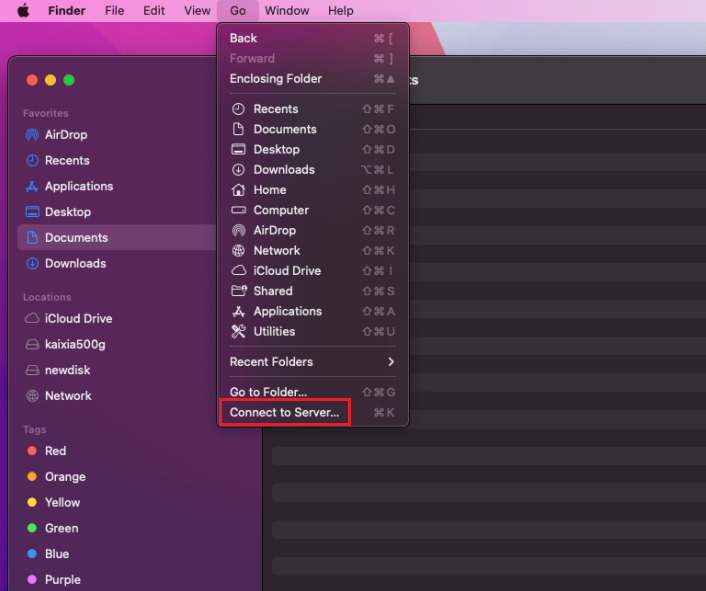
. Open Finder, select Connect to Server... from the menu.
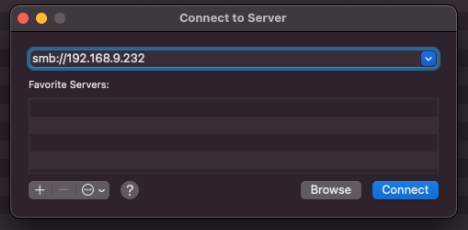
. Then enter smb://UNIHIKER's IP
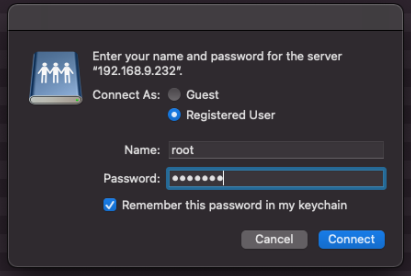
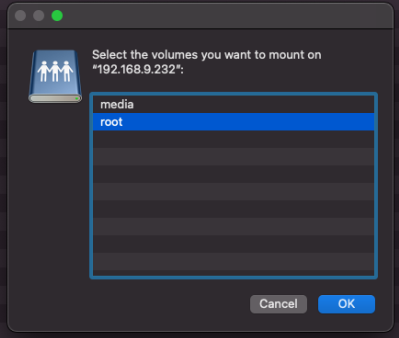
.Select the root folder and open it. we have to upload the codes here.
After downloading the code, move on to the directory and copy all the files and paste them into the root directory. Don't forget to change to port number . You can change them in this file - “ app.py ”.
Well, now we need to install some Python libraries. Now let's explore the UNIHIKER through SSH. Type “ ssh root@ip ” then enter the password, the default pass is “ dfrobot ”.
login to the UNIHIKER

Now you need to update Python.
2. Download the miniforge conda installer file for python 3.10 -
wget https://github.com/conda-forge/miniforge/releases/latest/download/Miniforge3-Linux-aarch64.sh
3. Navigate to the downloaded directory and look for the miniforge installation file you just downloaded.

4. Install the miniforge conda with: sudo bash Miniforge3-Linux-aarch64.sh

5. Press enter

6. Accept the license

7. Select installation path. When asked, select the default install location or any location you want. For example - >>> /root/miniforge3

8. Initialize miniforge conda by adding it in your bash file to select conda python as your default python environment. Select “yes” to initialize or “no” to reject.
-> Do you wish the installer to initialize Miniforge3 >>> yes
![]()
9. Edit the .bashrc profile “ vim .bashrc ” and Source the bashrc to reload the environment variables: source ~/.bashrc
__conda_setup="$('/root/miniforge3/bin/conda 'shell.bash 'hook' 2> /dev/null)"
if [ $? -eq 0 ]; then
eval "$__conda_setup"
else
if [ -f "/root/miniforge3/etc/profile.d/conda.sh" ]; then
. "/root/miniforge3/etc/profile.d/conda.sh"
else
export PATH = "/root/miniforge3/bin:$PATH"
fi
fi
unset __conda_setup

You will see conda has been initialized in your bash file.
10. Check whether miniforge conda is working correctly, type: conda

Now type “ conda activate ”. Now we will install the dependencies by typing “ pip install mediapipe playsound pyserial ”. UNIHIKER setup is done.
Now we will code for the Arduino Mega,
Move to the folder “ directory/Arduino ” and upload the code to the Arduino.

Select the proper Board and Port and hit the upload button.
All the coding is here 👇
Now run the app.py. And it will started to work with image processing.


