

Automatic/Smart Cabinets that are voice activated through a custom Smart Home network.
Hardware components
![]() DFRobot UNIHIKER - IoT Python Programming Single Board Computer with Touchscreen
DFRobot UNIHIKER - IoT Python Programming Single Board Computer with Touchscreen
M5Stack CM4Stack Development Kit
![]() DFRobot FireBeetle ESP32 IOT Microcontroller (Supports Wi-Fi & Bluetooth)
DFRobot FireBeetle ESP32 IOT Microcontroller (Supports Wi-Fi & Bluetooth)
![]() Ultrasonic Sensor - HC-SR04 (Generic)
Ultrasonic Sensor - HC-SR04 (Generic)
![]() SG90 Micro-servo motor ×2
SG90 Micro-servo motor ×2
Software apps and online services
DFRobot Mind+
Thonny
For the UNIHIKER AIoT Innovation Challenge, I have chosen the Smart Terminal category:

First Things First
For the mobility impaired, a lot of the issues with cabinets and the kitchen as a whole seem to be in layout and design, which makes sense. It'd be frustrating to have things be just out of reach, or to try to open a cabinet and your wheelchair is in the way. One aspect that I'm able to tackle, though, is the way cabinetry is controlled in the first place. With technology we can open and close cabinets with more convenient systems and remove the inconveniences that mobility impaired people experience. That's only part of the picture, though. This project will be about not only creating Smart/Automatic Cabinets, but also putting together a forward thinking Smart Kitchen solution that could be easily leveraged to add more devices as well as making these custom devices easier to utilize.
We'll go through each piece of the setup step by step, but I want to provide a quick overview of the goal as a whole. There are 3 main parts.
1. Device(s) to kick off the process to tell the cabinet(s) to open/close in the first place
2. The device(s) that open and shut the Smart Cabinet(s)
3. A middleman that can listen for incoming commands and distribute them to the smart devices that are listening for their activation command.
Below is a quick animated depiction of the plan/implementation of the project to convey the full idea before we get into it (it may take a bit to load):
Automatic Cabinets
This first section is a bit tangential, but it's something I could see being an appealing alternative to some users so I wanted to include it before diving into our full Smart Cabinet and Smart Home setup.
The feedback specifically mentioned that voice activated controls would be a "game changer", so I will 100% be including that within this project. However, what came to mind for me when considering what felt ideal for improving cabinetry for the mobility impaired, a simpler solution came to mind. The reason being, if there are a lot of cabinets, they'll need different names for voice activation, or a lot of buttons if used in a different way like a phone app. What if the cabinets could just automatically open when you needed them? Different people have different needs and preferences, so if my focus is cabinets, I may as well offer multiple solutions.
Proximity Driven Cabinetry
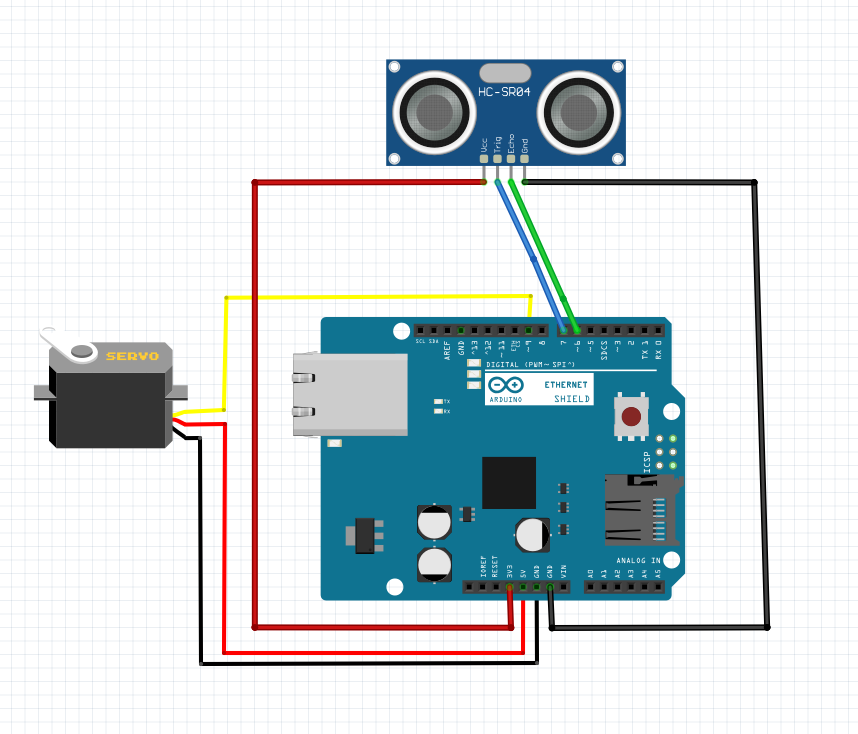
The first solution I wanted to tackle was having cabinets open by proximity. There would be a sweet spot in range, where if the cabinets were triggered to open from too far a distance cabinets would open at unwanted times and get quite annoying. Too close and it would be difficult to navigate into range without then blocking the cabinet, especially with wheelchairs involved. But, with that sweet spot in mind, which I estimated to be about a foot away and with the ultrasonic sensor placed beside where the cabinet opens, it could prove to be a very convenient solution. When triggered, the cabinet opens and stays open for a minute before automatically closing. This should give ample time to get whatever is needed from the cabinet, but if not the proximity sensor should detect the user's presence and remain open and this timing can easily be changed in the code.
The device is simple. It's an ultrasonic sensor and a servo. When the user is close, it opens for a minute, then closes if there is nothing in proximity. This could be easily adjusted to add 2 servos per 1 sensor, or whatever else the given setup requires. The code is included.
Especially with a cruising baby in the house (meaning they walk by holding themselves up on walls and things like cabinets) it felt unwise to install this in my own home, so instead I did a quick demonstration of it with a toy chest I built that had previously been a part of an interactive mural I made. It has a servo that opens and closes the toy chest, so I plugged in the arduino and gave it a whirl.
Now We'll Make It Smart
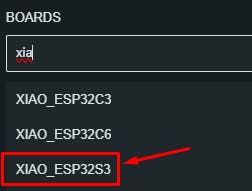
As promised, it's time to make it Smart. This time around I'm specifically using an ESP32 to make connecting to wifi easy. The Seeed Studio XIAO ESP32S3 Sense is wifi enabled, so it can also be used as the microcontroller for your Smart Cabinets. You would just choose the following board if you use it instead of a different ESP32.
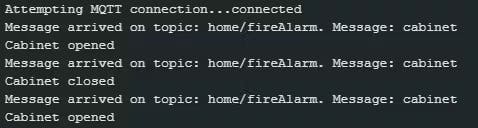
Now it's time for code! We'll go more in depth on what exactly is on the other side of this to trigger the command the code is listening for in the first place, but for the time being what matters is that we link to an MQTT server and then listen for a specific message. What I setup in the code was just "cabinet", which would then change the state of the cabinet to opened or closed. The code is included.
With this, the command to kick off sending the message in the first place can be triggered in various ways, including with voice commands. Obviously the following won't work until the server side of everything is setup, but you can run the following line in a command prompt and it will trigger your cabinet servo to move:
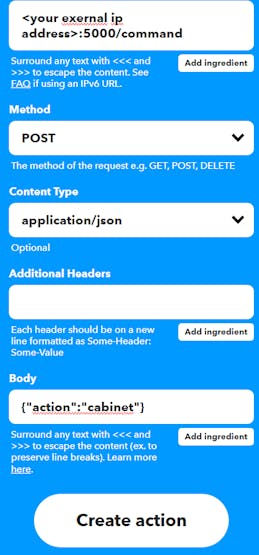
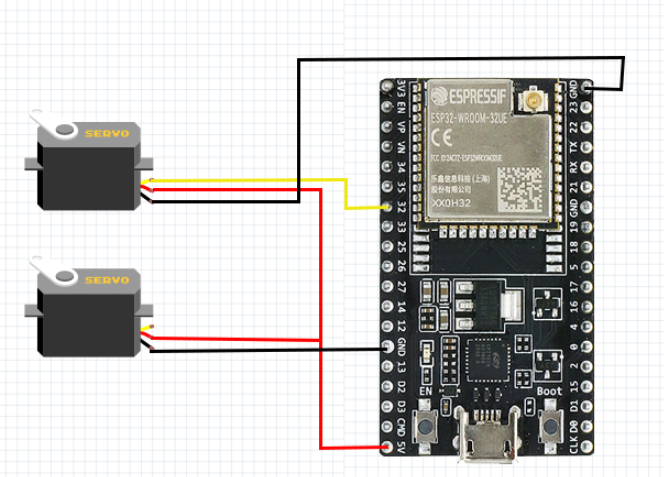
mosquitto_pub -h The above command will make more sense once we get through the next section, but it felt logical to provide a test for our current code while we're discussing it. Voice Commands (Pt. 1) Just to feel as though I've fully tackled the Smart Cabinet, here's a way to easily go about integrating voice commands by using something called IFTTT. I'll start by saying I don't currently need the pro version of IFTTT so I didn't run this myself but I'm pretty confident all information here is correct. As we'll get to later, we will be also adding a completely different, completely custom way to go about including voice commands that has been fully tested. This IFTTT setup is an easy to understand way to go about adding voice commands to devices you already own if you don't want the full solution I'm building out in this project, or if you just want multiple ways to activate your cabinets. I personally have android and Google devices, so I begin with adding a voice command through Google Assistant. You would have your scene name be something like "sink cabinet", depending on your setup For the "that" portion of the "if this then that" (what IFTTT stands for), we will select webhook. If you set it up as seen below, it should just work. The external ip address would be for the smart home device we're about to go through, since IFTTT works through external services. If you don't want to use IFTTT or include an external ip, our solution will include a fully internal setup momentarily. This brings us to what exactly is on the other side of the smart cabinet - the custom hub of the smart kitchen. (because Smartifying is definitely a word) For the custom Smart Home setup, I'll be using a CM4Stack. My goal was to set it up so generically that I can easily add a new device and not need to change a single thing in the smart hub. The short of it is I put together a python script that sets up a Flask server that waits for commands, which then publishes to an MQTT topic that runs on the same service. This can then be easily received by devices like the ESP32 listening for the "cabinet" command. Setup Before we get to start coding, we have to do a bit of setup. This is all done on the CM4Stack. Thankfully, you can have the browser up within it so you can just copy paste a lot of the commands below. Just update specific fields to be what you want, like your username and password. Install and Configure Mosquitto (MQTT Broker): First, set up the Mosquitto MQTT broker by installing it: sudo apt update Next, configure Mosquitto to listen on all network interfaces and set up authentication. Edit the Mosquitto configuration file: sudo nano /etc/mosquitto/mosquitto.conf Add the following at the end of the file: allow_anonymous false Create a password file and add a user (change your username in this one): sudo mosquitto_passwd -c /etc/mosquitto/passwd You'll then be prompted to set your password. After that, restart Mosquitto to apply the changes: sudo systemctl restart mosquitto Configure the Network: Ensure the device has a static IP address by editing the DHCP client configuration file. This makes it so that when you reboot, we don't have to update all the connected devices: sudo nano /etc/dhcpcd.conf Add the following lines: interface wlan0 Reboot again: sudo reboot Configure your Firewall: To make sure everything works correctly, we need to make sure certain ports are open: sudo apt install ufw SetThe Environment Variables: Finally, we have to set our environment variables that will be used by the Python script. Obviously, update the values as needed below: export MQTT_BROKER_ADDRESS=" At this point you should be ready to go and able to run the program we discussed at the start of this section. The code is included in the project. Just be sure the values are updated within the code to match what you setup just now and everything should work correctly right off the bat. This section will be short, but I figure it stands to reason that there would be more than 1 cabinet that needs to be made Smart. The code for 1 cabinet can be easily changed to accommodate more, but I figure it's still easier to add more cabinets when the program is already setup for multiple cabinets. Here, I've added a 2nd servo and expanded the program. Instead of just "cabinet", we listen for specific cabinets. So, the program will instead listen for "dishwasher cabinet" and "stove cabinet". This feels like a more realistic representation of how this would actually all get utilized. As noted in the section going through the Flask server setup, we don't need to do any modifications over there. It will just work. It's a good feeling to be able to control all aspects of projects like these. Our devices can all just talking to each other with no reliance on external entities, unless we choose to add them, and that's nice. Similarly nice was the discovery that the UNIHIKER has a built in microphone. By setting up a simple python script, we can have the UNIHIKER serve as a way to run voice commands through the CM4Stack's Flask server we just setup, which then go to devices like the Smart Cabinet we just built. Like the other UNIHIKER project I have, I'm running it in Mind+. We listen for voice commands and when we hear the word "butler", we send the subsequent words to our flask server. This then goes out to the devices in the home, which includes our Smart Cabinet(s). "Butler" acts as a trigger word, like how you say "Ok Google" or "Hey Siri". This can be easily changed, but that came to mind as a fun one. The only two libraries needed are: pip install SpeechRecognition And those can be installed via the Library Management tab in Mind+. As with the Smart Hiking Stick project I did, you need to ssh into the UNIHIKER and run the following command or you'll run into errors with the Google api: sudo apt-get install flac One nice thing about this UNIHIKER program is there's a lot less going on than with the Smart Hiking Stick. In that one, there was so much running simultaneously that I found that I needed to include a timeout for voice commands or it could just end up taking forever to process a command. With this project, we can leave it without a timeout, which leads to faster times processing the commands. As with the other parts of the project, the code is included. We now have a fully operational set of Smart Cabinets, with the option of making them Automatic instead oradditionally, a Smart Home Hub ready to go for future custom Smart Home projects, and the ability to control those custom Smart Home projects with voice commands. While the Smart Cabinet aspect of the project is built for others, I absolutely plan to build upon the Smart Home setup with additional custom devices. And, as far as the Smart Cabinets themselves go, hopefully this setup gets put to use in helping people in a real world setting - that's the goal, at least! I hope you enjoyed the project. Have a good one.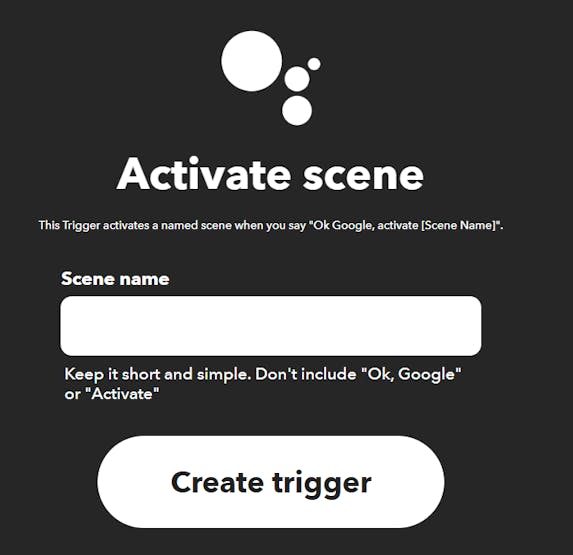
Smartifying the Kitchen
sudo apt install -y mosquitto mosquitto-clients
sudo systemctl start mosquitto
sudo systemctl enable mosquitto
password_file /etc/mosquitto/passwd
static ip_address=
static routers=
static domain_name_servers=
sudo ufw allow 1883
sudo ufw allow 5000
sudo ufw enable
export MQTT_TOPIC="home/
export HTTP_SERVER_PORT="5000"
export MQTT_USERNAME="
export MQTT_PASSWORD="More Cabinets
Custom Voice Commands
pip install paho-mqtt
The Wrap Up
Schematics:
Automatic Cabinet:
Smart Cabinets:
# -*- coding: UTF-8 -*-

import sys
import speech_recognition as sr
import time
import paho.mqtt.publish as publish

# MQTT Broker Settings
BROKER = "192.168.86.84"  # Change to your MQTT broker's IP address - this is the default one
PORT = 1883
TOPIC = "home/<topic>"
USERNAME = "<username>"  # Change to your MQTT username
PASSWORD = "<password>"  # Change to your MQTT password

said_butler = False  # To check if the last word we heard was "butler" so we know to send the next word(s) as a command

def listen_for_commands(recognizer, audio):
    global said_butler
    """Callback function that processes the audio as soon as it is available."""
    try:
        # Recognize speech using Google's speech recognition
        command = recognizer.recognize_google(audio).lower()
        print("You said:", command)

        # Check if the command contains the wake word 'butler'
        if 'butler' in command:
            said_butler = True  # Set flag to true to send next commands
            command = command.split('butler', 1)[1].strip()  # Get everything after 'butler'

        if said_butler and command:  # If the flag is set and there is a command
            print("Command received:", command)
            words = command.split()
            if len(words) > 0:
                first_word = words[0]
                print("First word received:", first_word)
                # Send the first word as a separate command to the MQTT broker
                publish.single(TOPIC, first_word, hostname=BROKER, port=PORT, auth={'username': USERNAME, 'password': PASSWORD})

            # Send the full command to the MQTT broker
            publish.single(TOPIC, command, hostname=BROKER, port=PORT, auth={'username': USERNAME, 'password': PASSWORD})
            print("Commands sent to the Flask server via MQTT.")
            said_butler = False  # Reset flag after command is sent

    except sr.UnknownValueError:
        print("Google Speech Recognition could not understand the audio")
    except sr.RequestError as e:
        print(f"Could not request results from Google Speech Recognition service; {e}")

def main():
    # Initialize recognizer class (for recognizing the speech)
    recognizer = sr.Recognizer()
    microphone = sr.Microphone()

    # Adjust the recognizer sensitivity to ambient noise and record audio
    with microphone as source:
        recognizer.adjust_for_ambient_noise(source)
        print("Set minimum energy threshold to:", recognizer.energy_threshold)
        recognizer.pause_threshold = 0.8  # Adjust based on testing; default is 0.8 seconds
        recognizer.non_speaking_duration = 0.4  # Adjust based on testing; default is 0.5 seconds

    # Start listening in the background (non-blocking)
    stop_listening = recognizer.listen_in_background(microphone, listen_for_commands, phrase_time_limit=5)

    # Keep the main thread alive, or the background listener will stop
    try:
        while True:
            time.sleep(0.1)  # Sleep briefly to limit CPU usage
    except KeyboardInterrupt:
        stop_listening(wait_for_stop=False)  # Stop listening when Ctrl+C is pressed
        print("Stopped listening...")

if __name__ == "__main__":
main()#include <WiFi.h>
#include <PubSubClient.h>
#include <ESP32Servo.h>
const char* ssid = "<Your Wifi>";
const char* password = "<Your wifi password>";
//MQTT Broker settings
const char* mqtt_server = "<server ip>"; // MQTT broker IP address
const int mqtt_port = 1883;
const char* mqtt_user = "<usernames>";
const char* mqtt_password = "<password>";
const char* mqtt_topic = "home/<topic>";
//Servo settings
const int servoPinDishwasher = 32;
const int servoPinStove = 33;
Servo servoDishwasher;
Servo servoStove;
int servoOpenPosition = 180; // Position to open the cabinet - change as needed
int servoClosePosition = 0; // Position to close the cabinet - change as needed
bool isDishwasherOpen = false;
bool isStoveOpen = false;
WiFiClient espClient;
PubSubClient client(espClient);
void setup() {
Serial.begin(115200);
delay(5000);
servoDishwasher.attach(servoPinDishwasher);
servoStove.attach(servoPinStove);
servoDishwasher.write(servoClosePosition);
servoStove.write(servoClosePosition);
setup_wifi();
client.setServer(mqtt_server, mqtt_port);
client.setCallback(callback);
}
void setup_wifi() {
Serial.print("Connecting to ");
Serial.println(ssid);
WiFi.begin(ssid, password);
while (WiFi.status() != WL_CONNECTED) {
delay(500);
Serial.print(".");
}
Serial.println("WiFi connected");
Serial.println("IP address: ");
Serial.println(WiFi.localIP());
}
void callback(char* topic, byte* message, unsigned int length) {
Serial.print("Message arrived on topic: ");
Serial.print(topic);
Serial.print(". Message: ");
String messageTemp;
for (int i = 0; i < length; i++) {
messageTemp += (char)message[i];
}
Serial.println(messageTemp);
// Check to use specific cabinets
if (messageTemp == "dishwasher cabinet") {
if (isDishwasherOpen) {
servoDishwasher.write(servoClosePosition);
isDishwasherOpen = false;
Serial.println("Dishwasher Cabinet closed");
} else {
servoDishwasher.write(servoOpenPosition);
isDishwasherOpen = true;
Serial.println("Dishwasher Cabinet opened");
}
} else if (messageTemp == "stove cabinet") {
if (isStoveOpen) {
servoStove.write(servoClosePosition);
isStoveOpen = false;
Serial.println("Stove Cabinet closed");
} else {
servoStove.write(servoOpenPosition);
isStoveOpen = true;
Serial.println("Stove Cabinet opened");
}
}
}
void reconnect() {
while (!client.connected()) {
Serial.print("Attempting MQTT connection...");
if (client.connect("ESP32Client", mqtt_user, mqtt_password)) {
Serial.println("connected");
client.subscribe(mqtt_topic);
} else {
Serial.print("failed, rc=");
Serial.print(client.state());
Serial.println(" try again in 5 seconds");
delay(5000);
}
}
}
void loop() {
if (!client.connected()) {
reconnect();
}
client.loop();
}#include <WiFi.h>
#include <PubSubClient.h>
#include <ESP32Servo.h>
const char* ssid = "<Your Wifi>";
const char* password = "<Your wifi password>";
//MQTT Broker settings
const char* mqtt_server = "<server ip>"; // MQTT broker IP address
const int mqtt_port = 1883;
const char* mqtt_user = "<usernames>";
const char* mqtt_password = "<password>";
const char* mqtt_topic = "home/<topic>";
const int servoPin = 32;
Servo myServo;
int servoOpenPosition = 180; // Position to open the cabinet - change as needed
int servoClosePosition = 0; // Position to close the cabinet - change as needed
bool isCabinetOpen = false; // Initial state of the cabinet
WiFiClient espClient;
PubSubClient client(espClient);
void setup() {
Serial.begin(115200); // Lowering baud rate for troubleshooting
delay(5000);
myServo.attach(servoPin);
myServo.write(servoClosePosition); // Ensure servo starts in the closed position
setup_wifi();
client.setServer(mqtt_server, mqtt_port);
client.setCallback(callback);
}
void setup_wifi() {
delay(10);
Serial.println();
Serial.print("Connecting to ");
Serial.println(ssid);
WiFi.begin(ssid, password);
while (WiFi.status() != WL_CONNECTED) {
delay(500);
Serial.print(".");
}
Serial.println("");
Serial.println("WiFi connected");
Serial.println("IP address: ");
Serial.println(WiFi.localIP());
}
void callback(char* topic, byte* message, unsigned int length) {
Serial.print("Message arrived on topic: ");
Serial.print(topic);
Serial.print(". Message: ");
String messageTemp;
for (int i = 0; i < length; i++) {
Serial.print((char)message[i]);
messageTemp += (char)message[i];
}
Serial.println();
if (messageTemp == "cabinet") {
if (isCabinetOpen) {
myServo.write(servoClosePosition);
isCabinetOpen = false;
Serial.println("Cabinet closed");
} else {
myServo.write(servoOpenPosition);
isCabinetOpen = true;
Serial.println("Cabinet opened");
}
}
}
void reconnect() {
while (!client.connected()) {
Serial.print("Attempting MQTT connection...");
if (client.connect("ESP32Client", mqtt_user, mqtt_password)) {
Serial.println("connected");
// Subscribe to the topic
client.subscribe(mqtt_topic);
} else {
Serial.print("failed, rc=");
Serial.print(client.state());
Serial.println(" try again in 5 seconds");
delay(5000);
}
}
}
void loop() {
if (!client.connected()) {
reconnect();
}
client.loop();
}#include <Servo.h>
const int trigPin = 7;
const int echoPin = 6;
const int servoPin = 9;
Servo myServo;
//These are the angles that were good for my setup - change based on what works for yours!
const int openAngle = 0;
const int closeAngle = 90;
const int distanceThreshold = 30; //Setting the threshold to around 1 ft
long getDistance() {
digitalWrite(trigPin, LOW);
delayMicroseconds(2);
digitalWrite(trigPin, HIGH);
delayMicroseconds(10);
digitalWrite(trigPin, LOW);
long duration = pulseIn(echoPin, HIGH);
long distance = duration * 0.034 / 2; //Convert to cm
return distance;
}
void setup() {
Serial.begin(115200);
pinMode(trigPin, OUTPUT);
pinMode(echoPin, INPUT);
myServo.attach(servoPin);
Serial.println("Setup complete.");
}
void loop() {
long distance = getDistance();
Serial.print("Distance: ");
Serial.print(distance);
Serial.println(" cm");
if (distance <= distanceThreshold) {
myServo.write(openAngle);
Serial.println("Opening cabinet");
delay(60000); //Sleep for 1 minute to leave the cabinet open that long
Serial.println("Done sleeping.");
} else {
myServo.write(closeAngle);
Serial.println("Closing cabinet");
}
delay(500); //Half a second delay
}from flask import Flask, request, jsonify
import paho.mqtt.client as mqtt
import logging
import os
# Configuration parameters
broker_address = os.getenv('MQTT_BROKER_ADDRESS', '192.168.86.84') # Default to internal IP address
mqtt_topic = os.getenv('MQTT_TOPIC', 'home/<topic>')
http_server_port = int(os.getenv('HTTP_SERVER_PORT', 5000))
mqtt_username = os.getenv('MQTT_USERNAME', '<username>')
mqtt_password = os.getenv('MQTT_PASSWORD', '<password>')
# Create Flask app
app = Flask(__name__)
# Setup logging
logging.basicConfig(level=logging.INFO)
# MQTT setup
mqtt_client = mqtt.Client(client_id="<client id>", protocol=mqtt.MQTTv311)
mqtt_client.username_pw_set(username=mqtt_username, password=mqtt_password)
# Define on_connect callback
def on_connect(client, userdata, flags, rc):
if rc == 0:
logging.info("Connected to MQTT Broker")
client.subscribe(mqtt_topic)
elif rc == 5:
logging.error("Authentication failed - check username and password")
else:
logging.error(f"Failed to connect, return code {rc}")
# Define on_message callback
def on_message(client, userdata, message):
logging.info(f"Received message: {message.payload.decode()} on topic {message.topic}")
mqtt_client.on_connect = on_connect
mqtt_client.on_message = on_message
try:
mqtt_client.connect(broker_address)
mqtt_client.loop_start()
except Exception as e:
logging.error(f"Failed to connect to MQTT Broker: {e}")
@app.route('/command', methods=['POST'])
def handle_command():
try:
data = request.json
action = data.get('action', '')
if action:
mqtt_client.publish(mqtt_topic, action)
logging.info(f"Command '{action}' sent to MQTT topic.")
return jsonify({"status": "success", "message": f"Command '{action}' sent to MQTT topic."}), 200
logging.warning("No action specified in the command.")
return jsonify({"status": "error", "message": "No action specified in the command."}), 400
except Exception as e:
logging.error(f"Error handling command: {e}")
return jsonify({"status": "error", "message": "Failed to process command."}), 500
if __name__ == '__main__':
try:
app.run(host='0.0.0.0', port=http_server_port)
except Exception as e:
logging.error(f"Exception occurred: {e}")
finally:
mqtt_client.loop_stop()
mqtt_client.disconnect()


