
Empowers individuals with fine motor skill impairments to effortlessly control their home environment through voice commands

1. Problem Statement
People with mobility impairments, particularly those with fine motor skill problems, encounter difficulties controlling home appliances such as lighting, heating, and locks due to physical limitations. Existing solutions often lack affordability and may not adequately address the specific needs of users with fine motor skill challenge
2. Evolution of the solution
Initially, I proposed a universal IoT controller for various mobility impairments. However, based on valuable feedback, I pivoted to a more focused approach. This evolution demonstrates the commitment to creating a truly effective and user-centric solution.
3. Refined solution overview
I have developed an affordable and targeted IoT controller system specifically designed for individuals with fine motor skill impairments. This system allows users to control various home appliances using voice commands, eliminating the need for physical interaction with switches, knobs, or buttons.
4. Key Features
1. Voice-activated control for home appliances
2. Affordable hardware components
3. Easy-to-use interface with minimal physical interaction required
4. Expandable system to control multiple devices
5. Customizable to address varying degrees of fine motor skill impairment
5. System Architecture
Remote Control Unit:
Hardware:
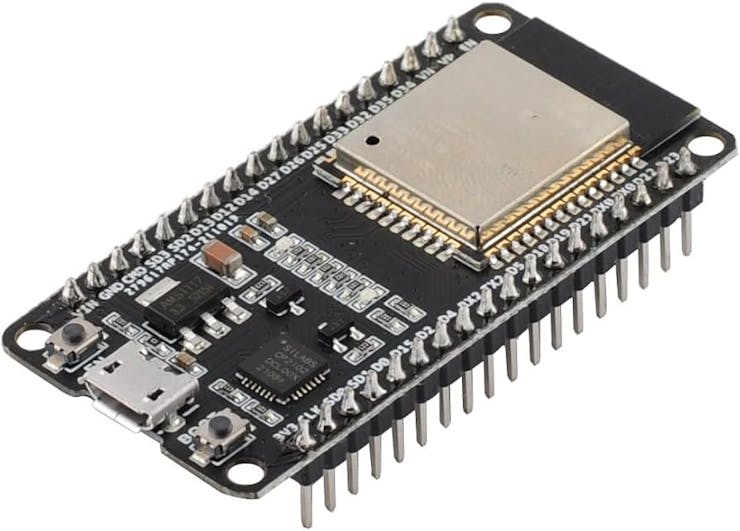
- ESP32 microcontroller
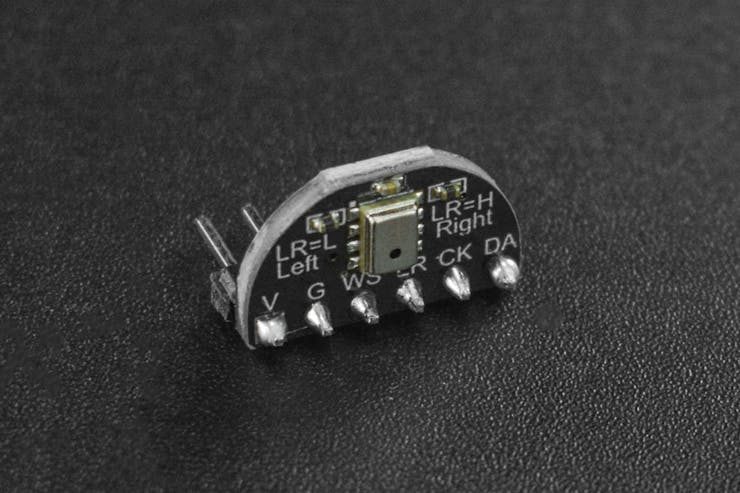
- I2S microphone for high-quality audio input
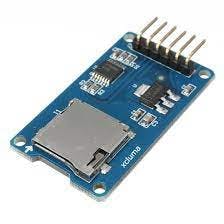
- SD card and SD card module for local storage
- Push button to initiate voice command recording
Functionality:
- User presses the button to start recording a voice command
- Audio is captured and stored on the SD card
- Recorded audio is sent to Deepgram API for speech-to-text transcription
- Transcribed command is sent to the Control Unit via TCP
Control Unit
Hardware:
- ESP32 microcontroller
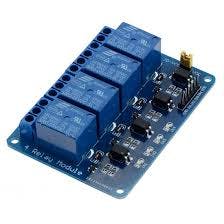
- 4-channel relay module for controlling multiple appliances
Functionality:
- Acts as a TCP server, listening for commands from the Remote Control Unit
- Interprets received commands
- Activates appropriate relays to control connected appliances
6. Materials and Components
- ESP32 microcontroller (x2)
- I2S microphone
- SD card module and SD card
- 4-channel relay module
- Push button
- Jumper wires
- Power supply
- Breadboard or PCB
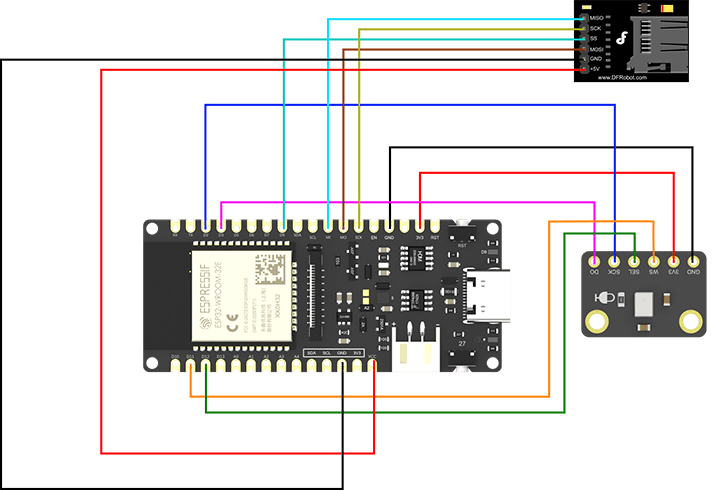
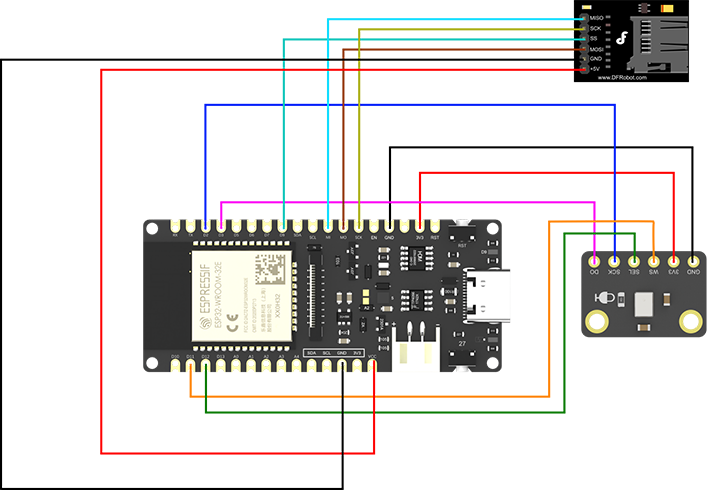
7. Circuit Diagram and Connections
Remote Control Unit Connections:
ESP32 to I2S Microphone:
- I2S Clock Pin: GPIO 33
- I2S Data Pin: GPIO 35
- WS : 22
ESP32 to SD Card Module:
- MOSI: GPIO 23
- MISO: GPIO 19
- SCK: GPIO 18
- CS: GPIO 5
Push Button:
- One pin to GPIO 34
- The other pin to GND
Control Unit Connections:
ESP32 to Relay Module:
- Relay Channel 1: GPIO 13
- Relay Channel 2: GPIO 12
- Relay Channel 3: GPIO 14
- Relay Channel 4: GPIO 27
8. Procedure
Step 1: Set Up the Remote Control Unit
- Assemble the ESP32 microcontroller with the I2S microphone, push button, and SD card module as per the connection diagram.
- Flash the ESP32 with code to record audio on the SD card and send it to the Deepgram API for transcription.
Step 2: Set Up the Control Unit
- Assemble the second ESP32 microcontroller with the 4-channel relay module.
- Flash the ESP32 with code to listen for commands from the Remote Control Unit via TCP and trigger the appropriate relay based on the command.
Step 3: Testing and Configuration
- Ensure that the Control Unit is listening for commands from the Remote Control Unit.
- Press the push button, issue a voice command (e.g., "turn on kitchen light"), and verify that the correct relay is triggered.
9. How this Works
Before we look at the code lets look at the functionality logic. This will help you understand how everything work
_VzuIaR8sHY.jpg?auto=compress%2Cformat&w=740&h=555&fit=max)
How Deepgram's AI speech to text conversion model work
Deepgram’s speech-to-text conversion process involves several key steps:
- Audio Input: The audio is first converted into a digital format.
- Segmentation: The digital audio is segmented into smaller pieces for easier processing.
- Feature Extraction: Deepgram’s AI models analyze these segments to extract relevant features and patterns.
- Transcription: The extracted features are then used to generate the text transcription.
To get your Deepgram Speech-to-Text (STT) API key, follow these steps:
- Sign Up: Go to the Deepgram website and sign up for an account if you don’t already have one.
- Log In: Once you have an account, log in to the Deepgram dashboard.
- Navigate to API Keys: In the dashboard, find the section for API keys. This is usually under the “Settings” or “Account” menu.
- Create a New API Key: Click on the option to create a new API key. You may need to provide a name or description for the key to help you identify it later.
- Copy the API Key: Once the key is generated, copy it and store it securely. You’ll need this key to authenticate your API requests.
Remote Control Unit Code:
The code is in 3 separate files so download the code from my Github
Make sure you add your actual credentials the following lines of code
const char* ssid = "*****";
const char* password = "*******";


const char* responder_ip = "*******";  // IP of the responder board
int responder_port = 80
Enter your Deepgram API in line 18 in transcription.ino
const char* deepgramApiKey = "***********"; // ## INSERT your Deepgram credentials !Code to record audio from I2S microphone and send transcription to Control Unit
- Recording Audio: The button press triggers recording via the I2S microphone.
- Sending Transcription: Once recorded, the audio is transcribed using the Deepgram API and sent to the Control Unit.
Control Unit Code:
Copy code
// Code to receive commands via TCP and control relays
#include <WiFi.h>
#define KITCHEN_LIGHTS 12
#define BEDROOM 13
#define TV 14
#define HEATER 27
#define DOOR 26
const char* ssid = "*****";
const char* password = "******";
WiFiServer server(80);  // Create a server that listens on port 80
void setup() {
Serial.begin(115200);
// Set up the GPIO pins for the actuations
pinMode(KITCHEN_LIGHTS, OUTPUT);
pinMode(BEDROOM, OUTPUT);
pinMode(TV ,OUTPUT);
pinMode(HEATER ,OUTPUT);
pinMode(DOOR ,OUTPUT);
// Initialize all pins to OFF
digitalWrite(KITCHEN_LIGHTS, LOW);
digitalWrite(BEDROOM, LOW);
digitalWrite(TV, LOW);
digitalWrite(HEATER, LOW);
digitalWrite(DOOR, LOW);
// Connect to the WiFi network
WiFi.begin(ssid, password);
Serial.print("Connecting to wifi ... ");
while (WiFi.status() != WL_CONNECTED) {
Serial.print(".");
delay(500);
}
Serial.println("Device Connected.");
Serial.print("The IP: ");
Serial.println(WiFi.localIP());
// Start the server
server.begin();
Serial.println("Server started, waiting for commands...");
}
void loop() {
// Check if a client is connected
WiFiClient client = server.available();
if (client) {
Serial.println("Client connected");
// Wait for the client to send data
String command = "";
while (client.connected() && client.available()) {
char c = client.read();
command += c;
}
command.toLowerCase();  // Ensure the command is in lowercase
Serial.println("Received command: " + command);
// Actuation logic based on the received command
if (command.indexOf("kitchen lights on") != -1) {
digitalWrite(KITCHEN_LIGHTS, HIGH);  // Turn on kitchen lights
Serial.println("Kitchen lights turned ON.");
}
else if (command.indexOf("kitchen lights off") != -1) {
digitalWrite(KITCHEN_LIGHTS, LOW);  // Turn off kitchen lights
Serial.println("Kitchen lights turned OFF.");
}
if (command.indexOf("bedroom lights on") != -1) {
digitalWrite(BEDROOM, HIGH);  // Turn on bedroom lights
Serial.println("Bedroom lights turned ON.");
}
else if (command.indexOf("bedroom lights off") != -1) {
digitalWrite(BEDROOM, LOW);  // Turn off bedroom lights
Serial.println("Bedroom lights turned OFF.");
}
if (command.indexOf("tv on") != -1) {
digitalWrite(TV, HIGH);  // Turn on TV
Serial.println("TV turned ON.");
}
else if (command.indexOf("tv off") != -1) {
digitalWrite(TV, LOW);  // Turn off TV
Serial.println("TV turned OFF.");
}
if (command.indexOf("fan on") != -1) {
digitalWrite(HEATER, HIGH);  // Turn on heater
Serial.println("Heater turned ON.");
}
else if (command.indexOf("fan off") != -1) {
digitalWrite(HEATER, LOW);  // Turn off heater
Serial.println("Heater turned OFF.");
}
if (command.indexOf("lock the door") != -1) {
digitalWrite(DOOR, HIGH);  // Lock the door
Serial.println("Door Locked.");
}
else if (command.indexOf("unlock the door") != -1) {
digitalWrite(DOOR, LOW);  // Unlock the door
Serial.println("Door Unlocked.");
}
// Close the connection
client.stop();
Serial.println("Client disconnected.");
}
}
- TCP Listener: The ESP32 listens for transcribed commands from the Remote Control Unit.
- Relay Control: The relays are triggered based on the received commands.
User Interaction Flow
- User presses the button on the Remote Control Unit- User speaks a command (e.g., "kitchen lights on" or "lock the door")
- System processes the command and sends it to the Control Unit- Control Unit executes the command by activating the appropriate relay
Addressing Feedback and challenges
Focused Disability Category: This solution specifically targets individuals with fine motor skill impairments, addressing the feedback to focus on a particular disability category.
Cost-Effectiveness: By utilizing affordable components like ESP32 microcontrollers and basic sensors, I created a solution that is significantly more cost-effective than many existing commercial options. This directly addresses the concern about expensive assistive technologies.
Simplified Interaction: The use of voice commands eliminates the need for complex physical interactions, making it ideal for users who struggle with buttons, switches, or touch interfaces. This approach is particularly beneficial for those with varying degrees of fine motor skill impairments.
Scalability and Customization: The system can be easily expanded to control additional appliances by adding more relay channels or control units.
Avoiding the "One-Size-Fits-All" Pitfall: Unlike solutions that claim to be universally accessible but end up being only partially useful, our system is designed to be highly effective for our specific user group.
Targeted Improvements:
- Implement local voice recognition to reduce reliance on internet connectivity
- Develop a mobile app for additional control options and system configuration
- Integrate with existing smart home ecosystems for broader compatibility
- Implement user profiles to support multiple users with different needs
Conclusion
This project demonstrates a thoughtful application of user feedback to create a focused, effective solution for individuals with fine motor skill impairments. By pivoting from a universal approach to a targeted one, I've developed a system that significantly improves independence and quality of life for our specific user group.
ESP32_Microphpone_SD-CardConnection
Code
This article was first published on Hackster on September 4, 2024
cr:https://www.hackster.io/tech_nickk/voice-activated-home-control-9a4c8c
Author:Nickson Kiprotich


