DIY Wireless Door Sensor | ESP8266 + NRF24L01 | Home Security System

Are you looking for an affordable DIY home security solution? This wireless door sensor allows you to monitor your doors remotely and receive real-time alerts when a door is opened or closed. 🚪🔔
Using ESP8266 and NRF24L01, this project is easy to build, scalable, and perfect for smart home automation.
✨ Features:
✅ Wireless Monitoring – Uses NRF24L01 for seamless communication
✅ ESP8266 IoT Integration – Expandable with Blynk, MQTT, or Home Assistant
✅ Real-Time Alerts – Buzzer & LED notify when the door is opened
✅ DIY & Budget-Friendly – Uses affordable, easy-to-source components
✅ Expandable System – Add multiple door sensors for complete security

You can get all the components from JLCMC.
The NRF24L01 is a wireless communication module used to transmit the door sensor data to Hub.
Connections:
VCC - 3.3V
GND - GND
CE - D2(GPIO4)
CSN - D1(GPIO5)
SCK - D6(GPIO12)
MOSI - D7(GPIO13)
MISO - D8(GPIO15)

The LED is used as a status indicator for the door sensor when the door is open.
Connections:
Led Anode (Long Leg) - D0(GPIO16)
Led Cathode (Short Leg) - GND

A push button is used to reset(boot) or restart the ESP8266. When pressed, it connects GPIO2 (D4) to GND, triggering a reset.
Connections:
Button One Leg - GND
Button Other Leg - D4(GPIO02)

The magnetic door sensor detects whether the door is open or closed by sending a signal to the ESP8266.
Connections:
Door Sensor Pin - A0(GPIO A0)
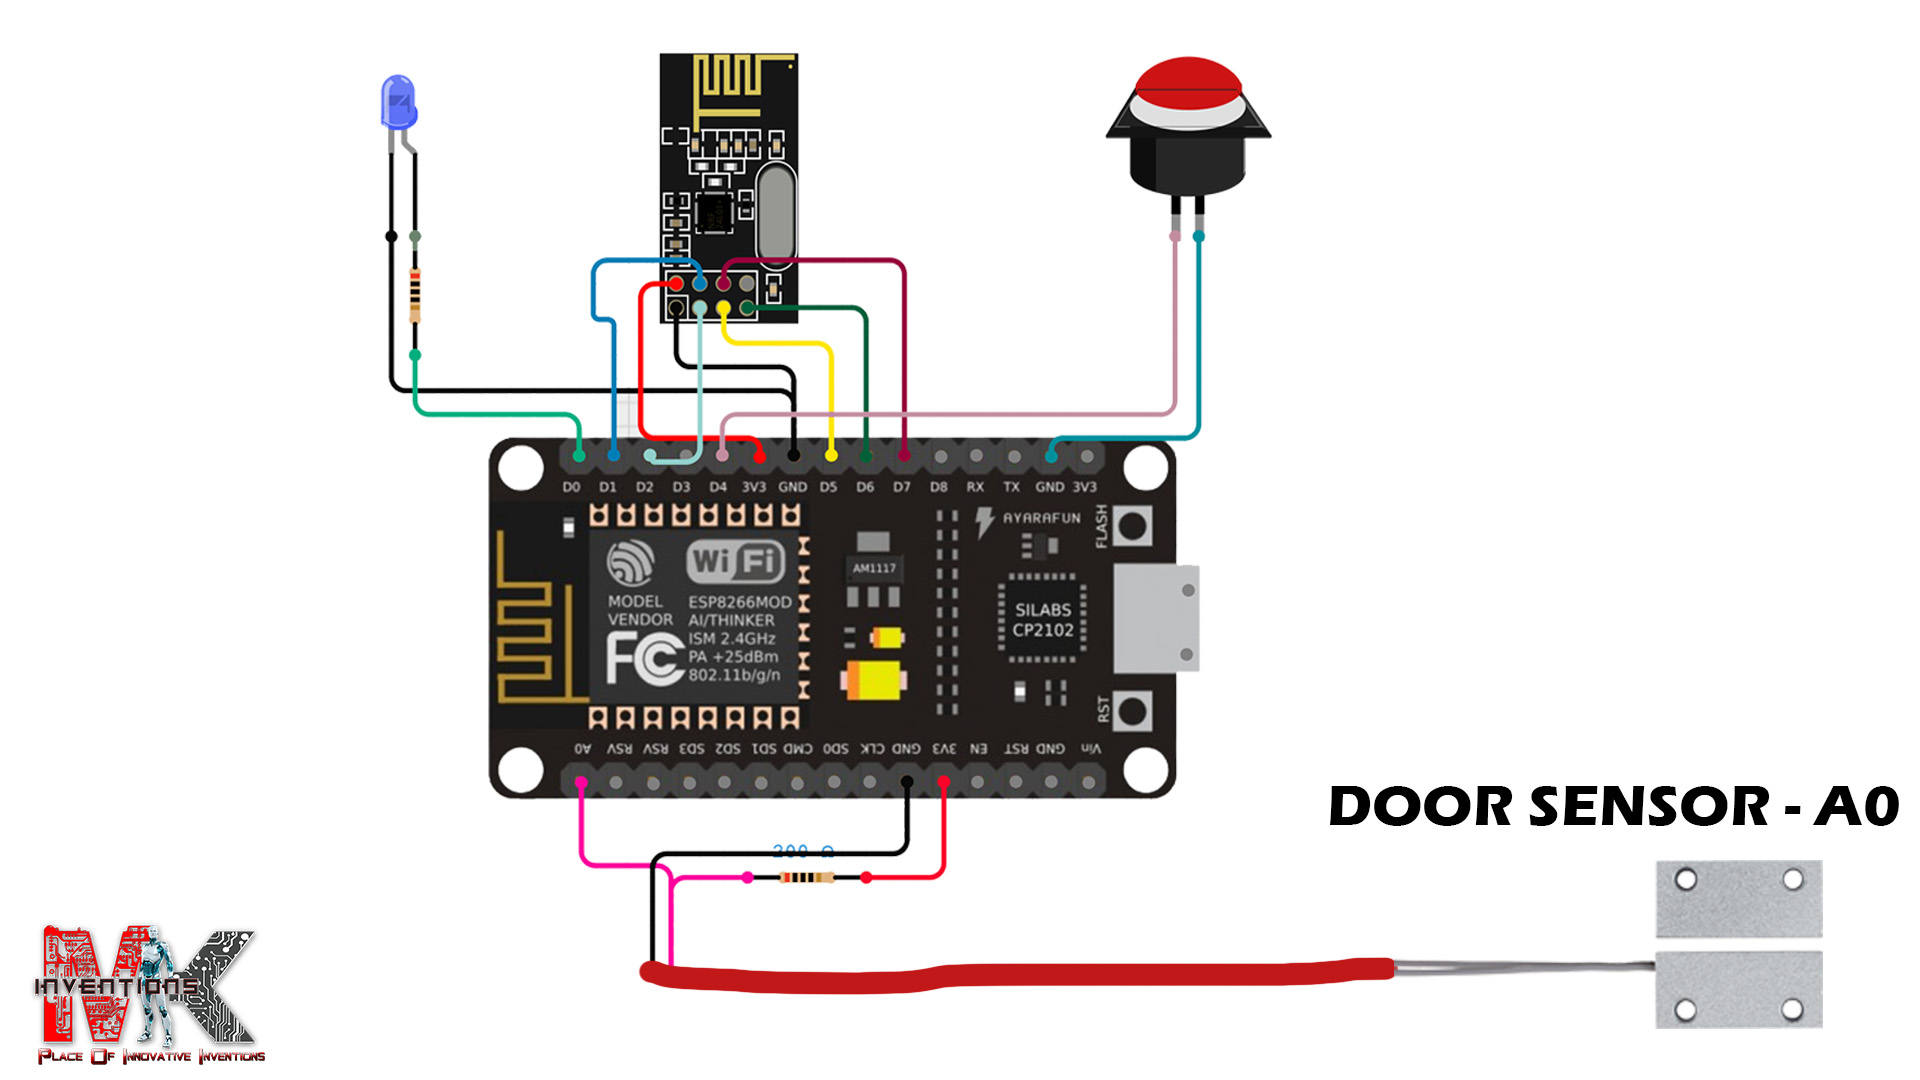
For powering the ESP8266, a DC Jack (7v - 12V ) can be used with a Voltage Regulator.
Connections:
DC Jack ESP8266 +12V - VIN (Through 3.3V Regulator)

Receiver (Arduino Uno) - Base Station
NRF24L01 Arduino Uno
VCC 3.3V
GND GND
CE D9
CSN D10
SCK D13
MOSI D11
MISO D12
OUTPUT Arduino Uno
Buzzer D7
LED A2

/**
 * Project: ESP8266 Wireless Door Sensor using NRF24L01
 * Author: Madhan Chiruguri
 * Date: March 11, 2025
 * Description: This project uses an ESP8266 to monitor a door sensor and transmit the status
 * wirelessly using an NRF24L01 module. A button press triggers a software reset.
 */

#include <SPI.h>
#include <nRF24L01.h>
#include <RF24.h>

// Define RF24 radio module pins (CE, CSN) for ESP8266
RF24 radio(4, 5);
const byte address[6] = "10001";  // NRF24L01 communication address

// Define pin assignments
#define DOOR_SENSOR A0        // Analog input for the door sensor
#define DOOR_STATUS_LED 16     // LED to indicate door status
#define BUTTON 2               // Button input pin for triggering reset

// Structure to hold the data packet for transmission
struct data {
  uint8_t nodeId;      // Unique ID of the transmitting node
  uint8_t nodeState;   // Node status (1 = Active)
  uint8_t doorState;   // Door status (1 = Open, 0 = Closed)
};

void setup() {
  Serial.begin(9600);
  Serial.println("\nInitializing...");

  NRF24_Init();  // Initialize NRF24L01 module

  pinMode(DOOR_STATUS_LED, OUTPUT); // Set LED as output
  pinMode(BUTTON, INPUT_PULLUP);    // Use internal pull-up resistor for button
}

void loop() {
  int buttonValue = !digitalRead(BUTTON);  // Read button state (active low)
  int sensorValue = analogRead(DOOR_SENSOR);  // Read door sensor value

  // If button is pressed, perform a software reset
  if (buttonValue == 1) {
    Serial.println("Button Pressed! Restarting...");
    ESP.restart();  // Restart ESP8266
  }

  // Determine door state based on sensor value threshold
  int doorOpenState = (sensorValue > 700) ? 1 : 0;
  digitalWrite(DOOR_STATUS_LED, doorOpenState); // Update LED status

  // Prepare data packet
  struct data sendData = {1, 1, doorOpenState};

  // Send data with retry mechanism (max 3 attempts)
  for (int i = 0; i < 3; i++) {
    if (radio.write(&sendData, sizeof(sendData))) {
      Serial.print("Sent: ID:");
      Serial.print(sendData.nodeId);
      Serial.print(", State:");
      Serial.print(sendData.nodeState);
      Serial.print(", Door:");
      Serial.println(sendData.doorState);
      break;  // Transmission successful, exit loop
    } else {
      Serial.println("Transmission Failed! Retrying...");
      delay(500);  // Wait before retrying
    }
  }

  yield();  // Prevent watchdog reset by allowing background tasks
  delay(500);  // Delay to control loop execution speed
}

// Function to initialize the NRF24L01 module
void NRF24_Init() {
  if (!radio.begin()) {
    Serial.println("NRF24L01 Initialization Failed!");
    return;
  }
  radio.openWritingPipe(address);  // Set communication address
  radio.setPALevel(RF24_PA_LOW);   // Set power level for stability
  radio.setRetries(5, 15);         // Set retry attempts and delay
  // radio.setDataRate(RF24_250KBPS); // Uncomment to slow down SPI for stability
  radio.stopListening();           // Set as transmitter
  Serial.println("NRF24L01 Initialized Successfully!");
}
#include <SPI.h>
#include <nRF24L01.h>
#include <RF24.h>

RF24 radio(9, 10);  // CE, CSN
const byte address[6] = "10001";

#define BUZZER 7
#define DOOR_STATUS_LED A2
#define NODE_STATUS

// Define data structure
struct data {
  uint8_t nodeId;
  uint8_t nodeState;
  uint8_t doorState;
};

unsigned long previousMillis = 0;
bool buzzerState = false;

// bool wasDisconnected = false; // Flag to track disconnection state

void setup() {
  Serial.begin(9600);
  Serial.println("\nInitializing...");

  pinMode(DOOR_STATUS_LED, OUTPUT);
  pinMode(BUZZER, OUTPUT);
  NRF24_Init();
}


void loop() {
  if (radio.available()) {
    struct data receiveData;
    radio.read(&receiveData, sizeof(receiveData));

    Serial.print("ID: ");
    Serial.print(receiveData.nodeId);
    Serial.print(", Status: ");
    Serial.print(receiveData.nodeState);
    Serial.print(", Door: ");
    Serial.println(receiveData.doorState);

    digitalWrite(DOOR_STATUS_LED, receiveData.doorState);
    // digitalWrite(BUZZER, receiveData.doorState == 1 ? HIGH : LOW);
    buzzer(receiveData.doorState, 100);
  }
}

void NRF24_Init() {
  if (!radio.begin()) {
    Serial.println("❌ NRF24L01 Initialization Failed!");
    return;
  }
  radio.openReadingPipe(1, address);
  radio.setPALevel(RF24_PA_MIN);
  radio.startListening();
  Serial.println("✅ NRF24L01 Initialized Successfully!");
}

void buzzer(int signal, int delayTime) {
  if (signal == 1) {
    if (millis() - previousMillis >= delayTime) {
      previousMillis = millis();
      buzzerState = !buzzerState;
      digitalWrite(BUZZER, buzzerState);
    }
  } else {
    digitalWrite(BUZZER, LOW);
  }
}

Sponsored by JLCMC: Your Go-To Partner for Mechanical Parts!
Introducing JLCMC, the newest addition to the trusted JLC family, delivering high-quality mechanical parts at the best prices in the market. With a legacy of excellence established by JLCPCB, JLCMC is here to provide reliable and affordable solutions for all your mechanical needs.
Why Choose JLCMC?
A Trusted Name:JLCMC is built on the foundation of JLC services, a global leader in PCB manufacturing and prototyping. Their commitment to quality and customer satisfaction carries forward into their mechanical parts services.Unbeatable Prices:
True to the JLC legacy, JLCMC offers mechanical parts at industry-leading prices, ensuring that your projects stay on budget without compromising on quality.Wide Range of Products:
From precision-engineered components to custom solutions, JLCMC has everything you need to bring your ideas to life, whether you're a hobbyist or a professional.Global Trust:
JLC services have earned the trust of millions of makers worldwide. With JLCMC, you get the same reliability, now in the realm of mechanical parts.


