

The Xiao ESP32 runs a tiny web server that serves an interactive piano keyboard to any browser on your WiFi network. When you tap a key (or press a keyboard key), the browser sends an HTTP request to the ESP32, which generates a sine wave at the correct frequency and pumps it out through the I2S bus to the MAX98357 amplifier.

Features:
- Web UI — A full 25-key piano rendered in HTML/CSS with both tap/click and physical keyboard support
- I2S Sine Wave Generator — Real-time sine wave synthesis at 22.05 kHz, 16-bit stereo
- Auto-Play Engine — 5 built-in songs (Twinkle Twinkle, Ode to Joy, Happy Birthday, Jingle Bells, Fur Elise) with a sequencer that chains songs randomly
- OLED Status — Shows IP address, current note/frequency, and auto-play song name
Get PCBs for Your Projects Manufactured

You must check out PCBWAY for ordering PCBs online for cheap!
You get 10 good-quality PCBs manufactured and shipped to your doorstep for cheap. You will also get a discount on shipping on your first order. Upload your Gerber files onto PCBWAY to get them manufactured with good quality and quick turnaround time. PCBWay now could provide a complete product solution, from design to enclosure production. Check out their online Gerber viewer function. With reward points, you can get free stuff from their gift shop. Also, check out this useful blog on PCBWay Plugin for KiCad from here. Using this plugin, you can directly order PCBs in just one click after completing your design in KiCad.
1. Hardware Connection:

2.Install Arduino IDE Libraries
Open Tools → Manage Libraries and install:
- Adafruit SSD1306 (by Adafruit)
- Adafruit GFX Library (by Adafruit)
The `WiFi.h`, `WebServer.h`, `Wire.h`, and `driver/i2s.h` libraries are built into the ESP32 Arduino core — no extra install needed.
3. Select Your Board
Go to Tools → Board → Boards Manager, search for "Seeed Xiao ESP32", and install the board package.
Then select:
- Board:Seeed Studio XIAO ESP32S3

- Port:(the COM port for your Xiao)

4. Configure WiFi
Open `xiao_piano.ino` and edit lines 17-18:``cpp
const char* WIFI_SSID = "YOUR_WIFI_SSID";
const char* WIFI_PASS = "YOUR_WIFI_PASSWORD";
Use 2.4GHz only — ESP32 does not support 5GHz WiFi.
5.Upload

Click Upload (→). Open Tools → Serial Monitor at 115200 baud. You should see:
The OLED will also display the IP address. Open that URL in any browser on the same WiFi network.

WiFi connecting...
WiFi OK — IP: 192.168.1.42
=== Piano ready ===
Open http://192.168.1.42 in your browser
The OLED displays the IP address. Open it in any browser on the same WiFi network.

6. How to Play
Manual Mode
Tap or click any key on the piano. Or use your keyboard:

Tip: If keyboard stops working, click anywhere on the page to give it focus.

Auto-Play Mode
Below the piano you'll see three controls:

- Random (green) — Plays a random song from the library
- Song picker dropdown — Choose: Twinkle Twinkle, Ode to Joy, Happy Birthday, Jingle Bells, Fur Elise
- Stop (orange) — Stops auto-play
When one song ends, a different random song starts automatically — it's a self-playing piano. The OLED shows the current song name and notes. Tap any key to exit auto-play and return to manual mode.

Conclusion
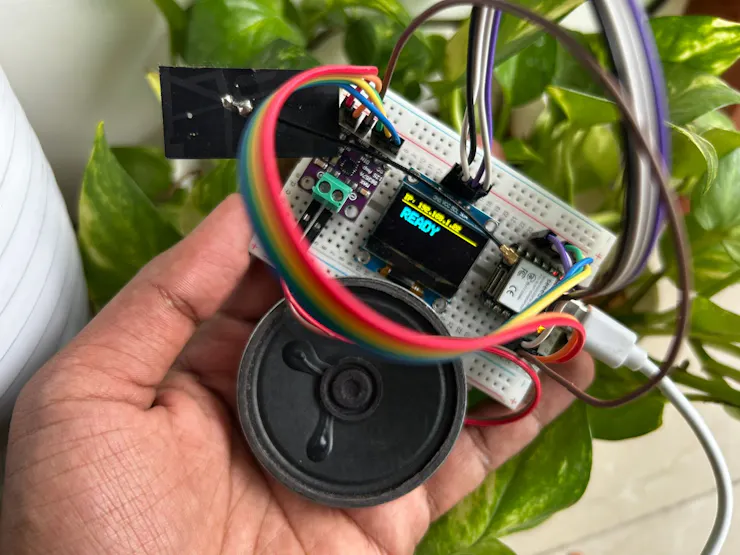
A single .ino file, you get a WiFi piano you can play from any phone, tablet, or laptop in your house. The auto-play mode with 5 built-in songs means it doubles as a self-playing music box. It's a fun weekend build that covers I2S audio, I2C displays, WiFi web serving, and real-time synthesis — all on a thumb-sized Xiao ESP32.





