
Edge AI Smart Stove which can be operated with Voice Command and Interactive Voice Feedback UI (like Alexa) without Internet Connectivity

Things used in this project
Hardware components
Software apps and online services
Infineon ModusToolbox™ Software
Picovoice AI Picovoice Porcupine Wake Word Engine
Picovoice AI Picovoice Shepherd No-code Platform
Audacity Audio Editor and Recorder
Free Text To Speech Reader Online
Hand tools and fabrication machines
Soldering iron (generic)
Hot glue gun (generic)
Cable Tie Small
Super Glue
Story
Introduction
Imagine a chef is cooking something while preparing salad or making dough, now he/she might need to adjust the heating on the stove. This is a scenario where voice controlled stove/oven can be very useful for a cook/chef. In any situation where user's both hand are busy doing something is the best scenario to utilize voice control applications.
Unfortunately existing solutions are connected solutions, one of those Alexa or Google cloud connected oven thingies. But, why let them know what you cook or when you cook ? Also, user needs to setup wifi connection for the device and download another app ! This is a big NO for many users.
Here is my solution: Edge AI Voice Controlled Stove, realized with Picovoice.ai generated voice recognition model and PSoC 6 MCU. Works out of the box !
This is not an "Internet of Things" but an "Internet OFF Things", so it's still an IoT (pun intended).
Features
-Voice controlled Ignition/Flame activation-Voice controlled flame/heating adjustment-Voice controlled cooking/burner timer setup-Interactive Voice Feedback UI for confirmation-Voice controlled Power off-Edge AI voice recognition, no cloud connectivity-Natural Language multi-commands operation
Video Demonstration
Hardware
These hardware are used to built this project :
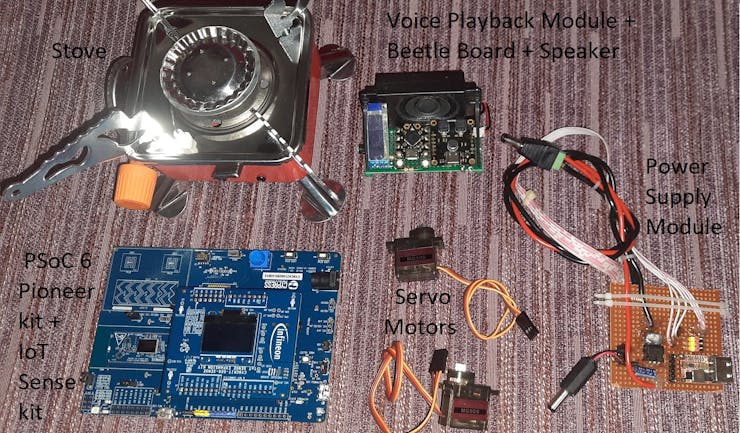
Hardware
PSoC™ 6 62S2 Wi-Fi BT Pioneer Kit (CY8CKIT-062S2-43012)
This is the development board for PSoC™ 62 dual core MCU CY8C624ABZI-S2D44 (150-MHz Arm Cortex-M4 and 100-MHz Arm Cortex-M0+ cores) with 2MB of Flash. It is powerful enough to run voice recognition AI without internet connectivity
IoT sense expansion kit (CY8CKIT-028-SENSE)
The IoT sense expansion kit is an add-on (shield) board that can be used with the Pioneer Kit, this board has analog/digital microphone for audio input and audio codec for audio output, which is required for this project
Voice Playback Module
My original goal was to use the IoT sense kit's audio codec for playing Voice UI messages and 2MB flash on PSoC6 to store the wave files. Unfortunately, I was unable to use the I2S Audio demo code provided in Modustoolbox. That's why I decided to use a project I made last year which can store up to 1000 separate audio messages in mp3 format up to 40 minutes long.
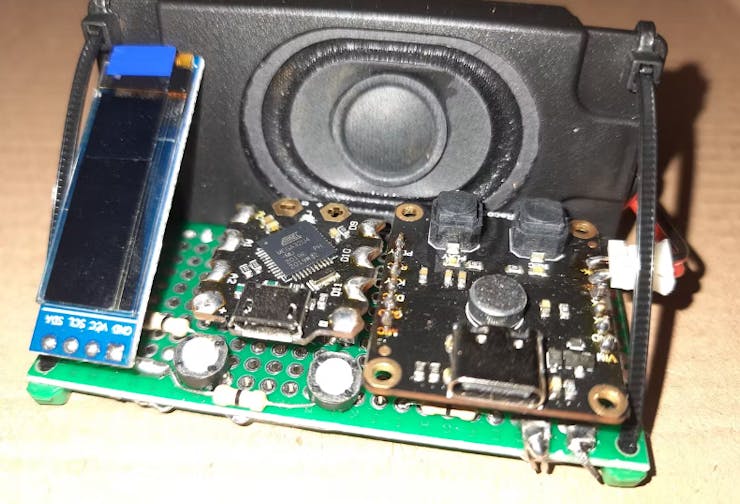
Voice Playback Module to play audio feedback messages
Here is the project in details : Countdown Voice Timer & Fire Starter
It was made using Fermion Voice Recorder/Playback Module, DFRobot Beetle Board & 3 Watts Enclosed Speaker.
I have changed the original firmware (attached below), so this module can receive serial messages sent from PSoC 6 and playback appropriate audio messages accordingly.
Power SupplyModule
This module consists of an LM7809 Linear Voltage Regulator and DC-DC Buck Converter module that can output 5 volts. I have used the 9 Vdc output to power the PSoC6 Pioneer. The 5 Vdc from the Buck Converter is used to supply adequate power to the servo motors and the Voice Playback module.
Metal Gear Servo Motors
There are two metal gear servo motors used for this project. One of the servo motor controls the (fuel) gas flow valve by partially opening is as needed. This servo motor can fully close the valve whenever the burner needs to be turned off. The other servo motor pulls the lever of peizo-igniter to generate spark for starting a flame.
Portable Gas Stove
The portable gas stove is a tiny single burner stove with build-in peizo igniter fire starter and a gas flow adjustment valve. I have picked this stove for ease of prototyping since it's easy to bring the whole setup near my computer for developing the firmware with a tiny stove. Of course, this project can be scaled for larger, multi-burner stove setup.
Hardware Build
Just like any quick and low budget prototyping, I have assembled the hardware with super glue, hot glue, cable tie and jumper wires. Main goal was to cut down cost, time and effort.
All the pieces are connected according to this schematic :
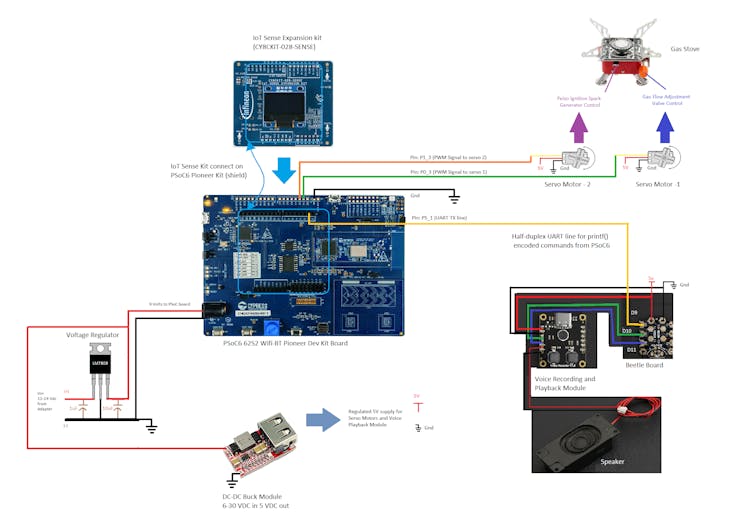
Schematic
One of the servo motor is superglued to the gas adjustment valve like this :
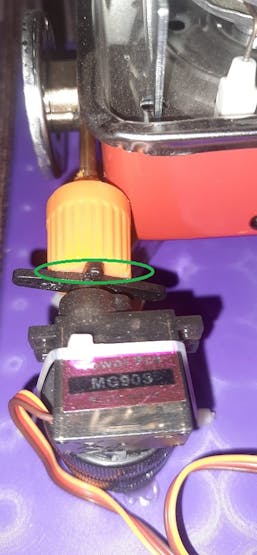
Servo motor for gas valve control
The other servo motor is threaded to the peizo ignition spark generator lever like this :-
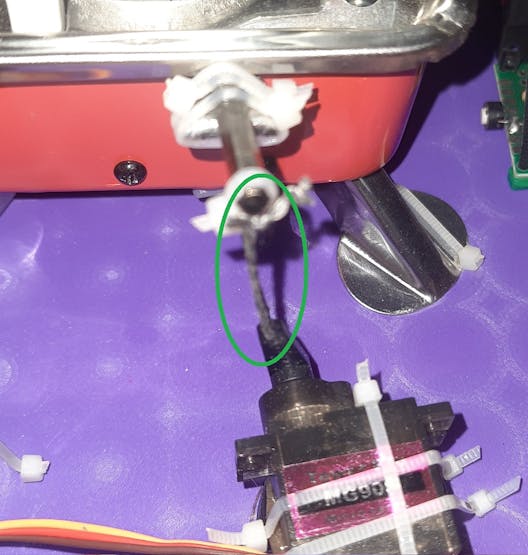
Servo motor to drive spark generator
This is how the Serial TX line is hacked out without modifying the Dev kit:-
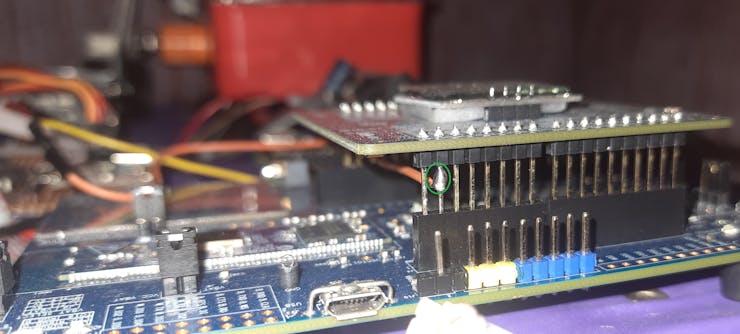
TX line hack !
All the parts are fastened with cable tie on a piece of hardboard. Jumper wires are used to interconnect all the hardware pieces.

Complete Hardware Assembly
Programming on Modustoolbox & Building Voice AI Model
Modustoolbox
To program the PSoC6 Pioneer Kit, please download and install the Modustoolbox(MTB) SDK. I have used MTB version 2.4, any version prior to version 2.1 of MTB should be avoided for this project.

Modustoolbox Software Development Kit
Modustoolbox download link : https://www.infineon.com/cms/en/design-support/tools/sdk/modustoolbox-software/
You might face some difficulties with MTB after installation. Make sure to add path to tools for MTB to work properly.

Adding Paths to Tools for MTB
Following installation guide from Infenion explains this setup process :-Modustoolbox Installation Guide [https://www.infineon.com/dgdl/Infineon-ModusToolbox-Installation-Guide_3-GettingStarted-v01_00-EN.pdf?fileId=8ac78c8c7d718a49017d99a20342316d]
Once the Modustoolbox(MTB) is installed, let's get started with the voice recognition demo first.
Run MTB and click on New Application from Quick Start menu:

Adding a demo application on MTB
Make sure your Internet connection is active, as this process will download the example application demo from Github
Select the appropriate platform (PSoC 6) and correct board (CY8CKIT-062S2-43012) from Board Support Package menu
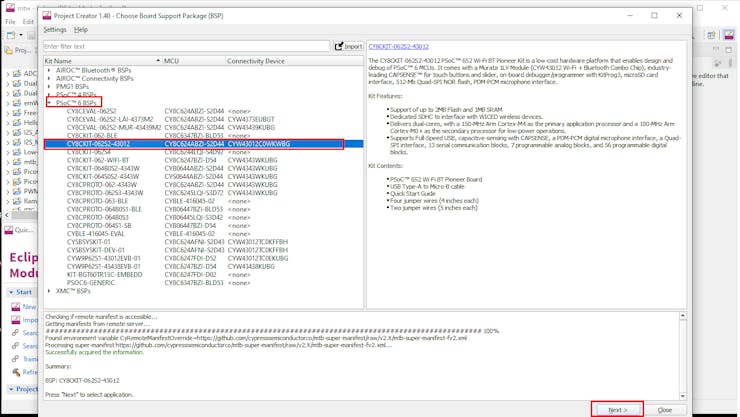
Platform and board selection
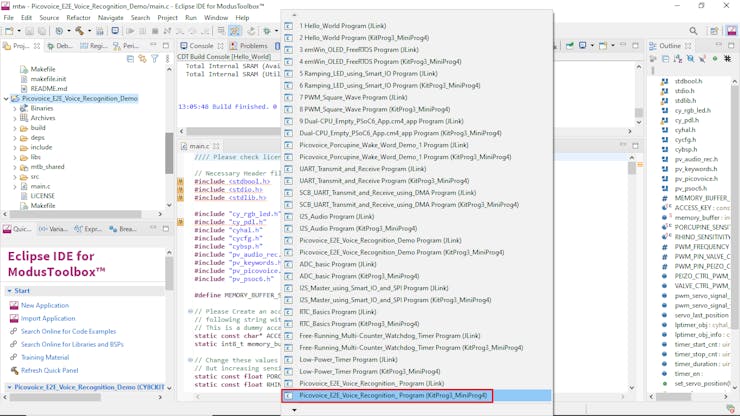
Next. select the Voice template application and check the demo project Picovoice E2E Voice Recognition Demo and click create
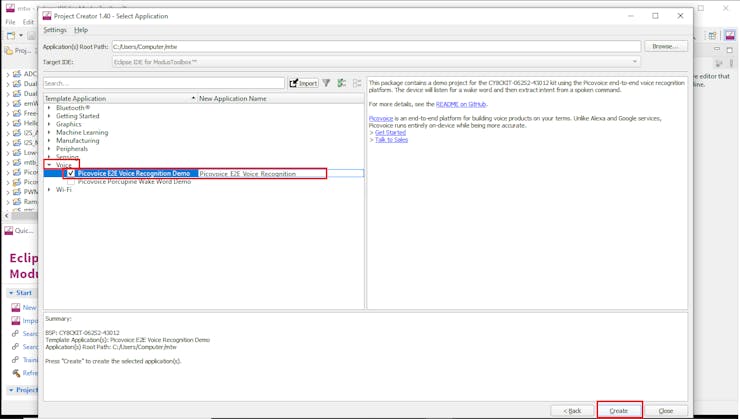
Selecting the voice demo
Now, open the main.c file inside the Picovoice E2E Voice Recognition Demo code. Find the line that accepts Picovoice Access Key, we will come back here later
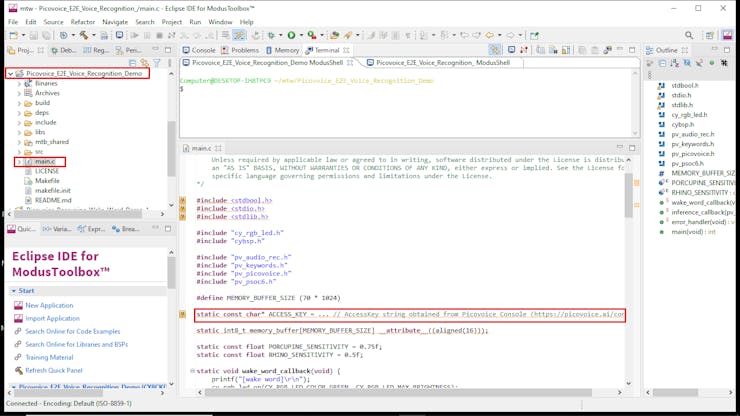
locate the code line where Access Key needs to be placed
Keep the MTB running in the background and open your web browser app, it's time for Picovoice.
Picovoice
Picovoice is one of the most intuitive way to build a voice recognition model and implement on different platforms. Simply put, you just need to type wake words and speech to intent words, then build the platform specific voice recognition model. Once the model is generated, download and implement the voice recognition model in your embedded development project.
Following steps will explain the process :
Step 0: Go to https://console.picovoice.ai/, create a new account and login. This page will appear
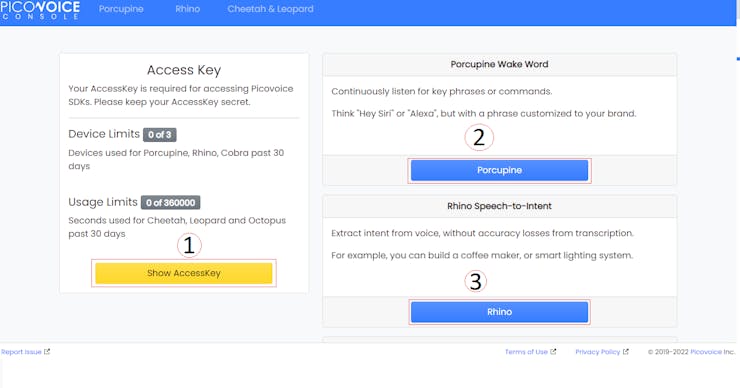
Picovoice Console
Step 1: Access Key and UUID (Unique Identifier)
First click on "Show AccessKey" and it will provide an unique string, copy this string and save it on a text file. This Access Key will be required in the code.
The Access Key looks something like this (this is a dummy string) :
XIn8zpxLsfsdfsadVmTTiPxze+v1A3ESyCdfsdfsdhXXrWwOKS0orK1VtQK6kg==This string must go between " " and end with ; like this inside the code:-
static const char* ACCESS_KEY = "XIn8zpxLsfsdfsadVmTTiPxze+v1A3ESyCdfsdfsdhXXrWwOKS0orK1VtQK6kg==";To make voice recognition models, one more information is needed, that is the device UUID ( In this case the UUID of the PSoC 6 (mcu) Pioneer Kit ).
Copy the Access Key string and Paste/Insert into the MTB demo code that was previously opened like this :
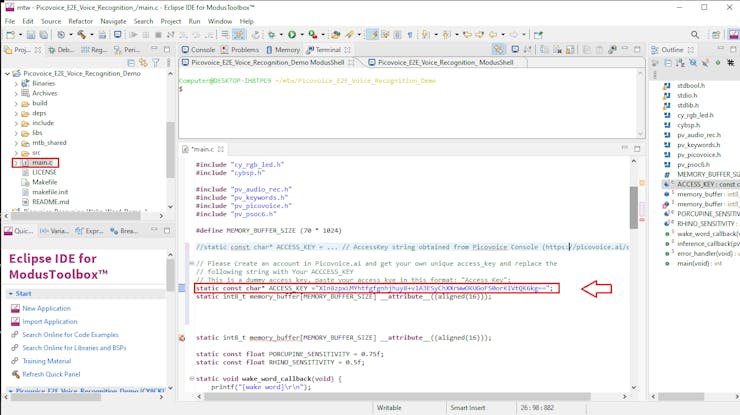
Pasting the Access Key in Demo code
Now, select the demo project and click on the build button (hammer icon).
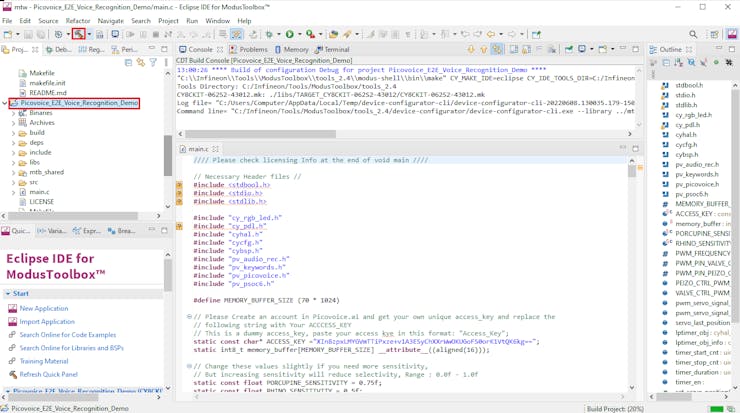
Building project
While, the build process is going on (it will take some time), connect the PSoC6 Pioneer Kit (+ IoT Sense Kit connected on it) to computer with an USB cable.
Once the build is completed, flash the code by clicking the Green Play icon, make sure to select the right programmer
Picovoice_E2E_Voice_Recognition_Program (KitProg3_MiniProg4)
Flashing firmware on PSoC6 mcu
Now, open a serial terminal application like Putty or TeraTerm, select the right serial port (eg. COM5) with 115200 baud rate

Serial Terminal Putty
Then say, loudly "Hey Pico"
You should get a response on serial monitor with an UUID of your PSoC6 Pioneer Kit, something like this (hexadecimal number) :

This is a dummy UUID, don't use it, use your board's original UUID
This UUID will be needed to make voice recognition models in Picovoice Console.
Now. let's go back to Picovoice console.
Step 2: Wake Word
Picovoice wake word is a special trigger word which will activate the device. I am going to use the word : Hey Stove as a wake word, because this is a voice controlled stove.
Go to Porcupine option on Picovoice console (https://console.picovoice.ai/ppn)
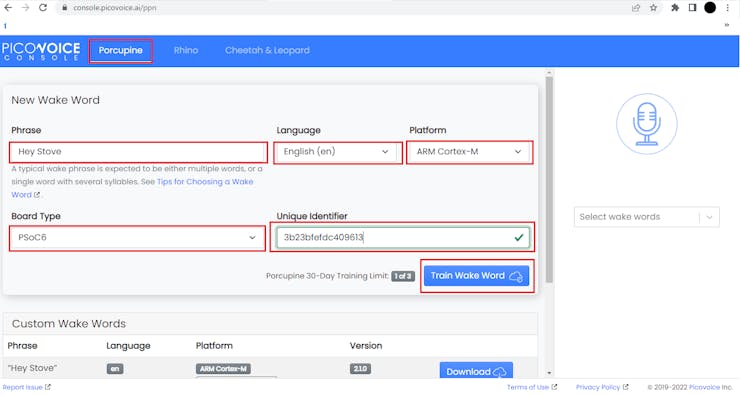
Wake Word training on Picovoice Console
Type Phrase: Hey StoveSelect Language: EnglishSelect Platform: ARM Cortex-MSelect Board: PSoC6Type the UUID/Unique Identifier from before: (hexadecimal number)Next, click Train Wake Word, with in few seconds your wake word trained model will be ready. Download the trained model
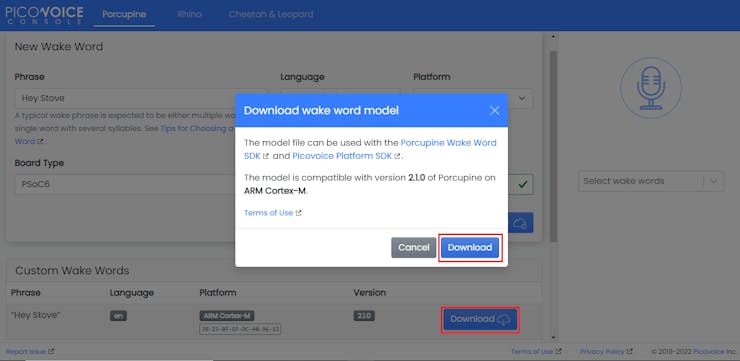
Download wake word model
You will get a downloaded zipped folder, unzip it and open the pv_porcupine_params.h file with any text editor (notepad). This is the wake word model, a large array of hexadecimal numbers.
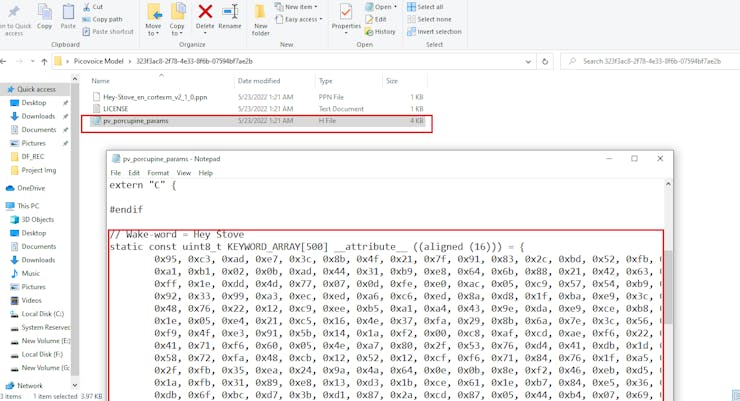
Hey Stove wake word model
More on this will be explained later.
Step 3: Speech to Intent Model
The wake word "Hey Stove" will activate the device but it won't perform any stove action. I want to turn on the stove, turn off the stove, change gas/flame, set cooking timer etc. I have intentions to do certain tasks with my stove. This is where the speech-to-intent engine is needed.
Picovoice Rhino Speech-to-Intent engine can extract multiple spoken commands, which can be used to perform different operations.
Go to Rhino option on Picovoice console (https://console.picovoice.ai/rhn)
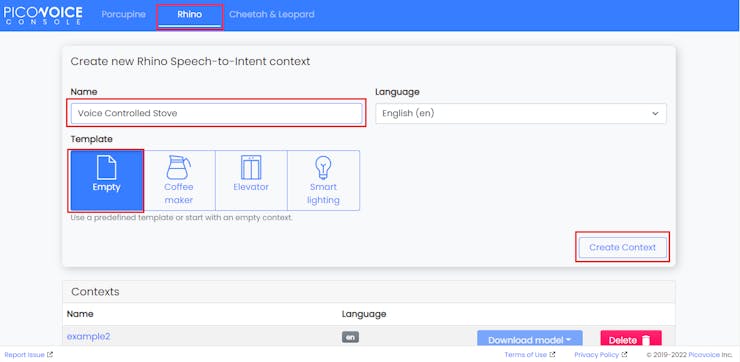
Type name: Voice Controlled Stove
Select Template: Empty
Then click Create Context, this will take you to a new page where the actual speech-to-intent model 'coding' is done.
Expressions for Intents
Here is a quick overview of Intents, Slots and Macros for Picovoice:-
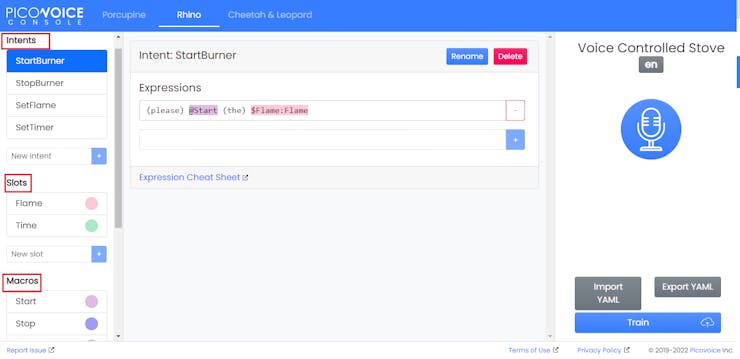
Intents
Intents are certain actions that you want to perform with voice control. Think of them as verbs used in grammar. Intents have expressions, which closely follows English grammar for sentences with a verb.
Intent Expressions= Action (do something) + Subject/Object (about something)
This voice control stove has 4 separate intent:
StartBurner : To start a fire on the stove's burnerStopBurner : To stop the fireSetFlame : To change the flame by adjusting gasSetTimer : To set a cooking timer to turn off the fire when time elapsedEach intent has it's own expression which you must type. An expression should be like this :
(polite word) @Macro(i.e. Verb/Action) (article words) $Slot(i.e. Noun/Variables)
   Please                    Start             the                 Burner
   Can you                   Set Timer         to                  Five Minutes?
It may seem a little confusing at first, but you will get it eventually (don't worry)
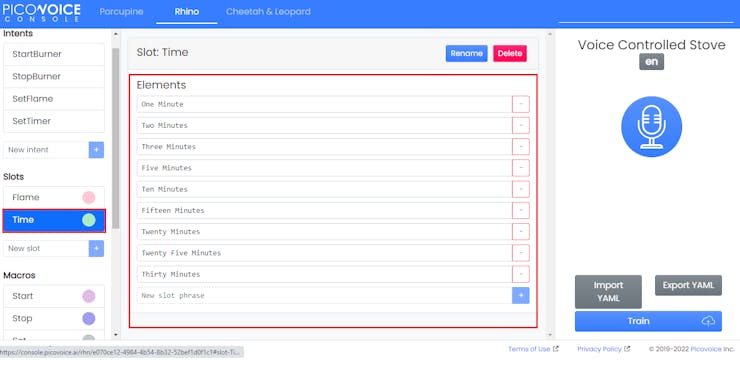
Slots
Slots are the variables in an intent. Slots can hold multiple elements representing different variables or different names for one variable
Think of it as the subject/object in English grammar on which the action needs to be performed.
For example, if we want to set a cooking timer, the time will be different depending on the command.
Set timer to one minuteSet timer to three minutesSet timer to five minutes
Slots = Variables in actions (usually)
Slot elements
Speech to Intent engine can extract these differences.
Slot will have $ symbol before them when when used inside an expression
Picovoice has some built-in slots, like pv.Percent [http://pv.percent/] which can directly extract a percent value from user's intent.
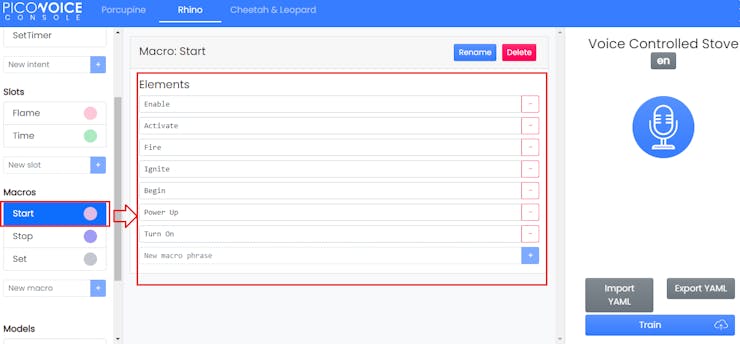
Macros
Macros are exactly used for different words with same meaning (intent). It is equivalent to Synonyms in English Grammar.
Macros will have @ symbol before them when used inside an expression
Macros = Synonyms for verbs
For example: Start can be said as turn on/power up/enable/activate any of these words.
So, how do you put everything together?
First, think of allthe possible ways a human can say the 'same thing' which represents a specific intent. Then list all the verbs/nouns in Macros, list all the variables in Slots and create an expression for the intent like this :
(please) @Start (the) $Flame:Flame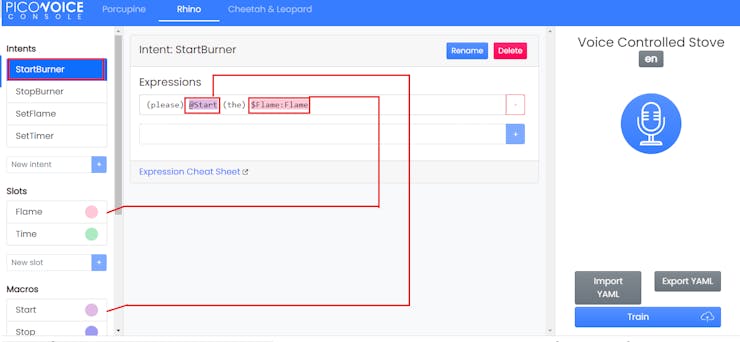
The Voice Recognition model will work better if it can detect wide variety of human phrases with same intention. Properly listed Macro elements and better expressions are the key to success.
Please read this to get a better understanding : https://picovoice.ai/docs/tips/syntax-cheat-sheet/
Step 4: Training the Model
Once all the Intents, Slots, Macros are done, click on "Train" on the bottom right corner:

Training in Rhino
Select as follows:
Model Platform: ARM Cortex-MBoard Type: PSoC6Unique Identifier (UUID) : That Hexadecimal NumberThen click Train "Voice Controlled Stove" for ARM Cortex-M
Go to https://console.picovoice.ai/rhn and download the speech to intent model.

Downloading Speech to Intent Model
Unzip the downloaded file.
Then, open the Voice-Controlled-Stove_en_cortexm_v2_1_0.h

Speech to Intent model for Voice Controlled Stove
There is this large array of hex numbers inside the file, this is the speech to intent model.
Step 5: Editing main.c and param.h in Modustoolbox
Now, go back to Modustoolbox. Copy the main.c code attached here.
Replace the entire original demo code from the main.c of Picovoice E2E Voice Recognition Demo

editing main.c with appropriate code
Next, edit the param.h by including the wake word model's array and speech to intent model's array. Both models (wake word + speech to intent) are combined together into param.h.

1 / 2 • Wake Word model pasted inside Param.h
I have attached the modified param.h below. Copy it's content and replace the original contents of param.h to avoid any confusion.
If you want to understand how the code works, please read it. There are tons of comments in the code explaining most of the things
Finally, click the hammer icon to build and green play button icon to flash the firmware into PSoC6 mcu, as explained before (see step 1).
Preparing Audio Files for Voice Playback
Step1: I have used https://ttsreader.com/ text-to-speech service to make the audio feedbacks.

Step 2: While the speech was playing, I have recorded the sound with Audacity . Select Windows WASPAPI and Source as Headphone/Speaker, then click the Record icon to capture audio playback in your computer.
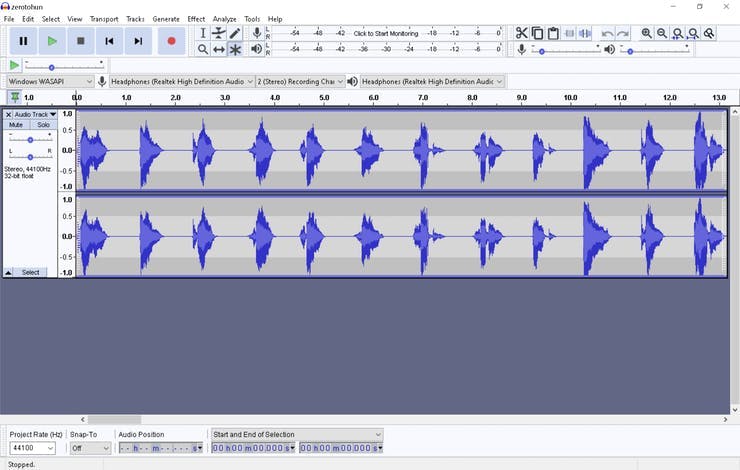
Recording with Audacity
Step 3: After recording, the audios are segmented into multiple mp3 files. To separate each segment of the audio (sound for every number), select that part with mouse, then use shortcut Ctrl+C (copy), Ctrl+N (new), Ctrl+V (paste) that audio segment. Repeat this step for each audio voice segment.
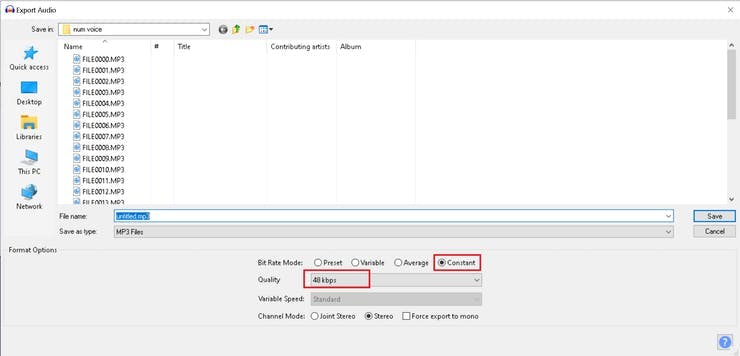
Converting to MP3 files
Step 4: Go to Files > Export as MP3, select 48 kbps quality and rename as FILE0000.MP3, FILE0001.MP3, FILE0002.MP3 up to FILE0100.MP3
(all the audio files are attached below, you can skip step 1-4, just download and copy the files according to step 5)

Copying MP3 files on DF Voice Module
Step 5: Voice module is connected to computer with a USB C cable, 16 MB Flash Drive appeared. It will require formatting (FAT) when using for the first time. Next, all the mp3 files are copied to a DF_REC directory inside the voice module's flash drive.
You can put maximum of 1000 MP3 files with total audio length of 40 minutes @ 48kbps. Higher sampling frequency song/audio voice will work but the audio length will be less due to larger file size
How the audio playback works ?
PSoC6 mcu's serial TX and Beetle board mcu's serial RX are connected for half duplex serial communication. PSoC6 mcu simply send's printf("some number"), which is transmitted to Beetle board's mcu. Depending on the number that was received from PSoC6 mcu, Beetle board mcu will send command to the Voice Playback Module to play the mp3 file representing that number.
For example: printf("040") command will play 0040.mp3 file. Check this project of mine, which explains this in full details :
https://www.hackster.io/PSoC_Rocks/countdown-voice-timer-fire-starter-ff58f8
Device Operation
To understand the device operation, let's have a look at all the PSoC6 Application Resources (PSoC6 mcu internal hardware)
Application Resources

PSoC 6 Resources used, see code (main.c) below for details
Depending on the voice commands from user, some of these resources will activate certain modules to control servos, enable timer, send printf messages to voice playback module etc.
Two PWM modules will generate 50 Hz PWM signals. By adjusting the duty cycles of these signals, both servo motors are controlled.LPTIMER will measure time elapsed when cooking timer function is activeUART TX will send printf() messages to Beetle board to play mp3 filesGPIO will drive Green LED on PSoC6 Pioneer Kit board when wake word is detected. Blue LED will glow when speech to intent is detected.Here are some example voice commands and hardware interactions:
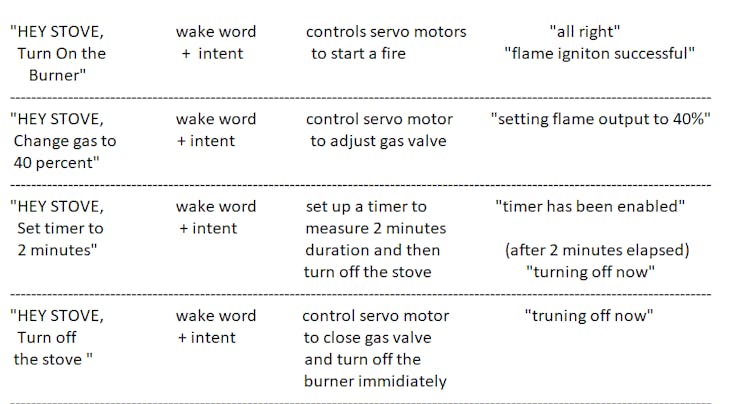
Voice Commands to operate the stove
Of course, these are not the only voice commands. For example:
"Hey Stove, turn on the burner" can also be said as :
"Hey Stove, start the fire"
"Hey Stove, turn on the flame"
"Hey Stove, activate the burner"
Gas/Flame adjustment constrains
Gas or Flame can be adjusted with any value between 10% to 100%, in step of 5%. Which means, 10%, 15%, 20%, 25%,....... 100%
Here are some valid voice commands examples :
"Hey Stove, change gas to 40%"
"Hey Stove, increase flame to 65%"
"Hey Stove, reduce gas to 25%"
For any values which is not divisible by 5 will have a default gas valve setting of 30%
Timer setting constrains
Cooking duration timer can be : 1 minute, 2 minutes, 3 minutes, 5 minutes, 10 minutes, 15 minutes, 20 minutes, 25 minutes, 30 minutes only
Of course, more or less options can be added by editing the main.c code.
Here are some valid timer setting voice commands:
"Hey Stove, set timer to 1 minute"
"Hey Stove, change timer to 5 minutes"
Existing timer setting can be overridden with new timer setting commands. For any value of minutes which is not listed above, default timer setting is one minute.
Conclusion
I have made this project with a limited budget (around 50$ of extra hardware) + PSoC6 Pioneer Kit which is provided by Infenion and Picovoice developer account which is provided by Picovoice for free, helped me realize this project. But if anyone wants to turn this into a product, more features may be added.
Here are few ideas for additional features:
Flame and Gas sensors for safetyTemperature Sensor for closed loop controlled heatingBuilt in cooking profiles with multi stage heatingSpillage detection on stove's surroundingsOvercook protection/food anti-burn protectionMulti burners cooking operationFlame sensor will protect against failed ignition and turn off the gas after few retries, gas sensor will notify user if there is gas leakage in absence of flame or there is no gas available.
Built in cooking profiles can take care of temperature adjustments for cooking different foods. User will say something like this : "Hey Stove, hard boil my eggs" or "Hey Stove, I want extra crispy French fry !"
Spillage detection will automatically adjust heating to avoid/reduce spillage of boiling milk or soup.
Same with overcook protection, no more burnt cooking. Some sensors like Acrylamide sensor may be needed. Multi burner cooking will allow chefs to cook lots of dishes at once.
All these features will have voice control and voice feedback as usual. My demo project is just the starting point for anyone willing to turn this into a real world product.
Schematics
DF_REC
Courtesy of : https://ttsreader.com/
Schematic
Schematic for Inter-modules (B2B) connectivity

Code
main
C/C++
Copy this code and replace the existing code in Picovoice_E2E_Voice_Recognition_Demo example's main.c code
//// Please check licensing Info at the end of void main ////

// Necessary Header files //
#include <stdbool.h>
#include <stdio.h>
#include <stdlib.h>

#include "cy_rgb_led.h"
#include "cy_pdl.h"
#include "cyhal.h"
#include "cycfg.h"
#include "cybsp.h"
#include "pv_audio_rec.h"
#include "pv_keywords.h"
#include "pv_picovoice.h"
#include "pv_psoc6.h"

#define MEMORY_BUFFER_SIZE (70 * 1024)

// Please Create an account in Picovoice.ai and get your own unique access_key and replace the
// following string with Your ACCCESS_KEY
// This is a dummy access_key, paste your access kye in this format: "Access_Key";
static const char* ACCESS_KEY ="XIn8zpxLMYGVmTTiPxze+v1A3ESyChXXrWwOKUGoFS0orK1VtQK6kg==";
static int8_t memory_buffer[MEMORY_BUFFER_SIZE] __attribute__((aligned(16)));

// Change these values slightly if you need more sensitivity,
// But increasing sensitivity will reduce selectivity, Range : 0.0f - 1.0f
static const float PORCUPINE_SENSITIVITY = 0.75f;
static const float RHINO_SENSITIVITY = 0.5f;


//////////////////////////////////////////////////////
//////////////////////////////////////////////////////
// PWM Frequency = 50Hz //
#define PWM_FREQUENCY (50u)
// PWM Output Pins for servo control //
#define PWM_PIN_VALVE_CTRL P0_3
#define PWM_PIN_PEIZO_CTRL P1_3
// PWM Duty-cycle = 10% //
float PEIZO_CTRL_PWM_DUTY_CYCLE = 10.0f;
float VALVE_CTRL_PWM_DUTY_CYCLE = 10.0f;
///////////////////////////////////////////////////////
cyhal_pwm_t pwm_servo_signal_peizo_ctrl;
cyhal_pwm_t pwm_servo_signal_valve_ctrl;
///////////////////////////////////////////////////////
float servo_last_position = 0.0f; // 0 position of servo
///LowPower Timer will be used for Cooking Timer purpose///
cyhal_lptimer_t lptimer_obj;
cyhal_lptimer_info_t lptimer_obj_info;
uint32_t timer_start_cnt = 0; // lp timer count for starting cooking timer
uint32_t timer_stop_cnt = 0; // lp timer count for stopping cooking timer
uint32_t timer_duration = 0; // in minute(s)
timer_en = 0; // cooking timer active/inactive flag

////////////////////////////////////////////////////////////
////////////////////////////////////////////////////////////


//This function will take an angle (0-180) and
//drive one of the servo to that position

void set_servo_position (float angle)
{
    // Initialize the PWM //
    __enable_irq();
     cyhal_pwm_init(&pwm_servo_signal_valve_ctrl, PWM_PIN_VALVE_CTRL, NULL);
    //Set the PWM output frequency and duty cycle */
    cyhal_pwm_set_duty_cycle(&pwm_servo_signal_valve_ctrl, VALVE_CTRL_PWM_DUTY_CYCLE, PWM_FREQUENCY);
    // Start the PWM //
     cyhal_pwm_start(&pwm_servo_signal_valve_ctrl);
     float angle_difference = angle - servo_last_position;
    ///////////////////////////////////////////////////////////////////
     // for cw servo rotation (ccw valve opening more - more gas flow)
     if (angle_difference>0.0f)
 	{
 	    // (scaling: 180.0 degrees / 10.0 % duty = 18.0)
    	float steps = angle_difference/18.0f;
    	float position_reference = servo_last_position/18.0f;
    		while(VALVE_CTRL_PWM_DUTY_CYCLE  >= 10.0f - steps - position_reference)
    		{
    		VALVE_CTRL_PWM_DUTY_CYCLE = VALVE_CTRL_PWM_DUTY_CYCLE - 0.05;
 	    	cyhal_pwm_set_duty_cycle(&pwm_servo_signal_valve_ctrl, VALVE_CTRL_PWM_DUTY_CYCLE, PWM_FREQUENCY);
 	    	Cy_SysLib_Delay(25);
   	        // duty cycle limit
 	    	//if (PWM_DUTY_CYCLE > 10.0f) PWM_DUTY_CYCLE = 10.0f;
 	        // if (PWM_DUTY_CYCLE < 0.0f) PWM_DUTY_CYCLE = 0.0f;

    		}
 	}
 ///////////////////////////////////////////////////////////////////
 ///////////////////////////////////////////////////////////////////
 // for ccw servo rotation (cw valve closing more - less gas flow)
     if (angle_difference<=0.0f)
      	{
         	float steps = angle_difference/18.0f;
        	float position_reference = servo_last_position/18.0f;
         		while(VALVE_CTRL_PWM_DUTY_CYCLE <= 10.0f - steps - position_reference)
         		{
         			VALVE_CTRL_PWM_DUTY_CYCLE = VALVE_CTRL_PWM_DUTY_CYCLE + 0.05;
      	    	cyhal_pwm_set_duty_cycle(&pwm_servo_signal_valve_ctrl, VALVE_CTRL_PWM_DUTY_CYCLE, PWM_FREQUENCY);
      	    	Cy_SysLib_Delay(25);

      	    	//if (PWM_DUTY_CYCLE > 10.0f) PWM_DUTY_CYCLE = 10.0f;
      	        //if (PWM_DUTY_CYCLE < 0.0f) PWM_DUTY_CYCLE = 0.0f;


         		}
      	}
///////////////////////////////////////////////////////////////////////////

     servo_last_position = angle;
     // some delay may be needed
    // turn off pwm signal //
	cyhal_pwm_free(&pwm_servo_signal_valve_ctrl);

}
////////////////////////////////////////////////////////////////////////////
////////////////////////////////////////////////////////////////////////////

//This function controls the other servo motor to activate the peizo ignition lever
	void operate_servo_peizo_ignition (void)
	{
	   // Initialize the PWM //
	   __enable_irq();
	     cyhal_pwm_init(&pwm_servo_signal_peizo_ctrl, PWM_PIN_PEIZO_CTRL, NULL);
	  // Set the PWM output frequency and duty cycle */
	     cyhal_pwm_set_duty_cycle(&pwm_servo_signal_peizo_ctrl, PEIZO_CTRL_PWM_DUTY_CYCLE, PWM_FREQUENCY);
	  // Start the PWM //
	     cyhal_pwm_start(&pwm_servo_signal_peizo_ctrl);
      // move servo motor 1 to pull the lever of peizo igniter spark generator

	 	while(PEIZO_CTRL_PWM_DUTY_CYCLE >= 0.0f)
	 	{
	 	PEIZO_CTRL_PWM_DUTY_CYCLE = PEIZO_CTRL_PWM_DUTY_CYCLE - 0.1;
	 	cyhal_pwm_set_duty_cycle(&pwm_servo_signal_peizo_ctrl, PEIZO_CTRL_PWM_DUTY_CYCLE, PWM_FREQUENCY);
	 	Cy_SysLib_Delay(25);
	 	}
	    while(PEIZO_CTRL_PWM_DUTY_CYCLE <=10.0f)
		{
	    PEIZO_CTRL_PWM_DUTY_CYCLE = PEIZO_CTRL_PWM_DUTY_CYCLE + 0.1;
		cyhal_pwm_set_duty_cycle(&pwm_servo_signal_peizo_ctrl, PEIZO_CTRL_PWM_DUTY_CYCLE, PWM_FREQUENCY);
		Cy_SysLib_Delay(25);
		}


		PEIZO_CTRL_PWM_DUTY_CYCLE = 10.0f;
		// turn of pwm signal
		cyhal_pwm_free(&pwm_servo_signal_peizo_ctrl);

	}

////////////////////////////////////////////////////////////////////
////////////////////////////////////////////////////////////////////


// convert percent value from string to integer, in step of 5, range: 10-100
// for example this string "forty percent" will return 40,
int get_percent (char *pv_value)
{
	int i = 30; //default value for wrong input

	if (!(strcmp(pv_value, "ten percent")))
			{i = 10;}
	if (!(strcmp(pv_value, "fifteen percent")))
		  {i = 15;}
	if (!(strcmp(pv_value, "twenty percent")))
			{i = 20;}
	if (!(strcmp(pv_value, "twenty five percent")))
			{i = 25;}
	if (!(strcmp(pv_value, "thirty percent")))
			{i = 30;}
	if (!(strcmp(pv_value, "thirty five percent")))
			{i = 35;}
	if (!(strcmp(pv_value, "forty percent")))
			{i = 40;}
	if (!(strcmp(pv_value, "forty five percent")))
			{i = 45;}
	if (!(strcmp(pv_value, "fifty percent")))
	    {i = 50;}
	if (!(strcmp(pv_value, "fifty five percent")))
		  {i = 55;}
	if (!(strcmp(pv_value, "sixty percent")))
			{i = 60;}
	if (!(strcmp(pv_value, "sixty five percent")))
			{i = 65;}
	if (!(strcmp(pv_value, "seventy percent")))
			{i = 70;}
	if (!(strcmp(pv_value, "seventy five percent")))
			{i = 75;}
	if (!(strcmp(pv_value, "eighty percent")))
			{i = 80;}
	if (!(strcmp(pv_value, "eighty five percent")))
			{i = 85;}
	if (!(strcmp(pv_value, "ninety percent")))
			{i = 90;}
	if (!(strcmp(pv_value, "ninety five percent")))
			{i = 95;}
	if (!(strcmp(pv_value, "hundred percent")))
	    {i = 100;}
	return i;
}

/////////////////////////////////////////////////////////////////
/////////////////////////////////////////////////////////////////

///// Convert Voice Command for Cooking Timer into integer //////
// Valid timer setting are 1,2,3,5,10,15,20,25,30 minutes only //

int get_timer_duration (char *minutes)
{
	int m = 1;

	if (!(strcmp(minutes, "One Minute")))
				{m = 1;}
	if (!(strcmp(minutes, "Two Minutes")))
				{m = 2;}
  if (!(strcmp(minutes, "Three Minutes")))
				{m = 3;}
	if (!(strcmp(minutes, "Five Minutes")))
				{m = 5;}
	if (!(strcmp(minutes, "Ten Minutes")))
				{m = 10;}
	if (!(strcmp(minutes, "Fifteen Minutes")))
				{m = 15;}
	if (!(strcmp(minutes, "Twenty Minutes")))
				{m = 20;}
	if (!(strcmp(minutes, "Twenty Five Minutes")))
				{m = 25;}
	if (!(strcmp(minutes, "Thirty Minutes")))
				{m = 30;}


	return m;
}

//////////////////////////////////////////////////////////////////
//////////////////////////////////////////////////////////////////

void check_if_timer_expired(void)
{
	cyhal_lptimer_get_info(&lptimer_obj, &lptimer_obj_info);
	uint32_t timeout_val = timer_start_cnt + timer_duration*60*(unsigned long)lptimer_obj_info.frequency_hz;
    timer_stop_cnt = cyhal_lptimer_read(&lptimer_obj);
    if(timer_stop_cnt>timeout_val)
    {
    	// duration of cooking timer has elapsed
    	// Turn off the stove/flame/gas
        set_servo_position(0.0f); // Fully Close Gas Valve
        // acknowledge shutdown cmd with voice playback
        printf("006"); printf("\r\n");
        timer_en = 0;
        cyhal_lptimer_free(&lptimer_obj);
    }

}

/////////////////////////////////////////////////////////////////
/////////////////////////////////////////////////////////////////


// glows on board green LED when wake word "Hey Stove" is said
static void wake_word_callback(void)
{
    cy_rgb_led_on(CY_RGB_LED_COLOR_GREEN, CY_RGB_LED_MAX_BRIGHTNESS);
}

// This is the core function to extract Intent from Inference //
// I have added my own code by modifying the original function //
// Original code provided by Picovoice //

/////////////////// Important note /////////////////////
/* printf() is used to send voice playback commands from
   PSoC6 to Beetle over half duplex UART line,
   after receiving each command a specific file on
   voice playback module is selected by Bettle board
   for playing appropriate mp3 file
   This is how the Interactive Voice UI works !
*/
/////////////////////////////////////////////////////////

static void inference_callback(pv_inference_t *inference)
{
    cy_rgb_led_on(CY_RGB_LED_COLOR_BLUE, CY_RGB_LED_MAX_BRIGHTNESS);

/////////////////////////////////////////////////////////////
/////////////////////////////////////////////////////////////
    if (!(inference->is_understood))
    {
   // "Intent not understood please say again" - msg playback
    	printf("014"); printf("\r\n");
    }
/////////////////////////////////////////////////////////////
/////////////////////////////////////////////////////////////
        // if there is a valid intent
    if (inference->is_understood)
    {
 // identify the intent and execute necessary hardware actions
//////////////////////////////////////////////////////////////
//////////////////////////////////////////////////////////////
    	if(!(strcmp(inference->intent, "StartBurner")))
    	{
    		// " All right" - msg playback
    		printf("002"); printf("\r\n");
    		// Turn on the stove/open gas valve + ignite fire
    		set_servo_position(10.0f); // Partially Open Gas Valve
      		Cy_SysLib_Delay(200);
    		operate_servo_peizo_ignition(); // Ignite fire with Spark
    		Cy_SysLib_Delay(500);

    		// Voice Playback  //
            // Flame sensing/ gas sensing here (later) //
    		// "Flame Ignition Successful" - msg playback
    		printf("003"); printf("\r\n");
    		Cy_SysLib_Delay(900);

    	}

///////////////////////////////////////////////////////////////////
///////////////////////////////////////////////////////////////////
    	if (!(strcmp(inference->intent,"StopBurner")))
    	{
    		// Turn off the stove/flame/gas
    		set_servo_position(0.0f); // Fully Close Gas Valve
            // "Turning off Now" msg playback
    		printf("006"); printf("\r\n");

    	}
///////////////////////////////////////////////////////////////////
///////////////////////////////////////////////////////////////////
    	if(!(strcmp(inference->intent, "SetTimer")))
    	{
    		timer_duration = get_timer_duration(inference->values[0]);
    		//printf("%d",timer_duration);
    		timer_en = 1; // timer enable indication flag
    		cyhal_lptimer_init(&lptimer_obj); // start low power timer
    		timer_start_cnt = cyhal_lptimer_read(&lptimer_obj);
    		// "Timer has been set" -msg playback
    		printf("007"); printf("\r\n");

    	}
///////////////////////////////////////////////////////////////////
///////////////////////////////////////////////////////////////////
    	if (!(strcmp(inference->intent, "SetFlame")))
    	{
        // Increase/decrease gas flow to adjust flame
    		int gas_valve = get_percent(inference->values[1]);
    	// scaling: half of (180 degree/100 percent) = 0.9f
            float valve_pos = gas_valve*0.9f;
            set_servo_position(valve_pos);

        // convert integer to string (for gas/flame level)
    		   char num2str[2];
    		   char padding[3]="0";
    		   sprintf(num2str, "%d", gas_valve);
    		   strcat(padding,num2str);

        // Voice msg playback confirms user's input for flame/gas adjustment
    		printf("004"); printf("\r\n");
    	    Cy_SysLib_Delay(2400);
    	    printf("%s",padding); printf("\r\n");
    	    Cy_SysLib_Delay(2500);
    		printf("005"); printf("\r\n");
    		Cy_SysLib_Delay(900);
 ///////////////////////////////////////////////////////////////////
 ///////////////////////////////////////////////////////////////////


    	}
    }


    for (int32_t i = 0; i < 10; i++) {
        if (cy_rgb_led_get_brightness() == 0) {
            cy_rgb_led_set_brightness(CY_RGB_LED_MAX_BRIGHTNESS);
        } else {
            cy_rgb_led_set_brightness(0);
        }
        Cy_SysLib_Delay(30);
    }
    cy_rgb_led_off();

    pv_inference_delete(inference);
}


/*static void error_handler(void) {
    while(true);
}*/


///////////////////// VOID MAIN ///////////////////
///////////////////////////////////////////////////

int main(void) {

	// necessary initializations for picovoice to work properly

    pv_board_init();
    pv_message_init();


// Use the following code if you need to know the UUID of your Board //
// UUID will be needed every time you create a new AI model on picovoice.ai //
/*
    const uint8_t *board_uuid = pv_get_uuid();
    printf("UUID: ");
    for (uint32_t i = 0; i < pv_get_uuid_size(); i++) {
        printf(" %.2x", board_uuid[i]);
    }
    printf("\r\n");
*/
// Initialize audio and start listening for user voice input //
    pv_audio_rec_init();
    pv_audio_rec_start();
    pv_picovoice_t *handle = NULL;
    pv_picovoice_init(ACCESS_KEY,
            MEMORY_BUFFER_SIZE,
            memory_buffer,
            sizeof(KEYWORD_ARRAY),
            KEYWORD_ARRAY,
            PORCUPINE_SENSITIVITY,
            wake_word_callback,
            sizeof(CONTEXT_ARRAY),
            CONTEXT_ARRAY,
            RHINO_SENSITIVITY,
            true,
            inference_callback,
            &handle);

// keep listening and if there is something meaningful,
// process it with picovoice AI engine
    while (true) {
        const int16_t *buffer = pv_audio_rec_get_new_buffer();
        if (buffer) {
             pv_picovoice_process(handle, buffer);

        }
///////////////////////////////////////////////////////////////////
///////////////////////////////////////////////////////////////////
        if (timer_en == 1)
        {
        	// while cooking timer is running, check if the timer has timed out
        	check_if_timer_expired();
        }
///////////////////////////////////////////////////////////////////
///////////////////////////////////////////////////////////////////

    }

    // should never reach here, just in case
    pv_board_deinit();
    pv_audio_rec_deinit();
    pv_picovoice_delete(handle);
}

//////////////////////// END_OF_MAIN ////////////////////////

///////////////////////Licensing Info////////////////////////
/////////////////////////////////////////////////////////////
////////////////// For Picovoice Code ///////////////////////
/*
    Copyright 2021 Picovoice Inc.

    You may not use this file except in compliance with the license. A copy of the license is located in the "LICENSE"
    file accompanying this source.

    Unless required by applicable law or agreed to in writing, software distributed under the License is distributed on
    an "AS IS" BASIS, WITHOUT WARRANTIES OR CONDITIONS OF ANY KIND, either express or implied. See the License for the
    specific language governing permissions and limitations under the License.
*/

////////////////// For Infenion/Cypress Code ////////////////
/*******************************************************************************
* Copyright 2020-2021, Cypress Semiconductor Corporation (an Infineon company) or
* an affiliate of Cypress Semiconductor Corporation.  All rights reserved.
*
* This software, including source code, documentation and related
* materials ("Software") is owned by Cypress Semiconductor Corporation
* or one of its affiliates ("Cypress") and is protected by and subject to
* worldwide patent protection (United States and foreign),
* United States copyright laws and international treaty provisions.
* Therefore, you may use this Software only as provided in the license
* agreement accompanying the software package from which you
* obtained this Software ("EULA").
* If no EULA applies, Cypress hereby grants you a personal, non-exclusive,
* non-transferable license to copy, modify, and compile the Software
* source code solely for use in connection with Cypress's
* integrated circuit products.  Any reproduction, modification, translation,
* compilation, or representation of this Software except as specified
* above is prohibited without the express written permission of Cypress.
*
* Disclaimer: THIS SOFTWARE IS PROVIDED AS-IS, WITH NO WARRANTY OF ANY KIND,
* EXPRESS OR IMPLIED, INCLUDING, BUT NOT LIMITED TO, NONINFRINGEMENT, IMPLIED
* WARRANTIES OF MERCHANTABILITY AND FITNESS FOR A PARTICULAR PURPOSE. Cypress
* reserves the right to make changes to the Software without notice. Cypress
* does not assume any liability arising out of the application or use of the
* Software or any product or circuit described in the Software. Cypress does
* not authorize its products for use in any products where a malfunction or
* failure of the Cypress product may reasonably be expected to result in
* significant property damage, injury or death ("High Risk Product"). By
* including Cypress's product in a High Risk Product, the manufacturer
* of such system or application assumes all risk of such use and in doing
* so agrees to indemnify Cypress against all liability.
*******************************************************************************/

////////////////// For my code //////////////////////////////
/* Most of my codes are inserted with in double slash lines
 *
 *
 */
///////////////////////////////////////////////////////////////
///////////////////////////////////////////////////////////////

////////////// (probably my codes, mostly !) //////////////////

///////////////////////////////////////////////////////////////
///////////////////////////////////////////////////////////////

///////////////////////////////////////////////////////////////
/////////// Do whatever you want with my part of codes ////////
///////////        No credit needed for my code        ////////
// but please follow Picovoice and Infenion terms of License //
///////////////////////////////////////////////////////////////
//////////////////// End of Magic Spells //////////////////////
voice playback module's code
C/C++
#include "U8glib.h"
#include <DFRobot_DF1101S.h>
#include <SoftwareSerial.h>

SoftwareSerial df1101sSerial(10, 11);          // RX = 10  TX = 11
SoftwareSerial PSoC6Serial(9, A1);          // RX = 9  TX = A1

U8GLIB_SSD1306_128X32 u8g(U8G_I2C_OPT_NONE);   // SCL = 2  SDA = 3

DFRobot_DF1101S df1101s;

#define BUTTON_DEC    A2
//#define BUTTON_INC     1 // Button disabled for serial port purpose (won't worry !)
#define BUTTON_SEL    A0

//#define OUTPUT_PIN1   0 // Output disabled for serial port usage
#define OUTPUT_PIN2   A1
#define OUTPUT_PIN3   9

#define BLUE_LED      13

/////////////////////////

// record more mp3 and add more defines like this
// if device needs to say something through speaker

//////////////////////////////////////////////////


int number_index = 3;
int volume = 30;
long last_millis;

void setup(void)
{

 u8g.setRot90();        // change oled display orientation

 // set GPIOs for buttons and LED

 pinMode(BUTTON_DEC, INPUT_PULLUP);
 //pinMode(BUTTON_INC, INPUT_PULLUP);
 pinMode(BUTTON_SEL, INPUT_PULLUP);
 pinMode(BLUE_LED, OUTPUT);

 //  Output pins for controlling something
 //pinMode(OUTPUT_PIN1, OUTPUT); digitalWrite(OUTPUT_PIN1,LOW);
 pinMode(OUTPUT_PIN2, OUTPUT); digitalWrite(OUTPUT_PIN2,LOW);

 // welcome message
 update_display_message_0();
 delay(500);

 // init soft serial to communicate with voice playback moduel

  df1101sSerial.begin(115200);
  delay(100);
  while(!df1101s.begin(df1101sSerial))
  {
 // update_display_message_1();
  df1101s.setPrompt(false);
  }

  //Set initial volume to 10
  df1101s.setVol(volume);

  // set playback mode
  df1101s.switchFunction(df1101s.MUSIC);

  // fast blink LED on pin 13
  for(int i = 0; i<10; i++)
  {debounce_blinky();}


  // init soft serial to half duplex to rcv cmd from PSoC6

  PSoC6Serial.begin(115200);


 // adjust volume with buttons
 // BUTTON_SEL for selecting shown value
 // BUTTON_INC for increasing shown value
 // BUTTON_DEC for decreasing shown value


for(int i = 0; i<10; i++)
{debounce_blinky();}

// set mp3 playback as single cycle
df1101s.setPlayMode(df1101s.SINGLECYCLE);

}

void loop()
{


while(true)
{
if (PSoC6Serial.available())
{
  char incoming_cmd[3]= "000";
  PSoC6Serial.readBytes(incoming_cmd, 3);
  int playback_index = atoi(incoming_cmd);
  df1101s.playSpecFile(incoming_cmd);
//  Serial.print(incoming_cmd);
}


}

// control fire starter circuit
//trigger_event();


} // end of loop

///////////////////////////////////
///control and display functions///
///////////////////////////////////

void update_display_message_0(void)
{
  u8g.firstPage();
  do {
     u8g.setFont(u8g_font_6x12);
     u8g.drawStr( 0, 10, "say");
     u8g.drawStr( 0, 25, "wake");
     u8g.drawStr( 0, 40, "word");
     u8g.drawStr( 0, 55, "====");
     u8g.drawStr( 0, 70, "HEY");
     u8g.drawStr( 0, 85, "stove");

  } while( u8g.nextPage() );
}


void debounce_blinky(void)
{
  digitalWrite(BLUE_LED,HIGH);
  delay(25);
  digitalWrite(BLUE_LED,LOW);
  delay(25);

}
pv_params.h
C/C++
this file contains the voice AI model generated with picovoice.ai
Full Project
C/C++
Import to MTB


