
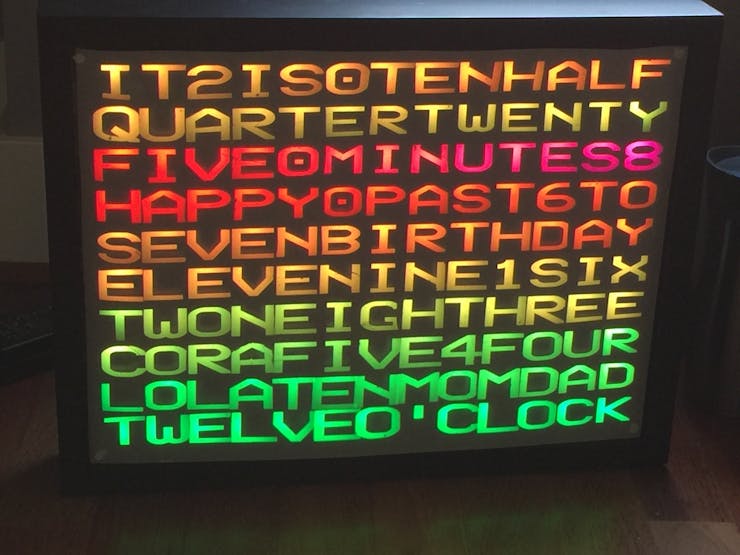
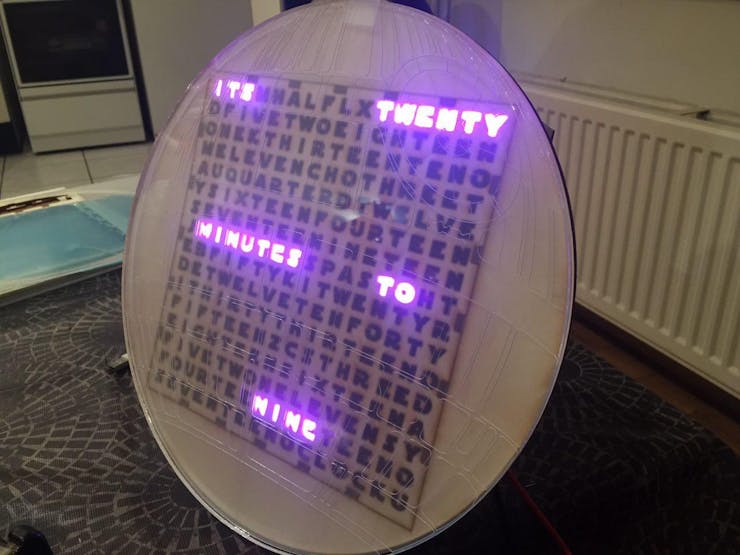
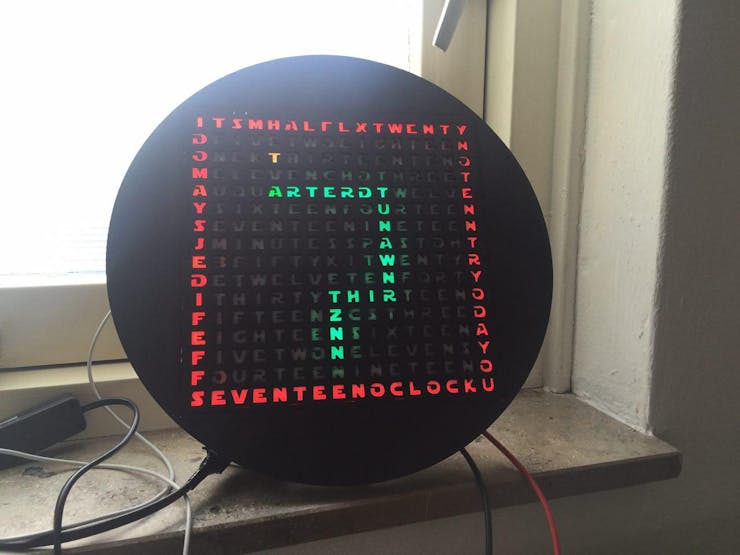
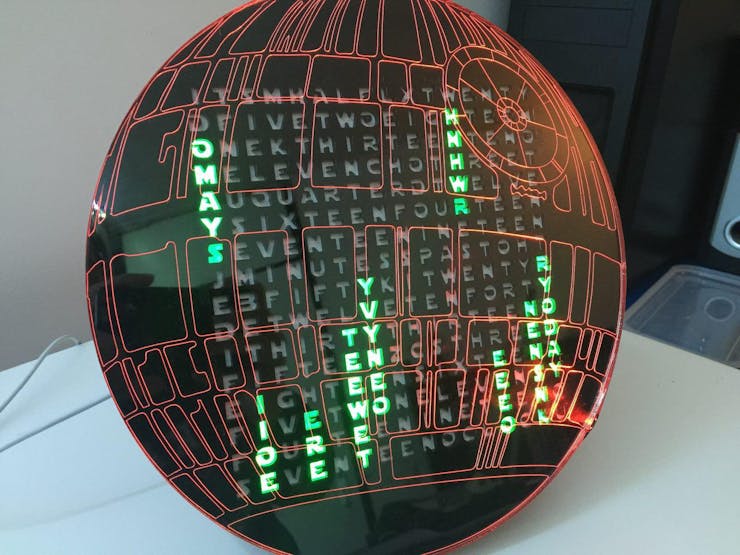
A word clock resembling the Death Star. Edgelit acrylic and an RGB matrix provide for neat light effects. Good looking AND useful!

Things used in this project
Hardware components
Software apps and online services
Particle.io
Hand tools and fabrication machines
Laser cutter (generic)
Soldering iron (generic)
Story
Background
"So you made a clock huh?" - Yes, I made a clock, a cool one though.
When I was little, my mom held back on teaching me how to read a regular analog clock so she could send me to bed earlier when she saw I was tired. Smart move. Unfortunately, analog clocks have since never been a great joy in my life, so I set out to look for something different. I've been used to using digital clocks, but they got boring too after a while. That's around the time I saw a word clock for the first time. "That makes so much sense" is one of the first things I thought, and the seed was planted.
Fast forward to Maker Faire 2015, where I had the pleasure of meeting the Particle team and several of the Elites, I noticed one of the latter was building a word clock as well. That's what gave me the final motivation to build one myself. Luckily I saw him struggling with soldering well over a 100 Neopixels for over a day, and I decided mine would have to be simpler. One of the other Elites had made an interesting project with an RGB matrix, which sparked the idea that those two might make a great combo.
The original V1 motivation by @wgbartley
Fast forward a bit more, and I started contemplating about how to best build my own version. I knew I wanted it to be something 'different', and a bit more 'advanced' than those 5-minute-accurate versions. There's nothing wrong with those, but I wanted more. Having always been a fan of Star Wars I thought it'd be fun to somehow combine those. Unknown to me at the time was that this contest was coming up, which was a welcome incentive to actually start doing something, rather than just dreaming about it.
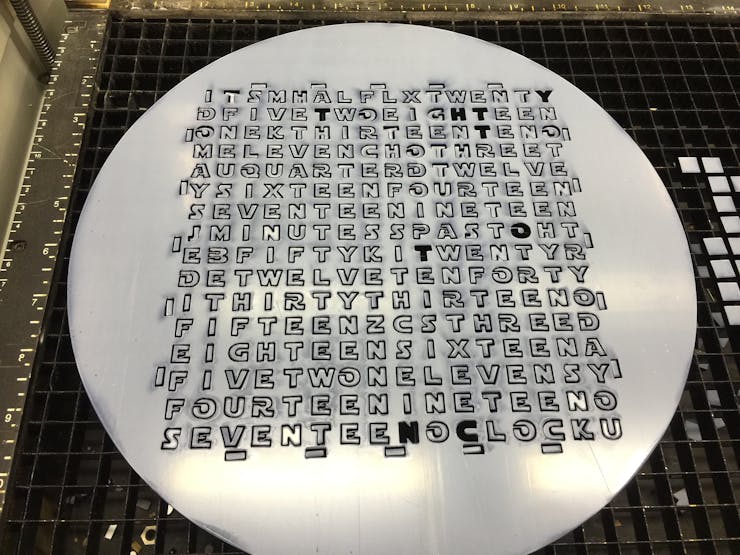
Lettering design
So, a word clock apparently needed words. I know, who would've thought, right? Hopeful as I was, I thought some smart person had probably figured out an algorithm to figure out the patterns. I found exactly one program, run in some Java machine that could do some basic layouts. First problem was the fact that I couldn't for the life of me get it running. Second problem was that it was relatively 'basic'. It could only do horizontal words, and only specific sets. Either was a no-go since I wanted vertical words as well as double sets.
After abandoning all hope of finding an existing layout (that's what you get for wanting custom things), I figured I might as well pull out trusty old excel and start puzzling. After about three days of frustrations, I managed to cram in as many Star Wars references as I could while maintaining the word clock functionality. Lovely.

That's how you iterate a word clock design
Now, in this layout I opted for a 'double system', so that you could display the time in the most common ways. The first being "It's MM minutes past/to HH", and the second one being "It's HH (o) MM". "Why would you want that?", I hear you say, well, because I could. No particular reason other than me thinking it was a good idea.
The reason it was so difficult to design this was because I wanted not only horizontal words, but vertical ones as well. With horizontal ones only, I would've probably had 2 rows left over. Unfortunately, things become quite a bit more complicated when they need to line up for the several words I wanted hidden in there. That also means that if you take those word out, there's quite a bit of space left for alternatives, such as weather conditions.
Case design
For the case I had several ideas. I thought of making it a BB-8 with a rotating head. It'd be in 2D, and the head would be able to rotate around the body. Alternatively, I though of making a Death Star with a laser beam out of fiber, like this guy did. Finally I figured edge-lit acrylic might look really neat as well. Seeing as the construction of a movable BB-8 was outside the reach of my capabilities, and there was no good way to combine the fiber with the matrix, I opted to go for the edge-lit acrylic.
The casing itself I wasn't too sure about, and hadn't really put too much thought into it either. The day before I could use the laser cutter at the FabLab at my school, I put together a simple box design. I got some 4mm plywood, and cut my casing out of it.
All design work has been done in both AutoDesk and Adobe Illustrator. I had used neither of these tools before, so it was mainly drawing lines by hand. It's a good way to get to know the software, so I'd recommend it regardless.
Building the casing
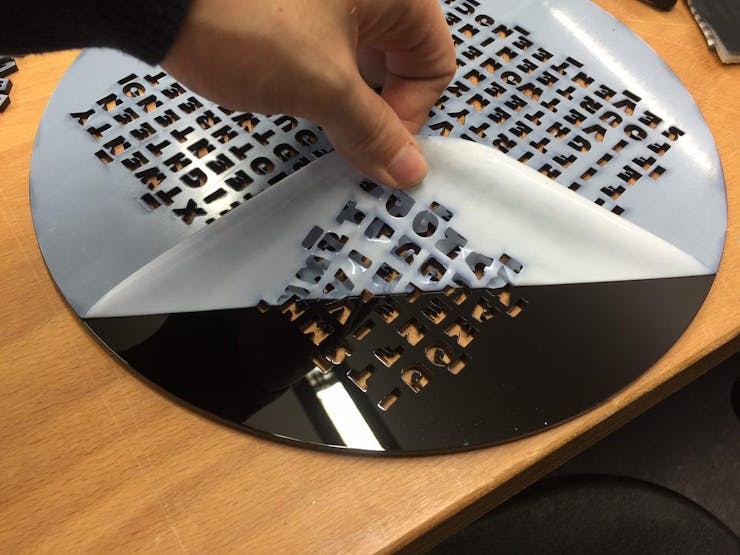
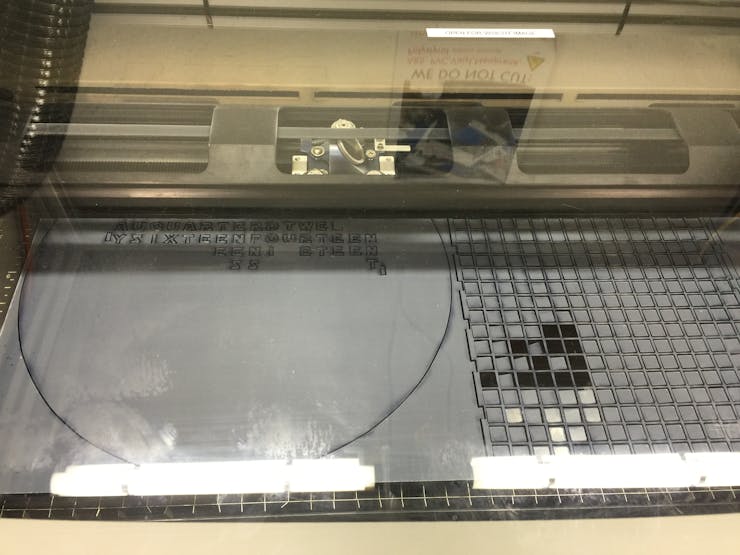
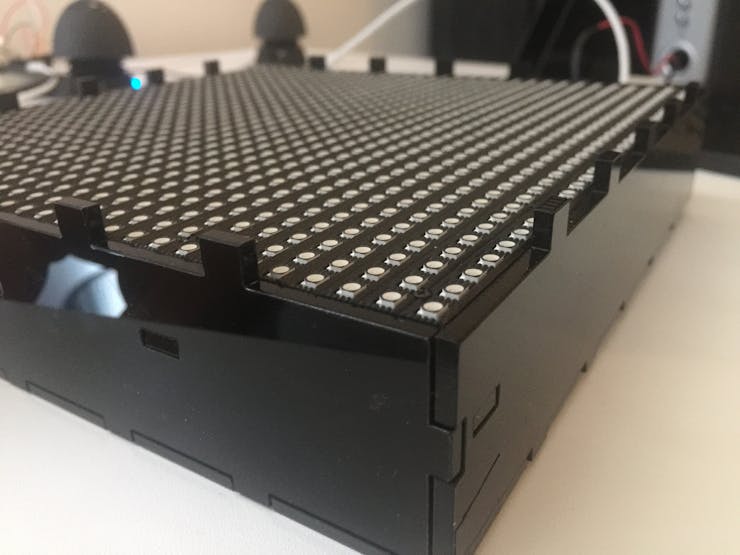
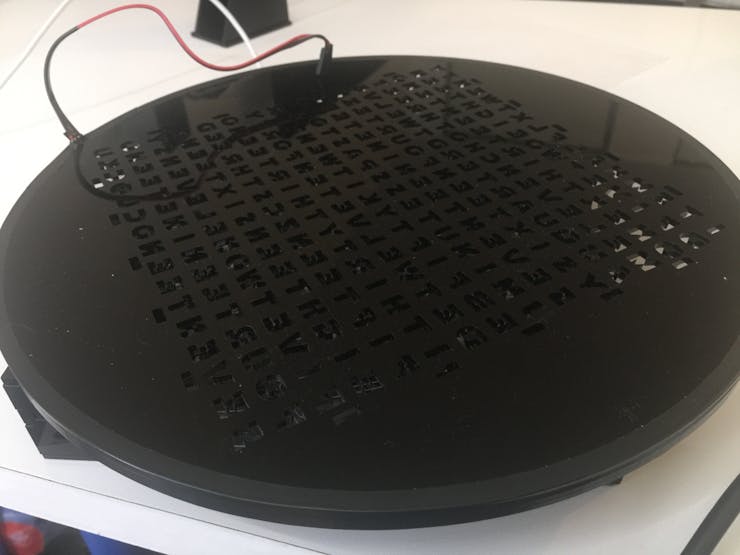
It was decided that the front plate would be clear acrylic lasered with a Death Star pattern that was to be edge-lit with a bunch of neopixels. The casing would be 4mm ply. To defuse the light, slightly opaque acrylic would be sandwiched between the front plate and the letters. So, that's what I did. I went to the FabLab, and lasered everything. Much to my surprise everything fit from the first go-around.
Pros:
- Clear acrylic looked REALLY NICE when lit.
- Opaque acrylic gave a holographic appearance with a single LED.
- Plywood was cheap.
Cons:
- Opaque acrylic diffused too much, made it hard to read.
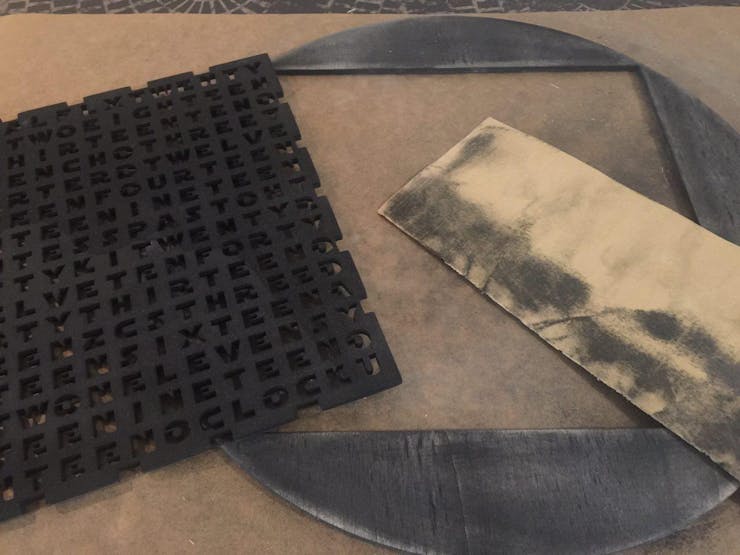
- Ply didn't look as nice unpainted.
- Ply didn't look nice at all painted due to the wood; looked like smudges.
- No idea how to attach the front plate.
- My matrix kept falling backwards due to lack of support.
They're so tiny and cute :)
Solution:
Build a new casing, using 3mm black acrylic. It's shiny, and looks really really nice. It has that "professional product" look to it. It didn't come cheap since I needed it desperately and couldn't find it anywhere else. Worth it in the end. Looks much more professional and finished, and with a bit of electrical tape was very easy to neatly attach to the front plate. I also added internal supports for the matrix, so that stays in place very well now. Putting it together can only happen in one way, and that's pretty self-explanatory. Looks so much better now:
That feeling.

The electronics
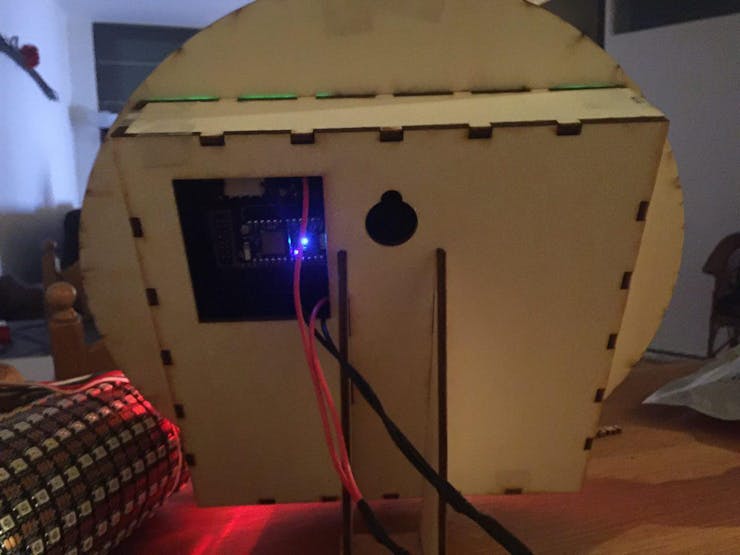
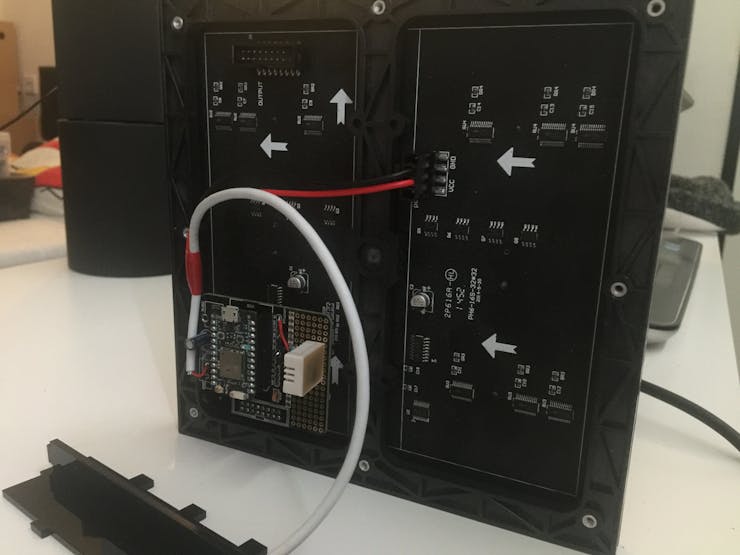
Although it might look like a complicated project it was actually very easy to do. The matrix made life a whole lot easier by now having to solder all those LEDs manually. So worth it. Hooking up the Photon to the Matrix was a breeze since @Peekay123 had so kindly provided me with one of this RGB Matrix shields. You plug the Photon in the shield, and the shield in the matrix, and that's it. Soldering the components to the board was all that was needed (which are about 20 pins).
The prototype area on the shield came to good use for hooking up the Neopixel for lighting the acrylic. At first I planned on putting a strip around the whole thing, but a single LED was bright enough that that wasn't necessary anymore. So, with another three wires, the neopixel was hooked up, still very easy to do.
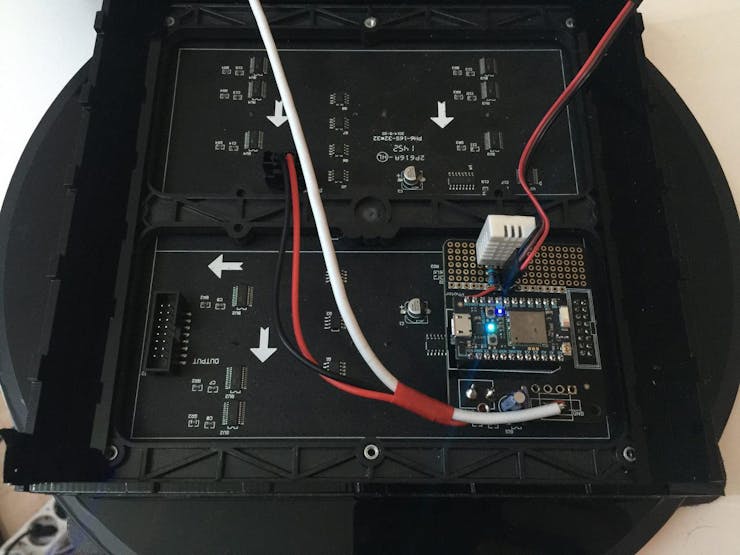
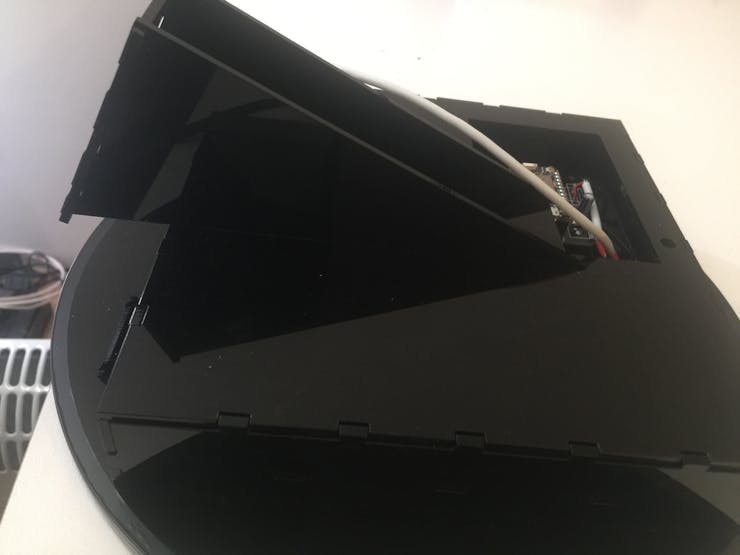
Photon on shield, on matrix, in Case.
Sound
I figured it'd be cool if the clock could play sounds of some sort so it could be used for notifications, or just for fun. To that end I bought some cheapish music module from Ebay. Unfortunately I couldn't get the thing working and had to abandon the idea. In that same time, there was a post on the Particle community about a "cheap MP3 shield", which seemed interesting. I thought I could always add it after the contest, so I ordered two.
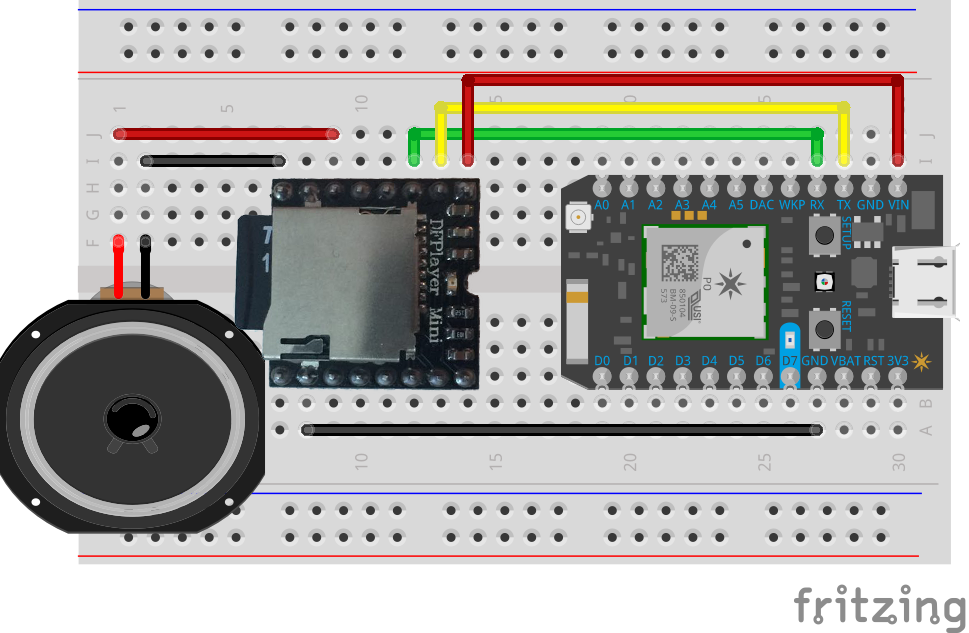
Much to my surprise, they arrived after 6(!) days from China - Netherlands. Totally unexpected, I had made no preparations to include it anymore. Still wanting to try it, I set it up on a breadboard with another Photon, and used the power of The Force (Internet) to connect the two. Using Particle publish and subscribe made this surprisingly easy to do. This is unfortunately not yet encased due to an exam messing up my time, but will be in the future. For now, it can be hooked up to pretty much any headphone jack. I've used two small speakers to test it, and it works wonderfully.
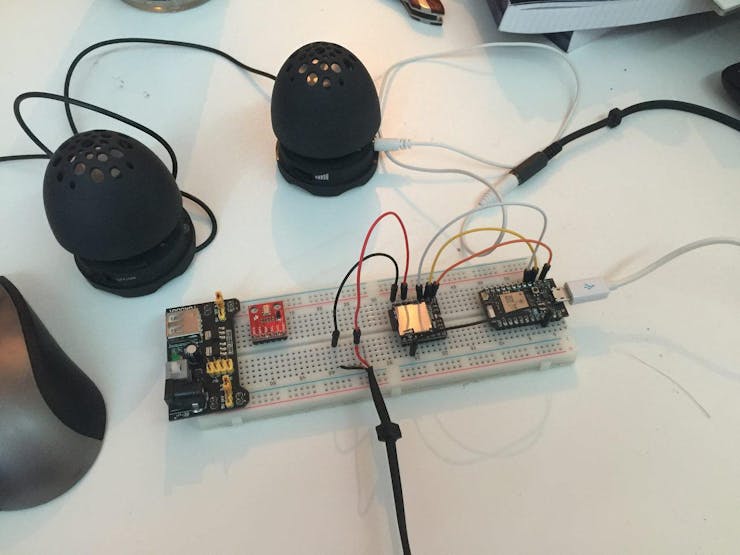
DFMini MP3 hooked up to off-the-shelve speakers.
Power
Powering the clock was/is a challenge. The Matrix can draw up to 4A when fully lit, and the photon about 300mA. One single neopixel can also draw 60mA. All those combined made it tough to power. The shield included a barrel jack and a 4 pin or screw terminal to connect to. Unfortunately I didn't have a beefy enough 5V supply laying around, so I decided to cheap-skate a little bit. (The following is how I did it for now, this will be fixed in the future and is by no means permanent, nor should it be!) I soldered an old USB cable to the shield and hooked that up to an iPad charger. Now, those only provide 2.1A, so are clearly not enough when you go all-out. Luckily, most of the time most of the pixels are off. You only need a couple to display the time, so you end up with a lower requirement. Admittedly, it's not good to design your system based on those assumptions, so I'd wholeheartedly recommend you get a decent power supply.
Software
Hardware can't do a thing without software, and that's where the 'magic' happens. Like I mentioned before, I wanted something 'more' than just a 'normal' word clock. I wanted something cool. I ended up putting different modes on it which you can use. Let's go through them briefly.
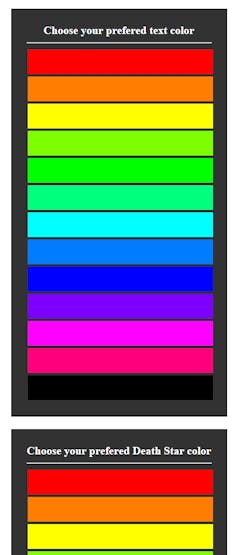
- Word clock: This is the word clock as you know it. It tells time and does so in one of two syntaxes. You've got "It's MM minutes past/to HH" and "It's HH (o) MM" to choose from. You can change the colors of the text as you please, and it should be fairly straightforward to extend this to full rainbow colors, for those interested.
- Matrix animation: This is the 'digital rain' from the matrix movies. What better medium to play it on than a matrix with letters. Match made in heaven (or code, actually...) For this part I used code from Carbon Frog [http://www.carbonfrog.com/Products/MC201V1.html] who also design word clocks. I'm no lawyer, but I understood the code was free to use according to the license. I had to edit very minor parts to make it line up with the code I already had in place, and account for the difference in size. Other than that, it wasn't too hard. All credits to them for that code, I merely merged that. (I don't wish to infringe on anything, they've got nice code, and I was glad I could use it. Check them out, they make nice things!)
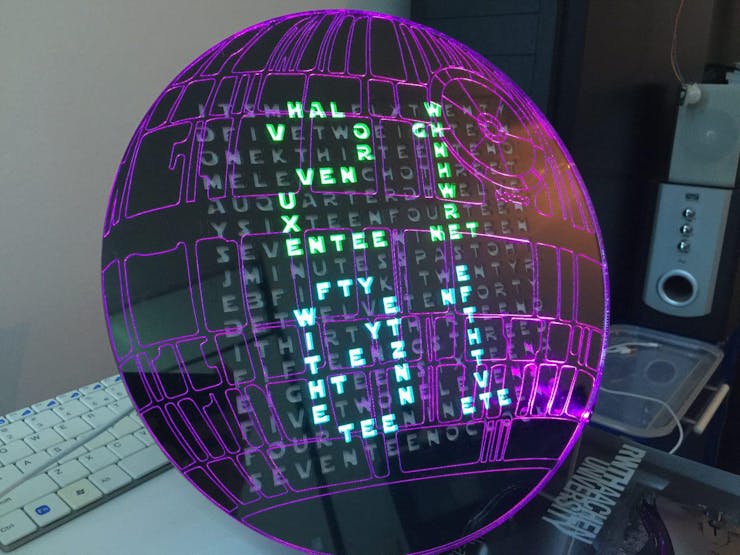
- Digital display: Use the matrix as a matrix and display the time in a digital fashion. Use the individual letters as pixels to make up digital letters. Easy to read from further away due to the increased size. Ideal for those mornings where your eyes are still stuck to your face.
- Snake: this might not be Star Wars related, but it's still really cool. As the name suggests, you can play Snake. Controls are currently through a web browser, but could just as easily be capacitive touch, movement sensors, accelerometers, and all kinds of crazy stuff. There are some Star Wars elements in it though, check the videos at the bottom for those.
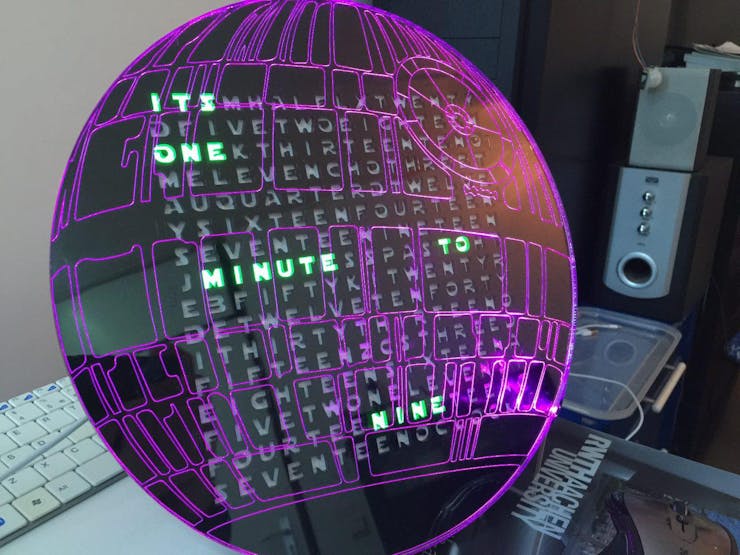
Word clock mode
Besides those modes, there are also the 'hidden' words that can be activated on demand. I won't spoil them, but can say there are 6 things to find in there, for those interested in searching. Linking this up with the sounds makes for a very neat effect. You see the clock display its gimmick, and hear speaker somewhere else accompany it. If that isn't IoT Force power, then I don't know what it ;).
Alternatively, this could also be used in a more useful fashion. IFTTT for example allows you to connect a huge amount of online services to it. Making LEDs blink, playing sounds, showing messages, and things like that are all very easy to do thanks to services like this. Tagged in a photo on facebook, blink blue. Got an email on gmail, fade red. This could even act as a notification devices for people with disabilities. It's both a graphical and audio stimulant that can warn them of certain events.
The code itself is not too difficult to understand, and should be fairly self-explanatory. Should you encounter anything that's hard to understand, feel free to ask, and I'll try my best to elaborate!
Interaction
Currently the Clock is controlled by a web page. It's made with the Particle Javascript library, and it kept as basic as possible to allow for easy customization. It too, should be rather easy to understand, since most actual actions are function calls to the clock, everything else is mostly cosmetics. Again, if something is unclear, feel free to ask!
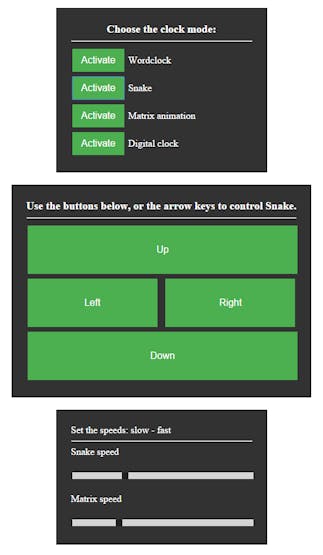
Very easy to use interface
In the future I'd like to expand the interaction possibilities with capacitive touch sensors. Those can be placed on the backside but can be triggered from the front. Not only does this look really neat and Star Wars-ish, but it also allows for local control, which despite the IoT era can still be nice every once in a while.
As mentioned before, services like IFTTT allow for very easy connections between online services. With Particle being one of said services, there's a lot of combinations to make, depending on your needs, wants, and or interests. Some like facebook notifications, other the current stockprice. Both are possible.
It also serves as a geeky communication device if you want it to. By using the matrix capabilities, it's possible to scroll text on the screen. Combining that with an active internet connection, and you've got a very simply and fun way to send messages to loved ones. Hook it up to IFTTT and you can even text it, or tweet it, or...
Display environmental data; those with a keen eye have probably noticed the extra sensor on the shield, that has been left unmentioned. That was in fact a DHT22 temperature and humidity sensor. Due to exams I have not been able to integrate this yet, but it's very doable, and shouldn't be too hard. That'll allow you to use the clock as an indoor thermostat. With the power of the internet you could also pull down weather data, and set it up as a local weather station, notifying you when it's going to rain and/or when it's going to be really hot.
I could go on like this for a while, but it should be obvious by now that there is no lack of possibilities.
Build your own
So, for people interested in building their own, I'll try and lay out the steps you might take to get this going. First of all, make sure you've got a bit of time to spend on this. Depending on what materials and equipment are available to you, not to mention your skills, this could take a weekend. Well spend, if I may say so myself.
Design
Download the design files, and load them up in your favorite editor. Make sure everything still has the proper dimensions, since importing files can often mess with this. The design I've uploaded has been made to work with 3mm material for the entire casing. The front plate should be 5mm clear acrylic for the best effect, since it's the same thickness as a neopixel. Then, find a place where you can use a laser cutter if you haven't got one yourself. See what type of files they require for their cutter and make sure you convert them to the appropriate format before going there. There's nothing worse than getting there with all the materials only to find out your files won't work. Time is precious, and cutting the whole clock took around 1.5 hours on a 35W Epilog Zing laser cutter. Depending on what device you have access to, that time may vary.
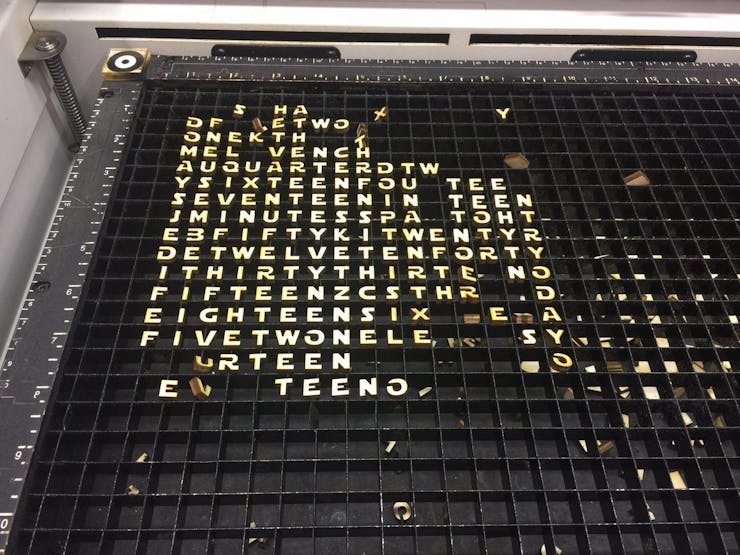
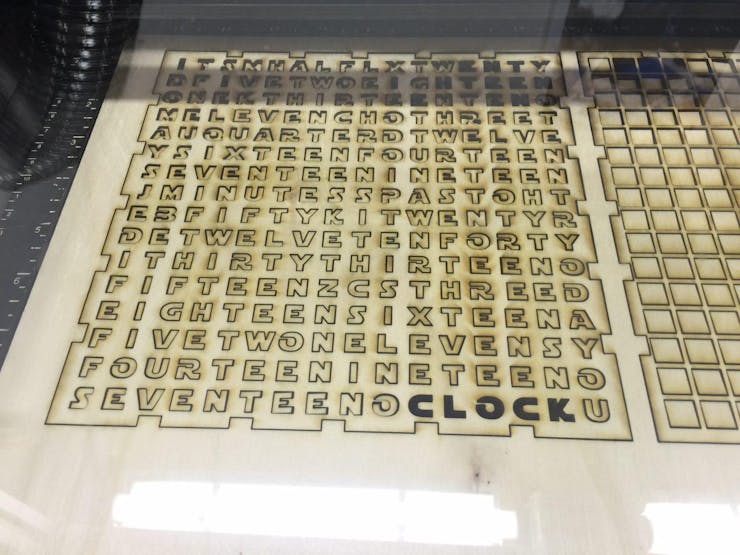
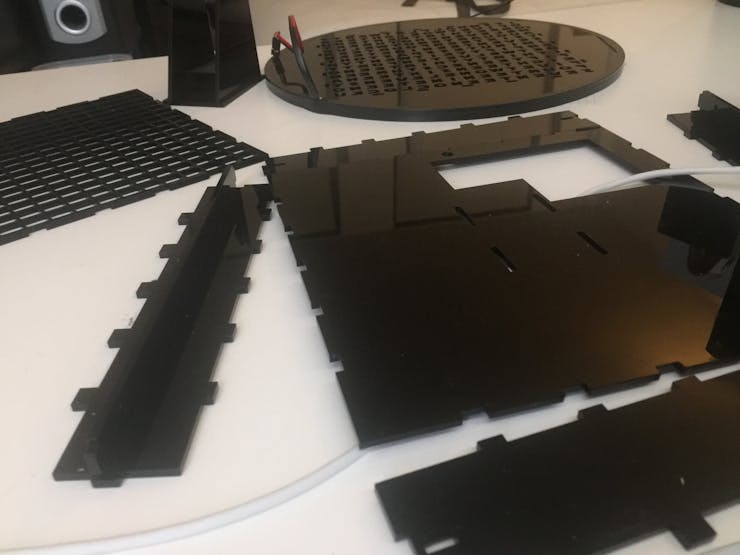
Cutting the materials
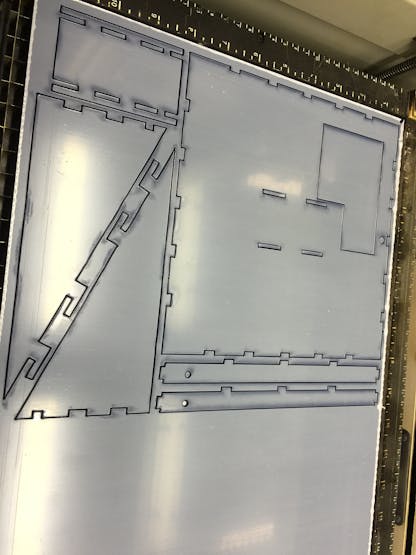
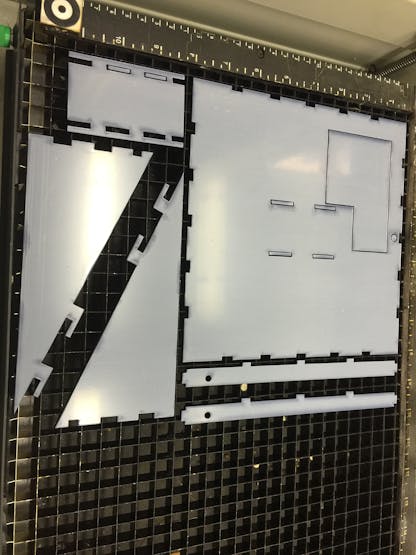
Once you've made sure all your files are okay to go for the machine you'll be using it's time to gather materials (if you haven't yet some so). Personally, I started with a 4mm ply case, but switched to 3mm black acrylic since it doesn't require finishing. You peel off the protective plastic and it looks amazing, whereas you'd have to sand the wood, paint it, and then hope it turns out right (which it didn't for me). Again, make sure the thickness matches the design and visa versa! Then, for the front plate, get clear 5mm acryllic, at least 30 by 30 cm (the plate itself will be 29cm diameter). Once you've got all that, go to your favorite laser cutter, prime it according to the specifications, load the materials and hit 'go'. Then, continue to watch in awe as you're making a PEW PEW laser WoMD by using a PEW PEW laser. Neat, isn't it?
Cheerfully cutting away
Electronics
Right, as I've mentioned, it was a rather easy project in terms of electronics, since I had this neat little shield. I'd highly recommend you to get one as well, since it make the process a whole lot smoother. Alternatively, you can design your own, of even use a protoboard if you like. The former gives a lot of flexibility in terms of design, allowing you to change things as you please (bigger smaller proto area for example). The latter option is probably one of the cheaper ones, although you'd have to solder all connections yourself, which can get rather messy. Again, the shield is a worthwhile investment, if only to save you the hassle of soldering the connections, while allowing for plug & play functionality.
Regardless of what option you choose, you'll need to solder the shield, and the neopixel to it. In the attachment is a schematic of how the neopixel should be connected. Due to a lacking part for the shield, I've used a 'bare' neopixel on a 'bare' Photon. Luckily, the pins are marked on the shield as well, so it should be rather trivial to solder them. I chose to use male headers on the board, and female Dupont cables for the neopixel, you I could easily take it off for servicing. You can solder them permanently as well, though you'll have to be a bit more carefully when dis(assembling).
The shield on the bare matrix. Neopixel not attached.
Assembly
Once you've got the parts and electronics ready, it's time to assemble. It's rather self explanatory, but let's go through it regardless. The pictures below might help, but let's talk through it as well.
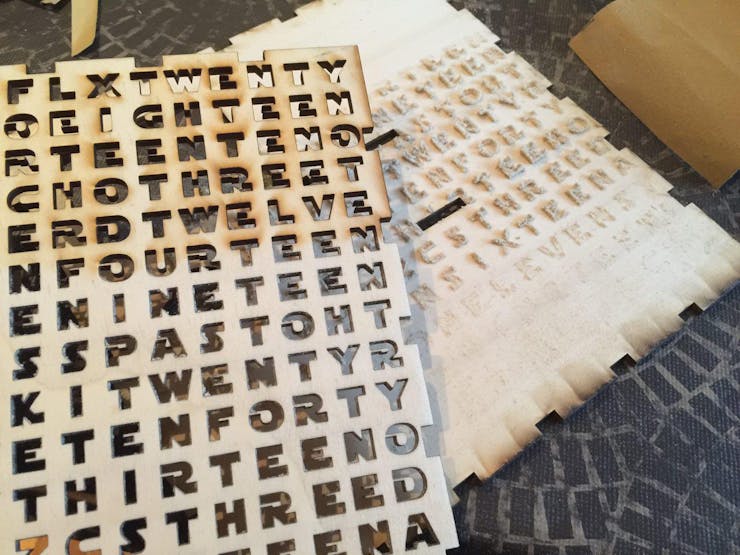
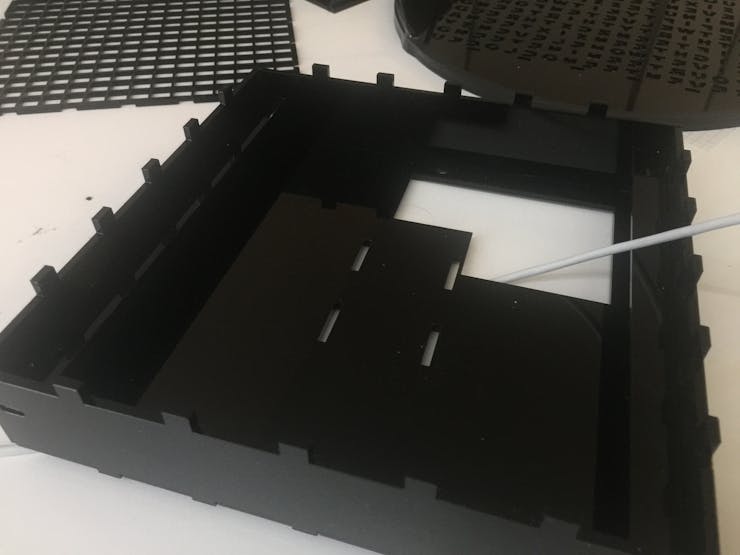
I'd suggest laying out the pieces so you've got a nice overview of what you've got. Put the backplate down, with the hole on the top right side. Put the four sides on their respective sides, making sure you mirror the pieces. Then, put the small supports in the two sides. These too need to be mirrored, since the holes need to align with the small 'pins' on the matrix. With a bit of fumbling, raise the sides up, and interlock them using the holes.
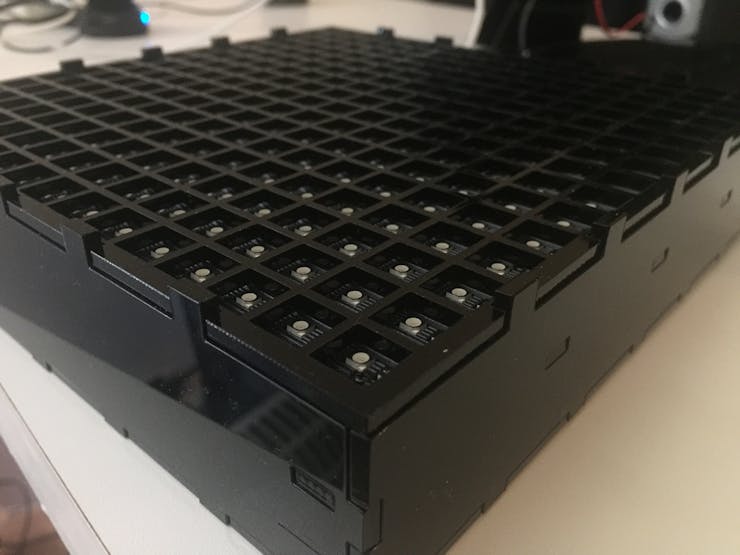
Once that's done, I'd suggest putting a little bit of scotch tape on the sides an back to keep it together temporarily. Continuing, you should now be able to lay in the matrix, which should sit flush to the case. Make sure you properly align it, since the shield should be able to go through the hole in the back. All good, moving on, put the raster over the matrix, which should prevent the light from 'bleeding' into the other letters. Then, to diffuse the light (the matrix is awfully bright), cut a piece of paper to 192mm by 192mm, and put that over the raster. Finally, add the letter plate by pushing it onto the sides. Just so I've said it, make sure you align it properly. With the bottom hole in the top right, the text should be readable from top, left to right.
Attaching the LED and front plate will be done simultaneously. Make sure both the Letter plate and the front plate are as clean as possible. You don't want to remove them after this. Put the front plate on the letter plate, making sure the 'laser nozzle' lines up with the 'E' in the top right corner. Then, using black electrical tape, start taping the two sides together, making sure the top of the tape is flush with the top of the plates. Gently turn the clock as you attach the tape, and press is gently to make sure it sticks. Due to the stretchiness of the tape, it curved nicely around the back, thus eliminating the need to cut it. Just before you reach full circle, cut if off, leaving about 5 mm of acrylic exposed, since that's where your neopixel is going to go. Prior to attaching the neopixel, I suggest coloring the sides black with a sharpie, since you'll then not notice it as much. Once that's done, put the neopixel against the clock, and stick a small piece of electrical tape over it to secure it.
Turn the clock over, and plug in the shield. If you hadn't yet attached power cables to your Matrix, you can remove the backplate, and do so now. Put the backplate on again, and insert the feet. You should be able to put them through the holes, and slide them up. If you want to hang the clock to the wall, you can omit the latter step, and use the small hole on the top to hang it.
Depending on the materials used and the accuracy of the laser cutter, things might somewhat loose, or somewhat tight. If you're lucky, the clock will hold with pressure fit, eliminating the need for adhesives. If it's on the loose side, you can consider using the black tape again, of perhaps some specialized acrylic glue. Since mine seems to hold up just fine, I've used neither.
That's it, mechanical and electrical construction completed.
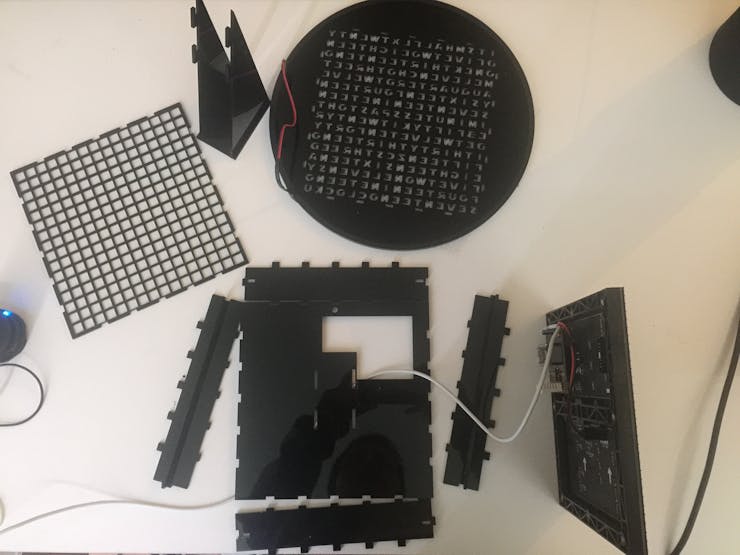
Lay out the pieces for an overview.
Code
unfortunately, smart robots are (still) a Star Wars dream, so unless you tell it what to do, it's not (yet) going to think for itself. To that extend, we need to put some code on it. Considering the fact that Particle is really awesome, the shield was made for it, the fact that I had every intention of using one, and this contest requires one, I figured I might as well use a Particle device for that ;) I suggest you do the same.
Okay, so you've got your Photon, and you've set it up. Assuming you've had no trouble doing so, you should have a cyan breathing device, which you can toggle the D7 led with using the app. If something did go awry, or you encountered issues, consider checking out the community for help. There are some very lovely folks on there, who'll gladly lend a hand.
So, with a working Photon, go to the web IDE. There, create a new app, and give the poor thing a name. Once that's done, use the libraries system to manually include the following libraries: neopixel, SparkIntervalTimer, Adafruit_mfGFX, RGBmatrixPanel. You have to do these manually, the IDE won't select them otherwise. Continuing, click the little '+' icon in the top of the idea to create a new tab (in the IDE, not your browser). Name the new tabs 'snake' (case sensitive!). Once that's done, copy the contents of the respective attached files into the tabs on the IDE. Finally, copy the contents of the main file, and paste it over whatever is in the main app on the web IDE by now. Make sure you edit the 'timezone' variable at around line 85-95 to make sure it matches the one you're in. After selecting the correct device and saying a little prayer, hit the 'verify' button, and hope everything works out the way it should. For those who don't know, that's when it says 'ready!' and doesn't give you a bunch of errors. If it works, hit 'flash' and be amazed at how you're now flashing a micro controller wirelessly, thanks to The Force (and some really, really awesome people over at Particle HQ!).
If all went well, your Photon should now restart, and your clock should come to life. Isn't that awesome?! (Yes! Yes it is!) Now, casually whisper (scream): "POWER! UNLIMITED POWER!", and gloat while your loved ones stare at you as if you've finally gone completely mental. Totally worth it though!
Control
The clock will actually run just fine on its own, but the real fun comes in the you can make it do stuff. For that I've made a really simple web page that'll allow you to control the clock remotely. To use it, place the three web related files (.html, .css, and .js) in the same directory. Then, edit the .html file with a text editor to replace your credentials in the appropriate places. They should be your Particle account email/password as well as the deviceID from the Photon you've used. The latter can be found be clicking the little arrow next to the device name in the Web IDE. If completed, open the .html file in your browser, and click away. If nothing got messed up, you should now be able to control your clock. If you manage to get these files on a web server, this will work from anywhere in the world. Controls, done.
With the clock and controls finished, the project it pretty much done. Although, it'd be really cool and convenient to add some sounds to it as well...
Sound
As mentioned, due to conflicting timetables (exams) and bad modules, I wasn't able to integrate sound into the casing before the end of the contest anymore. What I was able to do, was hooping up a good module to a separate Photon, and trigger that using the Force (Particle.publish and subcribe). That allowed me to quickly and easily test the setup without having to solder it in yet. As a matter of fact, I might leave it separated as is, since I can now place the clock and the sound in different places, making for a cool effect. The 'sound' Photon could even be used to add some physical controls to the clock as well.
To integrate sound, hook up the DFMini MP3 player as depicted in the attached schematic. Then, put some MP3 files on an microSD card, and be sure to name them XXXX_whatever. The XXXX would be the number of the song. "0008_Empire" for example would be the eight song. Insert the card, and make sure you've got some speakers hooked up.
Using the same procedure as before, create a new app in the Web IDE and copy the attached code into the project. This one doesn't use any libraries, so you don't have to worry about that. Flash it to the device, and wait for the Photon to restart.
If everything went according to plan, the clock should now trigger various sounds upon certain actions. Give Snake a try, of try activating some of the hidden words through the control page.
For those who can't wait to see it, here it is in its full glory. The breadboard on the left is in no way connected to the clock besides through the internet. All interactions happen through the Force (and satellites, servers, transatlantic cables, fibre, ISPs... mostly The Force though).
Well, in all honesty, what good would a Death Star do if you can't fire it? Remember that 'E' you had to align the nozzle to, well, here it is...
Now, let the apprentice become the master. I've trained you well, young Padawan, time to explore the galaxy on your own. Go forth, and expand upon what I have given thee. Build a clock, you must!
Conclusion
I've built a clock. And it's a pretty neat one. Mentioned several times, I wanted to create something 'more'. Designing a one-off 'ultimate' Star Wars project would've been cool, but then it would've been just that: 'ultimate Star Wars'. Instead, I (think) I built something that's not only ecstatically pleasing (I got my mom' seal of approval for a glowing Death Star, that's enough evidence for me...), but that's also actually useful. Yes, "it's just a clock", but I'll bet you I'll use a clock more often than a light saber (unfortunately...). With this project I've made something that's not only nice to have for now, and when my geeky friends come over, but it's actually something anybody could enjoy, due to the 'extreme' customization options. Swap the Death Star for your favorite Instagram quote, and you've finally got an excuse to use it. Hook up some IR LEDs and control your appliances. Use it to let your loved ones know you're thinking about them. Enable people with disabilities to have other means of notifications. Or, you know, attach a laser and blow up some planets. There's something for everybody.
Alternatively, just enjoy the beautiful thing you've just made :)!
Much more fun with sound, though still not as easy ;)
A final word of thanks to all the people who made this possible. The Star Wars universe is what inspired this. Several other people made it a reality, for which I'm grateful. With that said, all rights go to their respective owners, and I do not want to take credit for what isn't mine. I've tried to give credit where it was due, but for the ones I might have forgotten, there's this: thank you! No infringement of any kind is intended. The contents I've used, has been used because I very much admire the things you've created, and I hope you can see it as such. I tried my best to combine all the components into the project that it has become, and I think it turned out rather nice.
"Remember...the Force will be with you, always."
Custom parts and enclosures
Laser file for the front SVG
Load it up into a lasercutter, and hit "go". Most, if not all, lasercutter should be able to handle these formats.
Laser file for the back SVG
Load it up into a lasercutter, and hit "go". Most, if not all, lasercutter should be able to handle these formats.
Laser file for the front PLF
Format for VisiCut, might be useful to some.
Laser file for the back PLF
Format for VisiCut, might be useful to some.
Complete design in AutoCad (2D)
Load it up in AutoCad, and do whatever you like with it ;)
The Death Star
Laser it mirrored into 5mm acrylic, the same thickness as a neopixel.
Schematics
DFmini player hookup
A small MP3 module that allows you to easily play music from an SD card.
Neopixel hookup
How to hook up the neopixel. In actuality, this goes to the respective pin on the Matrix shield. Due to lack of a matching part, this should be sufficient.
![]()
Code
main.cpp
C/C++
It's the main code. Insert it into a new project in the web IDE and make sure you include the mentioned libraries through the library system. You'll have to add them manually, this won't happen automatically!
// This #include statement was automatically added by the Particle IDE.
#include "neopixel/neopixel.h"

// This #include statement was automatically added by the Particle IDE.
#include "snake.h"

// This #include statement was automatically added by the Particle IDE.
#include "SparkIntervalTimer/SparkIntervalTimer.h"

// This #include statement was automatically added by the Particle IDE.
#include "Adafruit_mfGFX/Adafruit_mfGFX.h"

// This #include statement was automatically added by the Particle IDE.
#include "RGBmatrixPanel/RGBmatrixPanel.h"

#include <math.h>


// =========================== Neopixel ===========================
#define PIXEL_COUNT 1
#define PIXEL_PIN A5
#define PIXEL_TYPE WS2812B
Adafruit_NeoPixel strip = Adafruit_NeoPixel(PIXEL_COUNT, PIXEL_PIN, PIXEL_TYPE);
// =========================== /Neopixel ==========================


// =========================== Snake code =========================
#include "snake.h"

void play_snake();

int length = 3;
bool update = true;
int Delay = 0;
unsigned long speed = game_speed;
unsigned long previousMillis = 0;
unsigned long currentMillis = 0;
// ========================== Snake code ==========================


// ========================== MATRIX ==============================
byte matrixBuffer [3] [16] [16]; // A 3 layer display buffer for the creation of various graphical effects

boolean intro = true;            // Indicates if mode has just been entered after mode change.

unsigned long FrameTime = 0;     // Keeps track of timeing between animation frames.
unsigned int  FrameRate = 0;     // Animation frame rate.
unsigned int frameCount = 0;     // Keeps counts of the number of frames since the begining of current transition.

byte field = 1;                 // Divides frames into fields to allow traces to move at different speeds

typedef struct                  // Traces are sprite like graphical elements that can be
{ // manipulated in a variety of ways.
  boolean active;               // Active or inactive.
  int regen;                    // Frame when the trace will regenerate.
  byte xPos;                    // X position
  byte yPos;                    // Y position
  byte speed;                   // Speed
  byte length;                  // Length
  byte terminate;               // Termination point, Should be at least 8 + Length
}  trace;
trace streamerTrace[16];        // 16 traces in struct array for streamer animations
// ===========================/MATRIX=================================


// Mode 0 = "Its MM minute(s) past/to HH"
// mode 1 = "Its HH oh 0M"
int timeMode = 0;

// displayMode
// 0 = clock
// 1 = Snake
// 2 = Matrix animation
// 3 = Digital
int displayMode = 0;

int specialModeNumber = -1;

int r = 255;
int g = 0;
int b = 0;
int sr = 255;
int sg = 0;
int sb = 255;
char pubstring[64];

char topLine[64] = {};

int8_t timeZone = 1;

unsigned long previousDisplayMillis = 0;
unsigned long delayTime = 5000;

// // allow us to use itoa() in this scope
extern char* itoa(int a, char* buffer, unsigned char radix);
void doWord(const uint8_t *w);
void blackOut();
void displayHour();
void doTime();
void displayMinute();
void mayTheForce();
void useTheForce();
void doOrDoNot();
int setMode(String command);
void lightLetter(int X, int Y, int red, int green, int blue);


/** Define RGB matrix panel GPIO pins **/
#if defined (STM32F10X_MD)  //Core
#define CLK D6
#define OE  D7
#define LAT A4
#define A   A0
#define B   A1
#define C   A2
#define D   A3
#endif

#if defined (STM32F2XX) //Photon
#define CLK D6
#define OE  D7
#define LAT A4
#define A   A0
#define B   A1
#define C   A2
#define D   A3
#endif

/****************************************/

//#define X_MAX 31    // Matrix X max LED coordinate (for 2 displays placed next to each other)
//#define Y_MAX 31


/***** Create RGBmatrix Panel instance *****
  Last parameter = 'true' enables double-buffering, for flicker-free,
  buttery smooth animation.  Note that NOTHING WILL SHOW ON THE DISPLAY
  until the first call to swapBuffers().  This is normal. */
//RGBmatrixPanel matrix(A, B, C, CLK, LAT, OE, true);
RGBmatrixPanel matrix(A, B, C, D, CLK, LAT, OE, true);
/*******************************************/


//  ======================== Snake code ========================
mysnake* temp;
mysnake snake[(ledmatrix_length * ledmatrix_width) - (ledmatrix_length * 2) - (ledmatrix_width * 2) + 4]; //create snake matrix
mysnake* snakehead; //pointer to head of the snake
food apple;
food* applepointer;

Serpent Snake(&matrix);
//  ======================= /Snake code ========================

// All the word positions/lengths
//x, y, length, height
static const uint8_t wordIts[8] = {0, 0, 3, 1};
static const uint8_t wordHalf[8] = {4, 0, 4, 1};
static const uint8_t wordTwenty[8] = {10, 0, 6, 1};
static const uint8_t wordFive[8] = {1, 1, 4, 1};
static const uint8_t wordTwo[8] = {5, 1, 3, 1};
static const uint8_t wordEight[8] = {8, 1, 5, 1};
static const uint8_t wordEighteen[8] = {8, 1, 8, 1};
static const uint8_t wordOne[8] = {0, 2, 3, 1};
static const uint8_t wordThirteen[8] = {4, 2, 8, 1};
static const uint8_t wordTen[8] = {12, 2, 3, 1};
static const uint8_t wordEleven[8] = {1, 3, 6, 1};
static const uint8_t wordThree[8] = {10, 3, 5, 1};
static const uint8_t wordA[8] = {0, 4, 1, 1};
static const uint8_t wordQuarter[8] = {2, 4, 7, 1};
static const uint8_t wordTwelve[8] = {10, 4, 6, 1};
static const uint8_t wordSix[8] = {1, 5, 3, 1};
static const uint8_t wordSixteen[8] = {1, 5, 7, 1};
static const uint8_t wordFour[8] = {8, 5, 4, 1};
static const uint8_t wordFourteen[8] = {8, 5, 8, 1};
static const uint8_t wordSeven[8] = {0, 6, 5, 1};
static const uint8_t wordSeventeen[8] = {0, 6, 9, 1};
static const uint8_t wordNine[8] = {8, 6, 4, 1};
static const uint8_t wordNineteen[8] = {8, 6, 8, 1};
static const uint8_t wordMinute[8] = {1, 7, 6, 1};
static const uint8_t wordMinutes[8] = {1, 7, 7, 1};
static const uint8_t wordPast[8] = {9, 7, 4, 1};
static const uint8_t wordTo[8] = {12, 7, 2, 1};
static const uint8_t wordO[8] = {13, 7, 1, 1};
static const uint8_t wordOh[8] = {13, 7, 2, 1};
static const uint8_t wordFifty2[8] = {2, 8, 5, 1};
static const uint8_t wordTwenty2[8] = {9, 8, 6, 1};
static const uint8_t wordTwelve2[8] = {2, 9, 6, 1};
static const uint8_t wordTen2[8] = {8, 9, 3, 1};
static const uint8_t wordForty2[8] = {11, 9, 5, 1};
static const uint8_t wordThirty2[8] = {1, 10, 6, 1};
static const uint8_t wordThirteen2[8] = {7, 10, 8, 1};
static const uint8_t wordFifteen2[8] = {0, 11, 7, 1};
static const uint8_t wordThree2[8] = {10, 11, 5, 1};
static const uint8_t wordEight2[8] = {0, 12, 5, 1};
static const uint8_t wordEighteen2[8] = {0, 12, 8, 1};
static const uint8_t wordSix2[8] = {8, 12, 3, 1};
static const uint8_t wordSixteen2[8] = {8, 12, 12, 1};
static const uint8_t wordFive2[8] = {0, 13, 4, 1};
static const uint8_t wordTwo2[8] = {4, 13, 3, 1};
static const uint8_t wordOne2[8] = {6, 13, 3, 1};
static const uint8_t wordEleven2[8] = {8, 13, 6, 1};
static const uint8_t wordFour2[8] = {0, 14, 4, 1};
static const uint8_t wordFourteen2[8] = {0, 14, 8, 1};
static const uint8_t wordNine2[8] = {7, 14, 4, 1};
static const uint8_t wordNineteen2[8] = {7, 14, 8, 1};
static const uint8_t wordSeven2[8] = {0, 15, 5, 1};
static const uint8_t wordSeventeen2[8] = {0, 15, 9, 1};
static const uint8_t wordOclock[8] = {9, 15, 6, 1};
/* === May/Use the Force be with you === */
static const uint8_t wordUse[8] = {1, 4, 1, 3};
static const uint8_t wordMay[8] = {0, 3, 1, 3};
static const uint8_t wordThe[8] = {5, 1, 1, 3};
static const uint8_t wordForce[8] = {7, 0, 1, 5};
static const uint8_t wordBe[8] = {1, 8, 1, 2};
static const uint8_t wordWith[8] = {3, 9, 1, 4};
static const uint8_t wordYou[8] = {15, 13, 1, 3};
/* ===================================== */
/* === Do or do not, there is no try === */
static const uint8_t wordDo[8] = {0, 1, 1, 2};
static const uint8_t wordOr[8] = {7, 1, 1, 2};
static const uint8_t wordDo2[8] = {9, 4, 1, 2};
static const uint8_t wordNot[8] = {15, 1, 1, 3};
static const uint8_t wordThere[8] = {3, 11, 1, 5};
static const uint8_t wordIs[8] = {9, 10, 1, 2};
static const uint8_t wordNo[8] = {12, 8, 1, 2};
static const uint8_t wordTry[8] = {15, 7, 1, 3};
/* =================================== */
/* === Sith / Jedi / Yoda ============ */
static const uint8_t wordJedi[8] = {0, 7, 1, 4};
static const uint8_t wordSith[8] = {8, 7, 1, 4};
static const uint8_t wordYoda[8] = {15, 9, 1, 4};
/* =================================== */


// Make pixel 0,0 reflect the onboard RGB LED state when not connected to the
// cloud or an OTA update is occurring
void ledChangeHandler(uint8_t r, uint8_t g, uint8_t b) {
  bool do_it = false;

  if (!Particle.connected()) {
    do_it = true;
  }

  if (do_it) {
    mayTheForce();
  }

}


void setup() {
  // Initialize the panel
  matrix.begin();

  //neopixel setup
  strip.begin();
  strip.setPixelColor(0, strip.Color(sr, sg, sb));
  strip.show(); // Initialize all pixels to 'off'

  //Do stuff with the status RGB
  RGB.onChange(ledChangeHandler);

  //  Connect to the cloud
  Particle.connect();
  while (!Particle.connected()) {
    Particle.process();
    delay(1);
  }

  Particle.function("text", text);                      // scroll a text over the matrix
  Particle.function("handleparams",handleParams);         // handles all parameters.

  // ===== Snake =====
  snakehead = &snake[(ledmatrix_length * ledmatrix_width) - (ledmatrix_length * 2) - (ledmatrix_width * 2) + 3];
  apple.row = 5;
  apple.column = 5;
  applepointer = &apple;
  Snake.snake_intialization(snake); //initialize snake location and direction
  // ===== Snake =====

  Time.zone(timeZone);       // Set time zone
}


void loop() {
  currentMillis = millis();

  if (specialModeNumber >= 0) {
    delayTime = 5000;
    blackOut();

    switch (specialModeNumber) {
      case 0:
        useTheForce();                      //display "use the force"
        Particle.publish("musicPick","8");
        delayTime = 8500;
        break;
      case 1:
        mayTheForce();                      // display "may the force be with you"
        Particle.publish("musicPick","37");
        break;
      case 2:
        doOrDoNot();                        // display "Do ot do not, there is no try"
        Particle.publish("musicPick","32");
        delayTime = 6000;
        break;
      case 3:
        //lightLetter(14, 1, 0, 255, 0);      // light up the Ion cannon pixel
        shootCannon();
        delayTime = 18000;
        break;
      case 4:
        doWord(wordJedi);                   // display "Jedi"
        break;
      case 5:
        doWord(wordSith);                   // display "Sith"
        break;
      case 6:
        doWord(wordYoda);                   // display "Yoda"
        break;
    }

    matrix.swapBuffers(true);
    //delay(delayTime);
    specialModeNumber = -1;
  }

  if (currentMillis - previousDisplayMillis > delayTime){
    previousDisplayMillis = currentMillis;

      switch (displayMode) {
        case 0:   // display the 'normal' wordclock
          doTime();
          break;

        case 1:   // play Snake
          if (currentMillis - previousMillis > speed) {
            // save the last time you blinked the LED
            previousMillis = currentMillis;
            update ? snake_alive() : snake_dead();
          }
          break;

        case 2:   // display matrix animation
          if ( currentMillis >= FrameTime + FrameRate) {  // Runs animation function every frame time
            FrameTime = currentMillis;
            streamerAnimation();                          // Just streamer traces animation, no time.
          }
          matrix.swapBuffers(true);
          break;

        case 3:   // Show time in digital fashion
          printTimeBig();
          break;

        default:  // default to normal wordclock
          doTime();
          break;
      }
      delayTime = 0;
   }
}


void scrollBigMessage(char *m, int timeDelay = 50) {
  matrix.setTextSize(2);
  matrix.setTextWrap(false);

  matrix.setTextColor(matrix.Color333(r,g,b));

  int l = (strlen(m) * -12) - 32;

  for (int i = 32; i > l; i -= 2) {
    matrix.fillScreen(0);
    matrix.swapBuffers(true);
    matrix.setCursor(i, 8);

    matrix.print(m);
    matrix.swapBuffers(false);
    delay(timeDelay);
    Particle.process();
  }
}


int text(String command) {
  command.toCharArray(topLine, 64);

  scrollBigMessage(topLine);
  return 0;
}

// this function automagically gets called upon a matching POST request
int handleParams(String command)
{
  //look for the matching argument <-- max of 64 characters long
  int p = 0;
  while (p<(int)command.length()) {
    int i = command.indexOf(',',p);
    if (i<0) i = command.length();
    int j = command.indexOf('=',p);
    if (j<0) break;
    String key = command.substring(p,j).toUpperCase();
    String value = command.substring(j+1,i);
    int val = value.toInt();


    // Modes
    if (key=="SETTIMEMODE")         // 0 - 1
      timeMode = val;
    else if (key=="SPECIALS")       // 0 - 6
      specialModeNumber = val;
    else if (key=="DISPLAYMODE")    // 0 - 3
      displayMode = val;

    // text color
    else if (key=="R")              // 0 - 255
      r = val;
    else if (key=="G")
      g = val;
    else if (key=="B")
      b = val;

    // Star color
    else if (key=="SR")
      sr = val;
    else if (key=="SG")
      sg = val;
    else if (key=="SB")
      sb = val;

    // Snake
    else if (key=="DIRECTION")
      Snake.set_new_direction(val); // 0 - 3
    else if (key=="SNAKESPEED")     // 50 - 250
      speed = val;

    else if (key=="SYSRESET")       // instant
      System.reset();

    else if (key=="MATRIXSPEED")
      FrameRate = val;

    p = i+1;
  }
  strip.setPixelColor(0, strip.Color(sr, sg, sb));
  strip.show();
  return 1;
}

void shootCannon(){
  int tempRed = sr;
  int tempGreen = sg;
  int tempBlue = sb;

  Particle.publish("musicPick", "1");
  delay(2000);

  Particle.publish("musicPick","2");

  strip.setPixelColor(0, strip.Color(255, 0, 0));
  strip.show();

  // X - X      - X -      - - -
  // - - -  ->  X - X  ->  - X -
  // X - X      - X -      - - -


  Particle.publish("shoot");
  for (int i = 0; i < 38; i++){
      blackOut();
      lightLetter(13, 0, 0, 255, 0);    // light up the top left
      lightLetter(15, 0, 0, 255, 0);    // top right
      lightLetter(13, 2, 0, 255, 0);
      lightLetter(15, 2, 0, 255, 0);
      matrix.swapBuffers(true);
      delay(100);
      blackOut();
      lightLetter(14, 0, 0, 255, 0);
      lightLetter(14, 2, 0, 255, 0);
      lightLetter(13, 1, 0, 255, 0);
      lightLetter(15, 1, 0, 255, 0);
      matrix.swapBuffers(true);
      delay(100);
  }
  blackOut();
  lightLetter(14, 1, 0, 255, 0);
  matrix.swapBuffers(true);
  delay(100);
  blackOut();
  lightLetter(14, 1, 0, 255, 0);
  matrix.swapBuffers(true);
  delay(100);
  blackOut();
  for (int i = 0; i < 15; i++){
      blackOut();
      lightLetter(13, 0, 0, 255, 0);    // light up the top left
      lightLetter(15, 0, 0, 255, 0);    // top right
      lightLetter(13, 2, 0, 255, 0);
      lightLetter(15, 2, 0, 255, 0);
      matrix.swapBuffers(true);
      delay(50);
      blackOut();
      lightLetter(14, 0, 0, 255, 0);
      lightLetter(14, 2, 0, 255, 0);
      lightLetter(13, 1, 0, 255, 0);
      lightLetter(15, 1, 0, 255, 0);
      matrix.swapBuffers(true);
      delay(50);
  }
  blackOut();
  lightLetter(14, 1, 0, 255, 0);
  matrix.swapBuffers(true);
  delay(500);
  blackOut();
  matrix.swapBuffers(true);
  delay(100);
  lightLetter(14, 1, 0, 255, 0);
  matrix.swapBuffers(true);
  delay(500);
  blackOut();
  matrix.swapBuffers(true);
  delay(100);
  lightLetter(14, 1, 0, 255, 0);
  matrix.swapBuffers(true);
  delay(3000);
  blackOut();

  strip.setPixelColor(0, strip.Color(tempRed, tempGreen, tempBlue));
  strip.show();
  delay(500);
  Particle.publish("musicPick", "3");
}


void doTime() {
    blackOut();

    doWord(wordIts);
    displayHour();
    displayMinute();
    matrix.swapBuffers(true);
    delay(1000);
}

void printTimeBig() {
  blackOut();
  matrix.setTextSize(2);

  matrix.setCursor(2 * 3, 0);
  matrix.setTextColor(matrix.Color333(0, 7, 0));
  switch (Time.hour()) {
    case 0:
      matrix.print("00");
      break;
    case 1:
      matrix.print("01");
      break;
    case 2:
      matrix.print("02");
      break;
    case 3:
      matrix.print("03");
      break;
    case 4:
      matrix.print("04");
      break;
    case 5:
      matrix.print("05");
      break;
    case 6:
      matrix.print("06");
      break;
    case 7:
      matrix.print("07");
      break;
    case 8:
      matrix.print("08");
      break;
    case 9:
      matrix.print("09");
      break;
    default:
      matrix.print(Time.hour());
  }

  matrix.setCursor(2 * 3, 2 * 8);
  matrix.setTextColor(matrix.Color333(0, 7, 7));
  switch (Time.minute()) {
    case 0:
      matrix.print("00");
      break;
    case 1:
      matrix.print("01");
      break;
    case 2:
      matrix.print("02");
      break;
    case 3:
      matrix.print("03");
      break;
    case 4:
      matrix.print("04");
      break;
    case 5:
      matrix.print("05");
      break;
    case 6:
      matrix.print("06");
      break;
    case 7:
      matrix.print("07");
      break;
    case 8:
      matrix.print("08");
      break;
    case 9:
      matrix.print("09");
      break;
    default:
      matrix.print(Time.minute());
  }
  matrix.swapBuffers(true);
  delay(1000);
}

//Display functions

void blackOut() {
  matrix.fillScreen(matrix.Color444(0, 0, 0));
}

void useTheForce() {
  doWord(wordUse);
  doWord(wordThe);
  doWord(wordForce);
}

void mayTheForce() {
  doWord(wordMay);
  doWord(wordThe);
  doWord(wordForce);
  doWord(wordBe);
  doWord(wordWith);
  doWord(wordYou);
}

void doOrDoNot() {
  doWord(wordDo);
  doWord(wordOr);
  doWord(wordDo2);
  doWord(wordNot);
  doWord(wordThere);
  doWord(wordIs);
  doWord(wordNo);
  doWord(wordTry);
}


void lightLetter(int X, int Y, int red = r, int green = g, int blue = b) {
  X *= 2;
  Y *= 2;
  matrix.drawPixel(X       , Y      , matrix.Color333(red, green, blue));
  matrix.drawPixel(X + 1   , Y      , matrix.Color333(red, green, blue));
  matrix.drawPixel(X       , Y + 1  , matrix.Color333(red, green, blue));
  matrix.drawPixel(X + 1   , Y + 1  , matrix.Color333(red, green, blue));
}

//(un)set Words
void doWord(const uint8_t *w) {
  int X = 0;
  int Y = 0;

  //finish loop per vertical row
  for (int i = 0; i < w[3]; i++) {
    //finish loops horizontally
    for (int j = 0; j < w[2]; j++) {
      X = (w[0] + j);
      Y = (w[1] + i);
      lightLetter(X, Y);
    }
  }
}

//set hours/minutes
void displayHour() {
  int h = Time.hourFormat12();
  int m = Time.minute();

  if (timeMode == 0) {
    if (m != 0 && m <= 30) {
      doWord(wordPast);
    }
    else if (m > 30) {
      h++;

      if (h == 13) {
        h = 1;
      }

      doWord(wordTo);
    }

    // hour
    switch (h) {
      case 1:
        (m != 0) ? doWord(wordOne2) : doWord(wordOne);
        break;
      case 2:
        (m != 0) ? doWord(wordTwo2) : doWord(wordTwo);
        break;
      case 3:
        (m != 0) ? doWord(wordThree2) : doWord(wordThree);
        break;
      case 4:
        (m != 0) ? doWord(wordFour2) : doWord(wordFour);
        break;
      case 5:
        (m != 0) ? doWord(wordFive2) : doWord(wordFive);
        break;
      case 6:
        (m != 0) ? doWord(wordSix2) : doWord(wordSix);
        break;
      case 7:
        (m != 0) ? doWord(wordSeven2) : doWord(wordSeven);
        break;
      case 8:
        (m != 0) ? doWord(wordEight2) : doWord(wordEight);
        break;
      case 9:
        (m != 0) ? doWord(wordNine2) : doWord(wordNine);
        break;
      case 10:
        (m != 0) ? doWord(wordTen2) : doWord(wordTen);
        break;
      case 11:
        (m != 0) ? doWord(wordEleven2) : doWord(wordEleven);
        break;
      case 12:
        (m != 0) ? doWord(wordTwelve2) : doWord(wordTwelve);
        break;
    }
  }

  else if (timeMode == 1) {
    switch (h) {
      case 1:
        doWord(wordOne);
        break;
      case 2:
        doWord(wordTwo);
        break;
      case 3:
        doWord(wordThree);
        break;
      case 4:
        doWord(wordFour);
        break;
      case 5:
        doWord(wordFive);
        break;
      case 6:
        doWord(wordSix);
        break;
      case 7:
        doWord(wordSeven);
        break;
      case 8:
        doWord(wordEight);
        break;
      case 9:
        doWord(wordNine);
        break;
      case 10:
        doWord(wordTen);
        break;
      case 11:
        doWord(wordEleven);
        break;
      case 12:
        doWord(wordTwelve);
        break;
    }
  }
}

void displayMinute() {
  int m = Time.minute();

  if (timeMode == 0) {
    switch (m) {
      case 0:
        doWord(wordOclock);
        break;
      case 1:
        doWord(wordOne);
        doWord(wordMinute);
        break;
      case 2:
        doWord(wordTwo);
        break;
      case 3:
        doWord(wordThree);
        break;
      case 4:
        doWord(wordFour);
        break;
      case 5:
        doWord(wordFive);
        break;
      case 6:
        doWord(wordSix);
        break;
      case 7:
        doWord(wordSeven);
        break;
      case 8:
        doWord(wordEight);
        break;
      case 9:
        doWord(wordNine);
        break;
      case 10:
        doWord(wordTen);
        break;
      case 11:
        doWord(wordEleven);
        break;
      case 12:
        doWord(wordTwelve);
        break;
      case 13:
        doWord(wordThirteen);
        break;
      case 14:
        doWord(wordFourteen);
        break;
      case 15:
        doWord(wordA);
        doWord(wordQuarter);
        break;
      case 16:
        doWord(wordSixteen);
        break;
      case 17:
        doWord(wordSeventeen);
        break;
      case 18:
        doWord(wordEighteen);
        break;
      case 19:
        doWord(wordNineteen);
        break;
      case 20:
        doWord(wordTwenty);
        break;
      case 21:
        doWord(wordTwenty);
        doWord(wordOne);
        break;
      case 22:
        doWord(wordTwenty);
        doWord(wordTwo);
        break;
      case 23:
        doWord(wordTwenty);
        doWord(wordThree);
        break;
      case 24:
        doWord(wordTwenty);
        doWord(wordFour);
        break;
      case 25:
        doWord(wordTwenty);
        doWord(wordFive);
        break;
      case 26:
        doWord(wordTwenty);
        doWord(wordSix);
        break;
      case 27:
        doWord(wordTwenty);
        doWord(wordEight);
        break;
      case 28:
        doWord(wordTwenty);
        doWord(wordEight);
        break;
      case 29:
        doWord(wordTwenty);
        doWord(wordNine);
        break;
      case 30:
        doWord(wordHalf);
        break;
      case 31:
        doWord(wordTwenty);
        doWord(wordNine);
        break;
      case 32:
        doWord(wordTwenty);
        doWord(wordEight);
        break;
      case 33:
        doWord(wordTwenty);
        doWord(wordSeven);
        break;
      case 34:
        doWord(wordTwenty);
        doWord(wordSix);
        break;
      case 35:
        doWord(wordTwenty);
        doWord(wordFive);
        break;
      case 36:
        doWord(wordTwenty);
        doWord(wordFour);
        break;
      case 37:
        doWord(wordTwenty);
        doWord(wordThree);
        break;
      case 38:
        doWord(wordTwenty);
        doWord(wordTwo);
        break;
      case 39:
        doWord(wordTwenty);
        doWord(wordOne);
        break;
      case 40:
        doWord(wordTwenty);
        break;
      case 41:
        doWord(wordNineteen);
        break;
      case 42:
        doWord(wordEighteen);
        break;
      case 43:
        doWord(wordSeventeen);
        break;
      case 44:
        doWord(wordSixteen);
        break;
      case 45:
        doWord(wordA);
        doWord(wordQuarter);
        break;
      case 46:
        doWord(wordFourteen);
        break;
      case 47:
        doWord(wordThirteen);
        break;
      case 48:
        doWord(wordTwelve);
        break;
      case 49:
        doWord(wordEleven);
        break;
      case 50:
        doWord(wordTen);
        break;
      case 51:
        doWord(wordNine);
        break;
      case 52:
        doWord(wordEight);
        break;
      case 53:
        doWord(wordSeven);
        break;
      case 54:
        doWord(wordSix);
        break;
      case 55:
        doWord(wordFive);
        break;
      case 56:
        doWord(wordFour);
        break;
      case 57:
        doWord(wordThree);
        break;
      case 58:
        doWord(wordTwo);
        break;
      case 59:
        doWord(wordOne);
        doWord(wordMinute);
...

This file has been truncated, please download it to see its full contents.
Snake.h
C/C++
Snake header file. Add this manually to the project by clicking the little '+' icon in the top of the web IDE. Make sure to name it 'snake', or else, change the include name in the main file.
#ifndef SNAKE_H_
#define SNAKE_H_

// This #include statement was automatically added by the Particle IDE.
#include "RGBmatrixPanel/RGBmatrixPanel.h"

#include "application.h"


#define ledmatrix_length 16
#define ledmatrix_width 16
#define game_speed 200


#define right 1
#define left 2
#define down 3
#define up 4
/*----------------definitions------------------*/


/*----------------structures------------------*/
typedef struct snakebit {
	char srow;
	char scolumn;
	char direction;
} mysnake;

typedef struct food {
	char row;
	char column;
} food;
/*----------------structures------------------*/

#pragma once
class Serpent
{

    RGBmatrixPanel* __matrix;
    int new_direction = 0;

public:
	Serpent();
	Serpent(RGBmatrixPanel* matrix);
	virtual ~Serpent();


    void set_new_direction(int val){
		this->new_direction = val;
	}
	int get_new_direction(){
		return this->new_direction;
	}


	void
	    snake_intialization(mysnake* snake),
		clear_matrix(),
		create_border(),
		light_bit(int row, int column, int color = 0),
		update_body(mysnake* snake, int length),
		show_body(mysnake* temp, int length),
		adapt_body(mysnake* snake, int length),
		change_direction(mysnake* snakehead),
		happy_meal(mysnake* listhead),
		renew_apple(food* applepointer, mysnake* listhead),
		update_head(mysnake* snakehead),
		clear(mysnake* snake);


	bool
	    check_collision(food* applepointer, mysnake* listhead),
	    body_crash(mysnake* listhead);
};


#endif /* SNAKE_H_ */
Snake.cpp
C/C++
Snake library. Add this in the same fashion as the .h file by clicking the little '+' icon in the top of the web IDE (if you haven't yet done so for the .h file). Then paste the code.
#include "snake.h"

Serpent::Serpent()
{
}

Serpent::Serpent(RGBmatrixPanel* matrix){
    __matrix = matrix;
}

Serpent::~Serpent()
{
}

void Serpent::snake_intialization(mysnake * snake) {
	int k;
	for (k = 0; k < ((ledmatrix_length * ledmatrix_width) - (ledmatrix_length * 2) - (ledmatrix_width * 2) + 4); k++) {
		snake[k].srow = 0;
		snake[k].scolumn = 0;
		snake[k].direction = 0;
	}
	snake[(ledmatrix_length * ledmatrix_width) - (ledmatrix_length * 2) - (ledmatrix_width * 2) + 3].srow = 5;
	snake[(ledmatrix_length * ledmatrix_width) - (ledmatrix_length * 2) - (ledmatrix_width * 2) + 3].scolumn = 5;
	snake[(ledmatrix_length * ledmatrix_width) - (ledmatrix_length * 2) - (ledmatrix_width * 2) + 3].direction = right;
	snake[(ledmatrix_length * ledmatrix_width) - (ledmatrix_length * 2) - (ledmatrix_width * 2) + 2].srow = 5;
	snake[(ledmatrix_length * ledmatrix_width) - (ledmatrix_length * 2) - (ledmatrix_width * 2) + 2].scolumn = 4;
	snake[(ledmatrix_length * ledmatrix_width) - (ledmatrix_length * 2) - (ledmatrix_width * 2) + 2].direction = right;
	snake[(ledmatrix_length * ledmatrix_width) - (ledmatrix_length * 2) - (ledmatrix_width * 2) + 1].srow = 5;
	snake[(ledmatrix_length * ledmatrix_width) - (ledmatrix_length * 2) - (ledmatrix_width * 2) + 1].scolumn = 3;
	snake[(ledmatrix_length * ledmatrix_width) - (ledmatrix_length * 2) - (ledmatrix_width * 2) + 1].direction = right;
    new_direction = right;
}

void Serpent::clear_matrix() {
    __matrix->fillScreen(0);
}

void Serpent::create_border() {
    __matrix->drawRect(0, 0, ledmatrix_width*2, ledmatrix_length*2, __matrix->Color333(255, 0, 0));
	__matrix->drawRect(1, 1, ledmatrix_width*2-1, ledmatrix_length*2-1, __matrix->Color333(255, 0, 0));
}

void Serpent::light_bit(int row, int column, int color) {
    //light bit

    int r = 0;
    int g = 0;
    int b = 0;

    switch (color){
        case 0:
            r = 0;
            g = 255;
            b = 50;
            break;
        case 1:
            r = 0;
            g = 255;
            b = 0;
            break;
        case 2:
            r = 255;
            g = 150;
            b = 0;
            break;

    }

	int X = row * 2;
	int Y = column * 2;


	__matrix->drawPixel(X       , Y      , __matrix->Color333(r, g, b));
	__matrix->drawPixel(X + 1   , Y      , __matrix->Color333(r, g, b));
	__matrix->drawPixel(X       , Y + 1  , __matrix->Color333(r, g, b));
	__matrix->drawPixel(X + 1   , Y + 1  , __matrix->Color333(r, g, b));

}

void Serpent::update_body(mysnake *snake, int length) {
	int i;
	for (i = (ledmatrix_length * ledmatrix_width) - (ledmatrix_length * 2) - (ledmatrix_width * 2) + 3 - length + 1; i < (ledmatrix_length * ledmatrix_width) - (ledmatrix_length * 2) - (ledmatrix_width * 2) + 3; i++){
    	switch (snake[i + 1].direction) {
    		case 1:
    			++(snake[i].scolumn);
    			break;
    		case 2:
    			--(snake[i].scolumn);
    			break;
    		case 3:
    			++(snake[i].srow);
    			break;
    		case 4:
    			--(snake[i].srow);
    			break;
    	}
	}
}

void Serpent::show_body(mysnake * snake, int length) {
	int i;
	for (i = (ledmatrix_length * ledmatrix_width) - (ledmatrix_length * 2) - (ledmatrix_width * 2) + 3 - length + 1; i < (ledmatrix_length * ledmatrix_width) - (ledmatrix_length * 2) - (ledmatrix_width * 2) + 3; i++) {
		light_bit(snake[i].srow, snake[i].scolumn);
	}
}

void Serpent::adapt_body(mysnake * snake, int length) {
	int i;
	for (i = (ledmatrix_length * ledmatrix_width) - (ledmatrix_length * 2) - (ledmatrix_width * 2) + 3 - length + 1; i < (ledmatrix_length * ledmatrix_width) - (ledmatrix_length * 2) - (ledmatrix_width * 2) + 3; i++) {
		snake[i].direction = snake[i + 1].direction;
	}
}

void Serpent::change_direction(mysnake *snakehead) {
	switch (snakehead -> direction) {
    	case up:
    	{
    		if (new_direction == 1) {
    			snakehead -> direction = right;
    			break;
    		}
    		if (new_direction == 2) {
    			snakehead -> direction = left;
    			break;
    		}
    	}
    	break;
    	case down:
    	{
    		if (new_direction == 1) {
    			snakehead -> direction = right;
    			break;
    		}
    		if (new_direction == 2) {
    			snakehead -> direction = left;
    			break;
    		}
    	}
    	break;
    	case right:
    	{
    		if (new_direction == 3) {
    			snakehead -> direction = up;
    			break;
    		}
    		if (new_direction == 4) {
    			snakehead -> direction = down;
    			break;
    		}
    	}
    	break;
    	case left:
    	{
    		if (new_direction == 3) {
    			snakehead -> direction = up;
    			break;
    		}
    		if (new_direction == 4) {
    			snakehead -> direction = down;
    			break;
    		}
    	}
    	break;
	}
}

void Serpent::happy_meal(mysnake *listhead) {
	mysnake *temp;
	temp = listhead - 1;

	switch (listhead->direction) {
    	case 1:
        	{
        		temp->srow = listhead->srow;
        		temp->scolumn = (listhead->scolumn) - 1;
        	} //right
        break;
    	case 2:
        	{
        		temp->srow = listhead->srow;
        		temp->scolumn = (listhead->scolumn) + 1;
        	} //left
        break;
    	case 3:
        	{
        		temp->srow = (listhead->srow) - 1;
        		temp->scolumn = listhead->scolumn;
        	} //down
        break;
    	case 4:
        	{
        		temp->srow = (listhead->srow) + 1;
        		temp->scolumn = listhead->scolumn;
        	}; //up
        break;
	}
	temp->direction = listhead->direction;

}

void Serpent::renew_apple(food * applepointer, mysnake * listhead) {
  applepointer->row = random(1, ledmatrix_width - 1);
  applepointer->column = random(1, ledmatrix_length - 1);
}

bool Serpent::check_collision(food* applepointer, mysnake* listhead) {
	mysnake* temp;
	temp = listhead;
	while (temp -> direction != 0) {
		if ((applepointer -> row == temp -> srow) && (applepointer -> column == temp -> scolumn)) {
			return 1;
		}
		--temp;
	}
	return 0;
}

void Serpent::update_head(mysnake* snakehead) {
	switch (snakehead -> direction) {
    	case 1:
    		++(snakehead -> scolumn); //right
    	break;
    	case 2:
    		--(snakehead -> scolumn); //left
    	break;
    	case 3:
    		++(snakehead -> srow); //down
    	break;
    	case 4:
    		--(snakehead -> srow); //up
    	break;
	}
}

bool Serpent::body_crash(mysnake* listhead) {
	mysnake* temp;
	temp = listhead - 1;
	while (temp -> direction != 0) {
		if ((listhead -> srow == temp -> srow) && (listhead -> scolumn == temp -> scolumn))
			return 1;
		--temp;
	}
	return 0;
}

void Serpent::clear(mysnake * snake) {
	int k;
	for (k = 0; k < ((ledmatrix_length * ledmatrix_width) - (ledmatrix_length * 2) - (ledmatrix_width * 2) + 4); k++) {
		snake[k].srow = 0;
		snake[k].scolumn = 0;
		snake[k].direction = 0;
	}
}
Index.html
HTML
It's the controller web page. Put it in a directory with the CSS and JS file, and open the HTML in a browser. Alternatively, host it somewhere, then navigate to it.
<html>
  <head>
    <title>Wordclock controller</title>
	  <script src="http://cdn.jsdelivr.net/sparkjs/1/spark.min.js"></script>
    <script type='application/javascript' src='fastclick.js'></script>
    <link rel="stylesheet" href="styles.css">

    <meta name="viewport" content="width=device-width, initial-scale=1, user-scalable=no, minimal-ui">
  </head>

  <body>
    <div class="container">

      <div class="flex-row">
        <div class="flex-child">
          <div class="header">Choose the clock mode:</div>
          <hr>
          <button type="button" onclick="functionPost('handleparams', 'displaymode=0')">Activate</button> Wordclock
          <br>
          <button type="button" onclick="functionPost('handleparams', 'displaymode=1')">Activate</button> Snake
          <br>
          <button type="button" onclick="functionPost('handleparams', 'displaymode=2')">Activate</button> Matrix animation
          <br>
          <button type="button" onclick="functionPost('handleparams', 'displaymode=3')">Activate</button> Digital clock
        </div>
      </div>

      <div class="flex-row" id="snakeDiv" style="display:none;">
        <div class="flex-child">
          <div class="header">Use the buttons below, or the arrow keys to control Snake.</div>
          <hr>
          <button type="button" onclick="functionPost('handleparams', 'direction=2')" style="width:100%; height:80px;">Up</button>
          <br>
          <button type="button" onclick="functionPost('handleparams', 'direction=3')" style="width:48%; height:80px;">Left</button>
          <button type="button" onclick="functionPost('handleparams', 'direction=4')" style="width:48%; height:80px; float:right;">Right</button>
          <br>
          <button type="button" onclick="functionPost('handleparams', 'direction=1')" style="width:100%; height:80px;">Down</button>
        </div>

      </div>

      <div class="flex-row">

        <div class="flex-child">
          Set the speeds: slow - fast
          <hr>
          Snake speed
          <br>
          <br>
          <input type="range" id="snakeSpeedRange" min="100" max="450" step="10" value="200" onchange="snakeSpeedRange()">

          <br>
          <br>

          Matrix speed
          <br>
          <br>
          <input type="range" id="matrixSpeedRange" min="10" max="50" step="5" value="20" onchange="matrixSpeedRange()">
        </div>
      </div>


      <div class="flex-row">
        <div class="flex-child">

          <div class="header">Choose your prefered time mode:</div>
          <hr>
          <button type="button" onclick="functionPost('handleparams', 'setTimeMode=0')">Activate</button> "It's MM past/to HH"
          <br>
          <button type="button" onclick="functionPost('handleparams', 'setTimeMode=1')">Activate</button> "It's HH (o) MM"
        </div>
      </div>

      <div class="flex-row">
        <div class="flex-child">
          <div class="header">Display a "special effect"</div>
          <hr>
          <button type="button" onclick="functionPost('handleparams', 'specials=0')">Activate</button> "Use the Force"
          <br>
          <button type="button" onclick="functionPost('handleparams', 'specials=1')">Activate</button> "May the Force be with you"
          <br>
          <button type="button" onclick="functionPost('handleparams', 'specials=2')">Activate</button> "Do, or do not. There is no try"
          <br>
          <button type="button" onclick="functionPost('handleparams', 'specials=3')">Activate</button> "Shoot cannon"
          <br>
          <button type="button" onclick="functionPost('handleparams', 'specials=4')">Activate</button> "Jedi"
          <br>
          <button type="button" onclick="functionPost('handleparams', 'specials=5')">Activate</button> "Sith"
          <br>
          <button type="button" onclick="functionPost('handleparams', 'specials=6')">Activate</button> "Yoda"
        </div>

      </div>


      <div class="flex-row selectors">

        <div class="flex-child">
          <div class="header">Choose your prefered text color</div>
          <hr>
          <button type="button" onclick="functionPost('handleparams', 'r=255,g=0,b=0')" style="background-color:rgb(255,0,0);"></button>
          <br>
          <button type="button" onclick="functionPost('handleparams', 'r=255,g=125,b=0')"style="background-color:rgb(255,125,0);"></button>
          <br>
          <button type="button" onclick="functionPost('handleparams', 'r=255,g=255,b=0')" style="background-color:rgb(255,255,0);"></button>
          <br>
          <button type="button" onclick="functionPost('handleparams', 'r=125,g=255,b=0')" style="background-color:rgb(125,255,0);"></button>
          <br>
          <button type="button" onclick="functionPost('handleparams', 'r=0,g=255,b=0')" style="background-color:rgb(0,255,0);"></button>
          <br>
          <button type="button" onclick="functionPost('handleparams', 'r=0,g=255,b=125')" style="background-color:rgb(0,255,125);"></button>
          <br>
          <button type="button" onclick="functionPost('handleparams', 'r=0,g=255,b=255')" style="background-color:rgb(0,255,255);"></button>
          <br>
          <button type="button" onclick="functionPost('handleparams', 'r=0,g=125,b=255')" style="background-color:rgb(0,125,255);"></button>
          <br>
          <button type="button" onclick="functionPost('handleparams', 'r=0,g=0,b=255')" style="background-color:rgb(0,0,255);"></button>
          <br>
          <button type="button" onclick="functionPost('handleparams', 'r=125,g=0,b=255')" style="background-color:rgb(125,0,255);"></button>
          <br>
          <button type="button" onclick="functionPost('handleparams', 'r=255,g=0,b=255')" style="background-color:rgb(255,0,255);"></button>
          <br>
          <button type="button" onclick="functionPost('handleparams', 'r=255,g=0,b=125')" style="background-color:rgb(255,0,125);"></button>
          <br>
          <button type="button" onclick="functionPost('handleparams', 'r=0,g=0,b=0')" style="background-color:rgb(0,0,0);"></button>
        </div>
      </div>

      <div class="flex-row selectors">
        <div class="flex-child">

          <div class="header">Choose your prefered Death Star color</div>
          <hr>
          <button type="button" onclick="functionPost('handleparams', 'sr=255,sg=0,sb=0')" style="background-color:rgb(255,0,0);"></button>
          <br>
          <button type="button" onclick="functionPost('handleparams', 'sr=255,sg=125,sb=0')"style="background-color:rgb(255,125,0);"></button>
          <br>
          <button type="button" onclick="functionPost('handleparams', 'sr=255,sg=255,sb=0')" style="background-color:rgb(255,255,0);"></button>
          <br>
          <button type="button" onclick="functionPost('handleparams', 'sr=125,sg=255,sb=0')" style="background-color:rgb(125,255,0);"></button>
          <br>
          <button type="button" onclick="functionPost('handleparams', 'sr=0,sg=255,sb=0')" style="background-color:rgb(0,255,0);"></button>
          <br>
          <button type="button" onclick="functionPost('handleparams', 'sr=0,sg=255,sb=125')" style="background-color:rgb(0,255,125);"></button>
          <br>
          <button type="button" onclick="functionPost('handleparams', 'sr=0,sg=255,sb=255')" style="background-color:rgb(0,255,255);"></button>
          <br>
          <button type="button" onclick="functionPost('handleparams', 'sr=0,sg=125,sb=255')" style="background-color:rgb(0,125,255);"></button>
          <br>
          <button type="button" onclick="functionPost('handleparams', 'sr=0,sg=0,sb=255')" style="background-color:rgb(0,0,255);"></button>
          <br>
          <button type="button" onclick="functionPost('handleparams', 'sr=125,sg=0,sb=255')" style="background-color:rgb(125,0,255);"></button>
          <br>
          <button type="button" onclick="functionPost('handleparams', 'sr=255,sg=0,sb=255')" style="background-color:rgb(255,0,255);"></button>
          <br>
          <button type="button" onclick="functionPost('handleparams', 'sr=255,sg=0,sb=125')" style="background-color:rgb(255,0,125);"></button>
          <br>
          <button type="button" onclick="functionPost('handleparams', 'sr=0,sg=0,sb=0')" style="background-color:rgb(0,0,0);"></button>

        </div>
      </div>

    </div>


    <script>

      var deviceID = "DEVICE_ID_HERE";

      var direction;
      var snakeState;
      //var directionsDiv = document.getElementById("directionsDiv");
      var controlEnabler = document.getElementById("controlEnabler");
      var snakeDiv = document.getElementById("snakeDiv");

      // callback to be executed by each core
      var callback = function(err, data) {
        if (err) {
          console.log('An error occurred:', err);
        } else {
          console.log('Device action successfull:', data);
        }
      };


      function functionPost(functionName, functionArgument){
        if (functionArgument.indexOf("displaymode") > -1){
          snakeState = (functionArgument == "displaymode=1") ? true : false;
          snakeDiv.style.display = snakeState ? "flex" : "none";
        }
        spark.callFunction(deviceID, functionName, functionArgument, callback);
      }


      document.onkeydown = function(e) {
        if (snakeState){
          switch (e.keyCode) {
            case 37:
              e.preventDefault();
              direction = 3;
              //alert('left');
              break;
            case 38:
              e.preventDefault();
              direction = 2;
              //alert('up');
              break;
            case 39:
              e.preventDefault();
              direction = 4;
              //alert('right');
              break;
            case 40:
              e.preventDefault();
              direction = 1;
              //alert('down');
              break;
          }
          functionPost('handleparams', 'direction=' + direction);
        }
      };


      function snakeSpeedRange()
      {
        var snakeSpeedRange = document.getElementById('snakeSpeedRange');
        functionPost('handleparams', 'snakespeed=' + snakeSpeedRange.value);
        snakeSpeedRange.blur();
      }

      function matrixSpeedRange()
      {
        var matrixSpeedRange = document.getElementById('matrixSpeedRange');
        functionPost('handleparams', 'matrixspeed=' + matrixSpeedRange.value);
        matrixSpeedRange.blur();
      }

      if ('addEventListener' in document) {
        document.addEventListener('DOMContentLoaded', function() {
          FastClick.attach(document.body);
        }, false);
      }

	  spark.on('login', function(response) {
        console.log(response);
      });

      spark.login({ username: 'EMAIL_ADRESS_HERE', password: 'PARTICLE_PASSWORD_HERE' });

    </script>
  </body>
</html>
fastclick.js
JavaScript
Just make sure it's in the same directory as the HTML file. It'll speed up click on mobile devices, which is needed for Snake.
;(function () {
	'use strict';

	/**
	 * @preserve FastClick: polyfill to remove click delays on browsers with touch UIs.
	 *
	 * @codingstandard ftlabs-jsv2
	 * @copyright The Financial Times Limited [All Rights Reserved]
	 * @license MIT License (see LICENSE.txt)
	 */

	/*jslint browser:true, node:true*/
	/*global define, Event, Node*/


	/**
	 * Instantiate fast-clicking listeners on the specified layer.
	 *
	 * @constructor
	 * @param {Element} layer The layer to listen on
	 * @param {Object} [options={}] The options to override the defaults
	 */
	function FastClick(layer, options) {
		var oldOnClick;

		options = options || {};

		/**
		 * Whether a click is currently being tracked.
		 *
		 * @type boolean
		 */
		this.trackingClick = false;


		/**
		 * Timestamp for when click tracking started.
		 *
		 * @type number
		 */
		this.trackingClickStart = 0;


		/**
		 * The element being tracked for a click.
		 *
		 * @type EventTarget
		 */
		this.targetElement = null;


		/**
		 * X-coordinate of touch start event.
		 *
		 * @type number
		 */
		this.touchStartX = 0;


		/**
		 * Y-coordinate of touch start event.
		 *
		 * @type number
		 */
		this.touchStartY = 0;


		/**
		 * ID of the last touch, retrieved from Touch.identifier.
		 *
		 * @type number
		 */
		this.lastTouchIdentifier = 0;


		/**
		 * Touchmove boundary, beyond which a click will be cancelled.
		 *
		 * @type number
		 */
		this.touchBoundary = options.touchBoundary || 10;


		/**
		 * The FastClick layer.
		 *
		 * @type Element
		 */
		this.layer = layer;

		/**
		 * The minimum time between tap(touchstart and touchend) events
		 *
		 * @type number
		 */
		this.tapDelay = options.tapDelay || 200;

		/**
		 * The maximum time for a tap
		 *
		 * @type number
		 */
		this.tapTimeout = options.tapTimeout || 700;

		if (FastClick.notNeeded(layer)) {
			return;
		}

		// Some old versions of Android don't have Function.prototype.bind
		function bind(method, context) {
			return function() { return method.apply(context, arguments); };
		}


		var methods = ['onMouse', 'onClick', 'onTouchStart', 'onTouchMove', 'onTouchEnd', 'onTouchCancel'];
		var context = this;
		for (var i = 0, l = methods.length; i < l; i++) {
			context[methods[i]] = bind(context[methods[i]], context);
		}

		// Set up event handlers as required
		if (deviceIsAndroid) {
			layer.addEventListener('mouseover', this.onMouse, true);
			layer.addEventListener('mousedown', this.onMouse, true);
			layer.addEventListener('mouseup', this.onMouse, true);
		}

		layer.addEventListener('click', this.onClick, true);
		layer.addEventListener('touchstart', this.onTouchStart, false);
		layer.addEventListener('touchmove', this.onTouchMove, false);
		layer.addEventListener('touchend', this.onTouchEnd, false);
		layer.addEventListener('touchcancel', this.onTouchCancel, false);

		// Hack is required for browsers that don't support Event#stopImmediatePropagation (e.g. Android 2)
		// which is how FastClick normally stops click events bubbling to callbacks registered on the FastClick
		// layer when they are cancelled.
		if (!Event.prototype.stopImmediatePropagation) {
			layer.removeEventListener = function(type, callback, capture) {
				var rmv = Node.prototype.removeEventListener;
				if (type === 'click') {
					rmv.call(layer, type, callback.hijacked || callback, capture);
				} else {
					rmv.call(layer, type, callback, capture);
				}
			};

			layer.addEventListener = function(type, callback, capture) {
				var adv = Node.prototype.addEventListener;
				if (type === 'click') {
					adv.call(layer, type, callback.hijacked || (callback.hijacked = function(event) {
						if (!event.propagationStopped) {
							callback(event);
						}
					}), capture);
				} else {
					adv.call(layer, type, callback, capture);
				}
			};
		}

		// If a handler is already declared in the element's onclick attribute, it will be fired before
		// FastClick's onClick handler. Fix this by pulling out the user-defined handler function and
		// adding it as listener.
		if (typeof layer.onclick === 'function') {

			// Android browser on at least 3.2 requires a new reference to the function in layer.onclick
			// - the old one won't work if passed to addEventListener directly.
			oldOnClick = layer.onclick;
			layer.addEventListener('click', function(event) {
				oldOnClick(event);
			}, false);
			layer.onclick = null;
		}
	}

	/**
	* Windows Phone 8.1 fakes user agent string to look like Android and iPhone.
	*
	* @type boolean
	*/
	var deviceIsWindowsPhone = navigator.userAgent.indexOf("Windows Phone") >= 0;

	/**
	 * Android requires exceptions.
	 *
	 * @type boolean
	 */
	var deviceIsAndroid = navigator.userAgent.indexOf('Android') > 0 && !deviceIsWindowsPhone;


	/**
	 * iOS requires exceptions.
	 *
	 * @type boolean
	 */
	var deviceIsIOS = /iP(ad|hone|od)/.test(navigator.userAgent) && !deviceIsWindowsPhone;


	/**
	 * iOS 4 requires an exception for select elements.
	 *
	 * @type boolean
	 */
	var deviceIsIOS4 = deviceIsIOS && (/OS 4_\d(_\d)?/).test(navigator.userAgent);


	/**
	 * iOS 6.0-7.* requires the target element to be manually derived
	 *
	 * @type boolean
	 */
	var deviceIsIOSWithBadTarget = deviceIsIOS && (/OS [6-7]_\d/).test(navigator.userAgent);

	/**
	 * BlackBerry requires exceptions.
	 *
	 * @type boolean
	 */
	var deviceIsBlackBerry10 = navigator.userAgent.indexOf('BB10') > 0;

	/**
	 * Determine whether a given element requires a native click.
	 *
	 * @param {EventTarget|Element} target Target DOM element
	 * @returns {boolean} Returns true if the element needs a native click
	 */
	FastClick.prototype.needsClick = function(target) {
		switch (target.nodeName.toLowerCase()) {

		// Don't send a synthetic click to disabled inputs (issue #62)
		case 'button':
		case 'select':
		case 'textarea':
			if (target.disabled) {
				return true;
			}

			break;
		case 'input':

			// File inputs need real clicks on iOS 6 due to a browser bug (issue #68)
			if ((deviceIsIOS && target.type === 'file') || target.disabled) {
				return true;
			}

			break;
		case 'label':
		case 'iframe': // iOS8 homescreen apps can prevent events bubbling into frames
		case 'video':
			return true;
		}

		return (/\bneedsclick\b/).test(target.className);
	};


	/**
	 * Determine whether a given element requires a call to focus to simulate click into element.
	 *
	 * @param {EventTarget|Element} target Target DOM element
	 * @returns {boolean} Returns true if the element requires a call to focus to simulate native click.
	 */
	FastClick.prototype.needsFocus = function(target) {
		switch (target.nodeName.toLowerCase()) {
		case 'textarea':
			return true;
		case 'select':
			return !deviceIsAndroid;
		case 'input':
			switch (target.type) {
			case 'button':
			case 'checkbox':
			case 'file':
			case 'image':
			case 'radio':
			case 'submit':
				return false;
			}

			// No point in attempting to focus disabled inputs
			return !target.disabled && !target.readOnly;
		default:
			return (/\bneedsfocus\b/).test(target.className);
		}
	};


	/**
	 * Send a click event to the specified element.
	 *
	 * @param {EventTarget|Element} targetElement
	 * @param {Event} event
	 */
	FastClick.prototype.sendClick = function(targetElement, event) {
		var clickEvent, touch;

		// On some Android devices activeElement needs to be blurred otherwise the synthetic click will have no effect (#24)
		if (document.activeElement && document.activeElement !== targetElement) {
			document.activeElement.blur();
		}

		touch = event.changedTouches[0];

		// Synthesise a click event, with an extra attribute so it can be tracked
		clickEvent = document.createEvent('MouseEvents');
		clickEvent.initMouseEvent(this.determineEventType(targetElement), true, true, window, 1, touch.screenX, touch.screenY, touch.clientX, touch.clientY, false, false, false, false, 0, null);
		clickEvent.forwardedTouchEvent = true;
		targetElement.dispatchEvent(clickEvent);
	};

	FastClick.prototype.determineEventType = function(targetElement) {

		//Issue #159: Android Chrome Select Box does not open with a synthetic click event
		if (deviceIsAndroid && targetElement.tagName.toLowerCase() === 'select') {
			return 'mousedown';
		}

		return 'click';
	};


	/**
	 * @param {EventTarget|Element} targetElement
	 */
	FastClick.prototype.focus = function(targetElement) {
		var length;

		// Issue #160: on iOS 7, some input elements (e.g. date datetime month) throw a vague TypeError on setSelectionRange. These elements don't have an integer value for the selectionStart and selectionEnd properties, but unfortunately that can't be used for detection because accessing the properties also throws a TypeError. Just check the type instead. Filed as Apple bug #15122724.
		if (deviceIsIOS && targetElement.setSelectionRange && targetElement.type.indexOf('date') !== 0 && targetElement.type !== 'time' && targetElement.type !== 'month') {
			length = targetElement.value.length;
			targetElement.setSelectionRange(length, length);
		} else {
			targetElement.focus();
		}
	};


	/**
	 * Check whether the given target element is a child of a scrollable layer and if so, set a flag on it.
	 *
	 * @param {EventTarget|Element} targetElement
	 */
	FastClick.prototype.updateScrollParent = function(targetElement) {
		var scrollParent, parentElement;

		scrollParent = targetElement.fastClickScrollParent;

		// Attempt to discover whether the target element is contained within a scrollable layer. Re-check if the
		// target element was moved to another parent.
		if (!scrollParent || !scrollParent.contains(targetElement)) {
			parentElement = targetElement;
			do {
				if (parentElement.scrollHeight > parentElement.offsetHeight) {
					scrollParent = parentElement;
					targetElement.fastClickScrollParent = parentElement;
					break;
				}

				parentElement = parentElement.parentElement;
			} while (parentElement);
		}

		// Always update the scroll top tracker if possible.
		if (scrollParent) {
			scrollParent.fastClickLastScrollTop = scrollParent.scrollTop;
		}
	};


	/**
	 * @param {EventTarget} targetElement
	 * @returns {Element|EventTarget}
	 */
	FastClick.prototype.getTargetElementFromEventTarget = function(eventTarget) {

		// On some older browsers (notably Safari on iOS 4.1 - see issue #56) the event target may be a text node.
		if (eventTarget.nodeType === Node.TEXT_NODE) {
			return eventTarget.parentNode;
		}

		return eventTarget;
	};


	/**
	 * On touch start, record the position and scroll offset.
	 *
	 * @param {Event} event
	 * @returns {boolean}
	 */
	FastClick.prototype.onTouchStart = function(event) {
		var targetElement, touch, selection;

		// Ignore multiple touches, otherwise pinch-to-zoom is prevented if both fingers are on the FastClick element (issue #111).
		if (event.targetTouches.length > 1) {
			return true;
		}

		targetElement = this.getTargetElementFromEventTarget(event.target);
		touch = event.targetTouches[0];

		if (deviceIsIOS) {

			// Only trusted events will deselect text on iOS (issue #49)
			selection = window.getSelection();
			if (selection.rangeCount && !selection.isCollapsed) {
				return true;
			}

			if (!deviceIsIOS4) {

				// Weird things happen on iOS when an alert or confirm dialog is opened from a click event callback (issue #23):
				// when the user next taps anywhere else on the page, new touchstart and touchend events are dispatched
				// with the same identifier as the touch event that previously triggered the click that triggered the alert.
				// Sadly, there is an issue on iOS 4 that causes some normal touch events to have the same identifier as an
				// immediately preceeding touch event (issue #52), so this fix is unavailable on that platform.
				// Issue 120: touch.identifier is 0 when Chrome dev tools 'Emulate touch events' is set with an iOS device UA string,
				// which causes all touch events to be ignored. As this block only applies to iOS, and iOS identifiers are always long,
				// random integers, it's safe to to continue if the identifier is 0 here.
				if (touch.identifier && touch.identifier === this.lastTouchIdentifier) {
					event.preventDefault();
					return false;
				}

				this.lastTouchIdentifier = touch.identifier;

				// If the target element is a child of a scrollable layer (using -webkit-overflow-scrolling: touch) and:
				// 1) the user does a fling scroll on the scrollable layer
				// 2) the user stops the fling scroll with another tap
				// then the event.target of the last 'touchend' event will be the element that was under the user's finger
				// when the fling scroll was started, causing FastClick to send a click event to that layer - unless a check
				// is made to ensure that a parent layer was not scrolled before sending a synthetic click (issue #42).
				this.updateScrollParent(targetElement);
			}
		}

		this.trackingClick = true;
		this.trackingClickStart = event.timeStamp;
		this.targetElement = targetElement;

		this.touchStartX = touch.pageX;
		this.touchStartY = touch.pageY;

		// Prevent phantom clicks on fast double-tap (issue #36)
		if ((event.timeStamp - this.lastClickTime) < this.tapDelay) {
			event.preventDefault();
		}

		return true;
	};


	/**
	 * Based on a touchmove event object, check whether the touch has moved past a boundary since it started.
	 *
	 * @param {Event} event
	 * @returns {boolean}
	 */
	FastClick.prototype.touchHasMoved = function(event) {
		var touch = event.changedTouches[0], boundary = this.touchBoundary;

		if (Math.abs(touch.pageX - this.touchStartX) > boundary || Math.abs(touch.pageY - this.touchStartY) > boundary) {
			return true;
		}

		return false;
	};


	/**
	 * Update the last position.
	 *
	 * @param {Event} event
	 * @returns {boolean}
	 */
	FastClick.prototype.onTouchMove = function(event) {
		if (!this.trackingClick) {
			return true;
		}

		// If the touch has moved, cancel the click tracking
		if (this.targetElement !== this.getTargetElementFromEventTarget(event.target) || this.touchHasMoved(event)) {
			this.trackingClick = false;
			this.targetElement = null;
		}

		return true;
	};


	/**
	 * Attempt to find the labelled control for the given label element.
	 *
	 * @param {EventTarget|HTMLLabelElement} labelElement
	 * @returns {Element|null}
	 */
	FastClick.prototype.findControl = function(labelElement) {

		// Fast path for newer browsers supporting the HTML5 control attribute
		if (labelElement.control !== undefined) {
			return labelElement.control;
		}

		// All browsers under test that support touch events also support the HTML5 htmlFor attribute
		if (labelElement.htmlFor) {
			return document.getElementById(labelElement.htmlFor);
		}

		// If no for attribute exists, attempt to retrieve the first labellable descendant element
		// the list of which is defined here: http://www.w3.org/TR/html5/forms.html#category-label
		return labelElement.querySelector('button, input:not([type=hidden]), keygen, meter, output, progress, select, textarea');
	};


	/**
	 * On touch end, determine whether to send a click event at once.
	 *
	 * @param {Event} event
	 * @returns {boolean}
	 */
	FastClick.prototype.onTouchEnd = function(event) {
		var forElement, trackingClickStart, targetTagName, scrollParent, touch, targetElement = this.targetElement;

		if (!this.trackingClick) {
			return true;
		}

		// Prevent phantom clicks on fast double-tap (issue #36)
		if ((event.timeStamp - this.lastClickTime) < this.tapDelay) {
			this.cancelNextClick = true;
			return true;
		}

		if ((event.timeStamp - this.trackingClickStart) > this.tapTimeout) {
			return true;
		}

		// Reset to prevent wrong click cancel on input (issue #156).
		this.cancelNextClick = false;

		this.lastClickTime = event.timeStamp;

		trackingClickStart = this.trackingClickStart;
		this.trackingClick = false;
		this.trackingClickStart = 0;

		// On some iOS devices, the targetElement supplied with the event is invalid if the layer
		// is performing a transition or scroll, and has to be re-detected manually. Note that
		// for this to function correctly, it must be called *after* the event target is checked!
		// See issue #57; also filed as rdar://13048589 .
		if (deviceIsIOSWithBadTarget) {
			touch = event.changedTouches[0];

			// In certain cases arguments of elementFromPoint can be negative, so prevent setting targetElement to null
			targetElement = document.elementFromPoint(touch.pageX - window.pageXOffset, touch.pageY - window.pageYOffset) || targetElement;
			targetElement.fastClickScrollParent = this.targetElement.fastClickScrollParent;
		}

		targetTagName = targetElement.tagName.toLowerCase();
		if (targetTagName === 'label') {
			forElement = this.findControl(targetElement);
			if (forElement) {
				this.focus(targetElement);
				if (deviceIsAndroid) {
					return false;
				}

				targetElement = forElement;
			}
		} else if (this.needsFocus(targetElement)) {

			// Case 1: If the touch started a while ago (best guess is 100ms based on tests for issue #36) then focus will be triggered anyway. Return early and unset the target element reference so that the subsequent click will be allowed through.
			// Case 2: Without this exception for input elements tapped when the document is contained in an iframe, then any inputted text won't be visible even though the value attribute is updated as the user types (issue #37).
			if ((event.timeStamp - trackingClickStart) > 100 || (deviceIsIOS && window.top !== window && targetTagName === 'input')) {
				this.targetElement = null;
				return false;
			}

			this.focus(targetElement);
			this.sendClick(targetElement, event);

			// Select elements need the event to go through on iOS 4, otherwise the selector menu won't open.
			// Also this breaks opening selects when VoiceOver is active on iOS6, iOS7 (and possibly others)
			if (!deviceIsIOS || targetTagName !== 'select') {
				this.targetElement = null;
				event.preventDefault();
			}

			return false;
		}

		if (deviceIsIOS && !deviceIsIOS4) {

			// Don't send a synthetic click event if the target element is contained within a parent layer that was scrolled
			// and this tap is being used to stop the scrolling (usually initiated by a fling - issue #42).
			scrollParent = targetElement.fastClickScrollParent;
			if (scrollParent && scrollParent.fastClickLastScrollTop !== scrollParent.scrollTop) {
				return true;
			}
		}

		// Prevent the actual click from going though - unless the target node is marked as requiring
		// real clicks or if it is in the whitelist in which case only non-programmatic clicks are permitted.
		if (!this.needsClick(targetElement)) {
			event.preventDefault();
			this.sendClick(targetElement, event);
		}

		return false;
	};


	/**
	 * On touch cancel, stop tracking the click.
	 *
	 * @returns {void}
	 */
	FastClick.prototype.onTouchCancel = function() {
		this.trackingClick = false;
		this.targetElement = null;
	};


	/**
	 * Determine mouse events which should be permitted.
	 *
	 * @param {Event} event
	 * @returns {boolean}
	 */
	FastClick.prototype.onMouse = function(event) {

		// If a target element was never set (because a touch event was never fired) allow the event
		if (!this.targetElement) {
			return true;
		}

		if (event.forwardedTouchEvent) {
			return true;
		}

		// Programmatically generated events targeting a specific element should be permitted
		if (!event.cancelable) {
			return true;
		}

		// Derive and check the target element to see whether the mouse event needs to be permitted;
		// unless explicitly enabled, prevent non-touch click events from triggering actions,
		// to prevent ghost/doubleclicks.
		if (!this.needsClick(this.targetElement) || this.cancelNextClick) {

			// Prevent any user-added listeners declared on FastClick element from being fired.
			if (event.stopImmediatePropagation) {
				event.stopImmediatePropagation();
			} else {

				// Part of the hack for browsers that don't support Event#stopImmediatePropagation (e.g. Android 2)
				event.propagationStopped = true;
			}

			// Cancel the event
			event.stopPropagation();
			event.preventDefault();

			return false;
		}

		// If the mouse event is permitted, return true for the action to go through.
		return true;
	};


	/**
	 * On actual clicks, determine whether this is a touch-generated click, a click action occurring
	 * naturally after a delay after a touch (which needs to be cancelled to avoid duplication), or
	 * an actual click which should be permitted.
	 *
	 * @param {Event} event
	 * @returns {boolean}
	 */
	FastClick.prototype.onClick = function(event) {
		var permitted;

		// It's possible for another FastClick-like library delivered with third-party code to fire a click event before FastClick does (issue #44). In that case, set the click-tracking flag back to false and return early. This will cause onTouchEnd to return early.
		if (this.trackingClick) {
			this.targetElement = null;
			this.trackingClick = false;
			return true;
		}

		// Very odd behaviour on iOS (issue #18): if a submit element is present inside a form and the user hits enter in the iOS simulator or clicks the Go button on the pop-up OS keyboard the a kind of 'fake' click event will be triggered with the submit-type input element as the target.
		if (event.target.type === 'submit' && event.detail === 0) {
			return true;
		}

		permitted = this.onMouse(event);

		// Only unset targetElement if the click is not permitted. This will ensure that the check for !targetElement in onMouse fails and the browser's click doesn't go through.
		if (!permitted) {
			this.targetElement = null;
		}

		// If clicks are permitted, return true for the action to go through.
		return permitted;
	};


	/**
	 * Remove all FastClick's event listeners.
	 *
	 * @returns {void}
	 */
	FastClick.prototype.destroy = function() {
		var layer = this.layer;

		if (deviceIsAndroid) {
			layer.removeEventListener('mouseover', this.onMouse, true);
			layer.removeEventListener('mousedown', this.onMouse, true);
			layer.removeEventListener('mouseup', this.onMouse, true);
		}

		layer.removeEventListener('click', this.onClick, true);
		layer.removeEventListener('touchstart', this.onTouchStart, false);
		layer.removeEventListener('touchmove', this.onTouchMove, false);
		layer.removeEventListener('touchend', this.onTouchEnd, false);
		layer.removeEventListener('touchcancel', this.onTouchCancel, false);
	};


	/**
	 * Check whether FastClick is needed.
	 *
	 * @param {Element} layer The layer to listen on
	 */
	FastClick.notNeeded = function(layer) {
		var metaViewport;
		var chromeVersion;
		var blackberryVersion;
		var firefoxVersion;

		// Devices that don't support touch don't need FastClick
		if (typeof window.ontouchstart === 'undefined') {
			return true;
		}

		// Chrome version - zero for other browsers
		chromeVersion = +(/Chrome\/([0-9]+)/.exec(navigator.userAgent) || [,0])[1];

		if (chromeVersion) {

			if (deviceIsAndroid) {
				metaViewport = document.querySelector('meta[name=viewport]');

				if (metaViewport) {
					// Chrome on Android with user-scalable="no" doesn't need FastClick (issue #89)
					if (metaViewport.content.indexOf('user-scalable=no') !== -1) {
						return true;
					}
					// Chrome 32 and above with width=device-width or less don't need FastClick
					if (chromeVersion > 31 && document.documentElement.scrollWidth <= window.outerWidth) {
						return true;
					}
				}

			// Chrome desktop doesn't need FastClick (issue #15)
			} else {
				return true;
			}
		}

		if (deviceIsBlackBerry10) {
			blackberryVersion = navigator.userAgent.match(/Version\/([0-9]*)\.([0-9]*)/);

			// BlackBerry 10.3+ does not require Fastclick library.
			// https://github.com/ftlabs/fastclick/issues/251
			if (blackberryVersion[1] >= 10 && blackberryVersion[2] >= 3) {
				metaViewport = document.querySelector('meta[name=viewport]');

				if (metaViewport) {
					// user-scalable=no eliminates click delay.
					if (metaViewport.content.indexOf('user-scalable=no') !== -1) {
						return true;
					}
					// width=device-width (or less than device-width) eliminates click delay.
					if (document.documentElement.scrollWidth <= window.outerWidth) {
						return true;
					}
				}
			}
		}

		// IE10 with -ms-touch-action: none or manipulation, which disables double-tap-to-zoom (issue #97)
		if (layer.style.msTouchAction === 'none' || layer.style.touchAction === 'manipulation') {
			return true;
		}

		// Firefox version - zero for other browsers
		firefoxVersion = +(/Firefox\/([0-9]+)/.exec(navigator.userAgent) || [,0])[1];

		if (firefoxVersion >= 27) {
			// Firefox 27+ does not have tap delay if the content is not zoomable - https://bugzilla.mozilla.org/show_bug.cgi?id=922896

			metaViewport = document.querySelector('meta[name=viewport]');
			if (metaViewport && (metaViewport.content.indexOf('user-scalable=no') !== -1 || document.documentElement.scrollWidth <= window.outerWidth)) {
				return true;
			}
		}

		// IE11: prefixed -ms-touch-action is no longer supported and it's recomended to use non-prefixed version
		// http://msdn.microsoft.com/en-us/library/windows/apps/Hh767313.aspx
		if (layer.style.touchAction === 'none' || layer.style.touchAction === 'manipulation') {
			return true;
		}

		return false;
	};


	/**
	 * Factory method for creating a FastClick object
	 *
	 * @param {Element} layer The layer to listen on
	 * @param {Object} [options={}] The options to override the defaults
	 */
	FastClick.attach = function(layer, options) {
		return new FastClick(layer, options);
	};


	if (typeof define === 'function' && typeof define.amd === 'object' && define.amd) {

		// AMD. Register as an anonymous module.
		define(function() {
			return FastClick;
		});
	} else if (typeof module !== 'undefined' && module.exports) {
		module.exports = FastClick.attach;
		module.exports.FastClick = FastClick;
	} else {
		window.FastClick = FastClick;
	}
}());
styles.css
CSS
Makes things look pretty. Goes in the same directory as the HTML file.
html{
  color:white;
}
 /*
 body{
   background-image:url("wordclock2.JPG");
   background-size:100%;
   background-repeat: no-repeat;
 }
 */

.container{

  display:flex;
  flex-flow: column wrap;

  justify-content:center;

}

.flex-row{
  display:flex;
  justify-content:center;
  margin:10px;
}


.flex-child{
  padding:25px;
  min-width:300px;
  max-width: 600px;
  background-color: rgba(40, 40, 40, 0.95);

}


button {
  background-color: #4CAF50;
  border: none;
  color: white;
  padding: 10px 15px;
  text-align: center;
  text-decoration: none;
  display: inline-block;
  font-size: 16px;
  margin: 4px 2px;
  cursor: pointer;
}

input[type=range] {
    width: 100%;
    height:20px;
}

input[type="range"]::-webkit-slider-thumb {
    width: 30px;
    height: 30px;
}

input[type="range" i] {
    color: white;
}

input[type=range]::-ms-thumb {
  box-shadow: 1px 1px 1px #000000, 0px 0px 1px #0d0d0d;
  border: 1px solid #000000;
  height: 36px;
  width: 16px;
  border-radius: 3px;
  background: #ffffff;
  cursor: pointer;
}


.selectors button {
  width:100%;
  height:40px;
  border: none;
  color: white;
  padding: 10px 15px;
  text-align: center;
  text-decoration: none;
  display: inline-block;
  font-size: 16px;
  margin: 2px 2px;
  cursor: pointer;
}

.header{
  word-wrap:normal;
  text-align:center;
  font-size:18px;
  font-weight:bold;
}
DFmini player code
C/C++
Flash it to the device you've got the player hooked up to. This code is pretty much a copy from this topic in the Particle community. I've only added the function and subscribe block to it: https://community.particle.io/t/a-great-very-cheap-mp3-sound-module-without-need-for-a-library/20111
/* DF Player mini command discovery (Modified for Particle world by @FiDel - Feb 16, 2016)
~~~~~~~~~~~~~~~~~~~~~~~~~~~~~~~~
This program is meant to discover all the possibilities of the command structure of the DFPlayer mini.
No special libraries are needed.
It's very easy to understand and can be the basis for your own mp3 player sketch.
Note: Commands are not always correctly described in the manual. I tried to fix it, but there is still a lot to do. The commands recoverd so far are listed below.

Use of sketch: Enter three (separated) decimal numbers in the Serial Monitor with no end of line character.
First number : Command
Second number: First (High Byte) parameter
Third number : Second (Low Byte) parameter
E.g.: 3,0,1 will play the first track on the TF card

Very important for 5V Arduinos: Use serial 1K resistors or a level shifter between module RX and TX and Arduino to suppress noise
Connect Sound module board RX to Arduino pin 11 (via 1K resistor)
Connect Sound module board TX to Arduino pin 10 (via 1K resistor)
Connect Sound module board Vcc to Arduino Vin when powered via USB (preferably 3.0) else use seperate 5V power supply
Connect Sound module board GND to Arduino GND

General DF Player mini command structure (only byte 3, 5 and 6 to be entered in the serial monitor):
~~~~~~~~~~~~~~~~~~~~~~~~~~~~~~~~~~~~~~~~~~~~~~~~~~~~~~~~~~~~~~~~~~~~~~~~~~~~~~~~~~~~~~~~~~~~~~~~~~~~
Byte Function Value
==== ================ ====
(0) Start Byte 0x7E
(1) Version Info 0xFF (don't know why it's called Version Info)
(2) Number of bytes 0x06 (Always 6 bytes)
(3) Command 0x__
(4) Command feedback 0x__ If enabled returns info with command 0x41 [0x01: info, 0x00: no info]
(5) Parameter 1 [DH] 0x__
(6) Parameter 2 [DL] 0x__
(7) Checksum high 0x__ See explanation below. Is calculated in function: execute_CMD
(8) Checksum low 0x__ See explanation below. Is calculated in function: execute_CMD
(9) End command 0xEF

Checksum calculation.
~~~~~~~~~~~~~~~~~~~~
Checksum = -Sum(byte(1..6)) (2 bytes, notice minus sign!)

Commands without returned parameters (*=Confirmed command ?=Unknown, not clear or not validated)
~~~~~~~~~~~~~~~~~~~~~~~~~~~~~~~~~~~~
CMD CMD
HEX Dec Function Description Parameters(2 x 8 bit)
==== === =================================== ========================================================================
0x01 1 Next * [DH]=X, [DL]=X Next file in current folder.Loops when last file played
0x02 2 Previous * [DH]=X, [DL]=X Previous file in current folder.Loops when last file played
0x03 3 Specify track(NUM) * [DH]=highByte(NUM), [DL]=lowByte(NUM)
1~2999 Playing order is order in which the numbers are stored.
Filename and foldername are arbitrary, but when named starting with
an increasing number and in one folder, files are played in
that order and with correct track number.
e.g. 0001-Joe Jackson.mp3...0348-Lets dance.mp3)
0x04 4 Increase volume * [DH]=X, [DL]=X Increase volume by 1
0x05 5 Decrease volume * [DH]=X, [DL]=X Decrease volume by 1
0x06 6 Specify volume * [DH]=X, [DL]= Volume (0-0x30) Default=0x30
0x07 7 Specify Equalizer * [DH]=X, [DL]= EQ(0/1/2/3/4/5) [Normal/Pop/Rock/Jazz/Classic/Base]
0x08 8 Specify repeat(NUM) * [DH]=highByte(NUM), [DL]=lowByte(NUM).Repeat the specified track number
0x09 9 Specify playback source (Datasheet) ? [DH]=X, [DL]= (0/1/2/3/4)Unknown. Seems to be overrided by automatic detection
(Datasheet: U/TF/AUX/SLEEP/FLASH)
0x0A 10 Enter into standby – low power loss * [DH]=X, [DL]=X Works, but no command found yet to end standby
(insert TF-card again will end standby mode)
0x0B 11 Normal working (Datasheet) ? Unknown. No error code, but no function found
0x0C 12 Reset module * [DH]=X, [DL]=X Resets all (Track = 0x01, Volume = 0x30)
Will return 0x3F initialization parameter (0x02 for TF-card)
"Clap" sound after excecuting command (no solution found)
0x0D 13 Play * [DH]=X, [DL]=X Play current selected track
0x0E 14 Pause * [DH]=X, [DL]=X Pause track
0x0F 15 Specify folder and file to playback * [DH]=Folder, [DL]=File
Important: Folders must be named 01~99, files must be named 001~255
0x10 16 Volume adjust set (Datasheet) ? Unknown. No error code. Does not change the volume gain.
0x11 17 Loop play * [DH]=X, [DL]=(0x01:play, 0x00:stop play)
Loop play all the tracks. Start at track 1.
0x12 18 Play mp3 file [NUM] in mp3 folder * [DH]=highByte(NUM), [DL]=lowByte(NUM)
Play mp3 file in folder named mp3 in your TF-card. File format exact
4-digit number (0001~2999) e.g. 0235.mp3
0x13 19 Unknown ? Unknown: Returns error code 0x07
0x14 20 Unknown ? Unknown: Returns error code 0x06
0x15 21 Unknown ? Unknown: Returns no error code, but no function found
0x16 22 Stop * [DH]=X, [DL]=X, Stop playing current track
0x17 23 Loop Folder 01 * [DH]=x, [DL]=1~255, Loops all tracks in folder named "01"
0x18 24 Random play * [DH]=X, [DL]=X Random all tracks, always starts at track 1
0x19 25 Single loop * [DH]=0, [DL]=0 Loops the track that is playing
0x1A 26 Pause * [DH]=X, [DL]=(0x01:pause, 0x00:stop pause)

Commands with returned parameters (*=Confirmed command ?=Unknown, not clear or not validated)
~~~~~~~~~~~~~~~~~~~~~~~~~~~~~~~~~
CMD CMD
HEX Dec Function Description Parameters(2 x 8 bit)
==== === =================================== ===========================================================================
0x3A 58 Medium inserted * [DH]=0, [DL]=(1:U-disk, 2:TF-card)
0x3B 59 Medium ejected * [DH]=0, [DL]=(1:U-disk, 2:TF-card)
0x3C 60 Finished track on U-disk * [DH]=highByte(NUM), [DL]=lowByte(NUM)
Not validated. Returns track number when song is finished on U-Disk
0x3D 61 Finished track on TF-card * [DH]=highByte(NUM), [DL]=lowByte(NUM)
Returns track number when song is finished on TF
0x3E 62 Finished track on Flash * [DH]=highByte(NUM), [DL]=lowByte(NUM)
Not validated. Returns track number when song is finished on Flash
0x3F 63 Initialization parameters * [DH]=0, [DL]= 0 ~ 0x0F. Returned code when Reset (0x12) is used.
(each bit represent one device of the low-four bits)
See Datasheet. 0x02 is TF-card. Error 0x01 when no medium is inserted.
0x40 64 Error ? [DH]=0, [DL]= 0~7 Error code(Returned codes not yet analyzed)
0x41 65 Reply ? [DH]=0, [DL]= 0~? Return code when command feedback is high
0x00 no Error (Other returned code not known)
0x42 66 The current status * [DH] = Device number [DL] = 0 no play, 1 play
0x43 67 The current volume * [DH]=0, [DL]= Volume (0-30)
0x44 68 The current EQ * [DH]=0, [DL]= EQ(0/1/2/3/4/5) [Normal/Pop/Rock/Jazz/Classic/Base]
0x45 69 The current playback mode * [DH]=0, [DL]= (0x00: no CMD 0x08 used, 0x02: CMD 0x08 used, not usefull)
0x46 70 The current software version * [DH]=0, [DL]= Software version. (My version is 5)
0x47 71 The total number of U-disk files * [DH]=highByte(NUM), [DL]=lowByte(NUM). Not validated
0x48 72 The total number of TF-card files * [DH]=highByte(NUM), [DL]=lowByte(NUM)
0x49 73 The total number of flash files * [DH]=highByte(NUM), [DL]=lowByte(NUM). Not validated
0x4A 74 Keep on (Datasheet) ? Unknown. No returned parameter
0x4B 75 The current track of U-Disk * [DH]=highByte(NUM), [DL]=lowByte(NUM), Current track on all media
0x4C 76 The current track of TF card * [DH]=highByte(NUM), [DL]=lowByte(NUM), Current track on all media
0x4D 77 The current track of Flash * [DH]=highByte(NUM), [DL]=lowByte(NUM), Current track on all media
0x4E 78 Folder "01" [DH]=x, [DL]=1 * [DH]=0, [DL]=(NUM) Change to first track in folder "01"
Returns number of files in folder "01"
0x4F 79 The total number of folders * [DH]=0, [DL]=(NUM), Total number of folders, including root directory

Additional info can be found on DFRobot site, but is not very reliable
Additional info:http://www.dfrobot.com/index.php?route=product/product&product_id=1121

Ype Brada 2015-04-06
*/

# define Start_Byte 0x7E
# define Version_Byte 0xFF
# define Command_Length 0x06
# define End_Byte 0xEF
# define Acknowledge 0x00 //Returns info with command 0x41 [0x01: info, 0x00: no info]


void execute_CMD(byte CMD, byte Par1, byte Par2) // Excecute the command and parameters
{
 // Calculate the checksum (2 bytes)
 int16_t checksum = -(Version_Byte + Command_Length + CMD + Acknowledge + Par1 + Par2);

 // Build the command line
 byte Command_line[10] = { Start_Byte, Version_Byte, Command_Length, CMD, Acknowledge, Par1, Par2, checksum >> 8, checksum & 0xFF, End_Byte};

 //Send the command line to the module
 for (byte k=0; k<10; k++)
 {
  Serial1.write( Command_line[k]);
 }
}


void setup ()
{
 Particle.function("musicPick",musicPick);
 Serial.begin(9600);
 Serial1.begin(9600);

 execute_CMD(0x3F, 0, 0); // Send request for initialization parameters

 while (Serial1.available()<10) // Wait until initialization parameters are received (10 bytes)
 delay(30); // Pretty long delays between succesive commands needed (not always the same)

 // Initialize sound to very low volume. Adapt according used speaker and wanted volume
 execute_CMD(0x06, 0, 25); // Set the volume (0x00~0x30)

 Particle.subscribe("musicPick", musicPickHandler);

}


void loop ()
{
 if (Serial.available())
 {
  // Input in the Serial monitor: Command and the two parameters in decimal numbers (NOT HEX)
  // E.g. 3,0,1 (or 3 0 1 or 3;0;1) will play first track on the TF-card
  byte Command = Serial.parseInt();
  byte Parameter1 = Serial.parseInt();
  byte Parameter2 = Serial.parseInt();

  // Write the input at the screen
  Serial.print("Command : 0x");if (Command < 16) Serial.print("0"); Serial.print(Command, HEX);
  Serial.print("("); Serial.print(Command, DEC);
  Serial.print("); Parameter: 0x");if (Parameter1 < 16) Serial.print("0");Serial.print(Parameter1, HEX);
  Serial.print("("); Serial.print(Parameter1, DEC);
  Serial.print("), 0x");if (Parameter2 < 16) Serial.print("0");Serial.print(Parameter2, HEX);
  Serial.print("("); Serial.print(Parameter2, DEC);Serial.println(")");

  // Excecute the entered command and parameters
  execute_CMD(Command, Parameter1, Parameter2);
 }

 if (Serial1.available()>=10) // There is at least 1 returned message (10 bytes each)
 {
  // Read the returned code
  byte Returned[10];
  for (byte k=0; k<10; k++)
  Returned[k] = Serial1.read();

  // Wtite the returned code to the screen
  Serial.print("Returned: 0x"); if (Returned[3] < 16) Serial.print("0"); Serial.print(Returned[3],HEX);
  Serial.print("("); Serial.print(Returned[3], DEC);
  Serial.print("); Parameter: 0x"); if (Returned[5] < 16) Serial.print("0"); Serial.print(Returned[5],HEX);
  Serial.print("("); Serial1.print(Returned[5], DEC);
  Serial.print("), 0x"); if (Returned[6] < 16) Serial.print("0"); Serial.print(Returned[6],HEX);
  Serial.print("("); Serial.print(Returned[6], DEC); Serial.println(")");
 }
}

int musicPick(String command){
    byte Command = 0x03;
    byte Parameter1 = 0x00;
    byte Parameter2 = command.toInt();
    // Excecute the entered command and parameters
    execute_CMD(Command, Parameter1, Parameter2);
    return 0;
}

void musicPickHandler(const char *event, const char *data)
{
    byte Command = 0x03;
    byte Parameter1 = 0x00;
    String dataString = String(data);
    byte Parameter2 = dataString.toInt();;

    execute_CMD(Command, Parameter1, Parameter2);
}
The article was first published in hackster, July 5, 2022
cr: https://www.hackster.io/moors7/death-star-word-clock-44ff10#cad
author: Jordy Moors


