
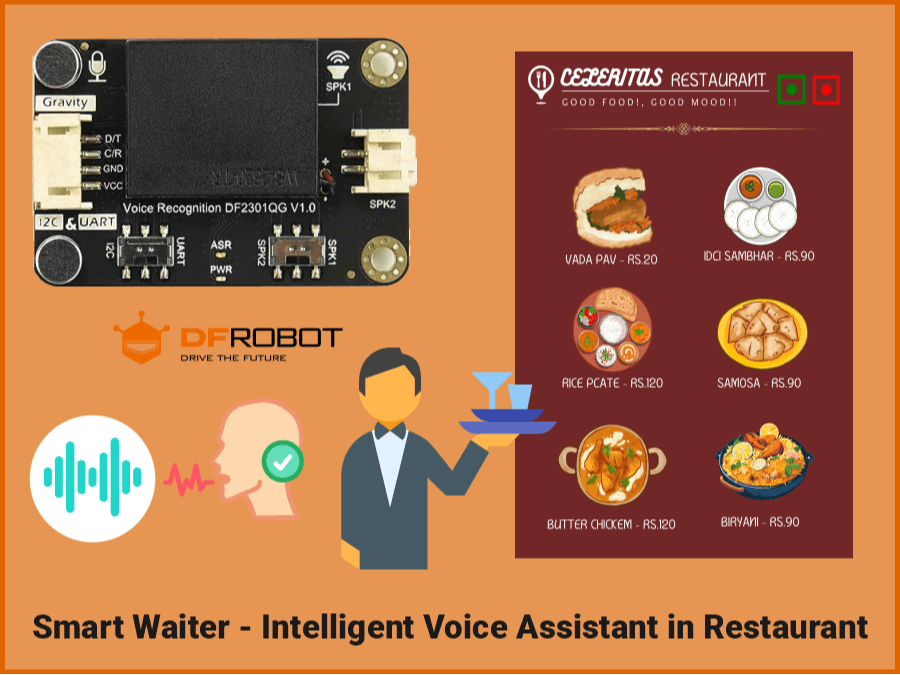
Restaurant/Hotel Food ordering System using Voice Assistant. Using DFRobot Offline Language Learning Voice Recognition Sensor
Things used in this project
Story
Introduction and Theory
We are in the era of technology where just about everything can be ordered or booked online. From groceries to flights, it’s all at our fingertips and part of the digital transformation. So, it’s no surprise that voice ordering for restaurants is becoming increasingly popular, especially amongst Millennials.
Voice ordering for restaurants is a technology that allows consumers to place an order at food establishments using their voice and a smartphone, tablet, or other device.

So, If you’re a restaurant manager or owner, there’s a good chance you’ve heard about voice ordering. This relatively new technology allows customers to place orders using only their voices and a voice technology-enabled device.
Existing Systems - A growing number of restaurant chains are deploying AI ordering systems to streamline phone orders and digitize their off-premise business. There are several AI-Based Voice Ordering Systems for Restaurants. Like - Kea, ConverseNow, VOICEplug AI, Voix, SoundHound, Presto Automation and many more. These are all off-premise solutions. Most of them work with smartphones. Here, We are going to make project for at edge, on-premises solution. Voice command food ordering system on every table of restaurant.
Problem Statement - Restaurants are one of the favorite premises and usually crowdy places. There are many reasons leading to the feeling of dissatisfaction including being entertained late in terms of order taking by the waiter and meals serving. The problem of late service in restaurants increases during busy season.

Whenever you go to eat in a restaurant during such busy time and when you order some food along with main course or starter and start eating your main course food, then, after some time if you want to add something extra to the food order. then you may have to wait for the waiter to come to your table and take further instructions for the new food.
Proposed Solution - This problem can be solved by virtual voice assistant waiter. Who takes food order by voice commands. You can call out his/her name, he will ask 'what food item you want', you can give voice order 'by just naming whichever food item you want from menu card'. This digital waiter then notify the Manager and Chef about your orders and additions.
What Technology wewill require to achieve this -
Voice recognition, also known as speech recognition or automatic speech recognition (ASR), is a technology that allows a computer system to identify and interpret spoken language. It is a subfield of artificial intelligence and natural language processing that focuses on converting spoken language into written text or performing specific actions based on spoken commands.
What hardware will require for do voice recognition?
To implement voice recognition, you will need certain hardware components and equipment. The specific hardware requirements can vary depending on the complexity of the voice recognition system you're building and the scale of your application. Here are some essential hardware components and considerations:
· Microphone: You'll need a microphone to capture audio input. The choice of microphone can impact the quality of audio recordings. There are various types of microphones available, including built-in microphones on devices like smartphones and laptops, external USB microphones, and professional-grade microphones for high-quality recordings.
· Audio Input Device: If you're working with a dedicated voice recognition system or hardware device, you may need an audio input device that includes both a microphone and audio processing capabilities. This is common in applications like smart speakers.
· Computer or Processing Unit: You'll need a computer or processing unit to run the voice recognition software. The hardware specifications of the computer should be sufficient to handle the computational demands of the voice recognition algorithms, especially if you're building a large-scale system.
· GPU (Graphics Processing Unit): For deep learning-based voice recognition models, having a GPU can significantly accelerate training and inference. GPUs are particularly important if you're implementing machine learning models like neural networks, which require intensive computational resources.
· Memory (RAM): Voice recognition systems often require a substantial amount of RAM to store and manipulate data during processing. The specific memory requirements will depend on the complexity of your application.
· Storage: You'll need storage space to store audio recordings, datasets, and the models used for voice recognition. The amount of storage required will depend on the volume of data you're dealing with.
· Networking: If your voice recognition system involves cloud-based processing or remote communication, you'll need a reliable internet connection and network hardware.
· Speakers or Audio Output: Depending on your application, you may also need speakers or audio output devices to provide responses or feedback to users after processing their voice input.
· Power Supply: For portable devices or systems not connected to the grid, you'll need an appropriate power supply, such as batteries or a power source for continuous operation.
It's important to note that the hardware requirements can vary based on the specific voice recognition software or platform you're using. Some voice recognition services, like cloud-based APIs provided by companies like Amazon, Google, and Microsoft, may not require extensive hardware on your end, as the heavy lifting is done on their servers.
What if all above requirements comes featured in one device, It'd be cherry on the cake for project development. So, DFRobot's Gravity: Offline Language Learning Voice Recognition Sensor fulfills all above requirements.
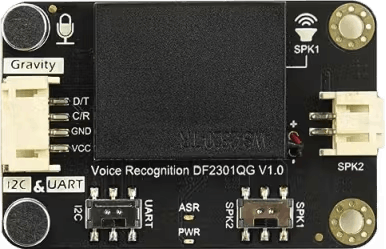
This Gravity: Offline Voice Recognition Sensor is built around an offline voice recognition chip, which can be directly used without an internet connection. Following are the features of this awesome sensor module -
Features
· Self-learning function: Control the module to learn command words by the voice, and any audio can be trained as a command
· Support I2C and UART, with a Gravity interface · Compatible with 3.3V/5V · Built-in with 121 commonly-used fixed command words
· The module has a built-in speaker and an interface for an external speaker, which can provide real-time voice feedback on recognition results · Equipped with power indicator (red) and recognition status indicator (blue)
· Dual microphones provide better noise resistance and longer recognition distance · Compatible with Arduino controllers: Arduino UNO, Arduino Leonardo, Arduino MEGA, FireBeetle series controllers, Raspberry Pi, ESP32
I'm very grateful to DFRobot for providing me their awesome hardware and supporting my Project's Idea with DFRobot's Gravity: Offline Language Learning Voice Recognition Sensor
I've created detailed blog article on Hackster about "How to getting started with Gravity: Offline Language Learning Voice Recognition Sensor". With thorough documentations, Hardware features, Programming instructions and one DIY project. You should check that out before exploring this project.
Block Diagram of the Project
Following figure shows functional block diagram of the project.
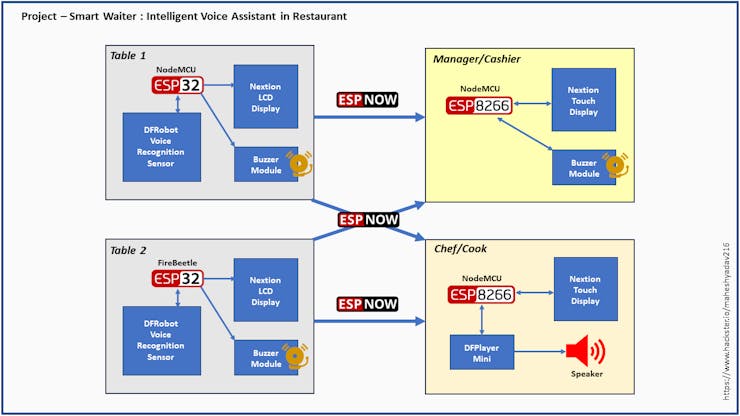
· Now suppose there is a Restaurant/Hotel where peoples visit for breakfast/brunch//lunch/dinner. In this Restaurant there will be multiple tables for sitting arrangement. But for the sake of demo, we will consider only two tables where we will install the voice assistant based food ordering system.
· Block diagram is basically divided into 4 hardware systems. Among which two will be installed at Table 1 and Table 2 at the Restaurant.
· Other two hardwares will be at Managers Desk and in Chef's cabin or Kitchen
How Project will work ?
· When any customer comes at Restaurant, sits on table for having meal. On the table, We will place Food Menu card and Table top standee of Instructions about how to order food. This Instruction standee will provide information to person sitting at table.
· For every table, there will be one virtual waiter (for ordering food). His/her name will be given instructions provided. Person has to call the name of that waiter to invoke the "Voice Assistant" system, once invoked by calling name of waiter, one can order any food item given in menu card.
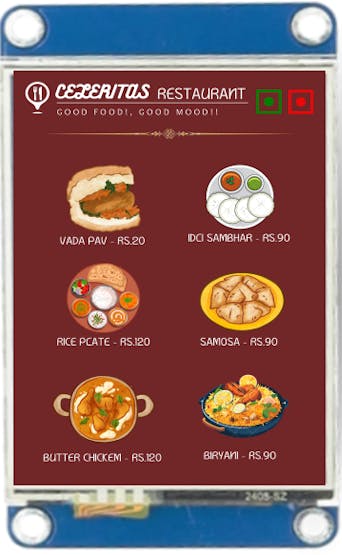
· Similar to menu card, The LCD display will also show Food Menu items on display with their images and price tags.
· For this project, for the sake of demo we have displayed only 6 food items on display. Like shown in image below
How to order food ? - Now suppose if we program the name of virtual waiter as "Minda". Then we can order food item named "IDLI Sambhar" as following steps -
· Invoke the virtual water voice assistant like say : “Hey Minda!”
· Virtual waiter will give feedback prompt as - "Yes! How can I help?"
· Then you can give command as say : "Order one IDLI Sambhar!"
· Virtual waiter will give feedback prompt as - "OK"
· Then on LCD screen you will get notification like following
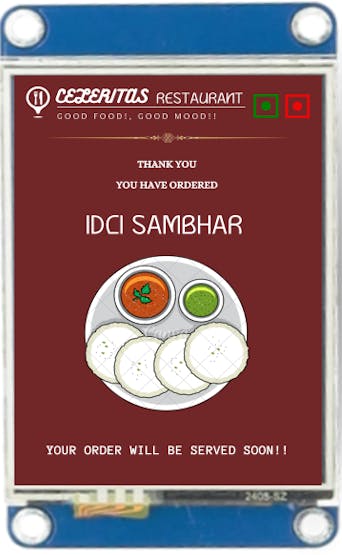
· Buzzer will beep one time with flashing status LED, informing order has been placed successfully.
· Now on software side, we are using ESPNOW protocol to establish communication between all nodes, like with tables to Manager and Chef. So, once customer gives an food order, the "ID" of that "Menu Item" will then send to Manager as well as to Chef's Hardware.
· On Manager side, he notified with Buzzer will beep one time with flashing status LED, conveying new order has been placed by someone. LCD display of manager will having Touch screen feature. On managers screen following GUI will displayed showing, what food item has been ordered and on what table
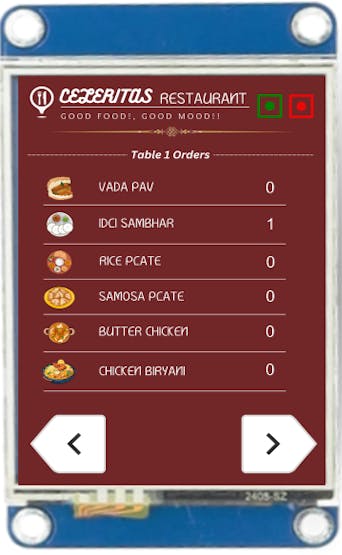
· Here, on above screen Manager can navigate to other display screens(Each table will have separate screen/page GUI). He can use those touch buttons to navigate through different pages to keep track of what food items ordered. It will help him/her for tally the bill. (In future advance version we can integrate billing system).
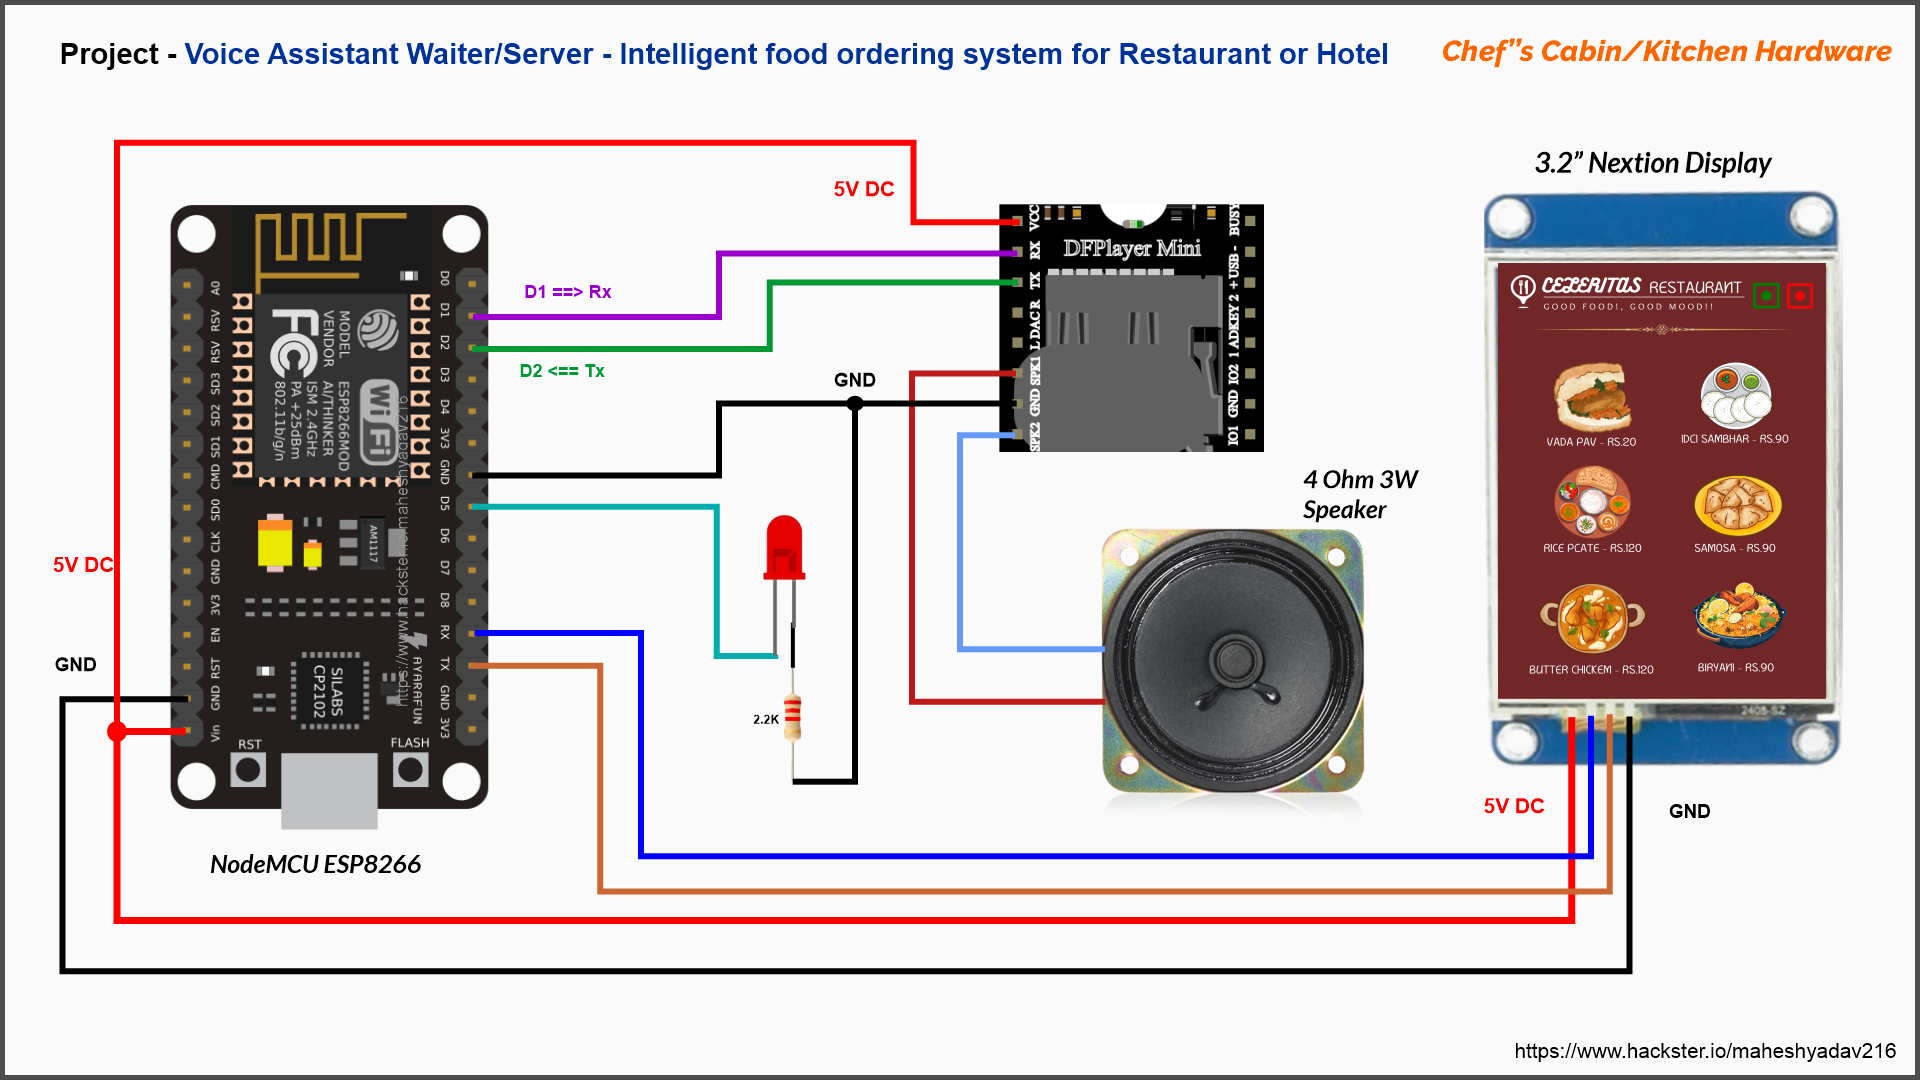
· In Chef's/cooks cabin or in Kitchen, Similar Display page/Screen will be shown but here instead of buzzer, We will use audio notifications. DFplayer Mini mp3 module will be used to play audio file, which will give information about which food item has been ordered and for which table.
· So in this way we will program our system to inform Chef and manager about the food orders.
Hardware
As we discussed in above block diagram. There are four different hardware nodes in this ESPNOW network. So there will be four different circuit diagrams. you can find all circuit diagram below in Schematics section. We have listed all the hardware components above in Things given above.
Nextion display requires significant amount of current. So it is recommended that, we should power it separately with 5V DC power. If we power it from MCU power pins and power MCU boards from computer USB then some fluctuations/flickering in display may occur.
Software
We will require multiple libraries for hardware systems to be installed at tables, manager and at kitchen. Lets see them with respect to Hardware
Table 1 Hardware (NodeMCU ESP32s dev Board) -
· Nextion Display Library - Go to GitHubpage of library to download the Nextion library for ESP8266 and ESP32 – ITEADLIB_Arduino_Nextion. You should have a.zip folder in your Downloads folder.
· DFRobot Voice Recognition Sensor library - Download and install the DFRobot_DF2301Q Library. You can either install it from library manger or download and install from its GitHub page.
· To install the libraries in Arduino IDE you can refer the guide of (Installing Libraries) from official Arduino.
· If you're using PlatformIO IDE, use following in 'platformio.ini' file of Project
; for NodeMCU ESP32s at Table 1

[env:nodemcu-32s]
platform = espressif32
board = nodemcu-32s
framework = arduino
monitor_speed = 9600
lib_deps =
	dfrobot/DFRobot_DF2301Q@^1.0.0
	itead/Nextion@^0.9.0
Nextion Library Settings -
As the Nextion library is old and not properly maintained, we require to do some settings in library files to make it work with our ESP32.
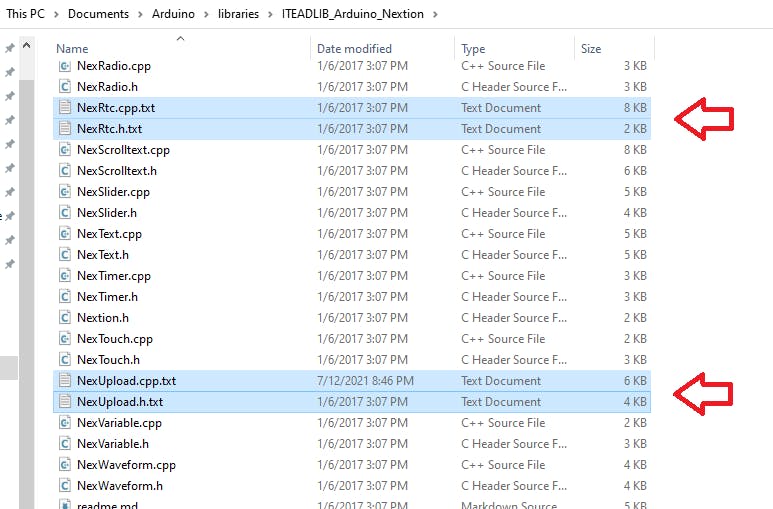
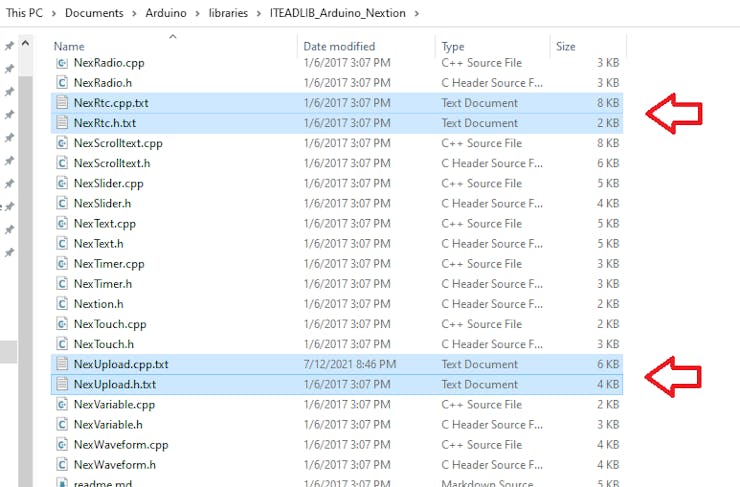
1. Once you downloaded and installed Nextion library, go to library folder and look for the 4 files NexUpload.cpp, NexUpload.h, NexRtc.cpp and NexRtc.h
2. Either remove or rename above 4 files. [If you opt to Rename then just change their extension (with.txt)]
Please note that in this setup (of ESP32) we are not modifying the NexConfig.h. Serial configurations will be same as of original. In this setup(table 1), We are connecting our Nextion display to Serial2 of ESP32
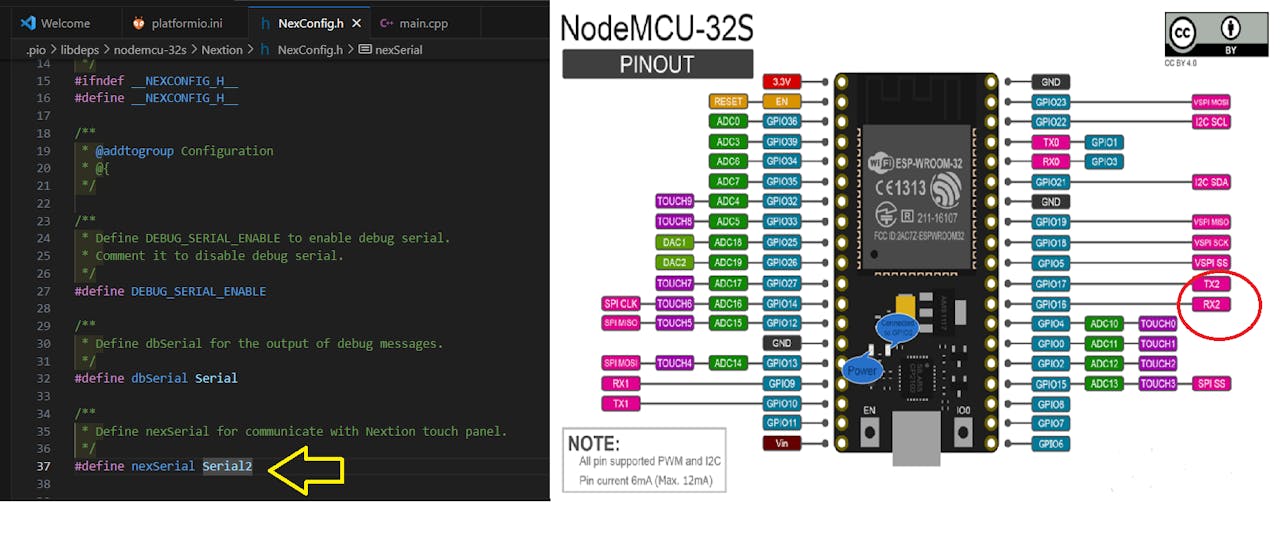
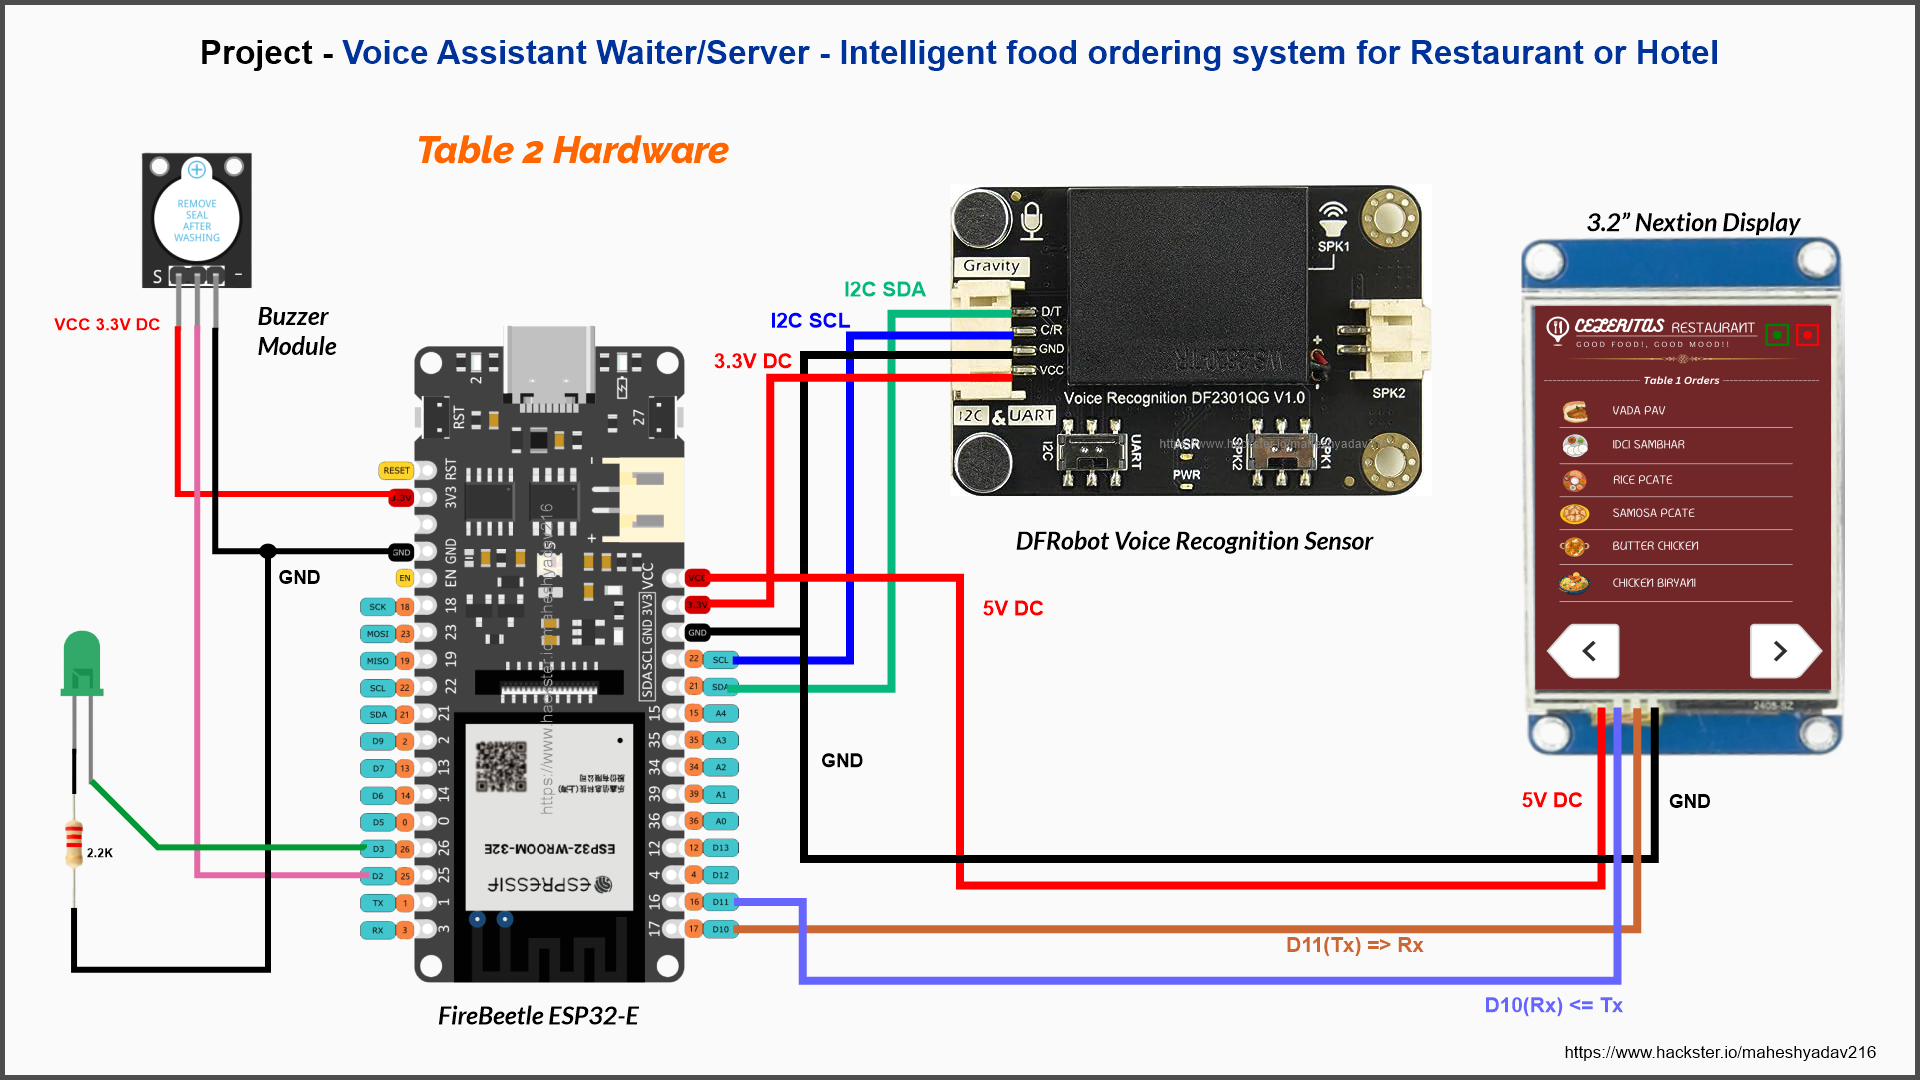
Table 2 Hardware (FireBeetle2 ESP32-E dev Board) -
· ·Nextion Display Library - Go to GitHub page of library to download the Nextion library for ESP8266 and ESP32 – ITEADLIB_Arduino_Nextion. You should have a.zip folder in your Downloads folder.
·DFRobot Voice Recognition Sensor library - Download and install the DFRobot_DF2301Q Library. You can either install it from library manger or download and install from its GitHubpage.
· To install the libraries in Arduino IDE you can refer the guide of (Installing Libraries) from official Arduino.
· If you're using PlatformIO IDE, use following in 'platformio.ini' file of Project
; for Firebeetle ESP32-E at Table 2

[env:dfrobot_firebeetle2_esp32e]
platform = espressif32
board = dfrobot_firebeetle2_esp32e
framework = arduino
monitor_speed = 9600
lib_deps =
    dfrobot/DFRobot_DF2301Q@^1.0.0
    itead/Nextion@^0.9.0
· Nextion Library settings will be same as of NodeMCU ESP32s. You have to either remove or rename 4 files NexUpload.cpp, NexUpload.h, NexRtc.cpp and NexRtc.h from Nextion library folder.
· Here also there is no change in NexConfig.h. Serial configurations will be same as of original. In this setup(table 2), We are connecting our Nextion display to Serial2 of Firebeetle ESP32
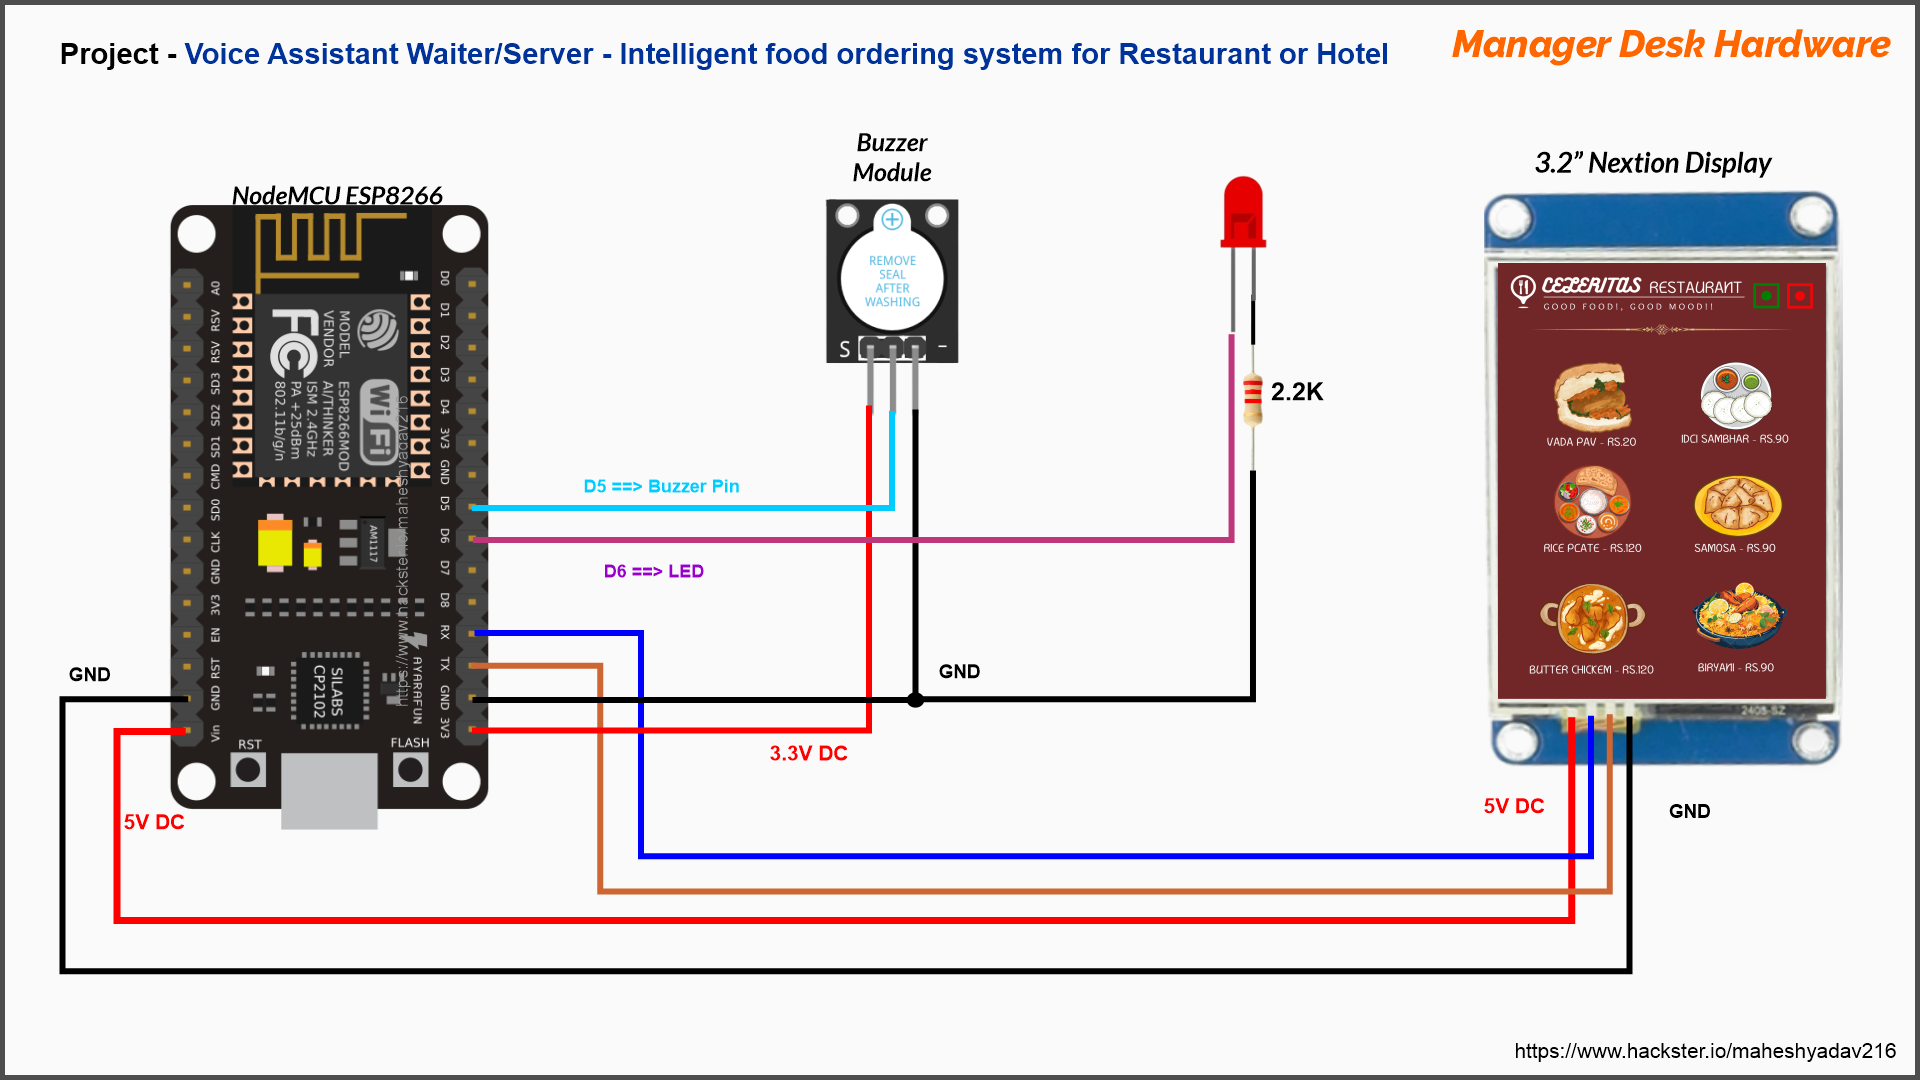
ManagerDesk Hardware (NodeMCUESP8266 dev Board) -
· Nextion Display Library - Go to GitHub page of library to download the Nextion library for ESP8266 and ESP32 – ITEADLIB_Arduino_Nextion. You should have a.zip folder in your Downloads folder.
· To install the libraries in Arduino IDE you can refer the guide of (Installing Libraries) from official Arduino.
· If you're using PlatformIO IDE, use following in 'platformio.ini' file of Project
; for NodeMCU ESP8266 at Managers Desk

[env:nodemcuv2]
platform = espressif8266
board = nodemcuv2
framework = arduino
monitor_speed = 9600
lib_deps =
    itead/Nextion@^0.9.0
Nextion Library Settings -
As the Nextion library is old and not properly maintained, we require to do some settings in library files to make it work with our ESP32.
1. Once you downloaded and installed Nextion library, go to library folder and look for the 4 files NexUpload.cpp, NexUpload.h, NexRtc.cpp and NexRtc.h
2. Either remove or rename above 4 files. [If you opt to Rename then just change their extension (with.txt)]
Please note that in this setup (of ESP8266) we need to modify the NexConfig.h. Since this Nextion library is configured for Arduino MEGA2560 by default. To make it work for ESP8266, you need to do the following:
1. Open the ITEADLIB_Arduino_Nextion folder
2. There should be a NexConfig.h file – open that file.
3. Comment line 27, so that it stays as follows:
//#define DEBUG_SERIAL_ENABLE4. Comment line 32:
//#define dbSerial Serial5. Change line 37, so that you have the following:
#define nexSerial Serial6. Save the NexConfig.h file.
7. Here’s the final result:
/**
* @file NexConfig.h
*
* Options for user can be found here.
*
* @author  Wu Pengfei (email:<[email protected]>)
* @date    2015/8/13
* @copyright
* Copyright (C) 2014-2015 ITEAD Intelligent Systems Co., Ltd. \n
* This program is free software; you can redistribute it and/or
* modify it under the terms of the GNU General Public License as
* published by the Free Software Foundation; either version 2 of
* the License, or (at your option) any later version.
*/
#ifndef __NEXCONFIG_H__
#define __NEXCONFIG_H__
/**
* @addtogroup Configuration
* @{
*/
/**
* Define DEBUG_SERIAL_ENABLE to enable debug serial.
* Comment it to disable debug serial.
*/
//#define DEBUG_SERIAL_ENABLE
/**
* Define dbSerial for the output of debug messages.
*/
//#define dbSerial Serial
/**
* Define nexSerial for communicate with Nextion touch panel.
*/
#define nexSerial Serial
#ifdef DEBUG_SERIAL_ENABLE
#define dbSerialPrint(a)    dbSerial.print(a)
#define dbSerialPrintln(a)  dbSerial.println(a)
#define dbSerialBegin(a)    dbSerial.begin(a)
#else
#define dbSerialPrint(a)    do{}while(0)
#define dbSerialPrintln(a)  do{}while(0)
#define dbSerialBegin(a)    do{}while(0)
#endif
/**
* @}
*/
#endif /* #ifndef __NEXCONFIG_H__ */
Please Note that, in this setup we are connecting Nextion display to default/main serial port of ESP8266. Same port will be used while flashing the code into ESP8266. So, you have to remove (Tx, Rx connections - with Nextion display) while uploading the code. After uploading you should connect it back.
Chef'scabin(Kitchen) Hardware (NodeMCUESP8266 dev Board) -
There are no any major changes in this configuration except one additional library for DFplayer Mini mp3 module.
· DFPlayer Mini Mp3 library - Download and install the DFPlayer Mini Library. You can either install it from library manger or download and install from its GitHubpage.
· To install the libraries in Arduino IDE you can refer the guide of (Installing Libraries) from official Arduino.
· If you're using PlatformIO IDE, use following in 'platformio.ini' file of Project
; for NodeMCU ESP8266 at Chef's (Kitchen)

[env:nodemcuv2]
platform = espressif8266
board = nodemcuv2
framework = arduino
monitor_speed = 9600
lib_deps =
    itead/Nextion@^0.9.0
    dfrobot/DFRobotDFPlayerMini@^1.0.6
Nextion Library Settings - same as of manager Desk hardware. Please refer above and replicate
Connectivity
For connecting all four nodes in this project we have used ESP-NOW protocol.
· ESP-NOW, which stands for "Espressif Simple Protocol for WiFi, " is a proprietary wireless communication protocol developed by Espressif Systems.
· It is specifically designed for use with their ESP8266 and ESP32 microcontrollers, which are commonly used in Internet of Things (IoT) and embedded systems applications.
· ESP-NOW provides a simple and efficient way for these devices to communicate with each other in a peer-to-peer or point-to-multipoint fashion.
In simple words, ESP-NOW is a fast communication protocol that can be used to exchange small messages (up to 250 bytes) between ESP32/ESP8266 boards.
· Please refer Guide1,Guide2 and Guide3 for more detailed information on this protocol. Or You can also go to its official documentation.
· In our project, we have created ESP-NOW network. Hardwares installed at tables are act as sender and Hardwares at Manager Desk and Kitchen act as receiver. · Sender nodes uses the (One to many communication mode) Send Data to Multiple Boards (one-to-many).
· To communicate via ESP-NOW, you need to know the MAC Address of the ESP receiver. That’s how you know to which device you’ll send the data to.
· Each ESP board has a unique MAC Address and that’s how we identify each board to send data to it using ESP-NOW.
· Follow this guide to (learn how to Get and Change the ESP MAC Address).
Once you get MAC address for all node for your ESP's (ESP32's and ESP8266). Replace them in code. Since each ESP board has a unique MAC Address so you have find out MAC addresses of your development boards
Voice Commands and Wake-up Commands
I've created detailed blog article on Hackster about "How to getting started with Gravity: Offline Language Learning Voice Recognition Sensor". With thorough documentations, Hardware features, Programming instructions and one DIY project. You should check that out before exploring this project.
Gravity: Offline Voice Recognition Sensor module features the Self-learning function: We can Control the module to learn command words by the voice, and any audio can be trained as a command.
· There are 121 fixed command words. And 1 default wake word ("Hello Robot")
· We can program 17 custom commands
· We can program 1 custom wake word
Custom Wake-upwords for InvokingVoice Assistant Waiter -
We have programmed custom wake words as per name of the waiter for 2 different tables. For table 1 - Name of virtual voice Assistant waiter is "Minda", we programmed custom wake-word to call her as "Hey Minda"
For table 2 - Name of virtual voice Assistant waiter is "Roxy", we programmed custom wake-word to call her as "Hi Roxy"
Please use Learning Mode to program the custom wake-words and command words. Also, note down their command ID's which yields on serial port. You will require to enter them into the code, in order to identify which command has been summoned by customer
Custom Command words for Food Menu items -
So, there are 6 different Food items on Menu card. You have to program their ordering commands into each voice recognition sensor.

So, for example if customer sees above menu and want to order one of the food item- e.g 'IDLI Sambhar' then How he/she can order?
· Say "Hey Minda".... this is Wake-up word to invoke the voice assistant waiter
· Then she will respond as : "Hi how can I help?"
· Then customer will say "Order IDLI Sambhar"
· Then waiter will give feedback as : "OK" or "Doing it"
So, to give food order in such way you have to first program the voice recognition sensor in learning mode. Then you can add custom commands like - "Order IDLI Sambhar","Order Samosa","Order Vada Pav","Order Butter Chicken" etc..
Please note that you can program command word in any language. Like we have programmed in Hindi. "IDLI Sambhar Order Karo".
Each custom command will have unique ID. You can add upto 17 custom command words. Means you can add upto 17 food items!!
Please note down the Id's for each learned command. You will require them to enter into the code, in order to identify which food order command has been summoned by customer
Follow the tutorial "How to getting started with Gravity: Offline Language Learning Voice Recognition Sensor" for more information about
· How to use Learning Mode?
· How to get ID's for commands ?
Once you get all MAC ID's, ID codes for all menu items voice commands then enter them into the code.
Refer circuit diagrams carefully to make the connections. Follow each step in software setup. We recommend you to go stepwise, do not assemble all circuits at once and run. Go stepwise with each interfacing.
Demo
Check out the demo to know, how the system is working in real time
Project Documentation
I will share all the documents, codes, schematics, Nextion Display Program files on GitHub.
Suggestions about Project design, Circuits, code modifications, Optimization, Errors/Bugs findings and queries are most welcomed.
Credits
Thank you Hackster, DFRobot and all other peoples, websites and entities who helped me (directly/indirectly) in this project.
Schematics
Table 1 Hardware
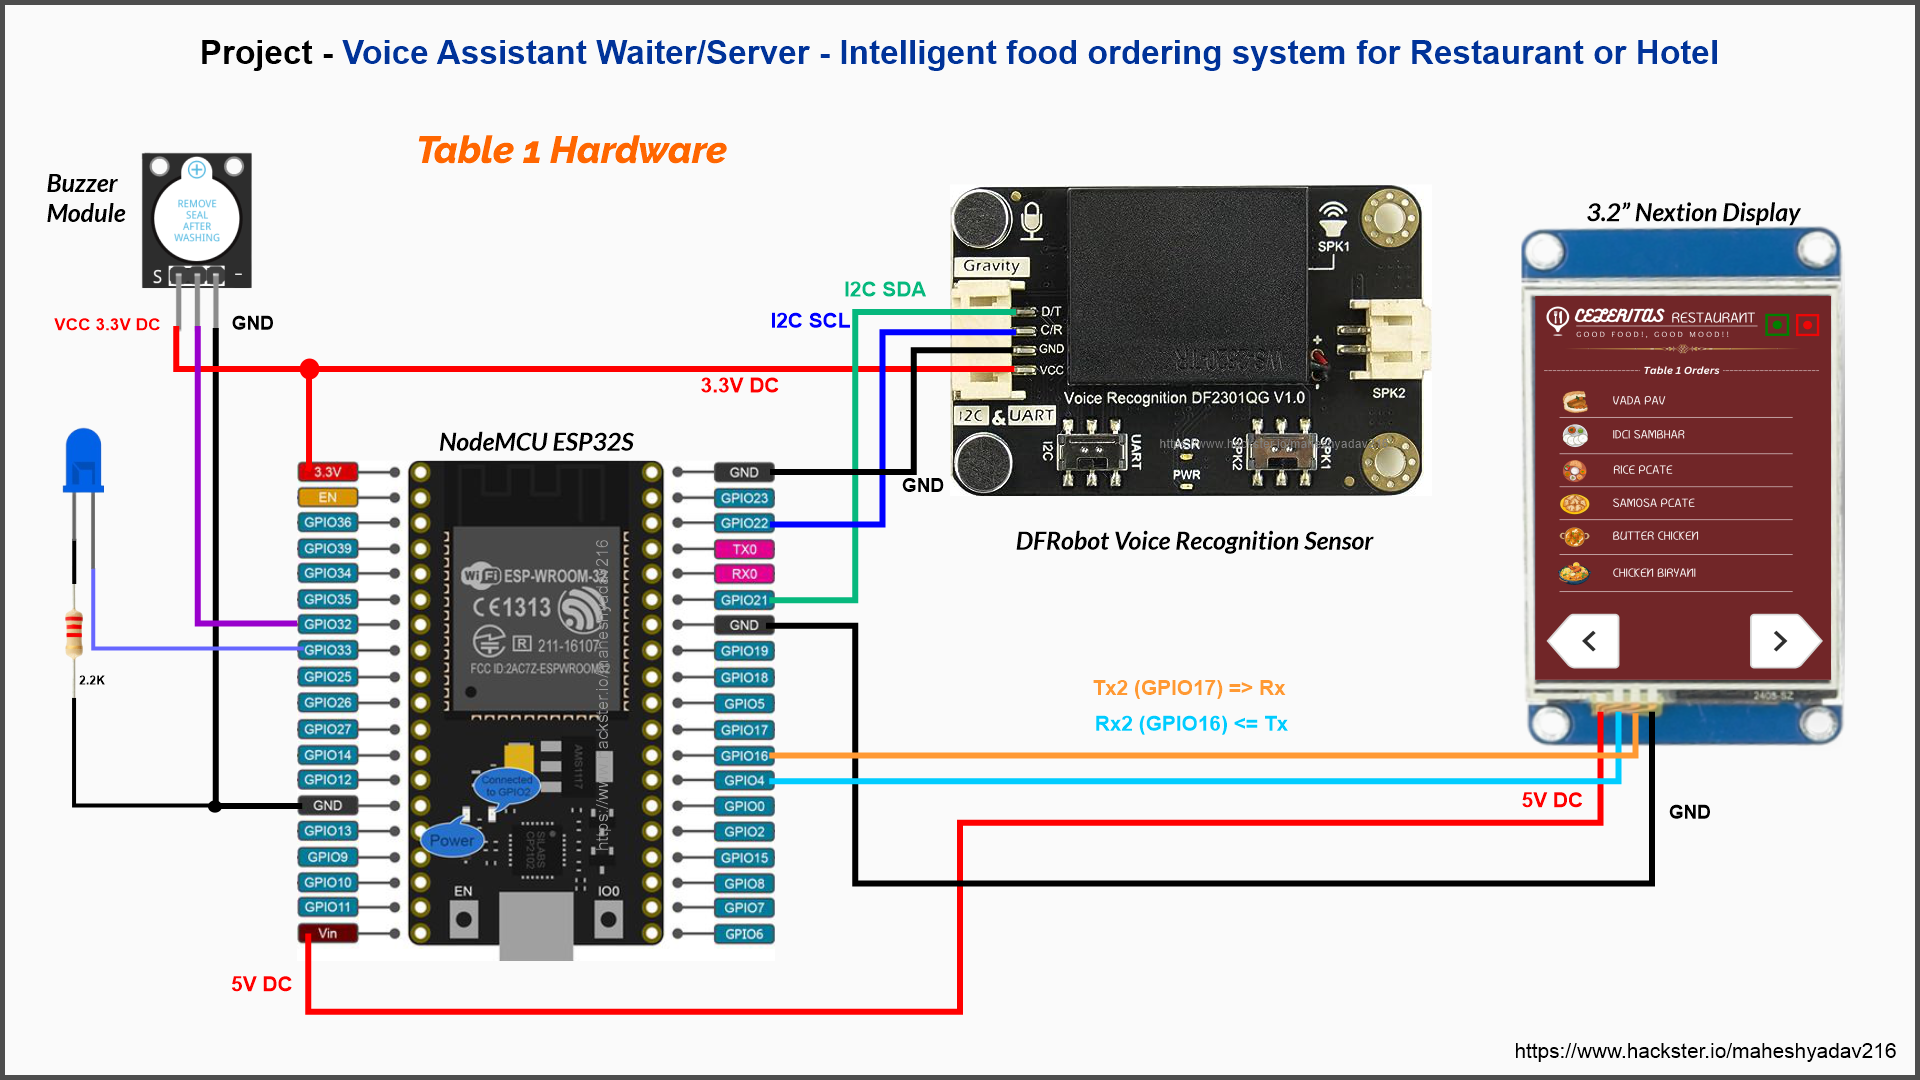
Table 2 Hardware
Manager Desk Hardware
Chef's (Kitchen) Hardware
All Schematics
maheshyadav216 / Project-Intelligent-Voice-Assistant-in-restaurant
Voice Assistant Waiter/Server - Intelligent food ordering system for Restaurant or Hotel — Read More
https://github.com/maheshyadav216/Project-Intelligent-Voice-Assistant-in-restaurant
Code for Table 1 Hardware
//=============================================================================================================//
// Project                 - Smart Waiter : Intelligent Voice Assistant in Restaurant
// Author                  - https://www.hackster.io/maheshyadav216
// Hardware                - SKU_SEN0539-EN_Gravity_Voice_Recognition_Module, NodeMCU ESP32s, Nextion Display
//                           FireBeetleESP32, NodeMCUESP8266, DFplayer Mini
// Softare                 - Arduino IDE 1/ PLatformIO with VSCode, Nextion Editor
// GitHub Repo of Project  - https://github.com/maheshyadav216/Project-Intelligent-Voice-Assistant-in-restaurant
// Code last Modified on   - 20/09/2023
//==============================================================================================================//

// Code of Hardware At table 1 (with NodMCU ESP32S dev Board). Refer Circuit diagram for more details

//Include Important Libraries
#include <Arduino.h>
#include "Nextion.h"
#include "DFRobot_DF2301Q.h"
#include <WiFi.h>
#include <esp_now.h>

//Peripherals pin definitions
#define buzzer 32
#define statLED 33

//Menu codes
uint8_t T1menu[6] = {11, 12, 13, 14, 15, 16};

// REPLACE WITH YOUR ESP RECEIVER'S (managers and Chefs) MAC ADDRESS
uint8_t broadcastAddress1[] = {0x60, 0x01, 0x94, 0x0E, 0xE2, 0xD7};
uint8_t broadcastAddress2[] = {0x80, 0x7D, 0x3A, 0x6E, 0x82, 0xF7};

typedef struct tmenu_struct {
  uint8_t x;
} tmenu_struct;

tmenu_struct t1order;

esp_now_peer_info_t peerInfo;

// callback when data is sent
void OnDataSent(const uint8_t *mac_addr, esp_now_send_status_t status) {
  char macStr[18];
  Serial.print("Packet to: ");
  // Copies the sender mac address to a string
  snprintf(macStr, sizeof(macStr), "%02x:%02x:%02x:%02x:%02x:%02x",
           mac_addr[0], mac_addr[1], mac_addr[2], mac_addr[3], mac_addr[4], mac_addr[5]);
  Serial.print(macStr);
  Serial.print(" send status:\t");
  Serial.println(status == ESP_NOW_SEND_SUCCESS ? "Delivery Success" : "Delivery Fail");
}

NexPage page0    = NexPage(0, 0, "page0");
NexPage page1    = NexPage(1, 0, "page1");
NexPage page2    = NexPage(2, 0, "page2");
NexPage page3    = NexPage(3, 0, "page3");
NexPage page4    = NexPage(4, 0, "page4");
NexPage page5    = NexPage(5, 0, "page5");
NexPage page6    = NexPage(6, 0, "page6");


//I2C communication
DFRobot_DF2301Q_I2C asr;


void shortBeep(){
  digitalWrite(buzzer, HIGH);
  delay(100);
  digitalWrite(buzzer, LOW);
}

void longBeep(){
  digitalWrite(buzzer, HIGH);
  delay(500);
  digitalWrite(buzzer, LOW);
}

void setup() {
  Serial.begin(115200);
  nexInit();
  page0.show();

// Peripherals pin definitions
  pinMode(buzzer, OUTPUT);
  pinMode(statLED, OUTPUT);
  digitalWrite(buzzer, LOW);
  digitalWrite(statLED, LOW);

  // Init the sensor
  while (!(asr.begin())) {
    Serial.println("Communication with device failed, please check connection");
    delay(3000);
  }
  Serial.println("Begin ok!");

  /**
   * @brief Set voice volume
   * @param voc - Volume value(1~7)
   */
  asr.setVolume(7);

  /**
     @brief Set mute mode
     @param mode - Mute mode; set value 1: mute, 0: unmute
  */
  asr.setMuteMode(0);

  /**
     @brief Set wake-up duration
     @param wakeTime - Wake-up duration (0-255)
  */
  asr.setWakeTime(8);

  /**
     @brief Get wake-up duration
     @return The currently-set wake-up period
  */
  uint8_t wakeTime = 0;
  wakeTime = asr.getWakeTime();
  Serial.print("wakeTime = ");
  Serial.println(wakeTime);

  // asr.playByCMDID(1);   // Wake-up command

  /**
     @brief Play the corresponding reply audio according to the ID
     @param CMDID - command word ID
  */
  //asr.playByCMDID(23);  // Command word ID

  WiFi.mode(WIFI_STA);

  if (esp_now_init() != ESP_OK) {
    Serial.println("Error initializing ESP-NOW");
    return;
  }

  esp_now_register_send_cb(OnDataSent);

  // register peer
  peerInfo.channel = 0;
  peerInfo.encrypt = false;

  // register first peer - The Manager
  memcpy(peerInfo.peer_addr, broadcastAddress1, 6);
  if (esp_now_add_peer(&peerInfo) != ESP_OK){
    Serial.println("Failed to add peer");
    return;
  }
  // register second peer - The Chef/cook
  memcpy(peerInfo.peer_addr, broadcastAddress2, 6);
  if (esp_now_add_peer(&peerInfo) != ESP_OK){
    Serial.println("Failed to add peer");
    return;
  }
}

void sendOrder(uint8_t value){
//ESPnow order sent to man-and-chef
  t1order.x = value;
  esp_err_t result = esp_now_send(0, (uint8_t *) &t1order, sizeof(tmenu_struct));

  if (result == ESP_OK) {
    Serial.println("Sent with success");
  }
  else {
    Serial.println("Error sending the data");
  }
}

void loop() {
  /**
     @brief Get the ID corresponding to the command word
     @return Return the obtained command word ID, returning 0 means no valid ID is obtained
  */
  page0.show();
  uint8_t CMDID = asr.getCMDID();
  switch (CMDID) {
    case 5:                                                               //If the command is “Order Vada Pav”
      page1.show();                                                       //Show page 1
      digitalWrite(statLED, HIGH);
      sendOrder(T1menu[0]);
      shortBeep();
      delay(3000);
      Serial.println("received'Order Vada Pav',command flag'5'");         //Serial transmits "received"Order Vada pav",command flag"5
      digitalWrite(statLED, LOW);
      break;

    case 11:                                                               //If the command is “Order Vada Pav”
      page1.show();                                                       //Show page 1
      digitalWrite(statLED, HIGH);
      sendOrder(T1menu[0]);
      shortBeep();
      delay(3000);
      Serial.println("received'Order Vada Pav',command flag'11'");         //Serial transmits "received"Order Vada pav",command flag"11
      digitalWrite(statLED, LOW);
      break;

    case 6:                                                               //If the command is “Order IDLI Sambar”
      page2.show();                                                       //Show page 2
      digitalWrite(statLED, HIGH);
      sendOrder(T1menu[1]);
      shortBeep();
      delay(3000);
      Serial.println("received'Order IDLI Sambar',command flag'6'");      //Serial transmits "received"Order IDLI Sambar",command flag"6
      digitalWrite(statLED, LOW);
      break;

    case 12:                                                               //If the command is “Order IDLI Sambar”
      page2.show();                                                       //Show page 2
      digitalWrite(statLED, HIGH);
      sendOrder(T1menu[1]);
      shortBeep();
      delay(3000);
      Serial.println("received'Order IDLI Sambar',command flag'12'");      //Serial transmits "received"Order IDLI Sambar",command flag"12
      digitalWrite(statLED, LOW);
      break;


    case 7:                                                               //If the command is “Order Rice Plate”
      page3.show();                                                       //Show page 3
      digitalWrite(statLED, HIGH);
      sendOrder(T1menu[2]);
      shortBeep();
      delay(3000);
      Serial.println("received'Order Rice Plate',command flag'7'");       //Serial transmits "received"Order Rice Plate",command flag"7
      digitalWrite(statLED, LOW);
      break;

    case 13:                                                               //If the command is “Order Rice Plate”
      page3.show();                                                       //Show page 3
      digitalWrite(statLED, HIGH);
      sendOrder(T1menu[2]);
      shortBeep();
      delay(3000);
      Serial.println("received'Order Rice Plate',command flag'13'");       //Serial transmits "received"Order Rice Plate",command flag"13
      digitalWrite(statLED, LOW);
      break;

    case 8:                                                               //If the command is “Order Butter Chicken”
      page4.show();                                                       //Show page 5
      digitalWrite(statLED, HIGH);
      sendOrder(T1menu[3]);
      shortBeep();
      delay(3000);
      Serial.println("received'Order Samosa',command flag'8'");           //Serial transmits "received"Order Samosa",command flag"8
      digitalWrite(statLED, LOW);
      break;

    case 14:                                                               //If the command is “Order Butter Chicken”
      page4.show();                                                       //Show page 5
      digitalWrite(statLED, HIGH);
      sendOrder(T1menu[3]);
      shortBeep();
      delay(3000);
      Serial.println("received'Order Samosa',command flag'14'");           //Serial transmits "received"Order Samosa",command flag"14
      digitalWrite(statLED, LOW);
      break;

    case 9:                                                               //If the command is “Order Butter Chicken”
      page5.show();                                                       //Show page 4
      digitalWrite(statLED, HIGH);
      sendOrder(T1menu[4]);
      shortBeep();
      delay(3000);
      Serial.println("received'Order Butter Chicken',command flag'9'");   //Serial transmits "received"Order Butter Chicken",command flag"9
      digitalWrite(statLED, LOW);
      break;

    case 15:                                                               //If the command is “Order Butter Chicken”
      page5.show();                                                       //Show page 4
      digitalWrite(statLED, HIGH);
      sendOrder(T1menu[4]);
      shortBeep();
      delay(3000);
      Serial.println("received'Order Butter Chicken',command flag'15'");   //Serial transmits "received"Order Butter Chicken",command flag"15
      digitalWrite(statLED, LOW);
      break;

    case 10:                                                              //If the command is “Order Biryani”
      page6.show();                                                       //Show page 6
      digitalWrite(statLED, HIGH);
      sendOrder(T1menu[5]);
      shortBeep();
      delay(3000);
      Serial.println("received'Order Biryani',command flag'10'");          //Serial transmits "received"Order Biryani",command flag"10
      digitalWrite(statLED, LOW);
      break;

    case 16:                                                              //If the command is “Order Biryani”
      page6.show();                                                       //Show page 6
      digitalWrite(statLED, HIGH);
      sendOrder(T1menu[5]);
      shortBeep();
      delay(3000);
      Serial.println("received'Order Biryani',command flag'16'");          //Serial transmits "received"Order Biryani",command flag"16
      digitalWrite(statLED, LOW);
      break;

    default:
      if (CMDID != 0) {
        Serial.print("CMDID = ");  //Printing command ID
        Serial.println(CMDID);
      }
  }
  delay(300);
}

//=======================================================================================================================================//
Code for Table 2 Hardware
//=============================================================================================================//
// Project                 - Smart Waiter : Intelligent Voice Assistant in Restaurant
// Author                  - https://www.hackster.io/maheshyadav216
// Hardware                - SKU_SEN0539-EN_Gravity_Voice_Recognition_Module, NodeMCU ESP32s, Nextion Display
//                           FireBeetle 2 ESP32-E, NodeMCUESP8266, DFplayer Mini
// Softare                 - Arduino IDE 1/ PLatformIO with VSCode, Nextion Editor
// GitHub Repo of Project  - https://github.com/maheshyadav216/Project-Intelligent-Voice-Assistant-in-restaurant
// Code last Modified on   - 20/09/2023
//==============================================================================================================//

// Code of Hardware At table 2 (with FireBeetle 2 ESP32-E dev Board). Refer Circuit diagram for more details

//Include Important Libraries
#include <Arduino.h>
#include "DFRobot_DF2301Q.h"
#include "Nextion.h"
#include <WiFi.h>
#include <esp_now.h>

//Peripherals pin definitions
#define buzzer 25
#define statLED 26

//Menu codes
uint8_t T2menu[6] = {21, 22, 23, 24, 25, 26};

// REPLACE WITH YOUR ESP RECEIVER'S MAC ADDRESS
uint8_t broadcastAddress1[] = {0x60, 0x01, 0x94, 0x0E, 0xE2, 0xD7};
uint8_t broadcastAddress2[] = {0x80, 0x7D, 0x3A, 0x6E, 0x82, 0xF7};

typedef struct tmenu_struct {
  uint8_t x;
} tmenu_struct;

tmenu_struct t2order;

esp_now_peer_info_t peerInfo;

// callback when data is sent
void OnDataSent(const uint8_t *mac_addr, esp_now_send_status_t status) {
  char macStr[18];
  Serial.print("Packet to: ");
  // Copies the sender mac address to a string
  snprintf(macStr, sizeof(macStr), "%02x:%02x:%02x:%02x:%02x:%02x",
           mac_addr[0], mac_addr[1], mac_addr[2], mac_addr[3], mac_addr[4], mac_addr[5]);
  Serial.print(macStr);
  Serial.print(" send status:\t");
  Serial.println(status == ESP_NOW_SEND_SUCCESS ? "Delivery Success" : "Delivery Fail");
}

NexPage page0    = NexPage(0, 0, "page0");
NexPage page1    = NexPage(1, 0, "page1");
NexPage page2    = NexPage(2, 0, "page2");
NexPage page3    = NexPage(3, 0, "page3");
NexPage page4    = NexPage(4, 0, "page4");
NexPage page5    = NexPage(5, 0, "page5");
NexPage page6    = NexPage(6, 0, "page6");


//I2C communication
DFRobot_DF2301Q_I2C asr;


void shortBeep(){
  digitalWrite(buzzer, LOW);
  delay(500);
  digitalWrite(buzzer, HIGH);

}

void longBeep(){
  digitalWrite(buzzer, LOW);
  delay(1000);
  digitalWrite(buzzer, HIGH);
}

void setup() {
  Serial.begin(115200);
  nexInit();
  page0.show();

// Peripherals pin definitions. Buzzer module is at Active LOW logic
  pinMode(buzzer, OUTPUT);
  pinMode(statLED, OUTPUT);
  digitalWrite(buzzer, HIGH);
  digitalWrite(statLED, LOW);

  // Init the sensor
  while (!(asr.begin())) {
    Serial.println("Communication with device failed, please check connection");
    delay(3000);
  }
  Serial.println("Begin ok!");

  /**
   * @brief Set voice volume
   * @param voc - Volume value(1~7)
   */
  asr.setVolume(7);

  /**
     @brief Set mute mode
     @param mode - Mute mode; set value 1: mute, 0: unmute
  */
  asr.setMuteMode(0);

  /**
     @brief Set wake-up duration
     @param wakeTime - Wake-up duration (0-255)
  */
  asr.setWakeTime(8);

  /**
     @brief Get wake-up duration
     @return The currently-set wake-up period
  */
  uint8_t wakeTime = 0;
  wakeTime = asr.getWakeTime();
  Serial.print("wakeTime = ");
  Serial.println(wakeTime);

  //asr.playByCMDID(1);   // Wake-up command

  /**
     @brief Play the corresponding reply audio according to the ID
     @param CMDID - command word ID
  */
  //asr.playByCMDID(23);  // Command word ID

  WiFi.mode(WIFI_STA);

  if (esp_now_init() != ESP_OK) {
    Serial.println("Error initializing ESP-NOW");
    return;
  }

  esp_now_register_send_cb(OnDataSent);

  // register peer
  peerInfo.channel = 0;
  peerInfo.encrypt = false;

  // register first peer - The Manager
  memcpy(peerInfo.peer_addr, broadcastAddress1, 6);
  if (esp_now_add_peer(&peerInfo) != ESP_OK){
    Serial.println("Failed to add peer");
    return;
  }
  // register second peer - The Chef/cook
  memcpy(peerInfo.peer_addr, broadcastAddress2, 6);
  if (esp_now_add_peer(&peerInfo) != ESP_OK){
    Serial.println("Failed to add peer");
    return;
  }
}

void sendOrder(uint8_t value){
//ESPnow order sent to man-and-chef
  t2order.x = value;
  esp_err_t result = esp_now_send(0, (uint8_t *) &t2order, sizeof(tmenu_struct));

  if (result == ESP_OK) {
    Serial.println("Sent with success");
  }
  else {
    Serial.println("Error sending the data");
  }
}

void loop() {
  /**
     @brief Get the ID corresponding to the command word
     @return Return the obtained command word ID, returning 0 means no valid ID is obtained
  */
  page0.show();
  uint8_t CMDID = asr.getCMDID();
  switch (CMDID) {
    case 5:                                                               //If the command is “Order Vada Pav”
      page1.show();                                                       //Show page 1
      digitalWrite(statLED, HIGH);
      sendOrder(T2menu[0]);
      shortBeep();
      delay(3000);
      Serial.println("received'Order Vada Pav',command flag'5'");         //Serial transmits "received"Order Vada pav",command flag"5
      digitalWrite(statLED, LOW);
      break;

    case 11:                                                               //If the command is “Order Vada Pav”
      page1.show();                                                       //Show page 1
      digitalWrite(statLED, HIGH);
      sendOrder(T2menu[0]);
      shortBeep();
      delay(3000);
      Serial.println("received'Order Vada Pav',command flag'11'");         //Serial transmits "received"Order Vada pav",command flag"11
      digitalWrite(statLED, LOW);
      break;

    case 6:                                                               //If the command is “Order IDLI Sambar”
      page2.show();                                                       //Show page 2
      digitalWrite(statLED, HIGH);
      sendOrder(T2menu[1]);
      shortBeep();
      delay(3000);
      Serial.println("received'Order IDLI Sambar',command flag'6'");      //Serial transmits "received"Order IDLI Sambar",command flag"6
      digitalWrite(statLED, LOW);
      break;

    case 12:                                                               //If the command is “Order IDLI Sambar”
      page2.show();                                                       //Show page 2
      digitalWrite(statLED, HIGH);
      sendOrder(T2menu[1]);
      shortBeep();
      delay(3000);
      Serial.println("received'Order IDLI Sambar',command flag'12'");      //Serial transmits "received"Order IDLI Sambar",command flag"12
      digitalWrite(statLED, LOW);
      break;


    case 7:                                                               //If the command is “Order Rice Plate”
      page3.show();                                                       //Show page 3
      digitalWrite(statLED, HIGH);
      sendOrder(T2menu[2]);
      shortBeep();
      delay(3000);
      Serial.println("received'Order Rice Plate',command flag'7'");       //Serial transmits "received"Order Rice Plate",command flag"7
      digitalWrite(statLED, LOW);
      break;

    case 13:                                                               //If the command is “Order Rice Plate”
      page3.show();                                                       //Show page 3
      digitalWrite(statLED, HIGH);
      sendOrder(T2menu[2]);
      shortBeep();
      delay(3000);
      Serial.println("received'Order Rice Plate',command flag'13'");       //Serial transmits "received"Order Rice Plate",command flag"13
      digitalWrite(statLED, LOW);
      break;

    case 8:                                                               //If the command is “Order Butter Chicken”
      page4.show();                                                       //Show page 5
      digitalWrite(statLED, HIGH);
      sendOrder(T2menu[3]);
      shortBeep();
      delay(3000);
      Serial.println("received'Order Samosa',command flag'8'");           //Serial transmits "received"Order Samosa",command flag"8
      digitalWrite(statLED, LOW);
      break;

    case 14:                                                               //If the command is “Order Butter Chicken”
      page4.show();                                                       //Show page 5
      digitalWrite(statLED, HIGH);
      sendOrder(T2menu[3]);
      shortBeep();
      delay(3000);
      Serial.println("received'Order Samosa',command flag'14'");           //Serial transmits "received"Order Samosa",command flag"14
      digitalWrite(statLED, LOW);
      break;

    case 9:                                                               //If the command is “Order Butter Chicken”
      page5.show();                                                       //Show page 4
      digitalWrite(statLED, HIGH);
      sendOrder(T2menu[4]);
      shortBeep();
      delay(3000);
      Serial.println("received'Order Butter Chicken',command flag'9'");   //Serial transmits "received"Order Butter Chicken",command flag"9
      digitalWrite(statLED, LOW);
      break;

    case 15:                                                               //If the command is “Order Butter Chicken”
      page5.show();                                                       //Show page 4
      digitalWrite(statLED, HIGH);
      sendOrder(T2menu[4]);
      shortBeep();
      delay(3000);
      Serial.println("received'Order Butter Chicken',command flag'15'");   //Serial transmits "received"Order Butter Chicken",command flag"15
      digitalWrite(statLED, LOW);
      break;

    case 10:                                                              //If the command is “Order Biryani”
      page6.show();                                                       //Show page 6
      digitalWrite(statLED, HIGH);
      sendOrder(T2menu[5]);
      shortBeep();
      delay(3000);
      Serial.println("received'Order Biryani',command flag'10'");          //Serial transmits "received"Order Biryani",command flag"10
      digitalWrite(statLED, LOW);
      break;

    case 16:                                                              //If the command is “Order Biryani”
      page6.show();                                                       //Show page 6
      digitalWrite(statLED, HIGH);
      sendOrder(T2menu[5]);
      shortBeep();
      delay(3000);
      Serial.println("received'Order Biryani',command flag'16'");          //Serial transmits "received"Order Biryani",command flag"16
      digitalWrite(statLED, LOW);
      break;

    default:
      if (CMDID != 0) {
        Serial.print("CMDID = ");  //Printing command ID
        Serial.println(CMDID);
      }
  }
  delay(300);
}

//========================================================================================================================================//
Code for Manager Desk Hardware
//=============================================================================================================//
// Project                 - Smart Waiter : Intelligent Voice Assistant in Restaurant
// Author                  - https://www.hackster.io/maheshyadav216
// Hardware                - SKU_SEN0539-EN_Gravity_Voice_Recognition_Module, NodeMCU ESP32s, Nextion Display
//                           FireBeetle 2 ESP32-E, NodeMCUESP8266, DFplayer Mini
// Softare                 - Arduino IDE 1/ PLatformIO with VSCode, Nextion Editor
// GitHub Repo of Project  - https://github.com/maheshyadav216/Project-Intelligent-Voice-Assistant-in-restaurant
// Code last Modified on   - 20/09/2023
//==============================================================================================================//

// Code of Hardware At Managers Desk (with NodeMCU ESP8266 dev Board). Refer Circuit diagram for more details

//Include Important Libraries
#include <Arduino.h>
#include "Nextion.h"
#include <ESP8266WiFi.h>
#include <espnow.h>

// Peripheral Pin Definitions
#define buzzer D5
#define statLED D6

// put function declarations here:
NexPage page0    = NexPage(0, 0, "page0");
NexPage page1    = NexPage(1, 0, "page1");


/*
 * Declare a number object [page id:0,component id:3, component name: "n0"].
 */
NexNumber n01 = NexNumber(0, 2, "n01");
NexNumber n02 = NexNumber(0, 3, "n02");
NexNumber n03 = NexNumber(0, 4, "n03");
NexNumber n04 = NexNumber(0, 5, "n04");
NexNumber n05 = NexNumber(0, 6, "n05");
NexNumber n06 = NexNumber(0, 7, "n06");

NexNumber n11 = NexNumber(1, 2, "n11");
NexNumber n12 = NexNumber(1, 3, "n12");
NexNumber n13 = NexNumber(1, 4, "n13");
NexNumber n14 = NexNumber(1, 5, "n14");
NexNumber n15 = NexNumber(1, 6, "n15");
NexNumber n16 = NexNumber(1, 7, "n16");


//Structure example to receive data
//Must match the sender structure
typedef struct tmenu_struct {
  uint8_t mcode;
} tmenu_struct;

tmenu_struct myOrder;

//Menu codes
uint8_t T1vada = 0;
uint8_t T1idli = 0;
uint8_t T1rice = 0;
uint8_t T1samosa = 0;
uint8_t T1butter = 0;
uint8_t T1biryani = 0;

uint8_t T2vada = 0;
uint8_t T2idli = 0;
uint8_t T2rice = 0;
uint8_t T2samosa = 0;
uint8_t T2butter = 0;
uint8_t T2biryani = 0;


uint8_t menu_code;


//callback function that will be executed when data is received
void OnDataRecv(uint8_t * mac, uint8_t *incomingData, uint8_t len) {
  memcpy(&myOrder, incomingData, sizeof(myOrder));
  menu_code = myOrder.mcode;
  //Serial.print("Bytes received: ");
  //Serial.println(len);
  //Serial.print("menu Code: ");
  //Serial.println(myOrder.mcode);
}

void shortBeep(){
  digitalWrite(buzzer, HIGH);
  delay(100);
  digitalWrite(buzzer, LOW);
}

void longBeep(){
  digitalWrite(buzzer, HIGH);
  delay(500);
  digitalWrite(buzzer, LOW);
}

void blinkStat(){
  digitalWrite(statLED, HIGH);
  delay(1000);
  digitalWrite(statLED, LOW);
}

void setup() {
  // put your setup code here, to run once:
  Serial.begin(115200);
  nexInit();
  page0.show();

// Peripheral Pin Definitions
  pinMode(buzzer, OUTPUT);
  digitalWrite(buzzer, LOW);
  pinMode(statLED, OUTPUT);
  digitalWrite(statLED, LOW);

  //Set device as a Wi-Fi Station
  WiFi.mode(WIFI_STA);
  //Init ESP-NOW
  if (esp_now_init() != 0) {
    Serial.println("Error initializing ESP-NOW");
    return;
  }

  // Once ESPNow is successfully Init, we will register for recv CB to
  // get recv packer info
  esp_now_set_self_role(ESP_NOW_ROLE_SLAVE);
  esp_now_register_recv_cb(OnDataRecv);
}

void loop() {
  // put your main code here, to run repeatedly:
  // Check for which code received and Identifiy the food item ordered
  switch(menu_code) {
    case 11:
      shortBeep();
      blinkStat();
      T1vada +=1;
      page0.show();
      n01.setValue(T1vada);
      menu_code = 0;
      break;

    case 12:
      shortBeep();
      blinkStat();
      T1idli +=1;
      page0.show();
      n02.setValue(T1idli);
      menu_code = 0;
      break;

    case 13:
      shortBeep();
      blinkStat();
      T1rice +=1;
      page0.show();
      n03.setValue(T1rice);
      menu_code = 0;
      break;

    case 14:
      shortBeep();
      blinkStat();
      T1samosa +=1;
      page0.show();
      n04.setValue(T1samosa);
      menu_code = 0;
      break;

    case 15:
      shortBeep();
      blinkStat();
      T1butter +=1;
      page0.show();
      n05.setValue(T1butter);
      menu_code = 0;
      break;

    case 16:
      shortBeep();
      blinkStat();
      T1biryani +=1;
      page0.show();
      n06.setValue(T1biryani);
      menu_code = 0;
      break;

    case 21:
      shortBeep();
      blinkStat();
      T2vada +=1;
      page1.show();
      n11.setValue(T2vada);
      menu_code = 0;
      break;

    case 22:
      shortBeep();
      blinkStat();
      T2idli +=1;
      page1.show();
      n12.setValue(T2idli);
      menu_code = 0;
      break;

    case 23:
      shortBeep();
      blinkStat();
      T2rice +=1;
      page1.show();
      n13.setValue(T2rice);
      menu_code = 0;
      break;

    case 24:
      shortBeep();
      blinkStat();
      T2samosa +=1;
      page1.show();
      n14.setValue(T2samosa);
      menu_code = 0;
      break;

    case 25:
      shortBeep();
      blinkStat();
      T2butter +=1;
      page1.show();
      n15.setValue(T2butter);
      menu_code = 0;
      break;

    case 26:
      shortBeep();
      blinkStat();
      T2biryani +=1;
      page1.show();
      n16.setValue(T2biryani);
      menu_code = 0;
      break;

    default:
      if (menu_code != 0) {
        Serial.print("menu_code = ");  //Printing command ID
        Serial.println(menu_code);
      }
  }
  delay(300);
}
//==============================================================================================================//
Code for Chef's (Kitchen) Hardware
//=====================================================================================================================//
// Project                 - Smart Waiter : Intelligent Voice Assistant in Restaurant
// Author                  - https://www.hackster.io/maheshyadav216
// Hardware                - SKU_SEN0539-EN_Gravity_Voice_Recognition_Module, NodeMCU ESP32s, Nextion Display
//                           FireBeetle 2 ESP32-E, NodeMCUESP8266, DFplayer Mini
// Softare                 - Arduino IDE 1/ PLatformIO with VSCode, Nextion Editor
// GitHub Repo of Project  - https://github.com/maheshyadav216/Project-Intelligent-Voice-Assistant-in-restaurant
// Code last Modified on   - 20/09/2023
//======================================================================================================================//

// Code of Hardware at Chef's cabin(Kitchen) (with NodeMCU ESP8266 dev Board). Refer Circuit diagram for more details

//Include Important Libraries
#include <Arduino.h>
#include "Nextion.h"
#include <ESP8266WiFi.h>
#include <espnow.h>
#include "DFRobotDFPlayerMini.h"

#if (defined(ARDUINO_AVR_UNO) || defined(ESP8266))   // Using a soft serial port
#include <SoftwareSerial.h>
SoftwareSerial softSerial(/*rx =*/4, /*tx =*/5);
#define FPSerial softSerial
#else
#define FPSerial Serial1
#endif

DFRobotDFPlayerMini myDFPlayer;

#define statLED D5

// put function declarations here:
NexPage page0    = NexPage(0, 0, "page0");
NexPage page1    = NexPage(1, 0, "page1");


/*
 * Declare a number object [page id:0,component id:3, component name: "n0"].
 */
NexNumber n01 = NexNumber(0, 2, "n01");
NexNumber n02 = NexNumber(0, 3, "n02");
NexNumber n03 = NexNumber(0, 4, "n03");
NexNumber n04 = NexNumber(0, 5, "n04");
NexNumber n05 = NexNumber(0, 6, "n05");
NexNumber n06 = NexNumber(0, 7, "n06");

NexNumber n11 = NexNumber(1, 2, "n11");
NexNumber n12 = NexNumber(1, 3, "n12");
NexNumber n13 = NexNumber(1, 4, "n13");
NexNumber n14 = NexNumber(1, 5, "n14");
NexNumber n15 = NexNumber(1, 6, "n15");
NexNumber n16 = NexNumber(1, 7, "n16");


//Structure example to receive data
//Must match the sender structure
typedef struct tmenu_struct {
  uint8_t mcode;
} tmenu_struct;

tmenu_struct myOrder;

//Menu codes
uint8_t T1vada = 0;
uint8_t T1idli = 0;
uint8_t T1rice = 0;
uint8_t T1samosa = 0;
uint8_t T1butter = 0;
uint8_t T1biryani = 0;

uint8_t T2vada = 0;
uint8_t T2idli = 0;
uint8_t T2rice = 0;
uint8_t T2samosa = 0;
uint8_t T2butter = 0;
uint8_t T2biryani = 0;

uint8_t menu_code;


//callback function that will be executed when data is received
void OnDataRecv(uint8_t * mac, uint8_t *incomingData, uint8_t len) {
  memcpy(&myOrder, incomingData, sizeof(myOrder));
  menu_code = myOrder.mcode;
  //Serial.print("Bytes received: ");
  //Serial.println(len);
  //Serial.print("menu Code: ");
  //Serial.println(myOrder.mcode);
}

void blinkStat(){
  digitalWrite(statLED, HIGH);
  delay(1000);
  digitalWrite(statLED, LOW);
}


void setup() {
  // put your setup code here, to run once:
  FPSerial.begin(9600);
  Serial.begin(115200);
  nexInit();
  page0.show();

  pinMode(statLED, OUTPUT);
  digitalWrite(statLED, LOW);

  if (!myDFPlayer.begin(FPSerial, /*isACK = */true, /*doReset = */true)) {  //Use serial to communicate with mp3.
  Serial.println(F("Unable to begin:"));
  Serial.println(F("1.Please recheck the connection!"));
  Serial.println(F("2.Please insert the SD card!"));
  while(true){
    delay(0); // Code to compatible with ESP8266 watch dog.
    }
  }
  Serial.println(F("DFPlayer Mini online."));
  myDFPlayer.volume(26);  //Set volume value. From 0 to 30
  //myDFPlayer.play(1);  //Play the first mp3
  delay(1000);

  //Set device as a Wi-Fi Station
  WiFi.mode(WIFI_STA);
  //Init ESP-NOW
  if (esp_now_init() != 0) {
    Serial.println("Error initializing ESP-NOW");
    return;
  }

  // Once ESPNow is successfully Init, we will register for recv CB to
  // get recv packer info
  esp_now_set_self_role(ESP_NOW_ROLE_SLAVE);
  esp_now_register_recv_cb(OnDataRecv);
}

void loop() {
  // put your main code here, to run repeatedly:
  // Check for which code received and Identifiy the food item ordered
  switch(menu_code) {
    case 11:
      blinkStat();
      T1vada +=1;
      page0.show();
      n01.setValue(T1vada);
      myDFPlayer.play(2);
      menu_code = 0;
      break;

    case 12:
      blinkStat();
      T1idli +=1;
      page0.show();
      n02.setValue(T1idli);
      myDFPlayer.play(3);
      menu_code = 0;
      break;

    case 13:
      blinkStat();
      T1rice +=1;
      page0.show();
      n03.setValue(T1rice);
      myDFPlayer.play(4);
      menu_code = 0;
      break;

    case 14:
      blinkStat();
      T1samosa +=1;
      page0.show();
      n04.setValue(T1samosa);
      myDFPlayer.play(5);
      menu_code = 0;
      break;

    case 15:
      blinkStat();
      T1butter +=1;
      page0.show();
      n05.setValue(T1butter);
      myDFPlayer.play(6);
      menu_code = 0;
      break;

    case 16:
      blinkStat();
      T1biryani +=1;
      page0.show();
      n06.setValue(T1biryani);
      myDFPlayer.play(7);
      menu_code = 0;
      break;

    case 21:
      blinkStat();
      T2vada +=1;
      page1.show();
      n11.setValue(T2vada);
      myDFPlayer.play(8);
      menu_code = 0;
      break;

    case 22:
      blinkStat();
      T2idli +=1;
      page1.show();
      n12.setValue(T2idli);
      myDFPlayer.play(9);
      menu_code = 0;
      break;

    case 23:
      blinkStat();
      T2rice +=1;
      page1.show();
      n13.setValue(T2rice);
      myDFPlayer.play(10);
      menu_code = 0;
      break;

    case 24:
      blinkStat();
      T2samosa +=1;
      page1.show();
      n14.setValue(T2samosa);
      myDFPlayer.play(11);
      menu_code = 0;
      break;

    case 25:
      blinkStat();
      T2butter +=1;
      page1.show();
      n15.setValue(T2butter);
      myDFPlayer.play(12);
      menu_code = 0;
      break;

    case 26:
      blinkStat();
      T2biryani +=1;
      page1.show();
      n16.setValue(T2biryani);
      myDFPlayer.play(1);
      menu_code = 0;
      break;

    default:
      if (menu_code != 0) {
        Serial.print("menu_code = ");  //Printing command ID
        Serial.println(menu_code);
      }
  }
  delay(300);
}

//======================================================================================================================//
Project - Smart Waiter : Intelligent Voice Assistant in Restaurant
maheshyadav216 / Project-Intelligent-Voice-Assistant-in-restaurant
Voice Assistant Waiter/Server - Intelligent food ordering system for Restaurant or Hotel — Read More
https://github.com/maheshyadav216/Project-Intelligent-Voice-Assistant-in-restaurant
The article was first published in hackster, September 24, 2023
cr: https://www.hackster.io/maheshyadav216/smart-waiter-intelligent-voice-assistant-in-restaurant-1ad872
author: maheshyadav216


