


A hardware companion for Claude that reacts to what your AI is doing.

Claude Desktop Buddy: I Built a Desk Pet That Lives Off My AI's Permission Prompts
The Idea
If you use Claude Code or Claude's desktop app heavily, you know the rhythm. You kick off a task, Claude starts running, and then: ping, a permission prompt appears. Should Claude be allowed to run that Bash command? Write to that file? Make that API call? You click over to your computer, look at what it's asking, approve or deny, then go back to whatever you were doing.
It's not painful exactly, but it breaks flow. And if you're the kind of person who has Claude running sessions in the background while you're doing something else — cooking, sketching, reading — you either keep glancing at your screen or you miss prompts entirely and your session just sits there, blocked, waiting.
Claude Desktop Buddy is the answer to that problem. It's a small hardware device that sits on your desk, connects to the Claude desktop app over Bluetooth, and keeps you in the loop without demanding your full attention. When Claude is busy working, the little character on screen is sweating away. When a permission prompt comes in, it snaps to attention and the LED starts blinking. You glance over, read what Claude wants to do, hit the approve button or the deny button, and go back to what you were doing. That's it.
Oh, and it has 18 different ASCII pet species and supports custom animated GIF characters. Because why not.

What It Actually Is
At its core, Claude Desktop Buddy is open-source firmware for ESP32-based development boards. The Claude desktop apps for macOS and Windows expose a Bluetooth LE API — the Hardware Buddy API — that broadcasts live session data: how many sessions are running, whether any are blocked waiting for approval, recent transcript lines, cumulative token counts, and the details of any pending permission prompt.
The firmware connects to that API, parses the incoming data, and drives an animated character through a set of emotional states that mirror what Claude is actually doing. It also listens to the physical buttons on the device and can send approval or denial decisions back to the desktop app, which forwards them directly into Claude's session manager.
The whole thing is a feedback loop between a $15-ish development board and an AI assistant running on your computer, mediated entirely by Bluetooth JSON.
How the Connection Works
When you enable developer mode in the Claude desktop app (Help → Troubleshooting → Enable Developer Mode), a Developer menu appears. From there you can open the Hardware Buddy window, which scans for nearby BLE devices advertising the right service. Pick your device from the list, grant Bluetooth permission on first connect, and that's pairing done. From then on, the bridge auto-reconnects whenever both sides are awake. You don't need to touch the pairing window again.


On the wire, everything is Bluetooth LE using the Nordic UART Service - a standard serial-over-BLE profile that's widely supported across the embedded ecosystem. The Claude app sends UTF-8 JSON objects, one per line, over the characteristic. The device accumulates bytes until it sees a newline, parses the JSON, and acts on it.
The heartbeat message looks like this:
{
"total": 3,
"running": 1,
"waiting": 1,
"msg": "approve: Bash",
"entries": ["10:42 git push", "10:41 yarn test", "10:39 reading file..."],
"tokens": 184502,
"tokens_today": 31200,
"prompt": {
"id": "req_abc123",
"tool": "Bash",
"hint": "rm -rf /tmp/foo"
}
}
The device gets this whenever something changes on the Claude side, plus a keepalive ping every 10 seconds to confirm the connection is still alive. Everything the firmware needs to know about what Claude is doing lives in this one message. running > 0 means Claude is actively generating. waiting > 0 means something is blocked on a permission prompt. total == 0 means all sessions are closed. The prompt field only appears when there's actually a decision waiting.
If the device goes 30 seconds without a message, it assumes the connection is dead and goes back to sleep.
Approving and Denying Prompts
This is the part that makes the device actually useful rather than just decorative.
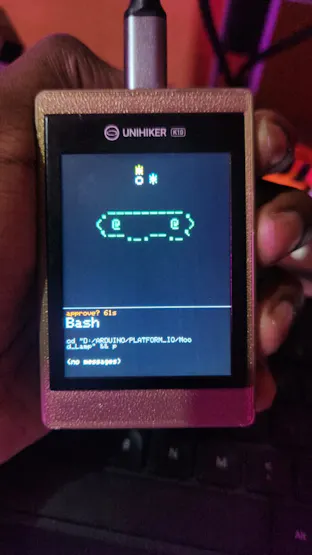
When a permission prompt comes in, the firmware displays the tool name and the hint — the specific command or path that Claude wants to act on — and switches the character into its attention state. The LED starts blinking. The screen stays on (normally it dims after 30 seconds of inactivity, but not when there's a prompt waiting).
You look over, read what Claude wants to do. If it looks fine, you hit the A button. If you want to block it, you hit B. The device sends back:
{"cmd":"permission","id":"req_abc123","decision":"once"}
or
{"cmd":"permission","id":"req_abc123","decision":"deny"}
The ID has to match the prompt.id from the heartbeat exactly. The desktop app checks this and forwards the decision to Claude's session manager. The session unblocks and continues. The whole interaction takes about two seconds if you're paying any attention at all.
Approve within five seconds and you get a bonus: the character briefly switches to the heart state. It's a small thing, but it's the kind of feedback that makes a device feel alive rather than just functional.
The Seven States
The character lives in one of seven states, each with its own animation:
The sleep-to-idle transition happens the moment the BLE connection is established, so you get a little visual confirmation that pairing worked. The celebrate state is genuinely fun, hitting a token milestone feels like a video game level-up, and it's a surprisingly good motivator to keep sessions going. The dizzy state exists entirely because someone thought it would be funny to shake the device and see what happens. They were right.

The ASCII Pets and GIF Characters
Out of the box, the firmware ships with 18 ASCII pet species, each with all seven animations hand-crafted in character art. You cycle through them from the settings menu. Your choice persists to non-volatile storage, so it survives power cycles.
But the more interesting feature is custom GIF characters. Drop a folder onto the Hardware Buddy window in the Claude desktop app and it streams the contents to your device over BLE using a chunked transfer protocol. The device switches to GIF mode live, no reflash needed.
A character pack is straightforward: a manifest.json that defines the character's name and color palette, plus GIF files at 96 pixels wide: one per state, or an array of GIFs for states like idle where you want variety so the same clip doesn't loop forever.
{
"name": "bufo",
"colors": {
"body": "#6B8E23",
"bg": "#000000",
"text": "#FFFFFF"
},
"states": {
"sleep": "sleep.gif",
"idle": ["idle_0.gif", "idle_1.gif", "idle_2.gif"],
"busy": "busy.gif",
"attention": "attention.gif",
"celebrate": "celebrate.gif",
"dizzy": "dizzy.gif",
"heart": "heart.gif"
}
}
The whole pack has to stay under 1.8MB, which is tighter than it sounds for GIFs. Running gifsicle --lossy=80 -O3 --colors 64 typically cuts 40–60% from the file sizes without visible quality loss. The repo includes a Python tool (tools/prep_character.py) that handles resizing source GIFs to the right width and normalizes scale so your character looks consistent across all seven states — otherwise the busy animation ends up three times bigger than the sleep one.
The Original Hardware: M5StickC Plus
The first version of the firmware was built for the M5StickC Plus, and it's easy to see why. It's a remarkable little device. For about $15 you get an ESP32-PICO-D4, a 1.14-inch (135×240) TFT display, a built-in MPU6886 IMU, a battery with a charging circuit, an IR transmitter, a real-time clock, and two physical buttons: all in a case smaller than a USB drive. It's self-contained, widely stocked, has a mature Arduino library that handles everything from the display driver to power management, and the maker community has been building projects on it for years.
For a desk pet that sits next to your monitor and shows Claude's status? Honestly, it works. The character animations are small but readable, the button layout covers approve and deny, and the shake gesture for dizzy mode is satisfying on a device this light.
The limitation is the screen. 135×240 pixels on a 1.14-inch panel is physically tiny. The transcript lines in the scroll view are squeezed to the point where you're reading them more like a ticker than actual content. The tool hint on permission prompts — the actual command Claude wants to run — is often truncated. You can read enough to make a decision, but it requires more squinting than feels comfortable as a daily driver. And if you're running GIF characters, there's just less canvas to work with.
The Port to UniHiker K10: Why We Moved
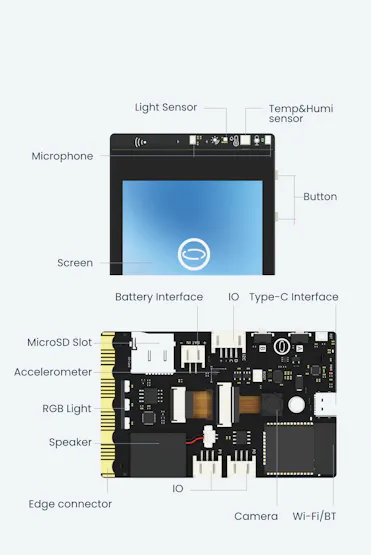
The decision to port the firmware to the DFRobot UniHiker K10 came from three specific frustrations with the M5StickC Plus, each of which the K10 addresses directly.

A Screen You Can Actually Read
The K10 has a 2.8-inch IPS display at 240×320 pixels. That's a meaningfully bigger canvas — more than four times the pixel area of the M5StickC Plus panel. The pet animations have room to express themselves. The transcript scroll shows real content instead of a compressed summary. The permission prompt display shows the tool name, the hint, and still has pixels left over for the character.
Going from 1.14 inches to 2.8 inches sounds incremental on paper, but in practice it's the difference between glancing at your device and having to lean in to read it.
Buttons That Make Sense for Approve/Deny
The M5StickC Plus has two buttons: the main button on the front face and a smaller button on the right side panel. For most M5Stick projects this is fine, but for a device where the whole point is a binary approve/deny interaction, it's awkward. The side button requires a grip adjustment. Fast decisions — the kind where you'd earn the heart animation — feel fumble-prone.
The K10 has two front-facing buttons in a natural side-by-side layout. Left button, right button. Deny, approve. Your fingers know where to go without looking.
Processing Room to Breathe
The K10 runs an ESP32-S3, which has more RAM and flash headroom than the ESP32-PICO-D4 in the M5StickC Plus. This matters most when you're decoding animated GIFs and maintaining an active BLE connection simultaneously. The original stick could stutter on complex character packs, particularly during state transitions where the GIF renderer and the BLE stack were competing for cycles. On the K10, character animations run cleanly even during active BLE traffic.
A Proper Home: Custom 3D Printed Case
The Unihiker K10 is a capable board, but bare PCB on a desk isn't exactly a finished product. To give the buddy a permanent home that fits the vibe of a desk companion, the case was designed in Fusion 360 and printed in bronze PLA. Bronze PLA has a weight and warmth to it that standard filament doesn't, it sits on your desk like a small object that belongs there rather than a development board you forgot to put away. The design is a simple upright cradle that angles the screen toward you at a natural viewing angle, with cutouts for the two side buttons (A and B) and a channel on the top for the USB-C cable to exit cleanly.
No supports needed for printing, and the tolerances are tight enough that the K10 snaps in without screws. The whole print takes about three hours on a 0.4mm nozzle and the bronze finish takes light well.


_ywIFOFpBSs.jpeg?auto=compress%2Cformat&w=740&h=555&fit=max)
What the Port Actually Involved
Porting the firmware wasn't a full rewrite — the application logic, the BLE bridge, the JSON protocol handling, the state machine, and all 18 ASCII pet species carry over completely unchanged. What changed is the hardware interface layer.
The original code was tightly coupled to the M5StickCPlus.h library, which provides convenient wrappers for the display, IMU, buttons, beeper, and power management. The K10 uses a different BSP entirely: DFRobot's unihiker_k10.h with a TFT_eSPI display driver.
The solution was a hardware abstraction layer in src/k10_hal.cpp and src/k10_hal.h. This file replaces every M5-specific call with an equivalent K10 call:
- The M5 IMU.getAccelData() becomes k10.getAccelerometerX/Y/Z()
- The M5 single red LED becomes the K10's RGB LED (pulsing red for the attention state)
- The M5 M5.BtnA and M5.BtnB become K10Button wrappers that provide the same edge-detection API the rest of the firmware expects
- Screen brightness uses the K10's backlight GPIO via PWM
- The software RTC synthesizes GetTime() and GetDate() from the time sync the BLE bridge receives on connect, since the K10 doesn't have a hardware RTC
The K10 also uses LittleFS instead of SPIFFS, and the larger flash capacity required a custom partition table (partitions_k10.csv) to give the filesystem enough space for a full GIF character pack while keeping the firmware partition intact.
Everything else — the platformio.ini gets a new [env:unihiker-k10] target, and that's about it.
Gallery(Demo Images)
The default screen shows the current time and date. Also a sleeping face when there is no activity.

This shows the status:
_eBW5MqJvZb.jpeg?auto=compress%2Cformat&w=740&h=555&fit=max)
When a promt is running:

This when you're prompted to approve or deny a command:

Building Your Own
The most important thing to know: you don't need this codebase to use the Hardware Buddy API. The BLE protocol is completely open. Any device that can advertise the Nordic UART Service and parse newline-delimited JSON can connect. Arduino, ESP32, nRF52, a Raspberry Pi Zero with a USB BLE dongle — all valid. The full protocol specification lives in REFERENCE.md in the repository.
If you do want to use this firmware on one of the supported boards:
- Enable developer mode in Claude: Help → Troubleshooting → Enable Developer Mode
- Install PlatformIO Core
- Clone this repository https://github.com/tech-nickk2/claude-desktop-buddy
- Flash with pio run -t upload (for a fresh device) or pio run -t erase && pio run -t upload (to wipe a previously flashed device first)
- Open Developer → Open Hardware Buddy… in the Claude desktop app, click Connect, and select your device from the scan list
One important note on security: the BLE link carries transcript snippets and tool-call hints, which are real content from your Claude sessions. The firmware requests LE Secure Connections bonding, which means the link is AES-CCM encrypted from first pairing forward. On first connect, the desktop prompts you to enter a 6-digit passkey that the device displays — standard BLE pairing. Reconnects reuse the stored key automatically. If you're building your own implementation, you should do the same. An unencrypted device is sniffable by anyone within radio range with a cheap BLE dongle.
What's Next
The token level-up celebration every 50K output tokens is more motivating than it has any right to be. There's an obvious path toward richer feedback from here — different visual reactions per tool type, a better transcript reader that takes advantage of the K10's larger screen, multi-session indicators, and maybe a proper info dashboard that shows daily token counts and session stats in a readable layout.
The protocol already sends turn events with the full content arrays from each completed assistant turn, so a smarter firmware could do a lot more with that data. The current implementation mostly ignores turn events in favor of the heartbeat snapshot, which is intentionally simple.
If you port to a new board, src/k10_hal.* is a reasonable template. The pattern is the same: implement the display calls, button edge detection, IMU, and LED, and the rest of the firmware works without modification.
Original hardware: M5StickC Plus (ESP32-PICO-D4, 1.14" 135×240 TFT)
Ported hardware: DFRobot Unihiker K10 (ESP32-S3, 2.8" 240×320 IPS)
Framework: Arduino via PlatformIO
Transport: Bluetooth LE · Nordic UART Service · newline-delimited JSON
Source: github.com/anthropics/claude-desktop-buddy





