Data Acquisition tools for Edge Impulse on ESP32 in MicroPython, to make better ML Models
Things used in this project
Hardware components
Hand tools and fabrication machines
Breadboard, 400 Pin
Story
So you want to build a cool -AI- ML thing, but you don't have all day to sit and make data samples for you model. Well, automate that thing my friend.
I made this so that I could get better data into my model in Edge Impulse. I connected it to a temperature sensor for the example code in the Github repository, but that serves as an example and the EdgeImpulse.py module can be used on its own in your project with your sensors.
Get the code
In a fresh directory drop this command:
git clone https://github.com/cameronbunce/ESP32-Edge-Impulse.gitEdge Impulse
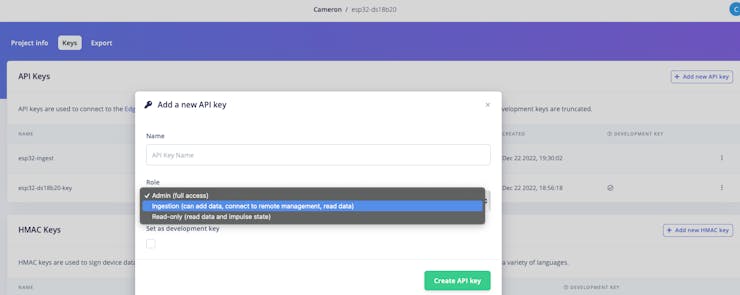
You'll need to create an Edge Impulse account at and clone my project for starters ( or feel free to make your own if you're already familiar with Edge Impulse). With your own project, you'll get your own keys for the API. From the Project main page click on Keys at the top. Click on "Add New API Keys" on the right side. Give this a silly name, and select the role of "Ingestion" click "Create" and copy this key. Paste this key into your local copy of secret_stub.py and save it as secret.py, and go back to the APi page for the HMAC key below the API key. This also goes in the new secret file you made, it is for signing your uploads to the API.

Hardware Setup
Begin with a generic ESP32, and a breadboard, perfboard, or a custom PCB if you're fancy. Connect the DS18B20 sensor to Vcc and Gnd, and data on ESP32 Pin 2 with a 4.7k Ohm resister pull-up. You can change this, but Pin 2 is used in the code here. We'll look at where you might change that below.
Software Setup
I updated Python3 for the latest Pip3 version and pulled down esptool.py and adafruit-ampy. You may also want Thonny or Mu if you don't have something similar.
pip3 install esptool
pip3 install adafruit-ampy
I'm using a nightly build of MicroPython from https://micropython.org/download/esp32/ because it has a built in package manager, which we will use. The file I use in this is esp32-20221220-unstable-v1.19.1-782-g699477d12.bin but a newer one may be available.
We begin by clearing the board, my Mac calls my device tty.usbserial-0001, but yours may vary. Check this by the terminal with `ls /dev | grep tty` before and after connecting your board.
esptool.py --chip esp32 -p /dev/tty.usbserial-0001 erase_flashThen we write the firmware for MicroPython to the device.
esptool.py --chip esp32 -p /dev/tty.usbserial-0001 --baud 460800 write_flash -z 0x1000 esp32-20221220-unstable-v1.19.1-782-g699477d12.binNow we need to get online. You could bang all the commands into the Mu REPL window, and that's a good way to learn, but there's one thing we can do here to make the future easier for us. If you started filling in your secret.py file above, you're going to fill the rest in now. Otherwise, right now we need the ssid and password part in a file called secret.py and loaded on the ESP32. So make your secret.py file and fill in at least:
ssid = "MySSID"
password = "Sup3r5ecr3tP4ssword"
And use ampy to get that file to the board
ampy -p /dev/tty.usbserial-0001 put /path/to/secret.pyNow in Mu you can paste the following in a tab, open the REPL, and press run. Your ESP32 will use the SSID and Password stored int he secret file to connect to your home network, it will then use that connection to pull down the HMAC library using mip, which is the Micropython version of pip. HMAC is the library that we'll use to sign the message we upload to Edge Impulse.
import network, mip, secret
wlan = network.WLAN(network.STA_IF)
wlan.active(True)
if not wlan.isconnected():
   wlan.connect(secret.ssid, secret.password)
   while not wlan.isconnected():
      pass
mip.install('hmac')
With your complete secret.py file, and your DS18B20 sensor(s) connected on Pin 2, take a look at EdgeImpluse_DS18B20_example.py in the Tests and Examples folder. At line 16 we see the following.
import json, time, hmac, hashlib
import ubinascii, network, ds18x20, onewire, secret
import urequests as requests
from machine import Pin, WDT

debug = True
SensorPin = 2 # a DS18B20 attached on pin 2
If you used a different pin, you can SensorPin to the pin you used. Debug messages will print to the serial interface, so you can watch for any trouble uploading that way. With that set, we'll put it on the board, but rename it main.py [http://main.py/] for the board to run.
ampy -p /dev/tty.usbserial-0001 put EdgeImpluse_DS18B20_example.py main.pyOnce finished ( `ampy... put...` takes ~16s for me ) you can open the REPL in Mu and watch the debug messages come across. A sample is 10 readings, 10 seconds apart, and the upload takes a little time as well, so a cycle is in the neighborhood of 2 minutes for the program to run. It does not loop.
If your upload doesn't throw errors, and the data shows up in Edge Impulse, then you're ready to dig in with the main directory of the repo.
LongRunning.py [http://longrunning.py/] uses deep sleep on the ESP32 to save battery and take readings spaced out over a whole day if needed. Let's look at where to find the controls for those periods.
interval = 600000 # 10 minutes
SensorPin = 2
ReadingBatch = 145 # 24 hours of readings with interval = 10 minutes being 144
The SensorPin is just like before, but there is no debug? We write any important messages to the flash on the ESP32. When we put the processor in Deep Sleep, we have to make sure any information we need is in flash, so the sensor readings and the messages ( "SSID Not Found" or any non-200 response from the API ) are written to files before we go to sleep. They are craftily called message.txt [http://message.txt/] and values.json [http://values.json/] and should allow us to upload data even if we run out of battery in the field or pull power.
ampy -p /dev/tty.usbserial-0001 put DS18B20Reader.py
ampy -p /dev/tty.usbserial-0001 put EdgeImpulse.py
ampy -p /dev/tty.usbserial-0001 put LongRunning.py main.py
A word of note: ESP32 devices in deep sleep are really unresponsive.
If you need to interrupt the program to recover it you will want to keep it from returning to main.py [http://main.py/], so put the following code in Mu or Thonny and restart the device. Press Control-C to break out to the REPL, and then run this:
import os
os.remove("main.py")
You can then check the messages and see what's happening and update as necessary. Other troubleshooting and my whole process to this point is available in the DevLog.md [http://devlog.md/] file.
You now have an automatic data feeding machine to build better ML models. Use your powers for awesome.
Schematics
Wiring Diagram
DS18B20 data on GPIO2 with a 4.7k pull-up to 3.3v
Code
ESP Edge Impulse
The article was first published in hackster, January 18, 2023
cr: https://www.hackster.io/cameronbunce/feed-the-machine-1dafdc
author: cameronbunce


