
In this article I will demonstrate how to send JSON Format data to AWS IoT Core using ESP32 via MQTT protocol.
Things used in this project
Hardware components
Story
Hello Everyone,
In this project I am going to demonstrate how we can send data to AWS IoT Core using ESP32 as Google Cloud has update that they are going to close their IoT Core service till 2023 and it's great time to get started with AWS IoT Core.
Recently I published the article on Wio Terminal + AWS IoT Core so if you want to see that just click here
https://www.hackster.io/mafzal/wio-terminal-aws-iot-core-2d78e5
if you are new to ESP32 then download the Arduino IDE from here and after installation of Arduino IDE Click on Arduino -> Preferences and put the below url in Additional Boards Manager
https://raw.githubusercontent.com/espressif/arduino-esp32/gh-pages/package_esp32_index.jsonafter setting up the URL in Preferences Navigate to Tools->Boards->Board Manager and Type ESP32 and install the relevant board.
Right now we are good to go with board installation and setup.
Step#1
Navigate to aws.amazon.com/
and type IoT Core in Search bar and click on IoT Core.

Step#2
Step#2
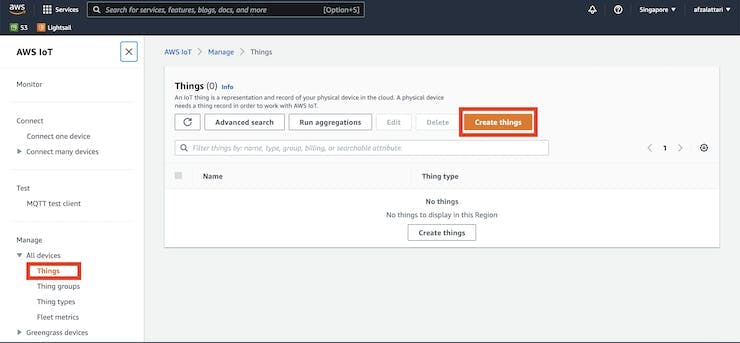
Click on the All Devices->Things and then Click on Create things
Step#3
Step#3
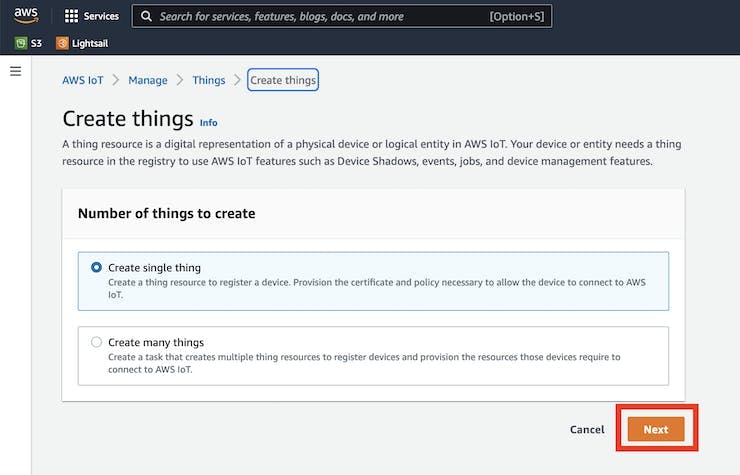
Select "Create Single Thing" and Click on "Next" button.
Step#4
Step#4
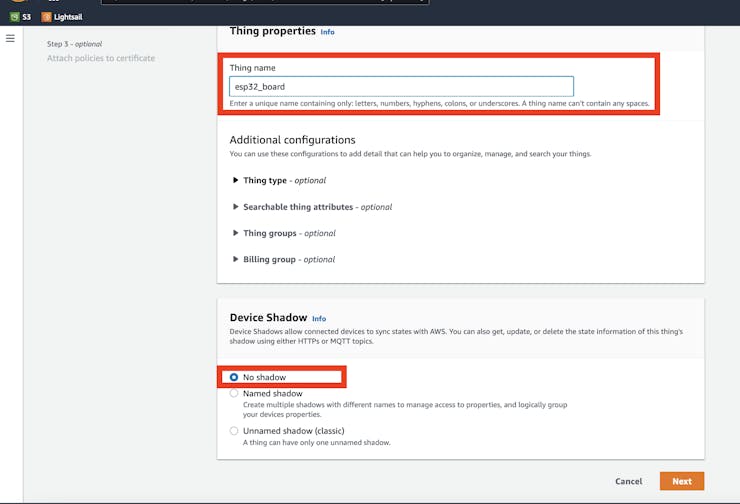
Type the thing name "esp32_board" or any thing that you want and leave the Additional Configuration. Select "No Shadow" and click on "Next" button
Step#5
Step#5
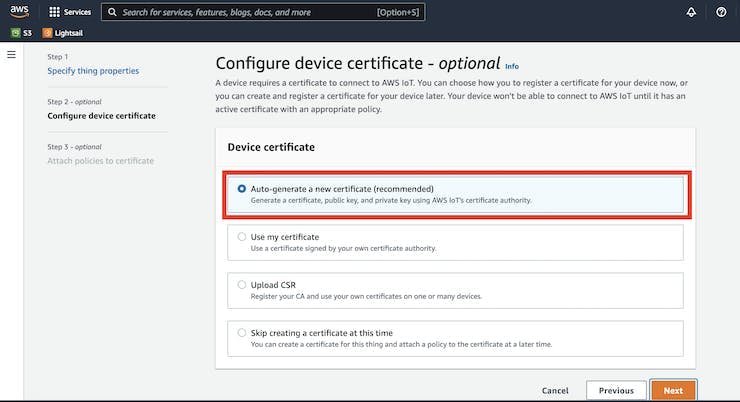
Select 'Auto-generate a new Certificate(recommended)" and click on "Next" button
Step#6
Step#6
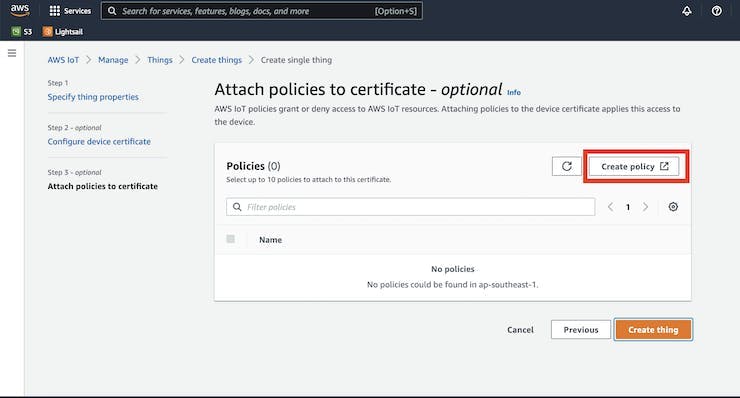
In AWS every resource have access policy so here we also need to create a policy regarding access so click on 'Create Policy" and you will be on next page where you can select the permissions for your device.
Step#7
Step#7
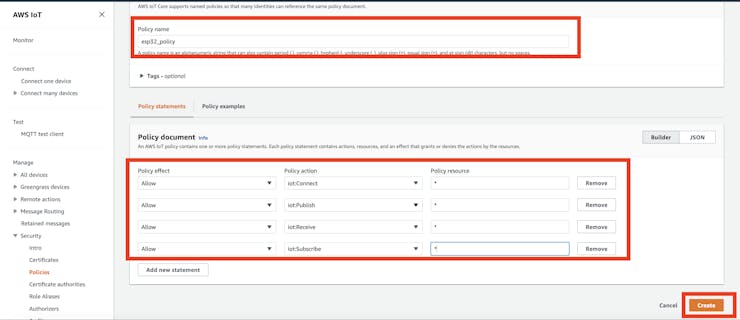
Below is the policy page type the Policy name I am giving it "esp32_Policy" but you can what ever you want, and below Select "Allow" under Policy effect and select different policy opitons like iot:Connect, iot:Publish, iot:Receive, iot:Subscribe" under Policy Actions and put * under Policy resource.
After adding these policies just click on create and you will be back to policy page.
Step#8
Step#8
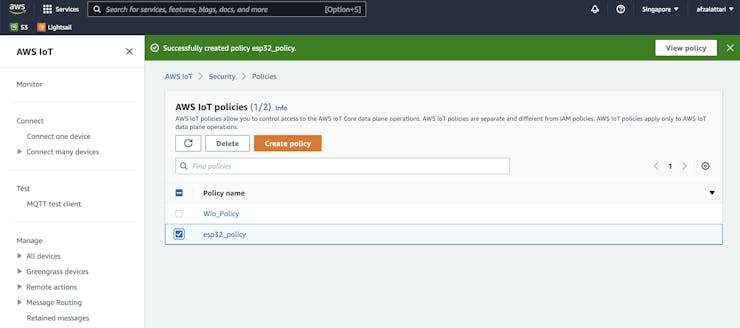
Hurry our policy is there just select "esp32_policy" and click on 'Create thing' button
Step#9
Step#9
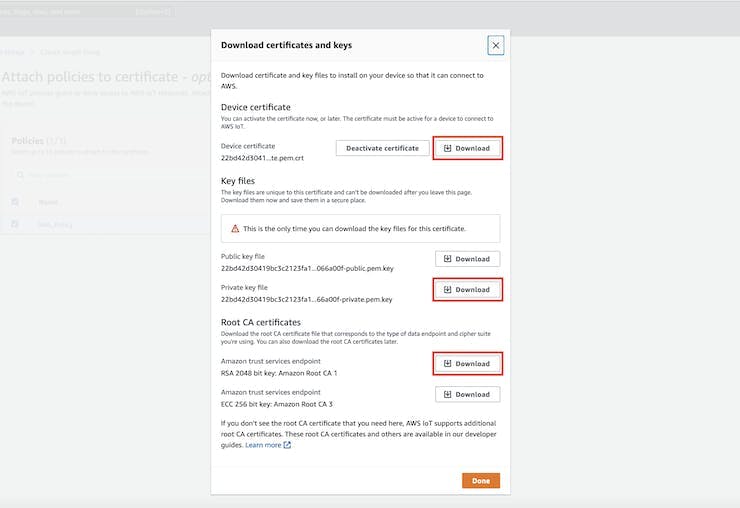
Congrats your device has been setup and now just download the 3 Certificates which are Device Certificate, Private Key File and Amazon trust services end Point.
Now our cloud setup has been completed and from onward we are moving back to arduino IDE for Coding.
Step#10
Step#10
For ESP32 we need 2 libraries to send data to AWS IoT Cloud just download the both libraries from GitHub by following below URLs
1-ArduinoMQTT https://github.com/256dpi/arduino-mqtt
2-ArduinoJSON https://github.com/bblanchon/ArduinoJson
Install the Library in Arduino IDE by Navigating Sketch ->Include Library -> Add.Zip Library..
Copy the code from code section there are 2 files one is main.ino and other is secret.h file.
Step#11
Step#11
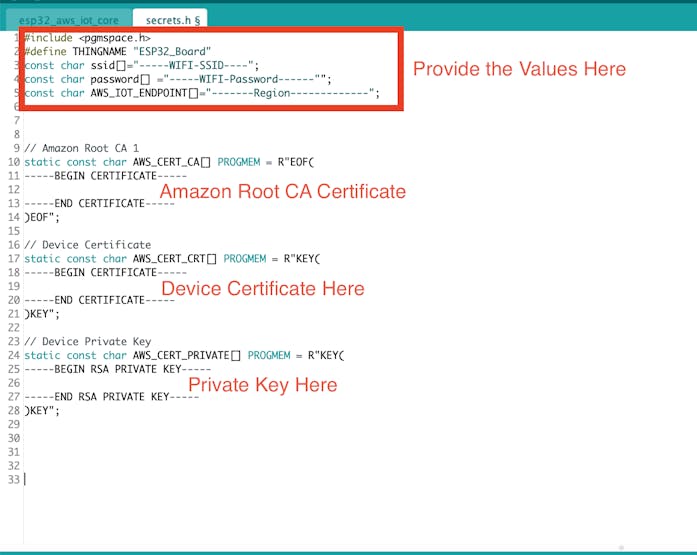
In the secrets.h just update your Wi-Fi SSID, Password, HOST Address (you can get the host information from your AWS IoT Portal by clicking on Settings.
Later just Open the Amazon trust services end Point, Device Certificate, Private Key File and paste the keys into code according to red marking area.
Step#12
Step#12
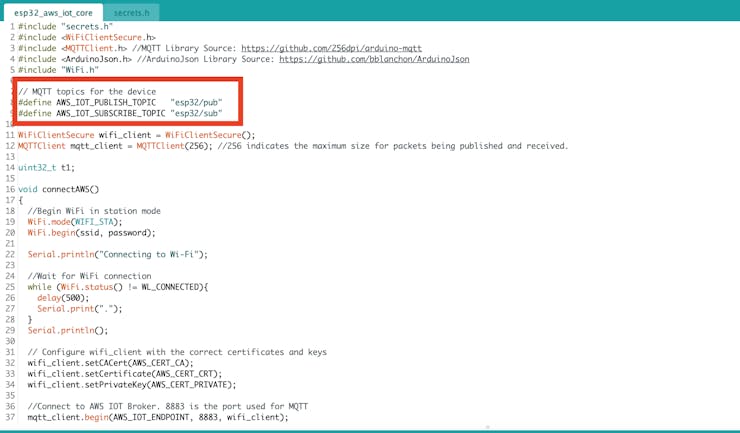
Change the topic in main.ino file or use the topics that I placed in the code. finally upload the code to ESP32.
Step#13
Step#13
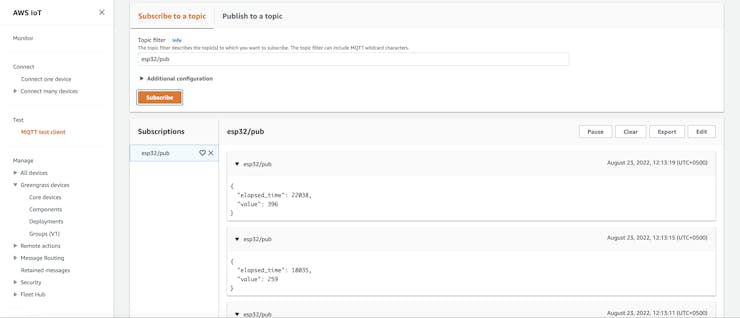
after uploading the code to Wio Terminal now hit back to AWS IoT Core dasboard and click on Test -> MQTT Test Client. and type the Pub Topic which is "esp32/pub" and click on Subscribe button and below you will see the data packets in real time which has been sent by device.
After practicing that simple project I hope you will get some happiness, if you face any issue during your practice please leave a comment and I will try my best to help you. I will try my best to make new article soon in which I will share how to store the thing/device data on AWS Cloud for further process.
if you want to learn more about MQTT and want to host your own MQTT Broker then here is my Course at Udemy look it here.
Code
main.io
Arduino
#include "secrets.h"
#include <WiFiClientSecure.h>
#include <MQTTClient.h> //MQTT Library Source: https://github.com/256dpi/arduino-mqtt
#include <ArduinoJson.h> //ArduinoJson Library Source: https://github.com/bblanchon/ArduinoJson
#include "WiFi.h"

// MQTT topics for the device
#define AWS_IOT_PUBLISH_TOPIC   "esp32/pub"
#define AWS_IOT_SUBSCRIBE_TOPIC "esp32/sub"

WiFiClientSecure wifi_client = WiFiClientSecure();
MQTTClient mqtt_client = MQTTClient(256); //256 indicates the maximum size for packets being published and received.

uint32_t t1;

void connectAWS()
{
  //Begin WiFi in station mode
  WiFi.mode(WIFI_STA);
  WiFi.begin(ssid, password);

  Serial.println("Connecting to Wi-Fi");

  //Wait for WiFi connection
  while (WiFi.status() != WL_CONNECTED){
    delay(500);
    Serial.print(".");
  }
  Serial.println();

  // Configure wifi_client with the correct certificates and keys
  wifi_client.setCACert(AWS_CERT_CA);
  wifi_client.setCertificate(AWS_CERT_CRT);
  wifi_client.setPrivateKey(AWS_CERT_PRIVATE);

  //Connect to AWS IOT Broker. 8883 is the port used for MQTT
  mqtt_client.begin(AWS_IOT_ENDPOINT, 8883, wifi_client);

  //Set action to be taken on incoming messages
  mqtt_client.onMessage(incomingMessageHandler);

  Serial.print("Connecting to AWS IOT");

  //Wait for connection to AWS IoT
  while (!mqtt_client.connect(THINGNAME)) {
    Serial.print(".");
    delay(100);
  }
  Serial.println();

  if(!mqtt_client.connected()){
    Serial.println("AWS IoT Timeout!");
    return;
  }

  //Subscribe to a topic
  mqtt_client.subscribe(AWS_IOT_SUBSCRIBE_TOPIC);

  Serial.println("AWS IoT Connected!");
}

void publishMessage()
{
  //Create a JSON document of size 200 bytes, and populate it
  //See https://arduinojson.org/
  StaticJsonDocument<200> doc;
  doc["elapsed_time"] = millis() - t1;
  doc["value"] = random(1000);
  char jsonBuffer[512];
  serializeJson(doc, jsonBuffer); // print to mqtt_client

  //Publish to the topic
  mqtt_client.publish(AWS_IOT_PUBLISH_TOPIC, jsonBuffer);
  Serial.println("Sent a message");
}

void incomingMessageHandler(String &topic, String &payload) {
  Serial.println("Message received!");
  Serial.println("Topic: " + topic);
  Serial.println("Payload: " + payload);
}

void setup() {
  Serial.begin(9600);
  t1 = millis();
  connectAWS();
}

void loop() {
  publishMessage();
  mqtt_client.loop();
  delay(4000);
}
secrets.h
Arduino
#include <pgmspace.h>
#define THINGNAME "ESP32_Board"
const char ssid[]="-----WIFI-SSID----";
const char password[] ="-----WIFI-Password------"";
const char AWS_IOT_ENDPOINT[]="-------Region-------------";


// Amazon Root CA 1
static const char AWS_CERT_CA[] PROGMEM = R"EOF(
-----BEGIN CERTIFICATE-----

-----END CERTIFICATE-----
)EOF";

// Device Certificate
static const char AWS_CERT_CRT[] PROGMEM = R"KEY(
-----BEGIN CERTIFICATE-----

-----END CERTIFICATE-----
)KEY";

// Device Private Key
static const char AWS_CERT_PRIVATE[] PROGMEM = R"KEY(
-----BEGIN RSA PRIVATE KEY-----

-----END RSA PRIVATE KEY-----
)KEY";
The article was first published in hackster, August 23, 2022
cr: https://www.hackster.io/mafzal/esp32-aws-iot-core-e6c274
author: Muhammad Afzal


